While surfing the internet, on many occasions your browser must have shown an error message stating “DNS server not responding” or “DNS server isn’t responding“. You start freaking out about what went wrong with the website, browser, or internet connection. But things are way different from what you are assuming.
This DNS server not responding generates an error when DNS fails to translate your hostnames into IP addresses. There can be multiple reasons that trigger this error message on your browser screen, which we will discuss in later sections of this post in detail.
But to your knowledge, most problems can be easily resolved with simple steps. The most common and effective method that would work is to restart your computer or switch to another web browser.
So, in this post, we try to cover all the aspects of “DNS Server not responding”, i.e. What is the meaning of DNS Server Not responding, what are the reasons that cause DNS Server not responding error and how can you fix them?
Keep on reading to get all your answers, Let’s get started!
Methods to fix DNS Server not Responding error (Windows)
- Check out different browsers
- Turn on your computer in Safe Mode
- Check with antivirus and Firewalls
- Restart your internet Modem or Router
- Update your Network Adapters with the latest version available
- Disable P2P feature to fix the DNS server not responding Windows 10
- Clear your DNS cache and reset your IP address
- Disable all connections other than the primary
- By changing the DNS settings on your Windows PC
- Temporarily Disable IPv6
- Check if disabling the Microsoft Virtual Wi-Fi Miniport Adapter fixes the issue?
- Contact your Internet service provider
Now you have got an idea about what the “DNS server does not responding” error means and what the possible reasons causing it. So, it is time for you to know how you can fix this error with the best possible methods available on both the platforms Windows as well as macOS.
1. Check out different browsers
One of the most common and basic methods that everyone should try first is to check if the error occurs in other browsers too. Sometimes, the DNS server not responding error can be fixed by simply changing the browser or updating the current one with its latest version available.
To start with, there are various other popular web browsers available on the internet such as Mozilla Firefox or Microsoft Edge you can try. If you are a macOS user and your default web browser is Safari you can try on either Chrome or Firefox instead.
If you don’t find a DNS server issue or an error message, it means there is an issue with your default current web browser. You can either reinstall it or update it with the latest version available.
However, if you still find the error message “DNS server not responding” after switching the browsers, it means, the source of this error is not your browsers.
2. Turn on your computer in Safe Mode
Sometimes, due to some issues in operating systems, your computer may show a DNS server not responding to error messages on your web browser. Hence, to figure out and resolve this issue you can turn your computer on in safe mode and check if it fixes the issue or not.
In safe mode, all the computer resources and files will be limited that are required to run the operating system, which can be an effective method to resolve this issue.
Turning Safe mode in Windows 7
For Windows 7 users, to turn on your computer in safe mode, you need to restart your computer by going to Power > Restart. After that, when the computer starts booting up, hold down the F8 key immediately. After that check, the issue DNS server not responding to Windows 7 was fixed or not.
Turning Safe mode in For Windows 10 or 11 users
Turning safe mode in both Windows 10 and 11 is quite the same but it is different from Windows 7. Let us see what steps you need to follow:
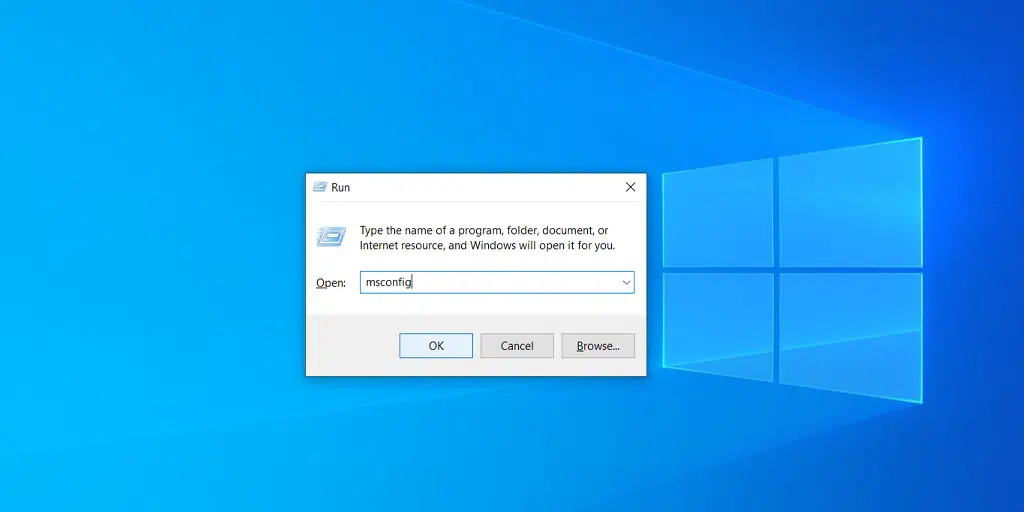
- Click on the Windows button as well as the key R simultaneously.
- Type “msconfig” in the box provided.
3. Select the Boot tab > Safe Boot option and click on the Apply button.
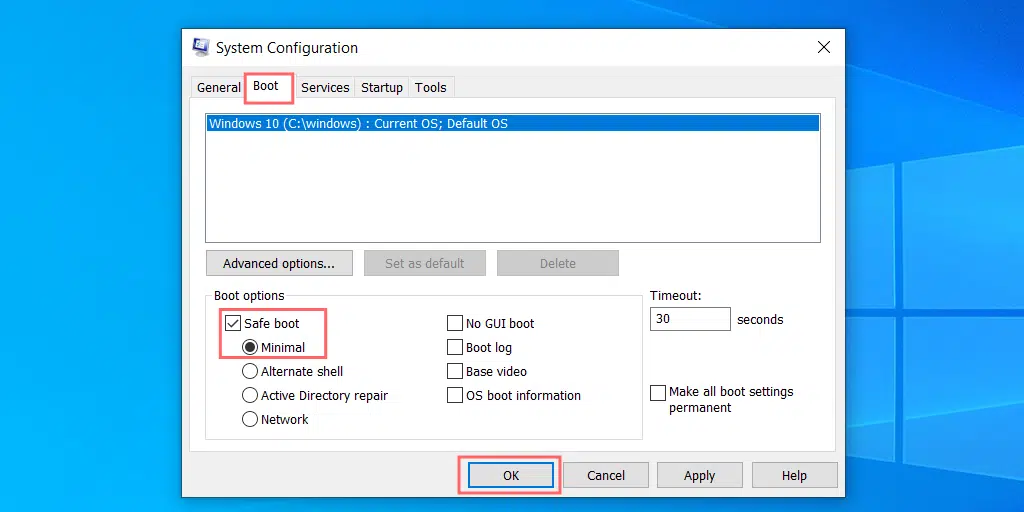
4. Now select the Restart button to apply the changes.
and your computer will boot up in safe mode. After that check, the issue of the DNS server not responding to Windows 10 or the DNS server not responding to Windows 11 has been fixed or not.
3. Check with antivirus and Firewalls
If checking with different browsers as well as accessing the website in safe mode does not help you to fix the issue, the next method you can try is to disable the antivirus and firewalls of your system temporarily.
Antivirus and Firewalls are some of the most important security measures of your system that secure your website from malicious attacks and intrusion. But sometimes they can also create problems for your system and with your connectivity.
Hence to check whether firewalls or antivirus software are the culprits, you need to disable them temporarily and check if the issue persists or not.
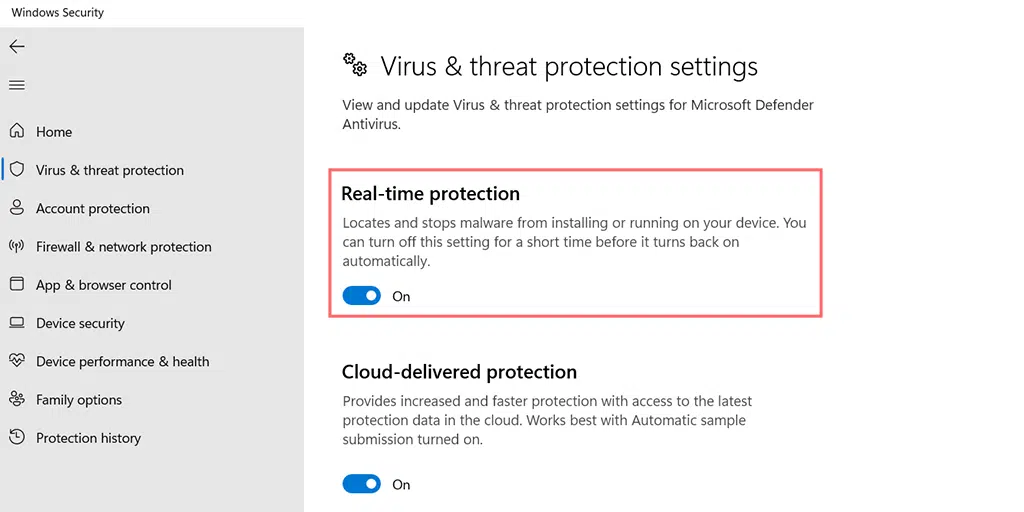
If you are a Windows user, to disable the Windows antivirus application “Windows Defender” you need to go to your Control panel > Update and Security > Windows Security > Virus and Threat protection >Manage Settings.
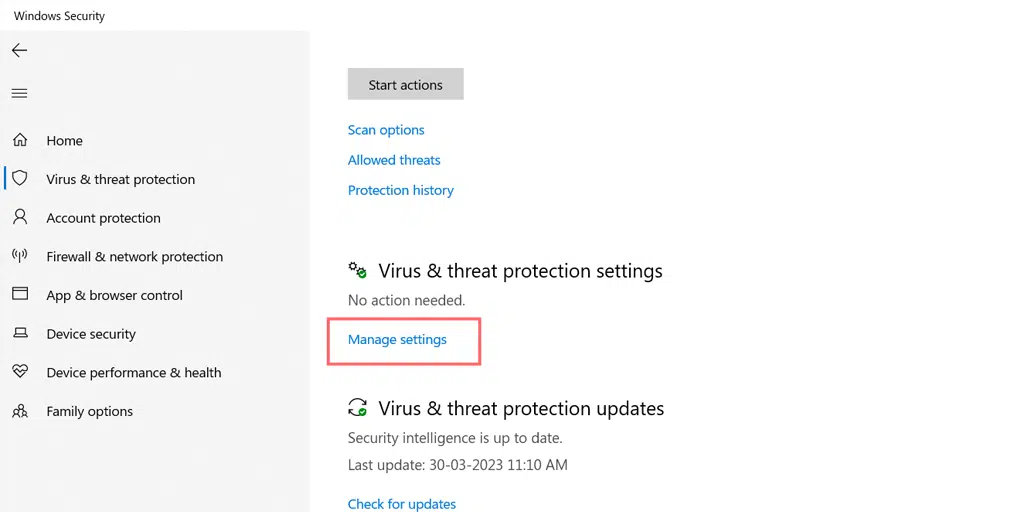
And turn off the Real-time Protection temporarily as shown in the picture below:
4. Restart your internet Modem or Router
Another easiest troubleshooting method to fix the DNS server not responding issue is by restarting your internet modem or Router. This method helps to clear out your router’s cache memory and that could help you to fix the issue.
To restart your modem, you can simply turn it off by pressing the power button until the LED lights stop blinking and wait for 10 seconds. Or it is better to remove the power source from the router/modem and wait for 30 seconds. After waiting for a while, turn on your modem or router or plug it into the power source again and wait till it can establish the connection.
After doing so, move back to your web browser and check if this method can resolve the “DNS server not responding issue” or not.
5. Update your Network Adapters with the latest version available
Another possible reason that you are facing the “DNS server not responding” issue can be due to an outdated version of your Network Adapters. So, in this situation, updating your network adapters with the latest version available can be the solution.
You can update your Network Adapter manually or use tools to search for updates and install them for you automatically. If your network adapter provider is Intel you can easily get the latest version on their official website.
6. Disable the P2P feature to fix the DNS server not responding to Windows 10
If all the above-mentioned methods are not able to fix the DNS server not responding error. Another thing you can try is to disable the Windows P2P feature which is exclusive to Windows 10 users.
However, the above all saves your machine’s download bandwidth. This means it lets you download all the Windows updates once and after that, it uses your device as a medium to spread/share this latest version across all the computers that are available on your local network.
However, this feature can also be a culprit of triggering a DNS server not responding error and disrupting your DNS process. Hence, you need to disable it temporarily and check whether it is the culprit or not.
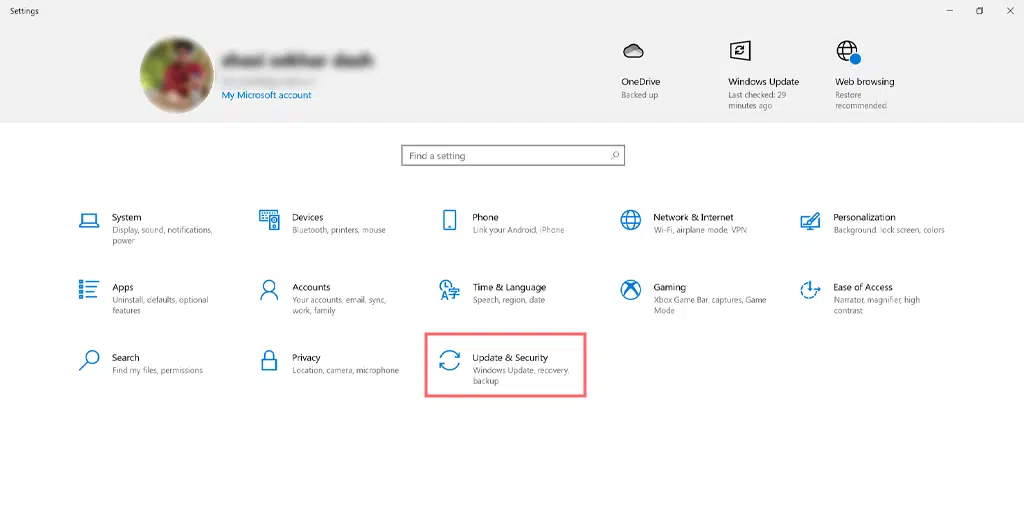
To disable this P2P feature, all you need to do is to click on Windows located at the down left corner of your machine and go to the Settings option followed by Update and Security as shown in the picture below:
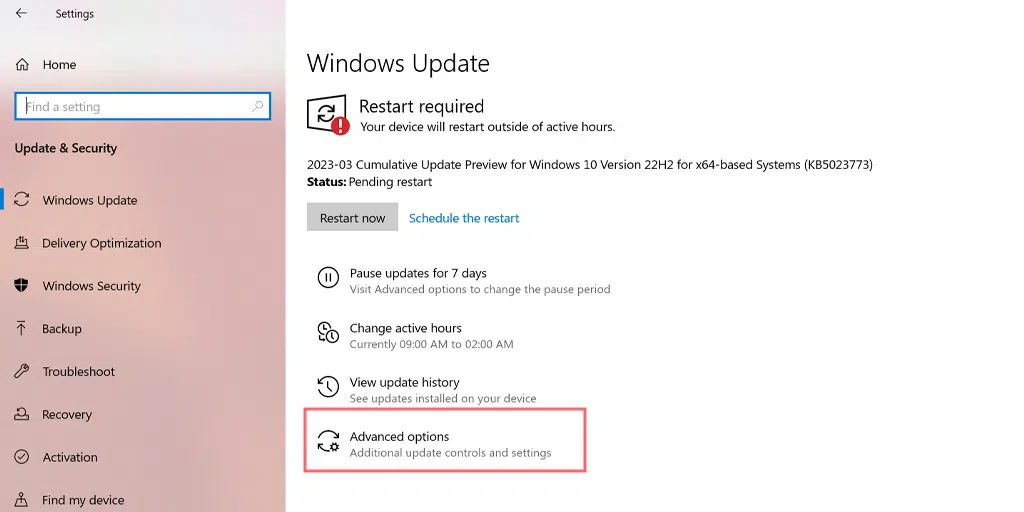
Now Click on the Advanced options as shown in the picture below:
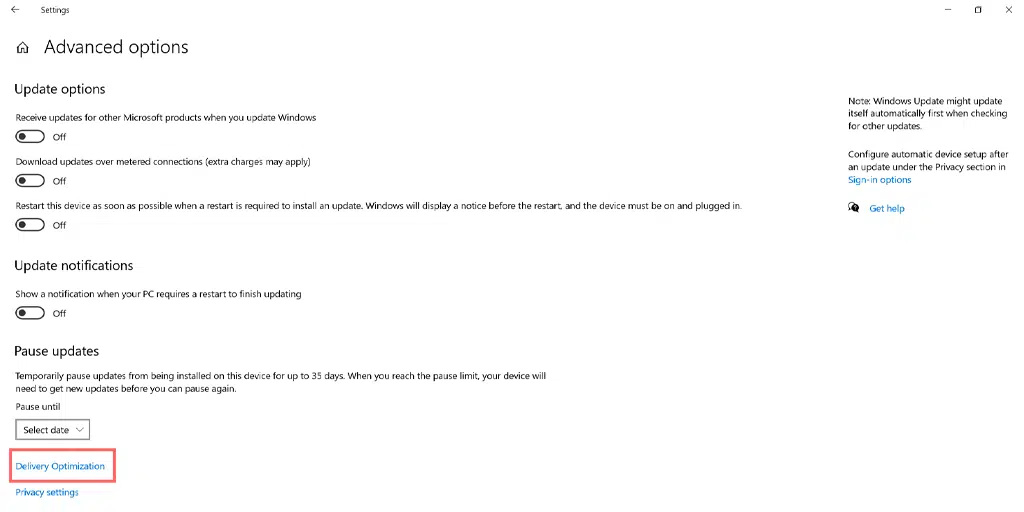
You will find the Delivery Optimization option just below the Advanced Options page as shown in the picture below:
Now to disable the P2P feature, you need to turn off the “Allow downloads from other PCs” option as shown in the picture below:
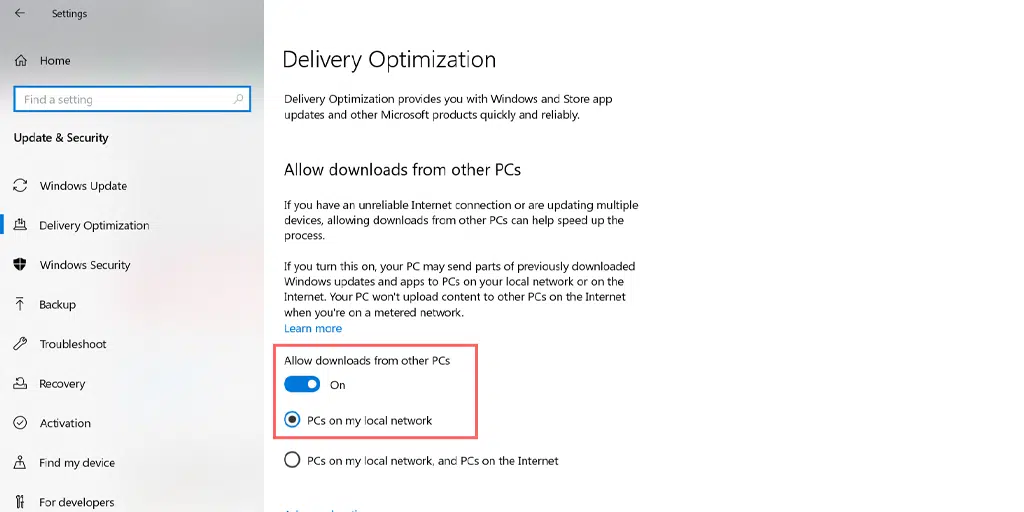
After following all the steps mentioned above, you need to restart your computer to make the changes effective and try to check if it can remove the issue or not. In case it doesn’t work we are going to provide you with more solutions that you can try.
7. Clear your DNS cache and reset your IP address
Earlier, you tried to restart your router to clear its cache but it didn’t work. Even if you tried the most effective and common methods it is still not able to fix it. Now it is time to get deeper and a little technical by looking at your DNS settings. Since the router has a cache present, it needs to be purged before establishing a connection to the internet.
For Windows users, you need to open your command prompt by typing the “cmd” in your Windows search bar and choosing the Command prompt application as shown:

Open the command prompt app and enter ipconfig/flushdns followed by pressing Enter:
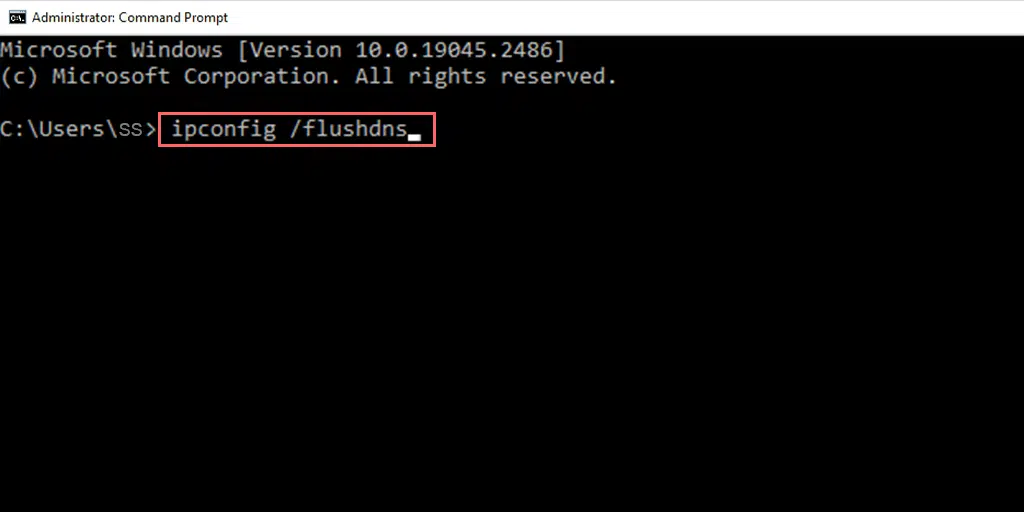
When hitting the Enter button, the Command prompt will flush your DNS instantly and a message will display stating “Successfully flushed the DNS Resolver Cache” as shown in the picture below:
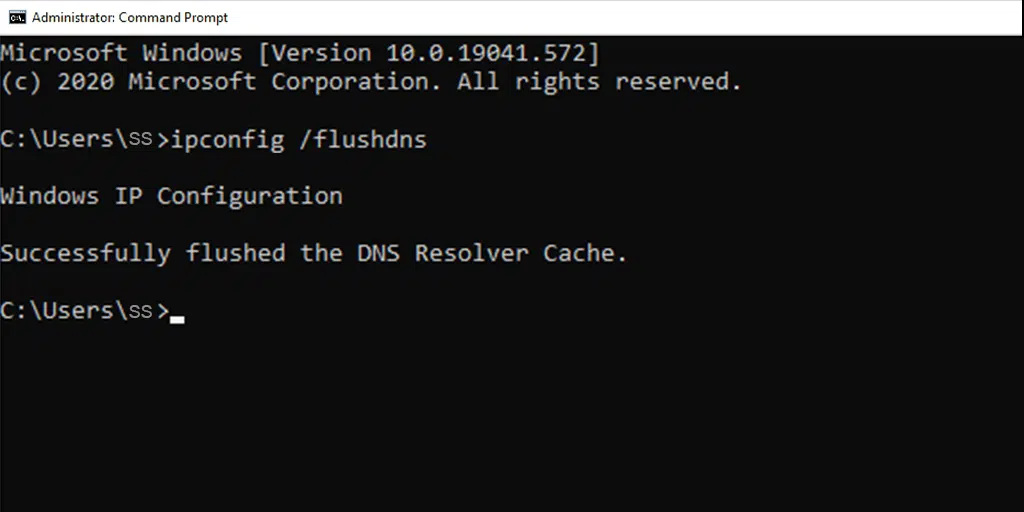
Similarly, repeat the same process by typing the following commands as mentioned below:
ipconfig /registerdns
ipconfig /release
ipconfig /renew
8. Disable all connections other than the primary
Now, if disabling all the firewalls and antivirus applications on your machine doesn’t help you out with the DNS server not responding issue, another thing you can try out is to disable all the connections other than the primary one. It means you should not disable the current or active connection but other available connections.
For Windows 10 or 11 users, you need to go to your Windows icon located at the bottom corner left-hand side of your screen and click on it. Type “Network connections” in the search bar as shown in the picture below and select the View network connections application as shown below:
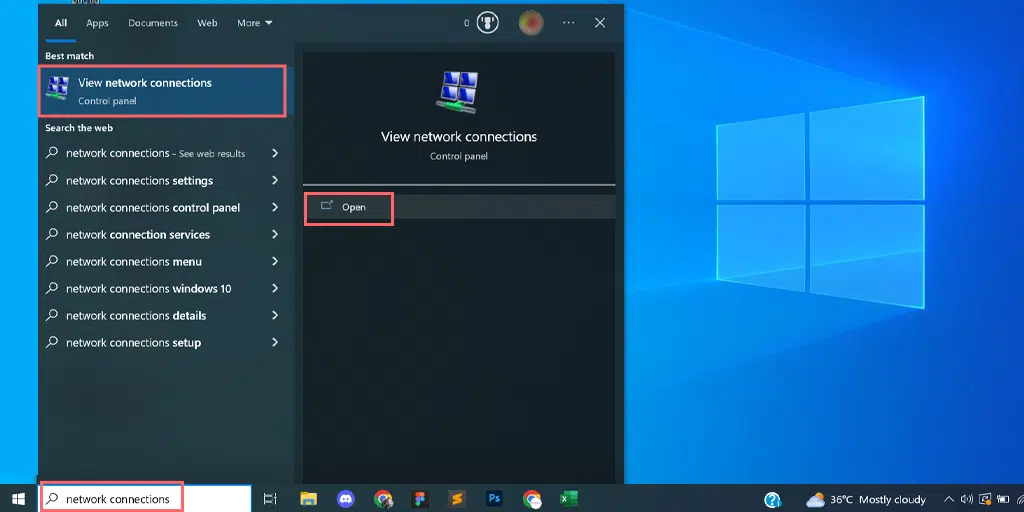
When you click on View Network connections, you will be directed to the Network Connections page, where you can see all the available connections you have. The active/current connection that you are using will be marked as green whereas the connections that are not in use will be marked as red cross as shown in the picture below.
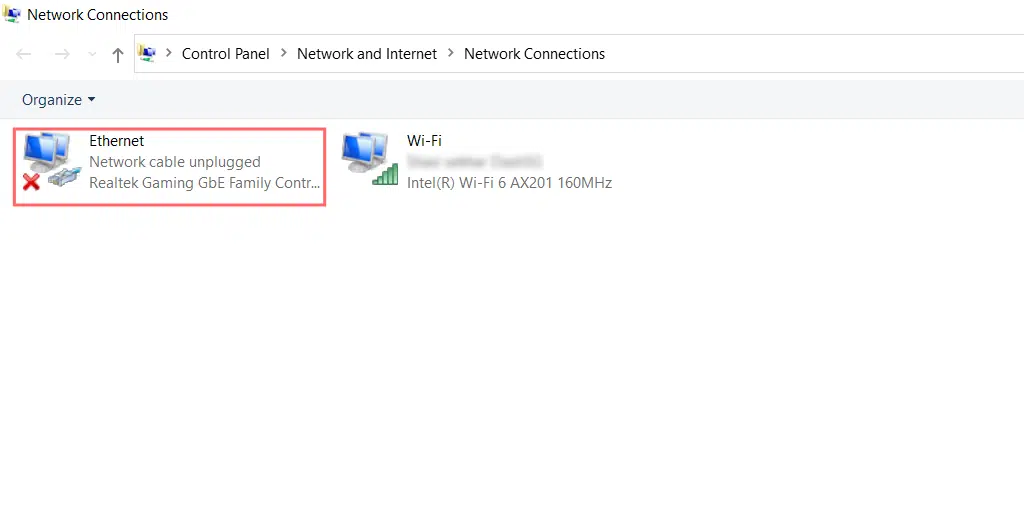
Now select the connections which are not in use and disable them one by one. After successfully disabling all the secondary connections, you need to restart your computer and check whether it resolves the DNS server not responding issue by accessing the website on your browser.
9. By changing the DNS settings on your Windows PC
This method is getting a little technical and requires a lot of steps, which can be a little confusing for any beginner. But it is an effective method that you must try if all the above methods fail to fix the DNS server not responding issue.
If you are a Windows user, the first thing you need to do is to go to your Network Connections, Following the same process mentioned in Method 8.
On the View Network connections page, choose the connection you are currently using or active and right-click on it to reveal options. Select properties.
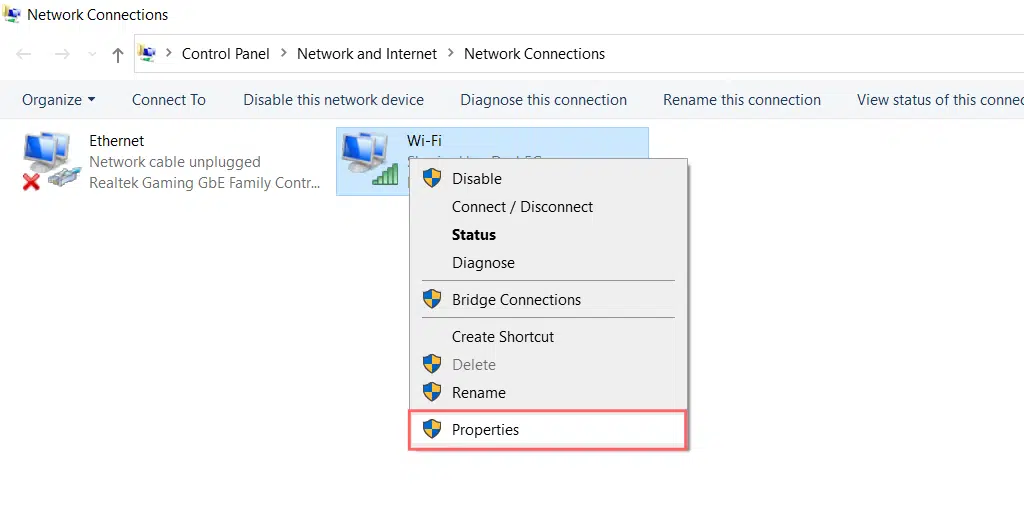
When you click on the properties, a new window will open, in which you have to select Internet Protocol Version 4 (TCP/IPv4), as shown in the picture below:
A new window of Internet Protocol Version 4 will appear and you need to select the option “Use the following DNS server address” to assign a different DNS address manually.
you can fill Google‘s public DNS IPv6 address in the Preferred DNS server as 8.8.8.8 and the Alternate DNS server as 8.8.4.4
10. Temporarily Disable IPv6
After IPv4, the latest internet protocol version that is primarily used is IPv6. Its main function is to route traffic between networks and the internet. But sometimes, it can also be the culprit for triggering a DNS server not responding error message on your computer screen.
So, to check whether it is the main culprit behind this error or not, you need to open your Computer Network Connection page, just like you did in the above two methods. and select the active/current connection, right-click on it, and select the Properties option.

You will have a Network Connection properties window as shown below:
Under the Networking tab of the panel that opens, scroll down until you see Internet Protocol Version 6 (TCP/IPv6):
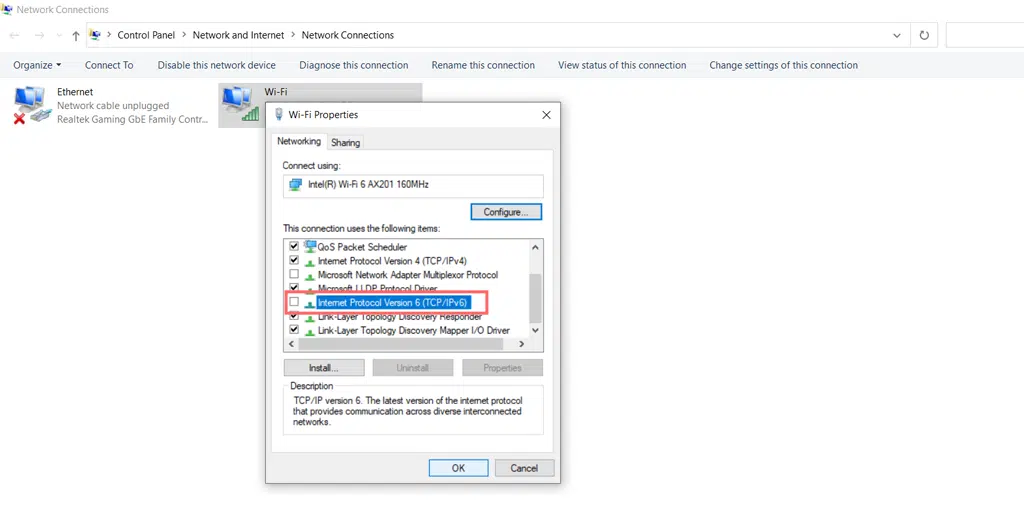
Now disable the IPv6 and unselect the box if it is selected by default as shown in the picture above. Now restart your web browser and check if the problem is resolved or not.
11. Check if disabling the Microsoft Virtual Wi-Fi Miniport Adapter fixes the issue.
To disable the Microsoft Virtual Wi-Fi Miniport Adapter, the first thing you need to do is press the Windows button and R key simultaneously on your keyboard. A run pop-up window will appear.

Now you need to type devmgmt.msc and hit the Enter key. This command will launch the Device Manager application on your computer screen. Now click on the View tab and select Show hidden Devices to show some new devices which are hidden in the list as shown in the picture below:
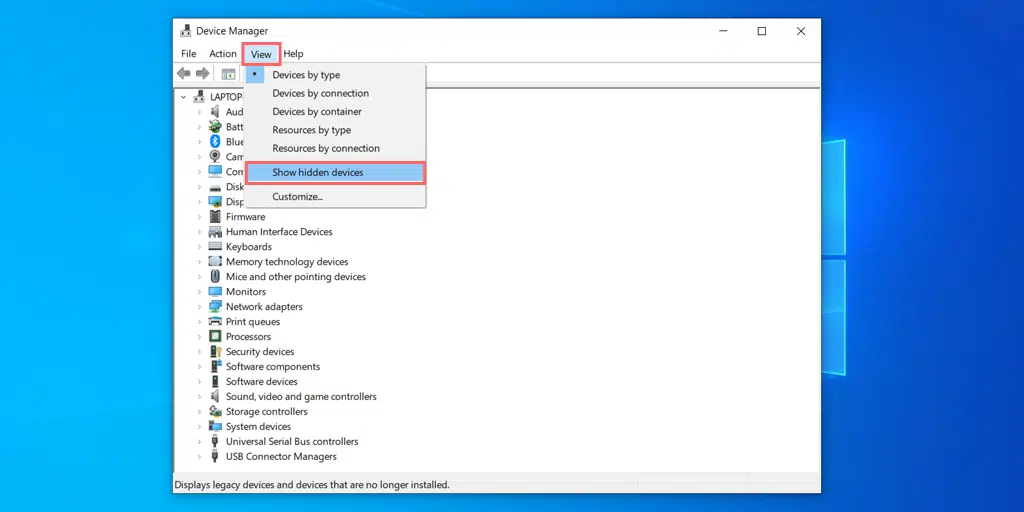
Click on the Network adapters category to expand and right-click on the Intel Virtual Wi-Fi Miniport Adapter to choose the uninstall device option.
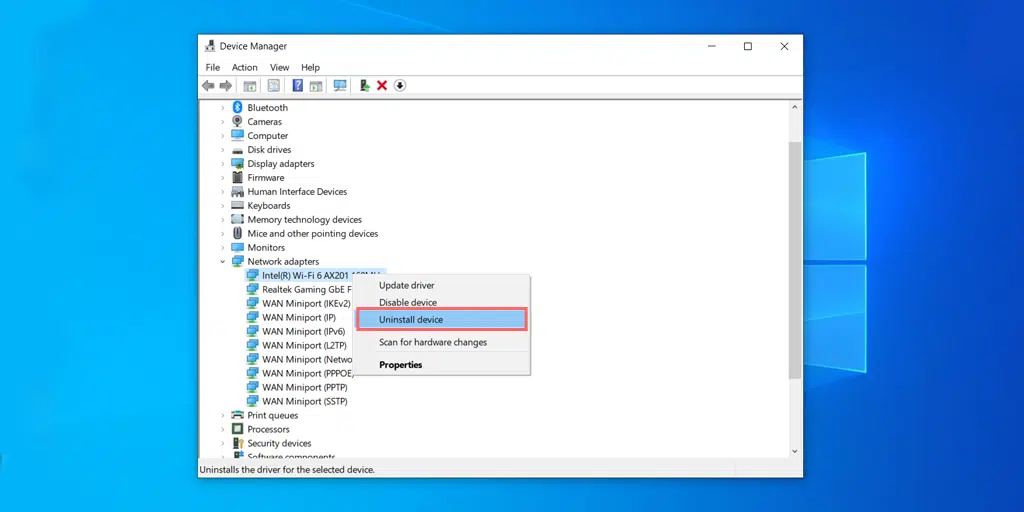
Do the same process with all the available Virtual Miniport Adapters and when done, close all the windows and restart your system.
12. Contact your Internet service provider
Although from the above 11 methods, any one method will be sufficient to fix the DNS server not responding error. But in case none of the above methods work, the only and final option left for you is to contact your Internet service provider.
Their technical knowledge and skills will help you to resolve this issue as soon as possible.
You can also read our other articles that are also based on similar kinds of errors such as:
Read: 🚩 chrome://net-internals/#dns – How to Clear DNS Cache Chrome
Methods to fix DNS Server not Responding error (macOS devices)
Now that you have learned how to fix the DNS server not responding error in Windows devices, it’s worth noting that Mac users can use the methods listed below:
1. Turning Safe mode in macOS
For macOS users, the process is almost the same. When your machine is booting up you need to press the shift key unless or until the Apple logo appears. Once the logo appears, you can release the key and your Mac machine will start in safe mode.
After that, in safe mode, you can check whether the issue persists while accessing the website again or not. If in safe mode there is no internet or any connectivity issue and if the DNS server not respond issue occurs, it may be caused by any third-party application such as an antivirus.
2. Flush DNS cache in macOS devices
For macOS users, to purge or flush the DNS cache, you need to go to your Terminal application by pressing the Command as well as Space keys simultaneously and type the “terminal” keyword into the Spotlight. Open the Terminal application type the following command and hit enter:
dscacheutil -flushcache
Now you are done, this simple command will flush out the DNS cache instantly.
3. Disable Secondary connections
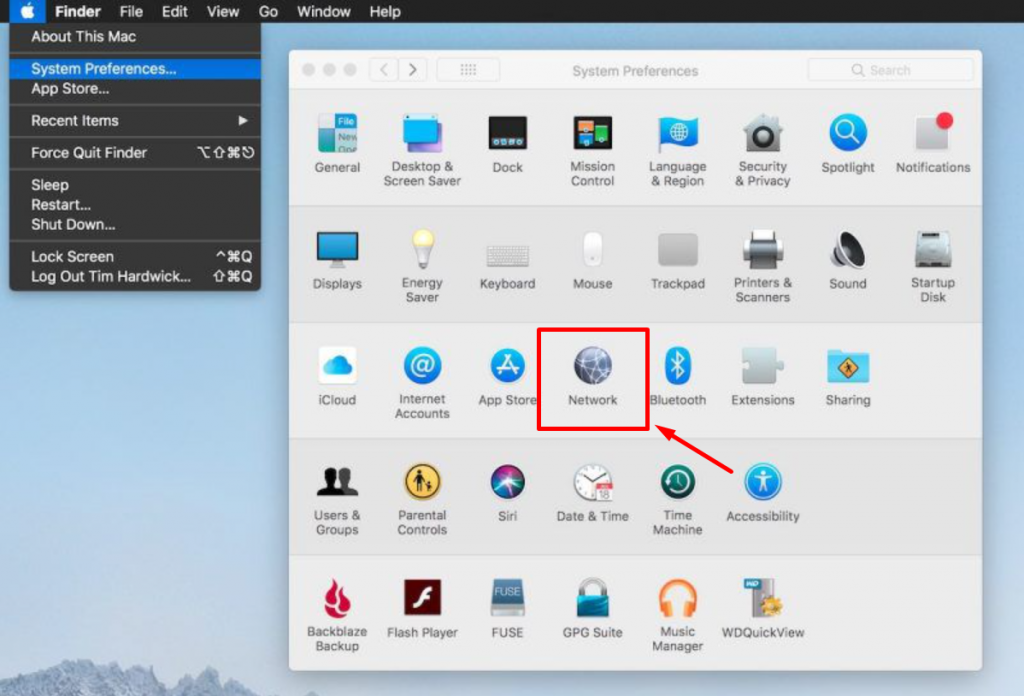
For macOS users, to disable secondary connections, the process is quite different. To do so, you need to navigate through the Apple icon similar to the Windows icon in Windows OS. Select System Preferences followed by Network.
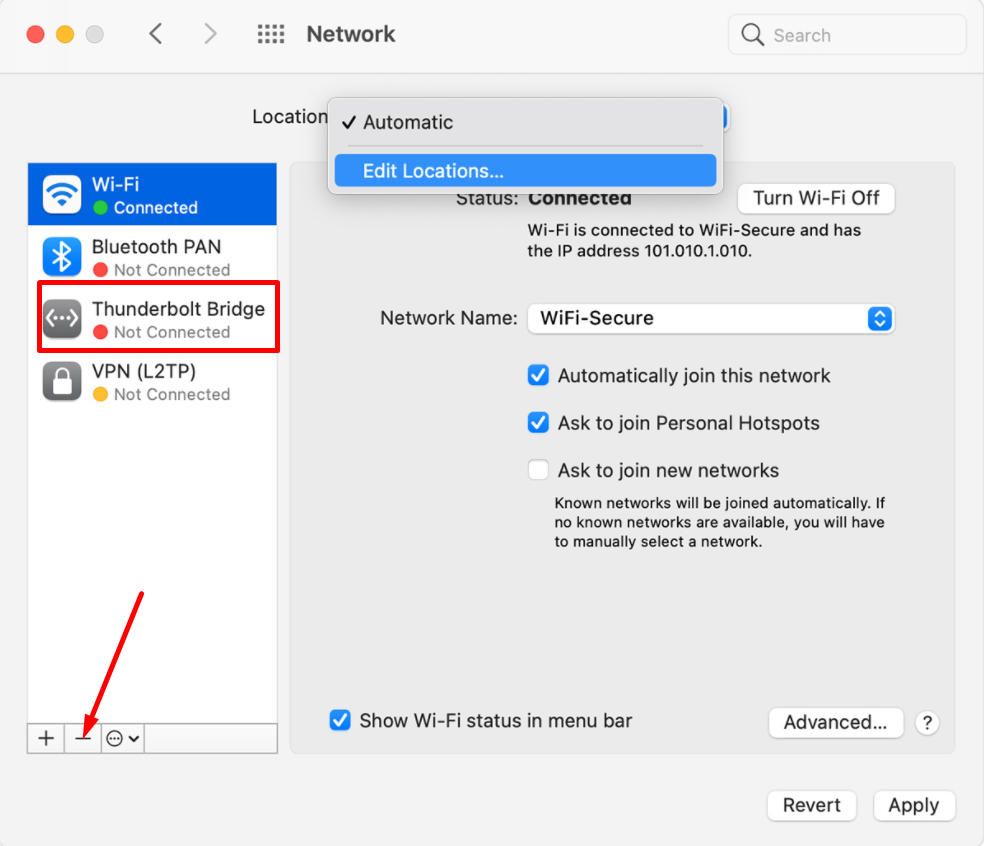
All the available network connections will be listed on the left side of the window as shown in the picture above. Now to disable any of the connections, you need to select the network and click on the (-) sign located at the bottom of the window as shown in the picture.
4. Temporarily Disable IPV6 in macOS
For macOS users, first of all, you need to open the Terminal application and enter the commands given below:
networksetup -listallnetworkservices
A complete list of all the available networks will appear. Now to disable IPv6 for Wi-Fi devices, you need to enter the command given below:
networksetup -setv6off Wi-Fi // for wifi connection
After that press the enter button, and you are done. You can check if this method is working or not by simply restarting your web browser and trying to access a website.
5. Disable the firewall in macOS
For Macintosh users to disable the Firewall temporarily, you need to go to your System Preferences > Security and Privacy > Firewall.
After successfully deactivating the antivirus or Firewalls, you can access the website from the website and check if the issue is still there or not. If the issue has been resolved, you can check the settings of your antivirus program and enable it.
6. Change DNS settings in macOS
However, if you are a macOS user, you can have this setting by navigating to your Apple icon > System preferences > Network.
The next thing you need to select your current network and select the Advanced button.
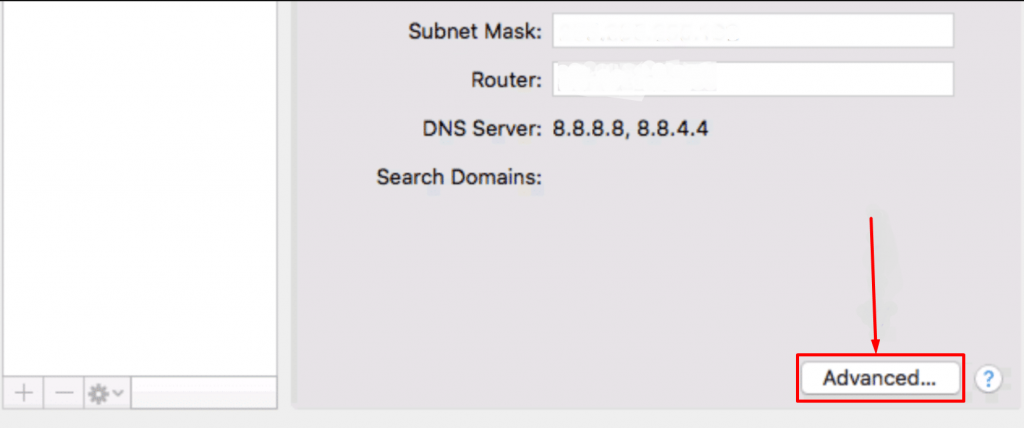
The moment you click on the Advanced button a new window will appear in which you need to enter a new DNS. Select the DNS tab click on the “+” button and press the Enter button.
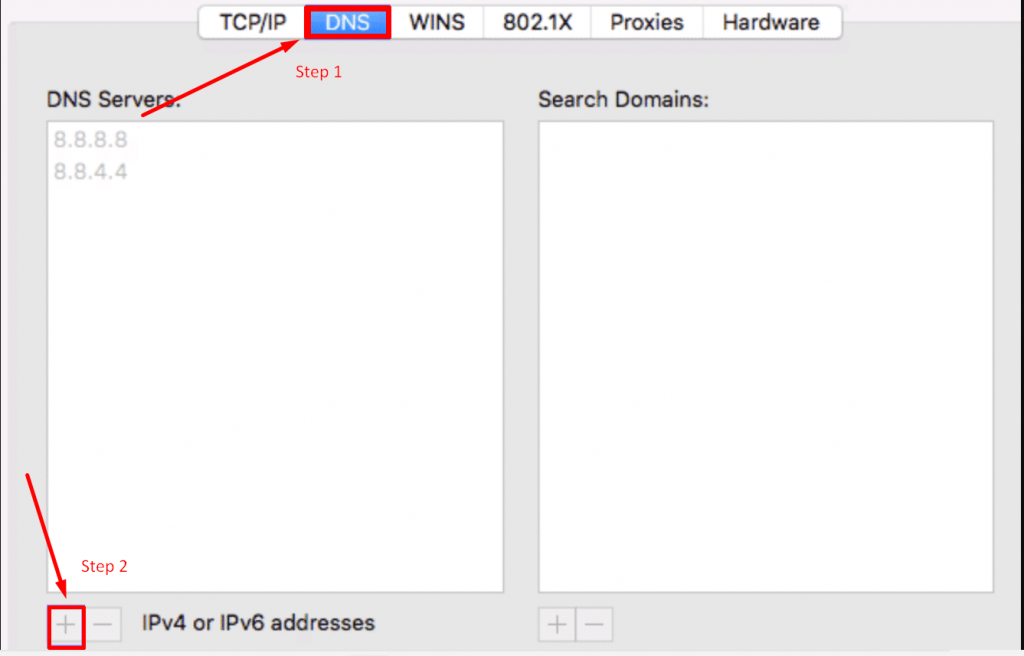
When you successfully enter the new DNS information, the next thing you need to do is to click on the Apply button and restart your web browser. You can access the website to check if the error DNS server not responding is resolved or not.
Intermittent DNS server not responding Issue
At times, there are certain occasions you may also experience an intermittent DNS server not responding error on your computer screen. The main culprit for triggering this error can be your faulty broadband router or modem. i.e the issue has been caused by your network adapter and you need to follow these steps to ensure it works properly:
- Restart your modem or router
- Update your network card drivers
- Try reconnecting your computer to the router
- Try disabling IPv6
- Reset Winsock
Step 1: All you need to Open a Cmd prompt with admin privileges
Step 2: Type netsh winsock reset catalog and press enter.
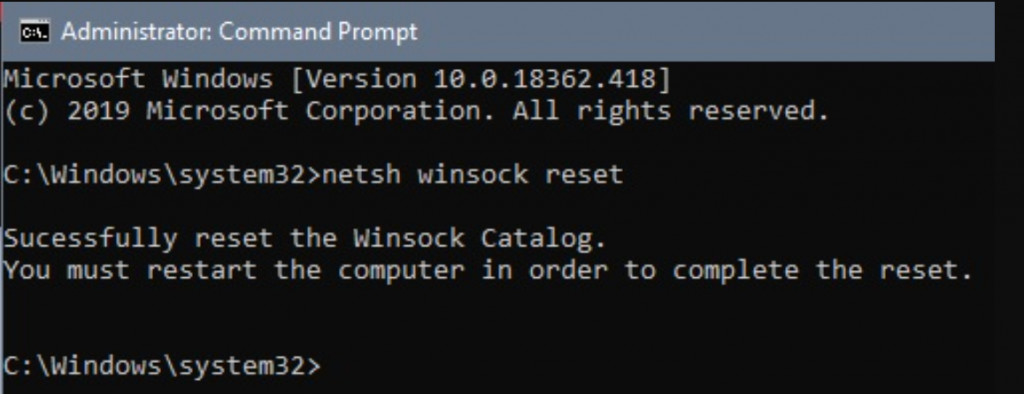
Step 3: Restart the computer and you are done.
However, if none of the methods mentioned above worked for you, you can try them out by performing a clean boot in Windows and disabling any antivirus program temporarily.
What is the meaning of a DNS Server Not Responding to an Error?
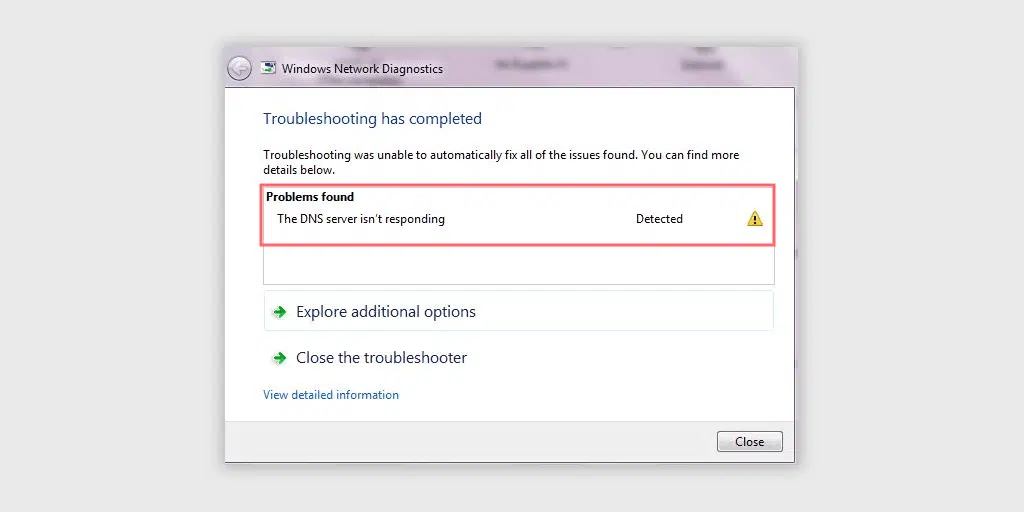
In simple words, a DNS or Domain Name Server is a translator that translates hostnames that are alphanumeric into IP addresses. Let us understand how it works in detail.
First of all, when you enter your web address or hostname in the address bar of your web browser, it is sent to a nearby DNS server via your router, where it gets translated into a numeric IP address. During this translation process, if anything goes wrong, the user will get notified by an error message on their web browser page stating “DNS server is not responding”. i.e. your web browser has not been able to make a successful connection to the internet.
Generally, this type of error occurs from the user end, either due to the user having a poor internet connection or not properly configured DNS. It is also possible that the user has not updated their web browsers or even the server is busy.
Hence, the most common and widely used solution that you must try to fix this issue is simply restarting your Personal computer or trying on other browsers.
Let us check out what are the possible reasons for DNS Server not responding on your PC, especially on your Windows device. Since Windows has the major Operating system market share in the world, let us see what are the reasons for the DNS servers not responding on Windows 10.
Possible Reasons for DNS Server not responding to Windows 10 devices
When a user enters the host’s name in the web browser, it gets translated into an IP address by DNS. The DNS saves all these IP addresses that the user requests in the form of a cache. Hence, from this, there can be only two possibilities that cause this error to happen in Windows 10 devices. They are:
- Exhausted Cache Memory: You have already read that all the IP addresses that the user request is stored in DNS as cache memory so that whenever the user likes to visit the website again, it does not go through the same process again and again.
- Malware attacks: Some malware or Computer viruses are assigned to steal data from your browser. Similarly, phishing is a data-stealing technique in which your computer is infected with some malware and Your web data is being stolen from the DNS cache or compromised. Due to this, you will start being redirected to some other potentially harmful websites.
Now you must be able to understand what are the possible causes that let this error message reflect on your webpage. Let us check out the different methods by which you can fix this issue as soon as possible.
Since only two dominating operating systems are used worldwide, i.e. Microsoft and Mac OS, we will talk about solutions for only these two platforms.
Summary
Encountering the error message “DNS server not responding” while accessing a website can be quite irritating and frustrating. Although the reason for triggering this error can be due to a variety of reasons, the best part is, that it can be resolved by following some simple methods. Such as:
- Trying to access the website on a different browser
- Turn your computer into safe mode
- Check with Antivirus and Firewalls
- Restart your Internet Modem and Router
- Update your Network Adapters with the latest version available
- Disable the Windows P2P feature
- Clear your DNS cache and reset your IP address
- Disable all the connections rather than primarily the active one
- Change your DNS settings on Windows
- Disable IPv6
- Disable Microsoft Virtual Wi-Fi Miniport Adapter
- Contact your ISP
Apart from the above methods, if you have any more working methods that we have missed mentioning in this post, please do let us know in the comment section below.
Save your time, money, and resources, and give your website mammoth growth with WPOven’s the best wordpress vps hosting.
- 24X7 WordPress Expert support
- Cloudflare integration
- High-end Security
- Datacentres around the world, etc.
You can have all these features and much more in a single plan with unlimited Free migrations, unlimited staging, and a 14-day risk-free guarantee, Signup Now!
Frequently Asked Question
How do I fix the DNS server that isn’t responding?
The 12 best methods to fix a DNS server not responding are:
1. Trying to access the website on a different browser
2. Turn your computer into safe mode
3. Check with Antivirus and Firewalls
4. Restart your Internet Modem and Router
5. Update your Network Adapters with the latest version available
6. Disable the Windows P2P feature
7. Clear your DNS cache and reset your IP address
8. Disable all the connections rather than primarily the active one
9. Change your DNS settings on Windows
10. Disable IPv6
11. Disable Microsoft Virtual Wi-Fi Miniport Adapter
12. Contact your ISP (Internet Service Provider)
How do you reset your DNS server?
To reset your DNS server, Do the following steps:
1. Open CMD by clicking on the Start button located at the bottom corner left-hand side of your Windows PC.
2. A black window of CMD will appear.
3. Type ipconfig /flushdns and hit enter
4. Now Restart your Windows PC
What is a DNS failure?
Due to any reason, DNS is not able to convert your hostname into an IP address in a TCP/IP network. It is termed a DNS failure.

Rahul Kumar is a web enthusiast, and content strategist specializing in WordPress & web hosting. With years of experience and a commitment to staying up-to-date with industry trends, he creates effective online strategies that drive traffic, boosts engagement, and increase conversions. Rahul’s attention to detail and ability to craft compelling content makes him a valuable asset to any brand looking to improve its online presence.

