WordPress is one of the most popular and widely used platforms to build websites. Therefore, it is almost everyone’s first preference to get their website live on the internet. But due to a lack of awareness and knowledge, many beginners consider it a very daunting task to build a website on WordPress.
But believe it or not, knowing how to build a website with WordPress can be one of your major skill sets, that you can master and start your own online business in the present scenario.
One of the major advantages of building a website on WordPress is its user-friendly interface and great learning curve. There is no special skill or pre-requisite knowledge required to build a website with WordPress.
All you need to have is proper guidance and a step-by-step method (which you will provide in this post) and you are ready to go.
On top of that, the best thing about learning this skill to build a website with WordPress is:
- You will not be required to hire separate web developers or designers, hence saving a lot of money.
- You will learn new things and can easily implement them on your website from time to time on your own.
- You will have full control over your website and hence reduce any chances of information leaks.
- You can make this your full-time career option in the future to design websites for your clients.
Apart from all these benefits, the biggest advantage to learn ” How to build a website with WordPress ” is you can start your online business or Work on your project anytime that well reflects your work, without anyone’s interference.
If you are just a hobbyist or simple blogger do not like to spend a single penny on building a website and hosting. WordPress has a dedicated free platform “WordPress.org” for them.
We knew not everyone is tech-savvy and knows how to code. But WordPress has become a boon for them, so in this post, we will guide you on how to build a website with WordPress in a step-by-step method, so stay tuned and keep reading this post to the end!
Let us get started!
What is WordPress?
Before we start our tutorial on How to build a website with WordPress, the first thing you should need to learn about WordPress.
WordPress (WordPress.org) is one of the popular Content management systems (CMS), that is written in PHP along with MySQL. In other words, WordPress is termed an open-source software with the help of which you can build a website for free.
Here you might get confused between WordPress.org and WordPress.com. Since both the platforms are available from the same company but serve a different purpose. To get a better understanding of these two platforms in-depth, you can check out another detailed post on WorPress.com vs WordPress.org.
Although there are many paid as well as free platforms available to build websites, WordPress has still been popular and the first choice of any individual to create websites. You might be thinking why do so many people choose WordPress over other platforms? Let us see the reasons.
Why Is WordPress So Popular for Building Websites?
In the very beginning, WordPress was available as a free blogging platform, but now it has become a platform that servers almost 40% of the websites on the internet. This is due to its unique features and multiple advantages such as:
1. Flexibility And Customization
WordPress provides you with a wide range of customization options and flexibility that no other CMS can offer. You can build from a small blogging website to a fully functional eCommerce online business easily.
2. User-friendly Interface
Building a website on WordPress doesn’t require any special skill or high-end technical knowledge. You do not even need to hire any technical expertise or web designer to build your website. All you just need to have is a web hosting account and domain name registered and you are ready to build.
3. A wide range of Themes and Plugins are available
Since WordPress is known for its customization and flexibility features, what makes all these possible is due to the wide range of plugins, themes, and WordPress Templates available. You can increase the functionality and features of a website by installing plugins from WordPress’s repository as well as third-party libraries such as ThemeForest.
Similarly, you can give your website a completely different look with thousands of themes available in the market (paid and Free both).
4. Scalability
One of the major concerns that every website owner has for running any website is its scalability. It is because, as time passes by, you start getting visitors and hence pushing more content. As a result, it starts pushing load on your present CMS and hence impacts its performance.
This is why choosing the right web hosting provider becomes your utmost priority before starting to build a website. It helps to scale your website and also enhance your website’s overall experience. However, it is not alone responsible for your overall site performance but also the type of CMS you are using.
For instance, WordPress has already shown a great performance and holds a great reputation to power some of the most popular sites such as TED blog, TechCrunch, BBC America, and many more.
But one thing you must also keep in mind is that if you want a blazing-fast website with great performance. Having a good web host and CMS won’t be enough, but you will also require to maintain and fix issues of your website from time to time.
5. Support from a Huge, helpful, and friendly WordPress Community
As we have already mentioned multiple times, WordPress is famous and has a great share on the internet, all this is possible due to great support from the WordPress community. The community consists of users and developers who work on the platform and provide valuable updates and feedback from time to time that helps to bring the best of WordPress to its users.
Whenever a user is stuck into a problem or encounters an error while using WordPress CMS, they can ask the community and you will be hurdled with answers and solutions from the community members.
Now you know what is WordPress and Why are advantages of using it. Let us learn how you can build a website with WordPress.
How to Build A Website with WordPress in Step-By-Step Method?
Building a website/blog using CMS WordPress is very easy. There are almost 8 easy steps that if you follow thoroughly, you will be able to build a website with WordPress in no time.
Step 1: Decide the Niche of Your Website
The first and foremost step in building a website is to decide its niche. Try to choose only a particular niche that you are an expert on, you are interested in, must have high public demand, low competition, and show great future growth in terms of popularity and revenue.
Do not pick up that topic that doesn’t interest you and after some, it becomes a burden for you.
Step 2: Domain Registration
When you are done with choosing your website niche, the second step is to decide its domain name and brand. Choosing a domain name is usually a little as difficult a process as it seems. It is because there are various factors and points you have to keep in mind such as:
- The domain name must be around your niche.
- Do keyword analysis and see which keyword has higher search volume density with lower competition.
- It should be easy to spell and remember.
- Try making it short.
- Your first preference should be to get .com, if not then try for .net or.co.
- If you are looking to build a brand, the name should be unique and out of the box.
Once you are able to find your domain, get it registered immediately and next buy a web hosting plan in the next step.
Step 3: Buy A Web Hosting Plan
Your third step is to find the fastest, most reliable, and trusted web hosting service provider that can handle your website seamlessly. Here at WPOven, you will have the best deal with lots of other extra benefits that no other company can provide in the affordable price range.
At WPOven, you will provide industry-leading Fastest servers, top-notch security, and a full WordPress-optimized infrastructure. This means you will get a dedicated platform that is specially built for WordPress websites to fulfill all its needs and nurture them to get better results.
There are the Advantages you will have if you host your website on WPOven.
- Private Servers that are Fastest in the market.
- Up to 100% server uptime guarantee
- Amazon S3-based daily backup
- Datacenters all over the world
- Proudly partnered with Cloudflare (Worldwide CDN)
- SSL for all sites
- Secure by Design
- Unified and interactive Dashboard
- Premium Addons
- No migration limits
For your reference, you can also check out an ultimate Comparision between leading Web hosting providers that will help you to learn why WPOven is a perfect choice for you.
While looking for web hosting, you will find various types of web hosting being offered, which Shared hosting is cheaper and best suitable for hobbyists or simple bloggers. learn more about them in brief.
Step 3.1. Shared Hosting
One of the most affordable and basic types of web hosting is most suitable for beginners, bloggers, and small websites. Sharing hosting working model is similar to renting an apartment and sharing it with others.
Similarly, when you buy a shared hosting plan, it means you are buying a server that is also being used by other websites, and all the resources will also be used by them. This is why it has become more economical and affordable as compared to other types of web hosts.
Since the same server is being shared with thousands of other websites, all the costs get split which makes it more affordable. Another best thing about shared hosting is that the setup is way easier and cleaner.
However, apart from all its benefits, there are also some of its downsides you must consider:
- Poor website performance and speed.
- Vulnerable to attacks
- Security threat
- Poor Customer service
- No customizability
But, for beginners shared hosting is overall a good choice.
Step 3.2. VPS hosting
VPS or Virtual Private Server is the combination of both shared and dedicated hosting which is like renting an apartment in the same building.
Your website will be allocated a separate server which is being virtually separated or divided from other websites on the same parent server. Due to this, it will be able to provide major benefits of a dedicated server such as reliability, better security, enhanced website speed performance, better resource allocation, flexibility, and customizability.
But All these benefits come at an expensive price tag than shared hosting but are worth going with, also depending upon the web hosting company.
But at WPOven, you will experience the power of the Fastest Dedicated VPS hosting at the price of Shared hosting, which makes it a more affordable and desirable option.

Step 3.3. Dedicated Hosting
A dedicated hosting or dedicated hosting service is a type of web hosting in which an entire server is being allocated to the client on rent, rather than sharing it with others. These types of web hosting are most suitable for large companies, prominent brands, and eCommerce websites, that cannot compromise on speed, security, and performance.
If you are a beginner or a simple blogger, dedicated WordPress hosting is not meant for you. It is because the price of dedicated hosting is way too high and you won’t even be able to easily set up if you do not have any knowledge about it.
On top of that, if you made a slight mistake while configuring the setup, you can lose your entire website too.
Therefore, as a beginner or starter, it is better to go for either shared hosting (for a low budget) or VPS hosting (if security and website performance is your utmost priority).
Step 4: Install WordPress CMS
When you sign up with WPOven and add a site to the server, WordPress will be automatically installed on that site and ready to use. It is because we provide a pre-installed WordPress facility with our plans so that it becomes easy for non-techie clients to create their websites.
This is how you can add your domains to WPOven, and get automatically WordPress installed and ready to go.
However, there are various ways through which you can install WordPress CMS, that vary from one hosting provider to another. Some web hosts use auto-installer scripts such as Softaculous, QuickInstall, and Fantastico, which you will find in cPanel and involves more steps to follow.
Now after successfully installing WordPress, you need to configure its settings so that you can start building your website. For that, you need to login into your WordPress admin dashboard through the link: https://www.yourdomain.com/wp-login.
When a login page appears, provide your username/email and password, that you have generated while setting up your hosting account.
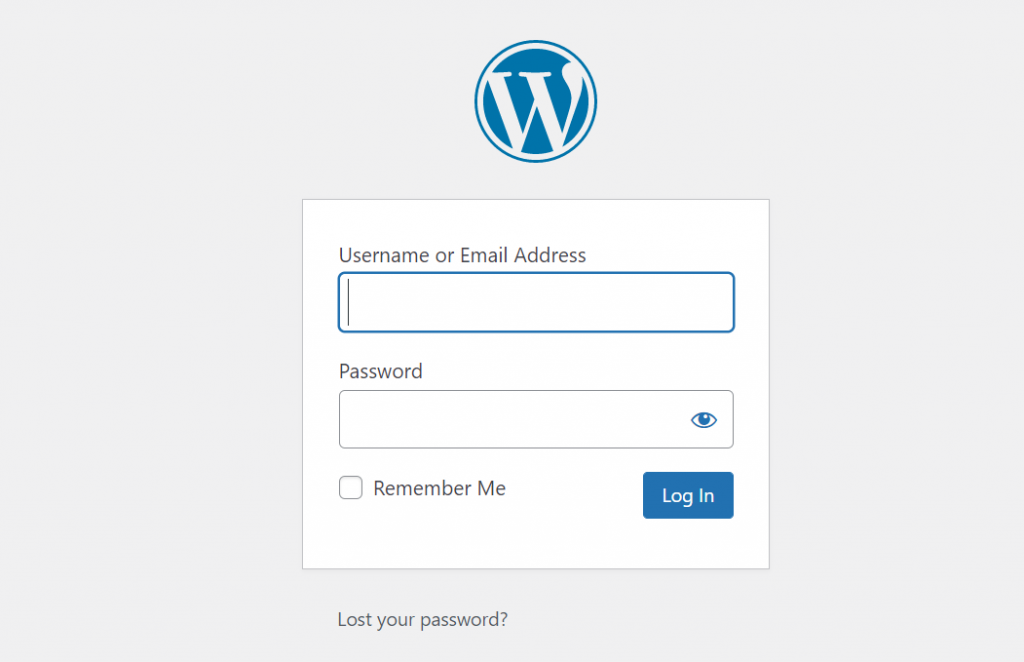
After successfully login to your website admin page, you will see a dashboard, showing all the essential options and tabs. But first, you need to set up some essential settings as mentioned below:
General settings
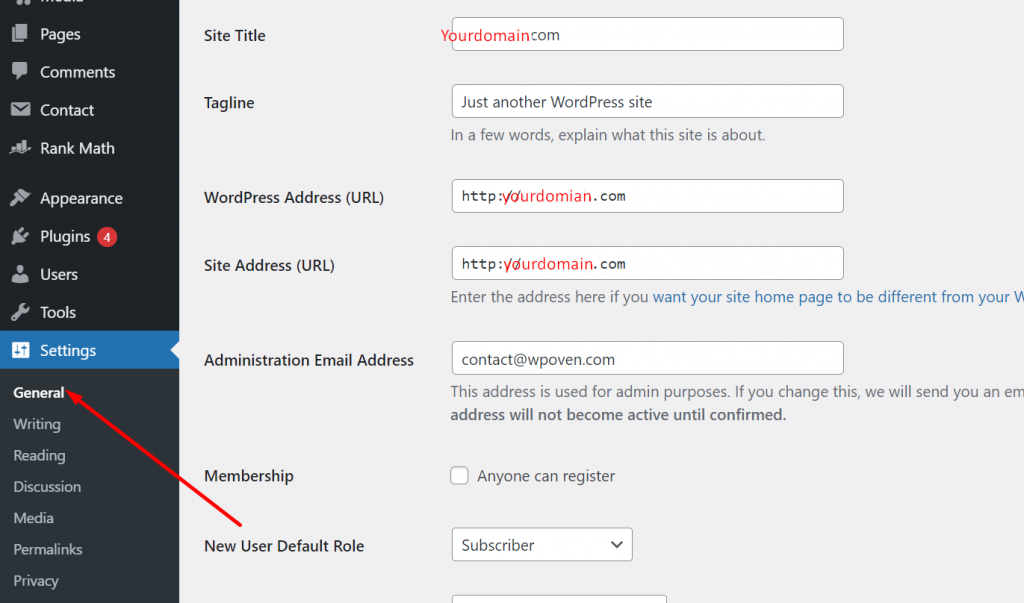
Go to Settings > General and you will find a lot of areas you need to fill, such as Site Title, Website Tagline, WordPress Address URL, and other relevant settings as shown in the picture above.
However, it is not mandatory to change these settings prior to website building but it is preferable to have a website tagline that helps your visitor to know the motto of the website and develop branding.
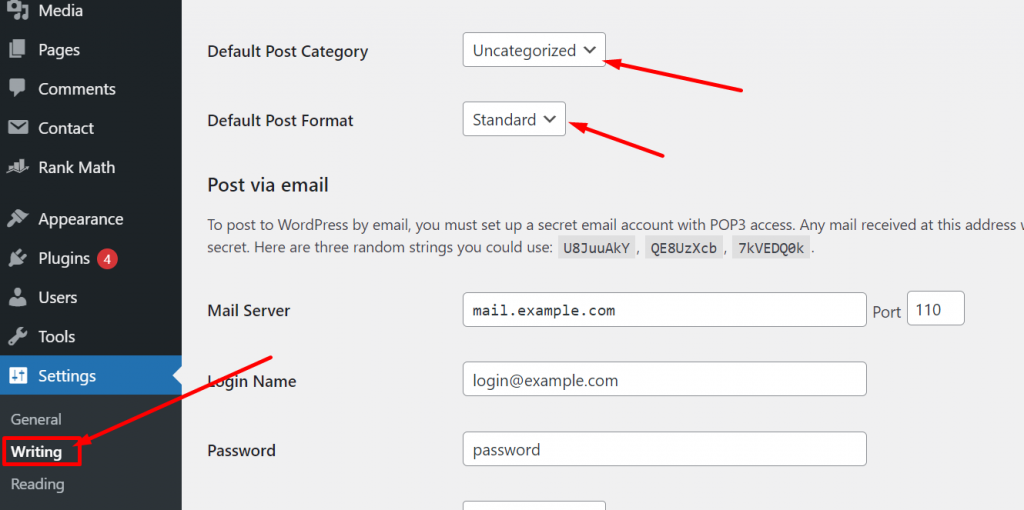
Writing Settings
After general settings, you will find the writing option in the same settings tab as shown in the picture below. In these settings, you will be able to set your default post category and default post format. However, this step is not mandatory to do and you can change these settings later on, even after you started pushing content on your website.
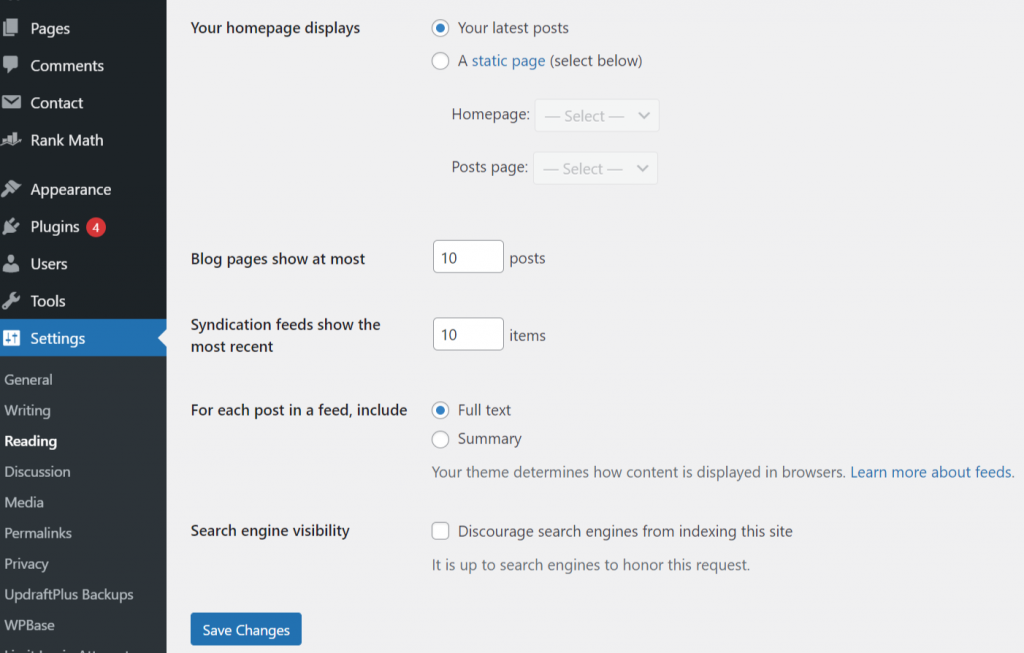
Reading Settings
Just below Writing settings, you will another option “Reading” through which you will be able to select what your homepage should display, the Number of blog posts to show at once, and search engine visibility.
However, you may find more options on the reading settings page depending upon the WordPress theme you are using.
Note: In the reading settings, do not forget to check the Search Engine visibility optional. It is because initially, you didn’t build your website and any of its pages, and if anyhow search engines index your website with no posts and setup, it will create a bad reputation on search engines and hence it will seriously impact your SEO.
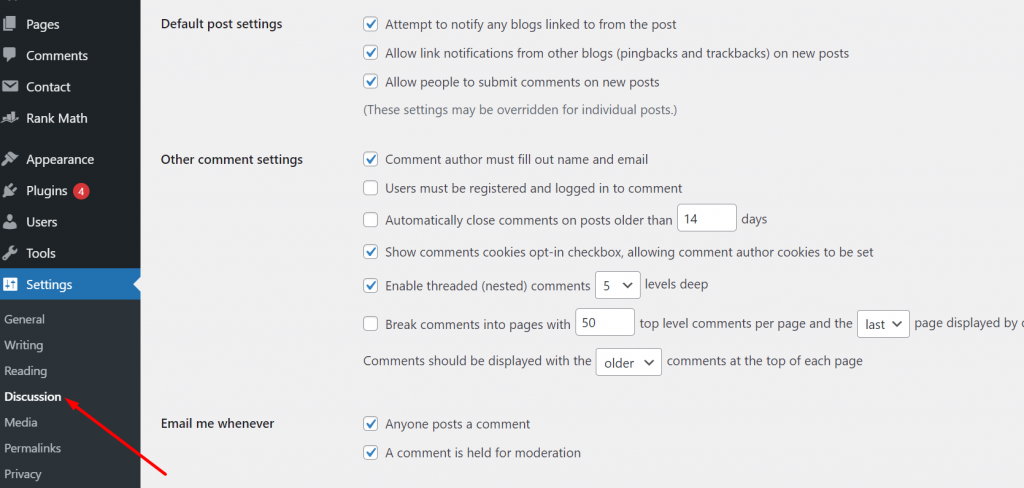
Discussion Settings
In the discussion settings, you will find all the options related to the post comments and moderation settings. Through this settings page, you will be able to restrict or moderate spammers and bots that generally spam the comment section with irrelevant spammy links and advertisements.
But initially, your primary focus should be on restricting random users to comment and enable mandatory manual approval of comments.
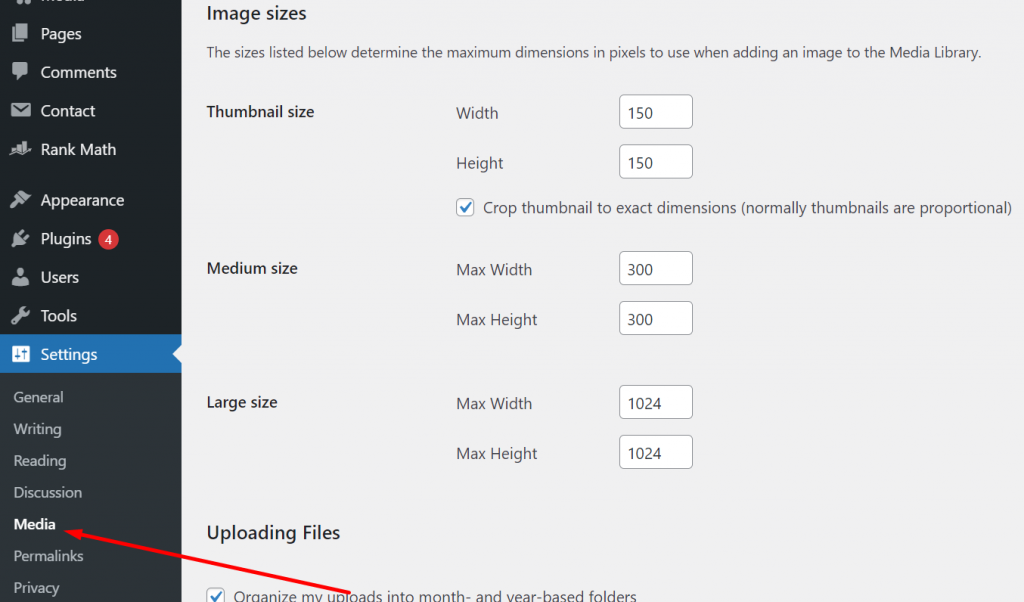
Media Settings
Below the Discussion, you will find Media settings with the help of which you can customize the size of media files to be uploaded on your website. However, you can leave the default settings as it is if you do not want to make any changes to them.
Permalinks Settings
Permalinks or Permanent links are the URLs of the posts or pages of your website that appear on the address bar of the browser. It is generally made up of a combination of your website domain name and your post/page name.
For example, let us take an example of one of our popular posts whose permalink link is ” https://www.wpoven.com/blog/how-to-start-a-wordpress-blog/ “. In which WPoven.com is your domain name and the rest “blog/how-to-start-a-wordpress-blog” is the post name.
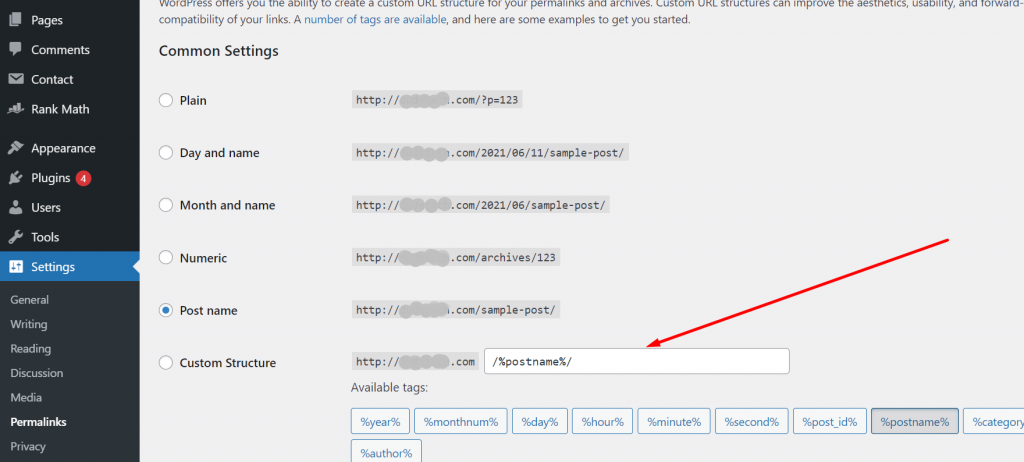
You can choose any format of permalinks to appear on your browser address bar, such as, plain, Day and name, Month and name, Numeric, or post name (popular). You can even customize the structure as per your requirement.
But from the SEO point of view, the permalink should be easy to understand and look simple, hence it is highly recommended to use post names as your default permalink format or structure.
Important Note: For better Search Engine Optimization results, always try to use your primary keyword in the URL slug. In addition to that, another thing you must keep in mind is that, once you selected your permalink structure and make it live, you cannot edit or change it afterward. If you do so, the link will break and a 404-error message will display on your screen.
Complete Your User Profile
To set a User profile, go to your WordPress dashboard > Select Users tab > click on Profile, shown in the picture below.
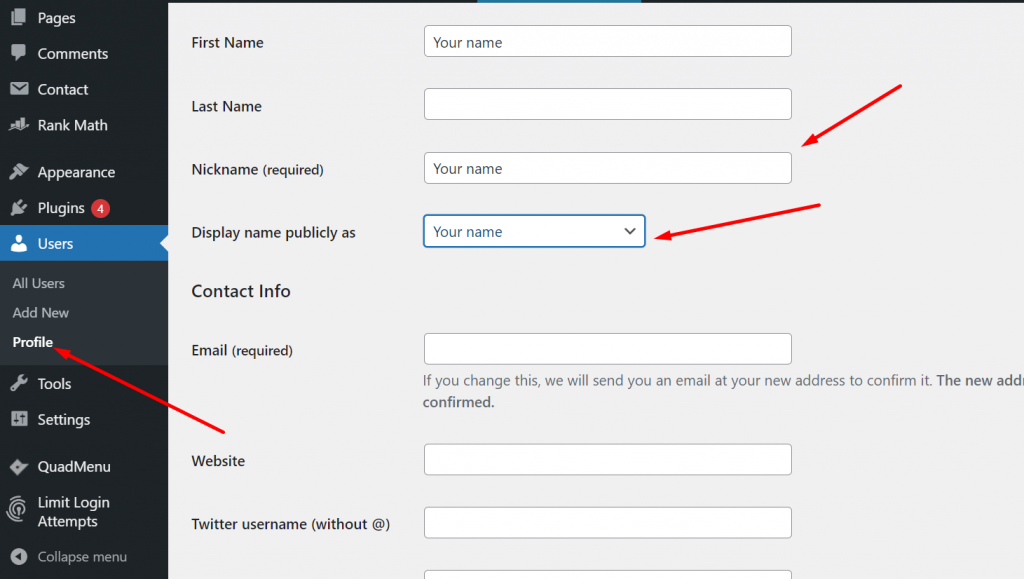
Setting up a user profile is essential because sometimes, the user information field as shown above is filled by default data provided by the theme you are using. This is why it becomes important for users to fill up all the user profile files with the correct information possible.
Also, make ensure that the drop-down option in the “Display name publicly field shows the correct options or not. In addition to it, do not forget to complete your Gravatar profile as well which lets you post articles on any WordPress site easily.
Step 5: Select A WordPress theme
In the beginning, you can start with WordPress free default theme which you can easily install from the WordPress dashboard itself. These default themes generally have clean and very basic designs with some basic features. If you are looking for more fancy options, then you can choose a paid/premium theme that matches your website niche.
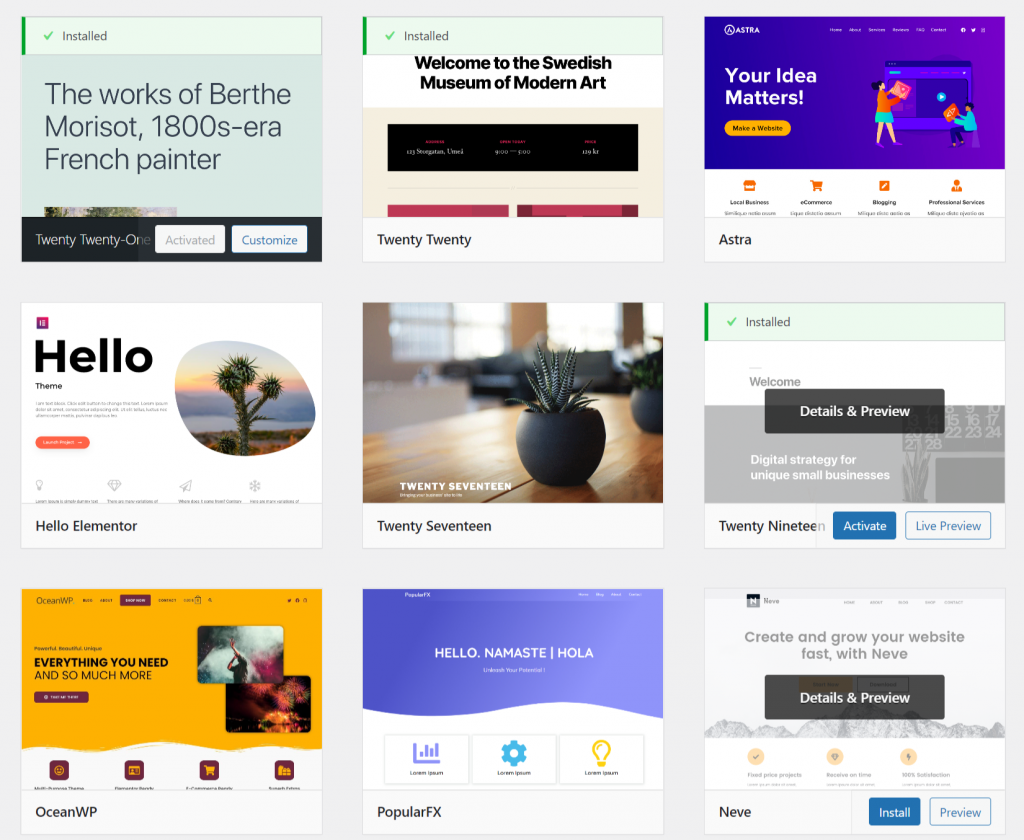
But, one thing you must keep in mind is that choosing a fancy theme is not as important as the quality of content you will be pushing. Hence your primary concern should be delivering high-quality content so that you can gather a good audience base.
If you are able to do so, then you can consider changing the theme of your website. There are plenty of WordPress theme directories available on the internet that offer you a variety of themes based on different niches. For example, ThemeForest. Choose the most suitable one, buy it, download it and upload it to your WordPress.
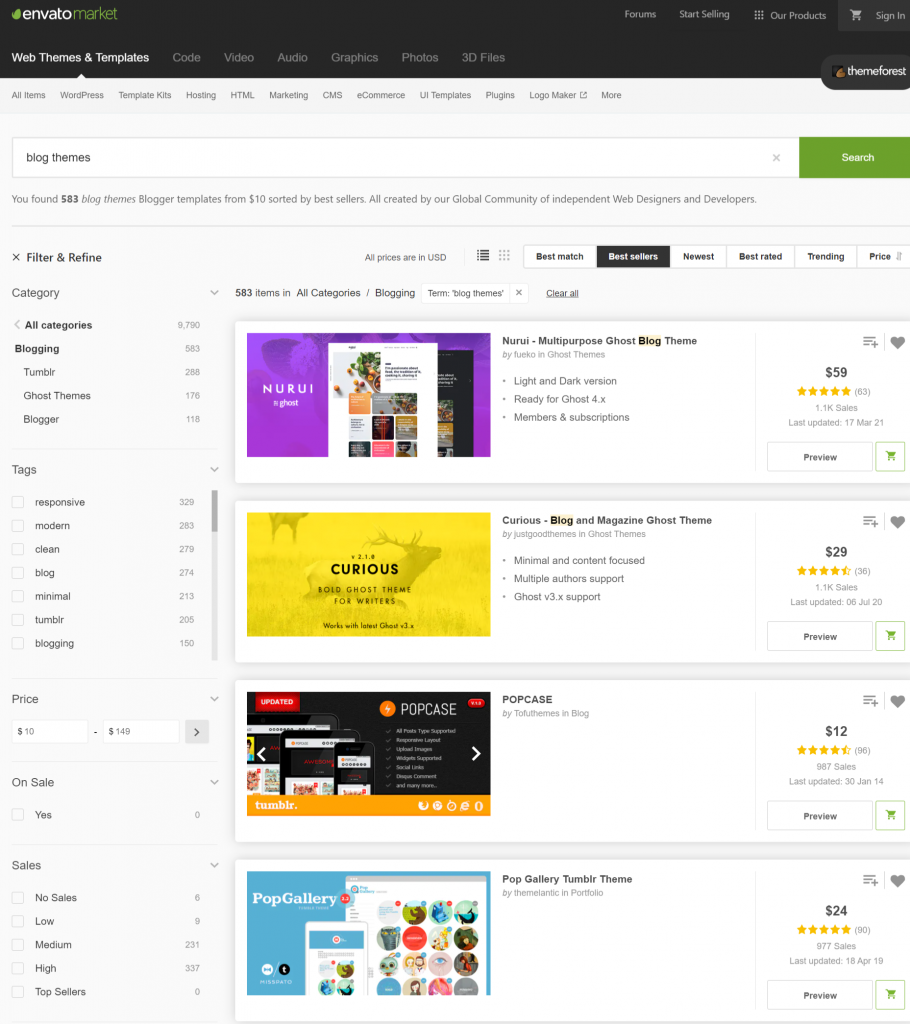
To add a third-party theme file, you have to Go to your WordPress dashboard > Appearance > Theme as shown in the picture below.
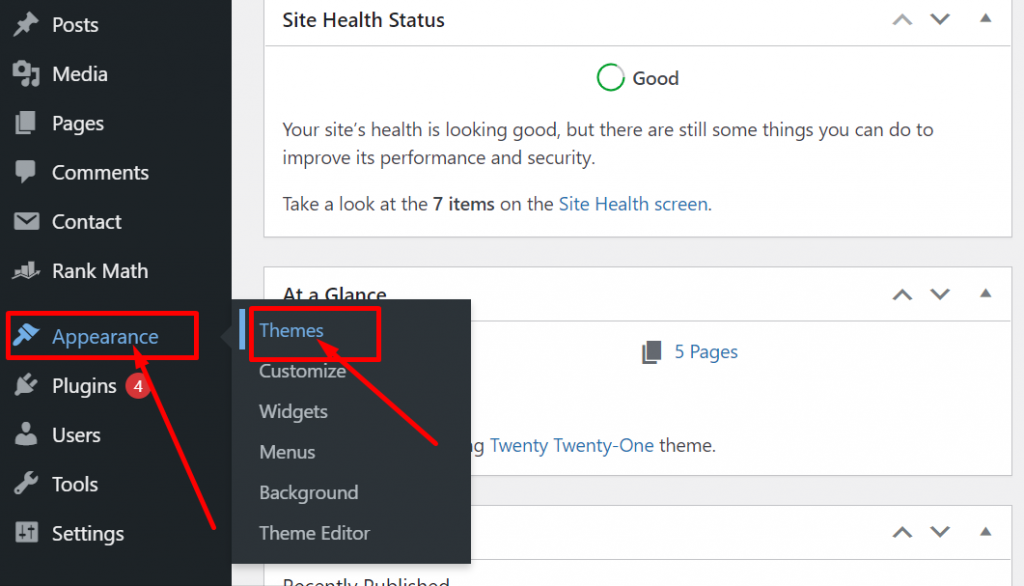
Now click on the add new button, as shown below:
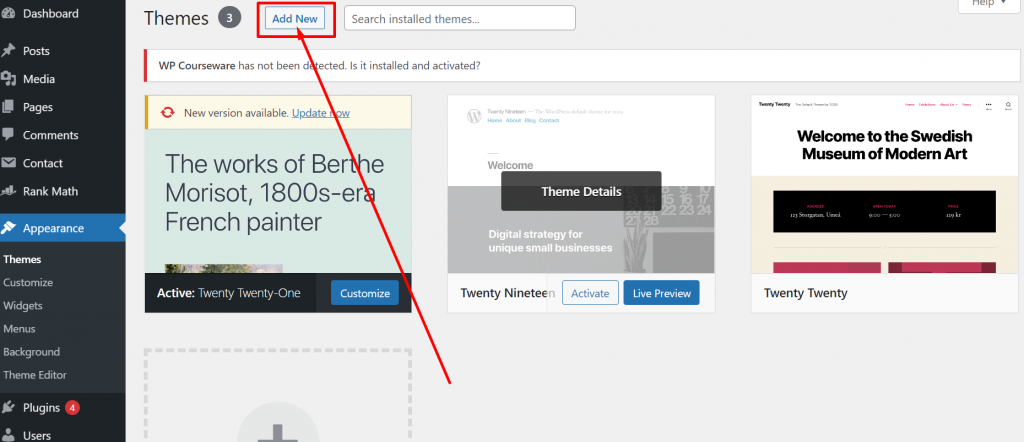
Now in the next step click on the Upload Them button, choose the theme zip file to upload, and click on the “Install Now” button.

After clicking on the Install Now button, the Theme installation process will begin and it will take a few minutes to complete the process. Once done, click on the Activate button to live the theme on your website.
Step 6: Install Essential Plugins
After themes, the next thing you need to install is some essential WordPress Plugins. However, installing plugins to a WordPress site is not that difficult but the main concern is installing multiple unnecessary plugins. It not just consumes server resources but also slows down your website and causes other different problems and hence, pulling down the overall website performance.
Although, for building a basic website, you do not need to have any WordPress plugins installed. Because WordPress has some basic but worthy built-in features and functionality available that would be enough to run a simple website.
But to enhance the overall website experience and make it more featureful, you will be required to need help from some essential plugins that we will mention in this post.
These plugins are simple but powerful and available and free to install from the WordPress repository itself.
6.1. RankMath SEO
Rank Math is one of the best SEO plugins out there in the market, which can help you to optimize your pages and posts to get better visibility in the SERPs. Search Engine Optimization is one of the major and primary sources for any website to get traffic.
Although, you can also get top rankings in SERPs without SEO, which is commonly known as SEM (Search Engine Marketing). In which you have to bid with some money to get a better position in SERP temporarily.
Whereas, SEO is organic and completely Free practice that shows results in the long run. All the traffic to the website will be organic and based on the quality of content you are pushing and its optimization.
Hence, to make SEO easier, Rank Math is an amazing tool that has amazing features that have the potential to do the task of the entire SEO team in just a few steps.
Go to your WordPress dashboard > Plugins > Add New. Now type Rank math in the search bar as shown in the picture below.
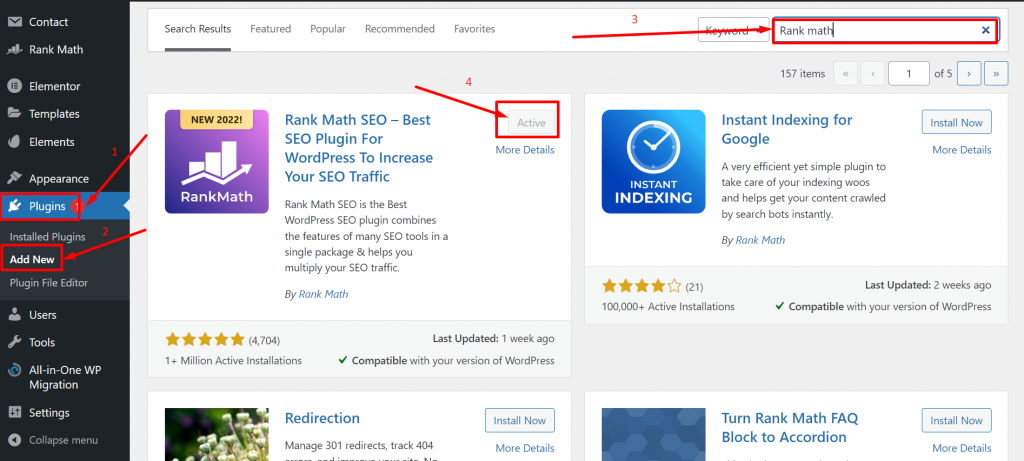
In the search result you will see Rank Math SEO, click on the “Install Now” button followed by “Activate” and you are done.
Similarly, install another anti-spamming plugin Akismet.
6.2. Akismet Spam Protection
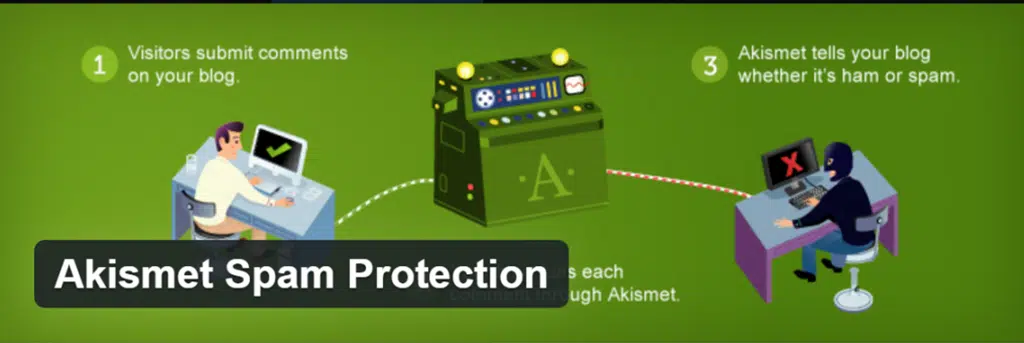
Spamming is one of the most common malpractices you may have noticed on the internet. Comment sections filled with irrelevant advertisements and malicious links can now be a potential threat to your website. Hackers usually use this method to get through your website and steal vital information.
Therefore, it becomes necessary to protect your website from spam. Akismet is one of the most popular Spam protection plugins that you must install. The process of installation for Akismet is the same as the Rank math SEO and it is also available for Free.
However, if you have chosen a reliable web host such as WPOven, there is no antispam protection required. Because a reliable web host has generally in-built strong anti-spamming and anti-hacking protection enabled.
Step 7: Complete Your Other Essential Website pages
Other than designing your home page, there are also other essential website pages that you cannot simply ignore. These pages include the contact us page, the About us page, the Guest blog page, etc.
Ge these pages complete and ready before you start pushing content or marking your website live. However, you can add these pages also, later on, but things can become a little harder and it would not be good for your website as well as your visitors.
Step 8: Hit the Publish Button
When everything is properly set, designed, customized, and ready to make it live, Hit the publish button on the home page and you are ready to serve your visitors. Start pushing, the high-quality content according to your niche, with hot topics that compels your visitors to read the content in a single go.
Try to use infographics, attractive relevant images, and correct information in your posts, so that the content becomes appealing to visitors and compels them to share with others. If possible, make a complete content calendar and follow it thoroughly.
Step 9: Add Your Website to Google Analytics
After successfully building your WordPress website and making it live, immediately you must add it to Google Analytics, in order to get tracking services free.
These Free tracking services include:
- User behavior
- Web traffic report
- CTR
- Bounce Rate
- Session duration etc.
Through this tool, you can analyze your website behavior and work on your website content accordingly. The best thing about this tool is that it’s available free of cost, all you need to integrate your website with Google Analytics and start getting results.
To know how you can integrate your website with Google Analytics, you must check out our dedicated blog on “How To Add Google Analytics To WordPress in easy steps.”
Step 10: Backup Your Website
While running a website, there are high chances that anything, anytime could happen with your website. No matter how strong the layers of protection you have enabled, there is no such 100% protection guarantee that anyone can provide. Hackers always try new and innovative methods to hack websites which are hard to predict.
The only thing you can do from your side is to become cautious and prepare yourself for any mishappening in the future. To minimize the risk, you must take a complete backup of your website daily and prevent any data loss in case of the website is hacked or crashed.
To make this easy, you can use a WordPress Backup plugin such as VaultPress from Jetpack, which makes the whole backup process automatic and easier.
But like we have earlier told you, adding multiple plugins not only adds features to your website but also increases server load. So, the best alternative to avoid installing essential plugins, you must select the most reliable web host that has all these features are provided by them without any need of installing extra plugins. In WPOven, you will have automatic daily Amazon S3-based backups that are stored offsite.
Step 11: Do the Marketing
Although SEO is the best way to do free marketing, you can also use other ways to get visitors to your website. Social media is one of the best ways to do free marketing and also helps in to do brand awareness. Create pages of your website on social media platforms and share your quality content on it. Build a community and post contents that help to solve their pain points.
On the other hand, you can also allow guest posting on your website or write guest posts for other websites in order to build good connections and links. Do comments and involve in forum discussions that help you to build community, and increase brand awareness or popularity.
Summary
From the above post on “How to build a website with WordPress“, you must have noticed that building a website with WordPress is not as tough as it seems. With proper guidance and the right approach, one can easily build any WordPress website in just simple 11 steps.
No doubt, as a beginner you might face some challenges while building a website, especially customizing the website and its designing part, but slowly and steadily you will be able to do it.
In case, if you find any difficulty in any of the steps you can mention it in the comment section below, and we will definitely try to help you.
Frequently Asked Questions
Can I build my own website with WordPress?
WordPress being the most popular CMS provides open-source software with the help of which anyone can easily build their website. All you need to have is,
1. Domain registered
2. Web hosting
3. Theme and plugins
and you are ready to start building your website.
How much does it cost to make a WordPress website?
Although the WordPress CMS is absolutely free, the money is required only for your Web hosting, Domain registration, and premium theme or plugin (if any). In general building, a simple and basic WordPress website can cost you around $100.
However, the building cost can be much higher at $10000 depending upon the features and type of website you want.
What kind of website can you build with WordPress?
The best thing about WordPress is its flexibility and Customization options, due to which you can build a wide variety of different WordPress sites such as:
1. Blogging sites.
2. Ecommerce websites
3. Personal/portfolio websites
4. Business Websites
5. Online community Websites
6. Membership websites
7. Digital Magazine websites
8. Educational websites and many more.

Rahul Kumar is a web enthusiast, and content strategist specializing in WordPress & web hosting. With years of experience and a commitment to staying up-to-date with industry trends, he creates effective online strategies that drive traffic, boosts engagement, and increase conversions. Rahul’s attention to detail and ability to craft compelling content makes him a valuable asset to any brand looking to improve its online presence.

