If you have a blog on WordPress, sooner or later, you will come across a question about protecting your site from hacking. Even if you are currently reading this article and think that this will not happen to you, your site is not very popular, and even to whom it is generally necessary, then you are very mistaken. We are going to talk about WordPress Login URL changes that you can do to secure your website.
The fact is that it’s not necessarily the visitors to your site or your worst enemy who wants to hack into a site. This is done by various bots that are created in order to post their links or spam comments on the site, without deleting them. Even if now, you now have everything well with the site, you can look at the logs in the hosting admin panel, if your provider gives such an opportunity.
In the article, we will review why it is important to change the WordPress login URL and the ways to do that.
Why it is important to have a WordPress login URL?
When a user freshly installed WordPress, he has access to the admin page, changes default settings, installs essential plugins, and adds a new theme. But to do all this stuff and customize your website without a WordPress login URL is next to impossible.
This is the only link through which a user or other members can get easy access to the admin dashboard and manage it.
Why Should You Change or Modify the WordPress Login URL?
In order to enter the WordPress admin panel, as a rule, you add wp-admin to the website address. In that case, the link looks like the following: http://example.com/wp-admin. [ This is a sample WordPress Login URL]
Using this link, absolutely anyone can go to the page and admin panel and try to access your site. They can use brute to collate the login and password. We can say that using the default WordPress login URL can be dangerous for your site’s security.
When you enter http://example.com/wp-admin in the browser address bar, WordPress redirects you to http://example.com/wp-login.php. That’s how WordPress Login URLs generally behave while you try to sign in. There, you can try to enter the correct password. The various bots use the same address to attack your site. As a result, it takes your site’s resources and overloads them.
Now you might be thinking How to avoid that? The simplest solution is to change the WordPress login page.
Additionally, when you are allowed to register on the site, it means your visitors have access to the login page and then you need to monitor all those who can access the site. In this particular situation, one of the possible solutions you can try is to close the registration for the users.
In that case, only you will have access to the login page. The bottom line of the method is to change the WordPress login URL.
If you allow registration, then, of course, visitors will know this address, but the bots that are configured for standard pages will disappear immediately. If there is no registration, no one else will be able to access the page.
How to Find Your WordPress Login URL?
After installing WordPress, you will have two default WordPress login URLs “mydomain.com/wp-admin” and “mydomain.com/login“
mydomain.com/wp-admin
mydomain.com/login
mydomain.com/admin
Or you can simply add “Wp-admin” or “login” at the end of your website URL provided by “/”.
However, there are at times when these login URLs do not work, then you can choose the fourth option given below:
mydomain.com/wp-login
Do not forget to remove “mydomain” with your own website domain name. We took the above domain as an example for a better explanation.
The above WordPress Login URLs can only work for new installations, but what if you have installed WordPress on the Subdirectory or Subdomain of your Website?
For WordPress installed in Subdirectory, Use these WordPress Login URLs
www.mydomain.com/wordpress/login/
www.mydomain.com/wordpress/wp-login.php
If WordPress is installed in Subdomain, Use the below WordPress login URLs
subdomain.mydomain.com/login/
subdomain.mydomain.com/wp-login.php
How to remember WordPress login URLs to get quick access?
All of these WordPress Login URLs direct you to the admin page, no matter which Login URL you choose. It is better you keep this Login URL bookmark on your browser or save it on your website in case you cannot remember it.
Saving Login URL on the Menu section of your Website
First of all, you need to log in to your WordPress dashboard.
- While opening the dashboard, Search for the Appearance section on the left-hand side of the Dashboard.
- Click on Appearance > Menus > Link Tab
- Add your WordPress login URL
- Click add to Menu
- And Save
![Find Your WordPress Login URL [Quick Beginner Steps] 2022 3 Saving WordPress login Url](https://www.wpoven.com/blog/wp-content/uploads/2021/05/Screenshot_37-1-1024x417.png)
Saving the Login URL on the Footer section of your website
Go to Your WordPress Admin dashboard.
- Click on the Appearance Section on the left side of the WordPress Dashboard.
- Select Widgets
- Drag meta to the Footer and you are done
![Find Your WordPress Login URL [Quick Beginner Steps] 2022 4 Saving WordPress login Url on the Footer section](https://www.wpoven.com/blog/wp-content/uploads/2021/05/Screenshot_13-1-1024x481.png)
How to Change or Modify WordPress Login URL?
Let us learn some of the best methods to change or modify the WordPress Login URLs in the below sections.
1. Changing the .htaccess file
First of all, you will need to get access to your website’s root folder via an FTP client, such as FileZilla. You will be able to find the login information in your hosting account control panel, or by contacting tech support. Use one of the FTP file managers to access the site. The most popular ones are FileZilla and Total Commander.
When you find the site, download it to your local drive and then open it in any text editor. The simplest option is the standard Notepad. Add the following code at the bottom of the file:
# BEGIN Hide console URL
<IfModule mod_rewrite.c>
RewriteEngine On
RewriteRule ^custom_admin_url/?$ /wp-login.php?your_secret_key [R,L]
RewriteCond %{HTTP_COOKIE} !^.*wordpress_logged_in_.*$
RewriteRule ^custom_admin_url/?$ /wp-login.php?your_secret_key&redirect_to=/wp-admin/ [R,L]
RewriteRule ^custom_admin_url/?$ /wp-admin/?your_secret_key [R,L]
RewriteCond %{SCRIPT_FILENAME} !^(.*)admin-ajax\.php
RewriteCond %{HTTP_REFERER} !^(.*)yoursite.com/wp-admin
RewriteCond %{HTTP_REFERER} !^(.*)yoursite.com/wp-login\.php
RewriteCond %{HTTP_REFERER} !^(.*)yoursite.com/custom_admin_url
RewriteCond %{QUERY_STRING} !^your_secret_key
RewriteCond %{QUERY_STRING} !^action=logout
RewriteCond %{QUERY_STRING} !^action=rp
RewriteCond %{QUERY_STRING} !^action=postpass
RewriteCond %{HTTP_COOKIE} !^.*wordpress_logged_in_.*$
RewriteRule ^.*wp-admin/?|^.*wp-login\.php /not_found [R,L]
RewriteCond %{QUERY_STRING} ^loggedout=true
RewriteRule ^.*$ /wp-login.php?your_secret_key [R,L]
</IfModule>
# END Hide console URL
To make everything work, you need to replace several elements. They meet several times, so be careful.
- custom_admin_url — this is your new URL — the admission address to the admin site and just logging into the site. Create your own address. For example, control_panel or something like that. Try to make it unique because modern bots can collate the most popular addresses.
- com — your website address, without HTTP://. Change to your own.
- your_secret_key — this should be replaced with the secret key you created. This should be a string of letters and numbers written in random order. For example, gjhehg57e3au83kwdhfh or something like that. Save it to a reliable place in case you may need to use or change it.
Now the login page will be available at yoursite.com/custom_admin_url, for example – example.com/control_panel.
Note: This method only works on Apache servers and does not work for Nginx servers.
There is another way to change the URL, and its bottom line is to change the file name. First, we completely block access to wp-login.php. To do this, add the following code to the .htaccess file:
<Files wp-login.php>
Order Deny, Allow
Deny from all
</Files>
Now in the website root folder, find the wp-login.php file and make its copy. You need to rename the copy, for example, mylog.php. Then we open a new mylog.php and change wp-login.php to mylog.php in it. Now, to enter the website login page, you will have to use example.com/mylog.php.
Perhaps, after the WordPress update, if the content inside changes, you will have to repeat the procedure. But until the code remains the same, everything will work.
Now when someone tries to go to the old addresses, they will be redirected to a 404 error page. You can only log in using the new link.
2. Editing the wp-config.php file
In order to change the WordPress login URL, you will need a file that is responsible for displaying the form to access the panel. It is called wp-login.php. You will have to access the site via FTP and download the file to the local drive. When you copy it to the computer, rename it. Choose a convenient to-use name. Make it quite difficult and avoid too simple names. Let’s call it website_control.php (it’s not necessary to give the file this name, you are free to choose any).
Now, open the file using any code editor like Notepad ++ or VS Code. Replace the old file name (wp-login.php), with the new file name (in our case, it’s website_control.php).
In total, you must have 12 replacements. Then save and upload the file back to the hosting.
Now you can log in to the admin panel at http://example.com/website_control.php. But, the old pages — http://example.com/wp-admin and http://example.com/wp-login — are still available. This means that we need to block access to the admin panels with old addresses.
3. Set up a redirect from WP-Admin and WP-Login
In order for no one to access the old addresses to enter the control panel without a 404 error, you will just need to configure the redirect.
For this, we need to open the functions.php file. Before you start, make a backup copy of functions.php
Open the WordPress admin panel using the new address, then go to Appearance — Editor — Theme functions. Scroll down to the bottom of the file. And in the end, insert the following code:
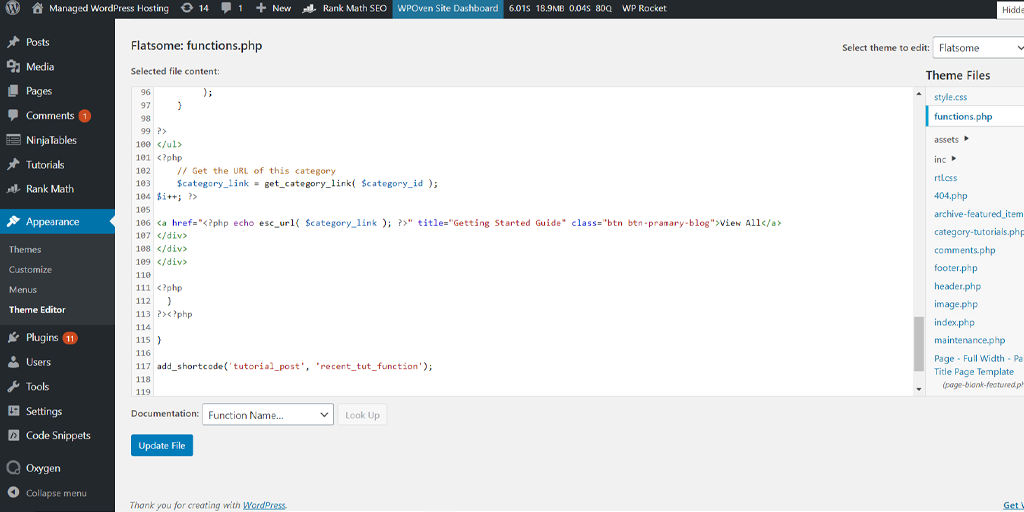
Redirect from wp-admin:
add_action( 'init', 'blockusers_init' );
function blockusers_init() {
if ( is_admin() && ! current_user_can( 'administrator' ) &&
! ( defined( 'DOING_AJAX' ) && DOING_AJAX ) ) {
wp_redirect( home_url() );
exit;
}
}
After that, the website will be redirected from http://example.com/wp-admin to http://example.com.
Redirect from wp-login:
function redirect_login_page() {
$page_viewed = basename($_SERVER['REQUEST_URI']);
if( $page_viewed == "wp-login.php?pass=1" ) {
wp_redirect( home_url() );
exit;
}
}
add_action('init','redirect_login_page');
There will be the same redirect from http://example.com/wp-login.php to http://example.com.
Redirect while leaving the admin panel:
function logout_page() {
$login_page  = home_url( 'wp-admin' );
wp_redirect( $login_page . "?loggedout=true" );
exit;
}
The latter code will clean all the junk code while the registered users leave the site.
4. Using WordPress Plugins to Hide or Manage Your WordPress Login URL
There are WordPress plugins that can help you manage your WordPress Login URL. We are sharing the best one to assist you with this.
WPS Hide Login

If you do not like to access the website core files and modify or change the WordPress URL by following the manual way, the best alternate and safest method you can go for is by using a simple and free WordPress plugin.
There are a lot of plugins available that are sufficient to do the job. But the main thing is to choose the one which does not affect site performance. Hence, a light and a less complex plugin such as WPS Hide Login is highly preferable.
This plugin is built lightweight and also it does not mess with website core files. WPS Hide Login is an Open-source plugin, which means it is available free to download from the WordPress directory.
Some Key features of WPS Hide Login
- Compatible with any plugins that connect the login form
- Works with multisite, with subdomains and subfolders
- Lightweight
- Absolutely Free
Pros and Cons of WPS Hide login plugin
Pros
- Easy to download and install
- Too many no. downloads, hence you can trust upon.
- Clean and simple UI
- Compatible with most of the login form plugins
Cons
- Does not work with hardcoded wp- login.php plugins
- do not guarantee free support
Points to Remember
- Keep in mind that, upon activation of the WPS Hide Login plugin. You will be restricted from using old login pages. It is because the plugin will redirect you to the WordPress login page with the new URL “/login” immediately. It happens so instantly that you do not even get time to customize it. You must remember the new login URL, to avoid future logins.
- And the second point worth remembering is that, once you no longer use the custom login URL. You can deactivate or delete the plugin from your WordPress. The website will go back to its default Login URL “Wp-admin“.
You can also check out and read our dedicated blog on “How to Start A WordPress Blog For Free in 8 Simple Steps?” and explore more settings to make your website experience even more secure and seamless.
Secure Your Website Using the Limit Login Attempts Reloaded Plugin
Limit login attempts reloaded is a simple security plugin that blocks Bruce force attacks and bans users who tried to do multiple failed login attempts. This plugin will directly ban IP addresses or usernames that try to multiple failed login attempts and surpass the specified number of login attempts. Making it tough for hackers to get through.
You must note that by default WordPress allows users for unlimited login attempts. Hence, it becomes vulnerable to being hacked by hackers who use brute force attacks.
Some key features of Limit Login attempt reloaded
- Limit the number of retry attempts when logging in (per each IP).
- Configurable lockout timings.
- Informs the user about the remaining retries or lockout time on the login page.
- Email notification of blocked attempts.
- Logging of blocked attempts.
- Safelist/Blocklist of IPs and Usernames (Support IP ranges) and many more.
Installation and Setup guide
Just like any WordPress Plugin, the installation of this WordPress limit login plugin is also quite simple. You need to go to the ‘Plugins’ section in your admin panel. Search for the ‘Limit login attempt’ and click on the ‘Install Now’ button. This way, the plugin will be successfully installed on your WordPress; after installing, press the ‘Activate’ button beside the plugin.
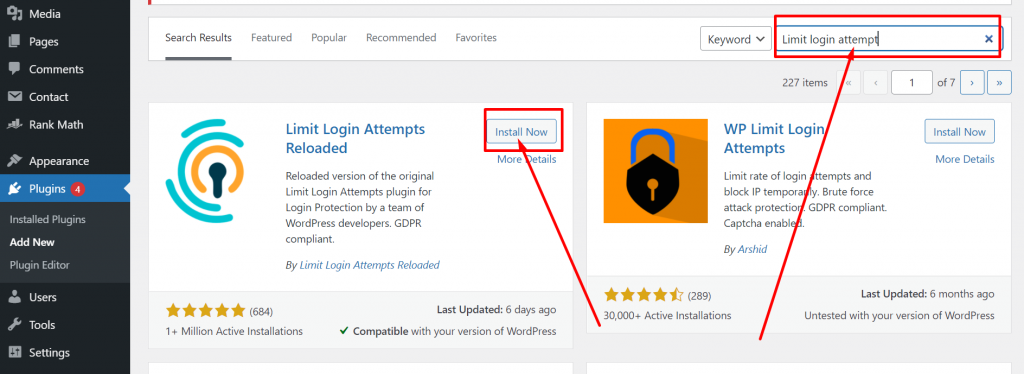
After you are done with the installation and activation part, you’ll find the plugin in the sidebar of your Dashboard.
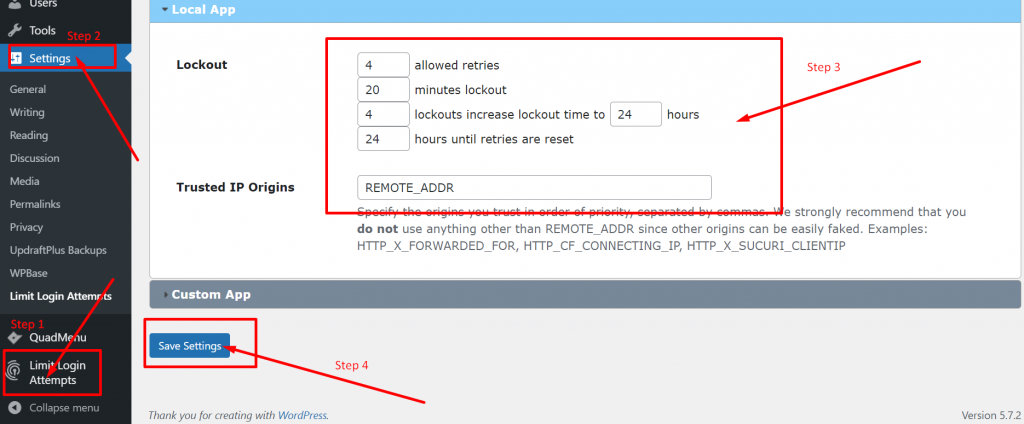
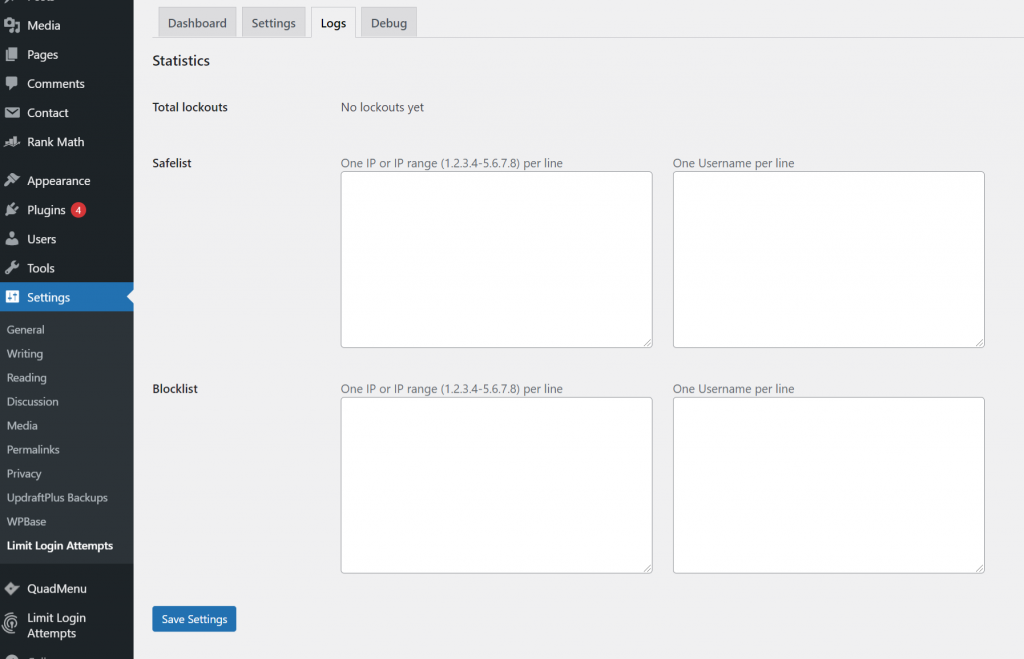
In the settings section of the plugins, you can see the options clearly mentioned.
In the lockout section:
- Allow Retries – This means the threshold number at which an IP address can attempt. After that, they will be banned or locked out completely. On average, the limitation should be around 4 to 5 attempts. Because humans have a tendency to make mistakes and often forget their passwords. The failed attempts give them some chance to remember their password and fix their mistakes.
- Minute’s lockout – With this option, you can set minutes up to long and an IP address will be blocked. You can also choose the “forever” option. But it is not a healthy or preferable practice. What if a genuine and authentic user gets banned forever? Hence, on average, you must provide them with about half an hour to remember their password and log in with the correct credentials.
- Lockouts increase – This helps in banning hackers who are using Bruce force attacks. It uses an algorithm in which a hacker makes multiple login attempts and gets banned multiple times. The plugin will Ban it for longer hours days or even weeks. However, it is highly preferred you choose only for up to 1 day.
- Hours until retries are set – You can set the time for how long a user should have to wait until everything resets and they can try again.
In the “Logs” section adjacent to the ” Settings” option, you will find the plugin also lets you manage safelist and blocklist options along with total lockouts.
The total lockouts let you know the total number of hackers who failed to log in.
Final Thought
The above four methods are the prominent ways to change your WordPress Login URLs which will prevent you from being attacked by hackers. These methods are more secure and easy to implement.
Did you find a new way to change your WordPress Login URLs? Let us know your ways in the comment section below and we shall add those steps to our blog.
Save your time, money, and resources, and give your website mammoth growth with WPOven’s Fastest, and WordPress Dedicated Server Hosting.
- 24X7 WordPress Expert support
- Cloudflare integration
- High-end Security
- Datacentres around the world, etc.
You can have all these features and much more in a single plan with unlimited Free migrations, unlimited staging, and a 14-day risk-free guarantee. Check out our plans or contact our support team which assists you in choosing the right plan.
Frequently Asked Questions
How do I log in to my WordPress site?
By default, WordPress provides you with a login URL for your WordPress site as www.yourdomain.com/wp-admin or www.yourdomain.com/wp-login.
1. Open your browser and type the default login URL in the address bar.
2. Enter your username/email address and password and Press “enter”.
3. Upon login successfully you will be landed on the WordPress dashboard through which you can do whatever you want with your website.
What is the WP admin login URL?
The WP admin login URL is simply a combination of your website URL along with”/admin” added at the end of your website URL. Through this, the website owner or admin will be landed on the WordPress dashboard and manage their website.
Is WordPress free or paid?
WordPress CMS is an open-source platform and available completely free to use. You can download and install it freely on your server and you are even free to make any changes to it.

I am a Co-Founder at WPOven INC currently living in Vancouver, Canada. My interests range from Web Development to Product development and Client projects. I am also interested in web development, WordPress, and entrepreneurship.




Hello I am so glad I found your website, I really found you by mistake, while I was browsing on Aol for something else, Nonetheless I am here now
and would just like to say many thanks for a marvelous
post and a all round enjoyable blog (I also love the theme/design),
I don’t have time to read it all at the moment but I have bookmarked it and also added in your RSS feeds, so when I have time
I will be back to read a lot more, Please do keep up the fantastic work.
hi!,I love your writing very so much! proportion we keep in touch more approximately your article on AOL?
I need an expert in this house to solve my problem. May be that
is you! Having a look ahead to look you.
I would like to thank you for the efforts you have
put in writing this blog. I’m hoping to check out the same high-grade blog posts from you later
on as well. In fact, your creative writing abilities has motivated
me to get my very own blog now 😉
Thanks on your marvelous posting! I really enjoyed reading
it, you are a great author.I will make sure
to bookmark your blog and will often come back at some point.
I want to encourage you continue your great posts, have a
nice day!
It’s genuinely very complex in this busy life to listen news on TV, therefore I simply use the web for that purpose, and take the hottest news.
I like this! I haven’t ever found a post as fascinating article like yours.
It is awesome. Is it OK to share on Twitter?
Keep up the great work!
I’m amazed, I have to admit. Rarely do I encounter a blog that’s equally educative and interesting, and
let me tell you, you have hit the nail on the head. The issue
is an issue that too few people are speaking intelligently about.
I’m very happy I found this during my hunt
for something relating to this.
At this moment I am going away to do my breakfast, after having my breakfast coming
yet again to read further news.
This paragraph will assist the internet people for creating new website or even a
weblog from start to end.
Excellent post. I used to be checking continuously this weblog and I’m impressed!
Extremely helpful information specifically the final section 🙂 I care for such info much.
I was seeking this certain information for a very long time.
Thanks and best of luck.
This piece of writing will assist the internet visitors for creating new
website or even a blog from start to end.
hi!,I like your writing very so much! share we be in contact extra about your article on AOL?
I need an expert in this area to solve my problem. May be that’s you!
Having a look ahead to peer you.
What’s up mates, its fantastic piece of writing regarding cultureand fully defined, keep it up all the time.
Hi there would you mind letting me know which web host you’re working
with? I’ve loaded your blog iin 3 different internet browsers and
I must say this blog loads a loot faster then most.
Can you suggest a good hosting provider at a honest price?
Kudos, I appreciate it!
If you would like to get much from this post then you have to apply these strategies
to your won weblog.
I am genuinely glad to glance at this web site posts which contains plenty of helpful
information, thanks for providing these kinds of statistics.
Thanks a lot. The best article I’ve ever read about the theme. Very clear and simpe and what is most important everything works perfectly.
Do you have any video of that? I’d love to find out some
additional information.
you’re actually a good webmaster. The website loading speed is amazing.
It sort of feels that you are doing any distinctive trick.
In addition, The contents are masterpiece. you’ve performed a great process in this subject!