While working on WordPress, You must hear about the term WordPress Multisite but do not know much about it. Also, it is possible that if you are running a WordPress site, you would have also run multiple WordPress projects simultaneously that have a few things in common. On some occasions, you might also find it difficult to manage all the WordPress websites at once and look for an alternative and more efficient way to manage all of them.
This is where WordPress Multisite will help you out. In this way, you will be able to create a network of websites on your single WordPress installation. This means you will be able to run as many websites as you want with a single WordPress installation.
For example, WordPress.com itself uses a multisite network for running millions of WordPress websites from a single WordPress installation.
Are you looking to set up a WordPress Multisite? It is one of the powerful features of WordPress that let you turn your website into a network of websites. In this article, we will try to cover almost everything about WordPress multisite from What is WordPress Multisite?, its pros and cons, and How you can set up a multisite network?
Let us get started!
What is WordPress Multisite?
WordPress Multisite is one of the powerful features of WordPress through which you can create a network of multiple sites. Through this feature, you can share all the features of WordPress through a single installation. Or in other words say, you only need to install WordPress once and you will be able to manage and add multiple websites you want.
Earlier, the WordPress Multisite was available separately with a different version of WordPress named WordPress MU. But, after the initial release of WordPress 3.0, the WordPress MU has been merged with the standard versions of WordPress and a separate WordPress Multisite mode has been implemented through which users can either turn it on or off.
In addition to it, the implementation of the Multisite setup was found to be the same as the standard WordPress installation. The best part is, the multisite network has the same configurations, core files, and structures as in the standard WordPress website, and all the processes for updates are also found to be similar. Once you have installed plugins and saved themes, it will be ready for as many websites as you add.
When you should consider WordPress multisite and When not?
The WordPress Multisite is one of the most powerful features of WordPress that allow you to create a network of WordPress websites that share similar functionality. All these similar functionalities can be implemented by using WordPress plugins, server configuration, or some applications. In addition to it, it works great if you use a limited number of themes that are specially developed to support the Multisite network and disallow members in the network to use their custom themes.
Likewise, if all the WordPress sites are different in some aspect of your network such as using different plugins, and having different themes and configurations, in this case, WordPress multisite feature is not a great option for you.
As already mentioned WordPress.com is the best example of the largest multisite network. Some website owners run multisite networks successfully and have common plugins, themes, and configuration, that possesses similar functionality.
To understand it better, University websites are again one of the best examples of multisite networks in which staff members can post-university news or start blogs and many more.
On the other hand, WordPress Multisite won’t be beneficial for you if you are planning to run only a single website or you are a beginner. Likewise, if you are a web developer or freelancing web designer and run multiple website projects for your client, WordPress Multisite is not a fit for you.
If you do so, you will find a lot of limitations because most of the features and functionality need to be enabled and provide access by the network admin.
Understanding the Main differences between WordPress Installation and WordPress multisite
- The first and main difference between WordPress install and WordPress multisite is the number of individual websites. In WordPress multisite network you can have as many websites as you like.
- Increased WordPress user roles– In WordPress multisite an additional user role will be added as Network admin along with all the user roles available for simple WordPress installation.
- Accessibility of the plugins and themes– In multisite all the sites on the same network can access the same plugin and theme but only the network admin has the power to install or remove them.
- Different Dashboard- A completely different dashboard to manage all the websites from the same screen.
- Data Storage– In WordPress Multisite, all the websites within a multisite network will share the same database and file system.
- Media Storage– Each website on a multisite network will have its own media folders for upload.
- Domain Name– Another main difference between WordPress installation and WordPress multisite is, the multisite network will have the same domain as on the site you have set up Multisite, for example, if your website is on mysite.com, the network will have the same domain name.
- Multisite Security- SSL certificate is required for each website on the multisite network.
Some Pros and Cons of WordPress Multisite
Now you have gone through when and when not to consider WordPress multisite as well as Understand the main difference between your standard WordPress installation and WordPress multisite. It is time for you to look at the pros and cons of WordPress Multisite and consider the mentioned below points while making a decision.
Pros
- The Multisite enables you to easily manage a huge number of sites through a single dashboard.
- Every site can have its admin and each admin will be able to manage their site only.
- You will have to install the plugin and themes just once. Then, you will be able to use it across your network.
- For updates, you will have an update once and it can be activated through the whole network.
- It is better to manage and you can use the space more efficiently.
- It allows you to earn money by providing hosting services to others through the Multisite network. In case you are offering a web hosting service, you might have little difficulty. This is because the blogs will have their tables within the database. They will have not directories on your server. They will have separate directories for media uploads. The file structure is handled by WordPress, you won’t have to worry about it.
- You can create your blogs and manage them on the network. It enables you to restrict access to users if you want to.
Cons
- On a Multisite, not all plugin works. You can check before installation of the plugin whether it is compatible with Multisite or not.
- In case your network is down at the moment, it will impact all the sites of that network.
- No site can add or delete any themes or plugins, they can simply deactivate and activate.
- An increase in the traffic on any site will affect all the sites on the network.
- If your website gets hacked, it means that all sites on your network will be hacked.
Some best practices to leverage WordPress multisite
After exploring all the facts about WordPress multisite and finding you are the perfect fit for WordPress multisite, then to ensure success you need to follow some best practices to leverage the features of WordPress multisite.
1. Contact and Work with experienced WordPress multisite user
To avail of all benefits and features of WordPress multisite, it is highly recommended that you must consult or contact a WordPress consultant who has experience in WordPress multisite and know all the features that help you to grow your WordPress managed hosting multisite.
so, that when your multisite site network grows, you can easily monitor all the activities and check if the server resources are well used, how many server resources are used, and database maintenance. All these things can be pretty manageable if you are dynamic enough and able to handle all these on your own and also help you to work with an experienced consultant who will guide you through your WordPress multi-use growth journey.
2. Choose the Best WordPress hosting that provides Multisite Support
Although, there are many WordPress hosting providers available out there, only a handful of them provide Multisite support. The web hosting provider must be updated with the latest technology and procedures that help to deliver a smooth and efficient multisite experience. A hosting provider with a good multisite support record and reputation will also increase the probability of success for your multisite projects.
At WPOven, we provide multisite support on our all plans and we provide all the latest technology procedures that help to run subdirectory multisite seamlessly with high efficiency. Also, we know how it can be difficult for users to enable Multisite manually, So at WPOven to enable Multisite, all you need to do is simply send us a request ticket and we will set it up for you.
How to Setup or Create a whole WordPress Multisite?
The WordPress Multisite is now a mode in WordPress. You will have to install and set up WordPress. After the installation, you enable the WordPress Multisite feature. You can enable Multisite on any existing WordPress site. It is better to have a backup for your site before enabling the Multisite.
But before setting up WordPress multisite setup, there are some things you need to make sure of before proceeding further.
- Make sure you have purchased a Web hosting that supports the Mumlitisite feature.
- Check whether you have a new WordPress installation or if you have an existing one, make sure to create a complete backup of files before proceeding.
- Make sure you have FTP login credentials ready and FTP client installed on your system.
Manually enable the Multisite feature on new WordPress install
Step1: Activating the Multisite
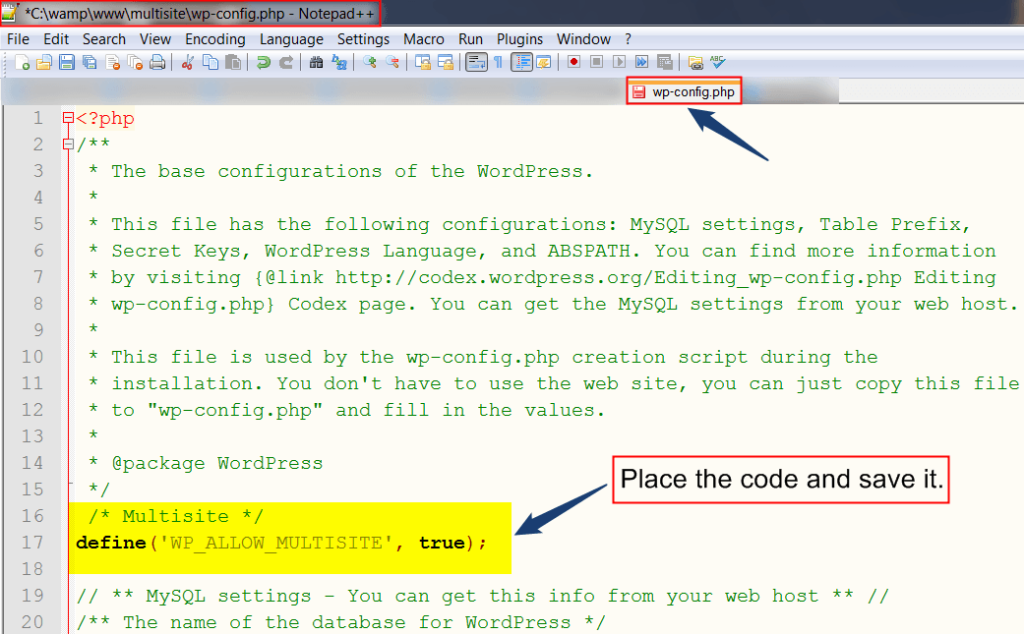
For enabling the Multisite, you will have to connect to your site through an FTP client. Open the wp-config.php file and add the following line to activate the MultiSite Network option.
define('WP_ALLOW_MULTISITE', true)
Before the next step, we need to know the difference between a Sub-domain Multisite and a sub-directory Multisite.
Sub-domain multisite: Example: http://subsite.example.com/
Sub-directory multisite: Example: http://example.com/site
Next, save your file and upload it to the server.
Step 2: Setting up the WordPress Multisite Network
Now, it is time to set up your network. You will have to deactivate all your plugins from the WordPress site.
- For this, you must go to the Plugins, then the Installed Plugins page, and choose all the plugins. You can choose to deactivate from the Bulk Actions, drop-down menu. By clicking on the apply button, complete the process.
- Then you must go to Tools, Network Setup to set up a Multisite network. On this screen, you will see you need Apache’s mod_rewrite module installed. This is installed and enabled on all the web hosting providers.
'Tools' -> 'Network Setup'
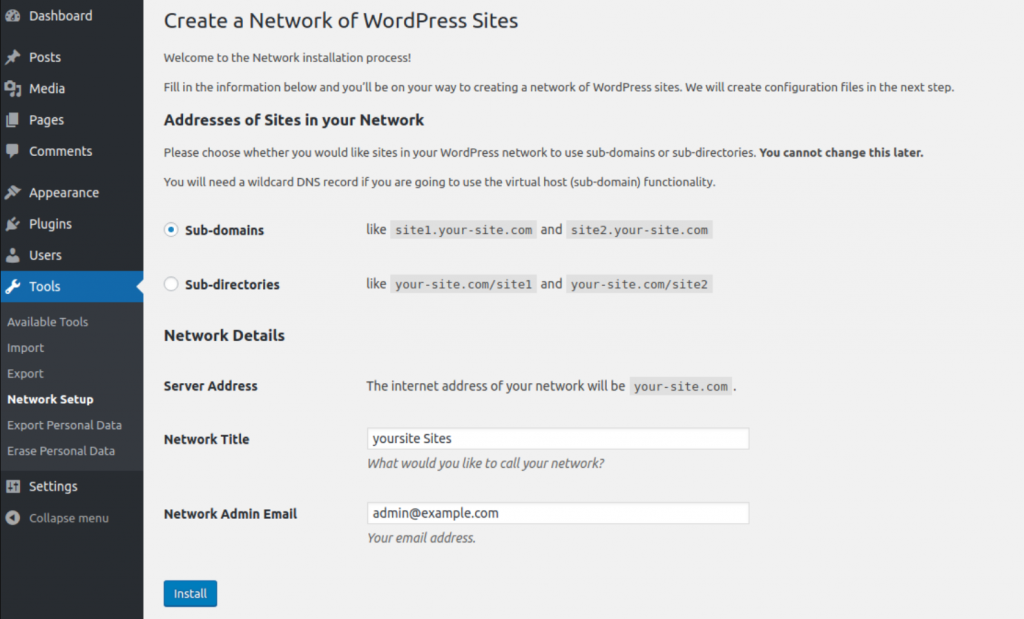
- Afterward, you need to decide what type of domain structure you will use for sites. You can choose from subdomains or sub-directories.
- Next, you must give the title to your network and make sure the email address you entered in the Network admin is right.
- Click on the Install button to proceed further.
and fill in the form. After filling out the form you will be directed to a page that asks you to update your ‘wp-config.php’ file with the settings provided there and also shows the Apache Settings to be updated.
At this point, WordPress will show a list of codes that you are required to your wp-config.php and .htaccess file. Then, you can use the FTP client to copy and paste the code in these 2 files. You will need to log in to your WordPress site.
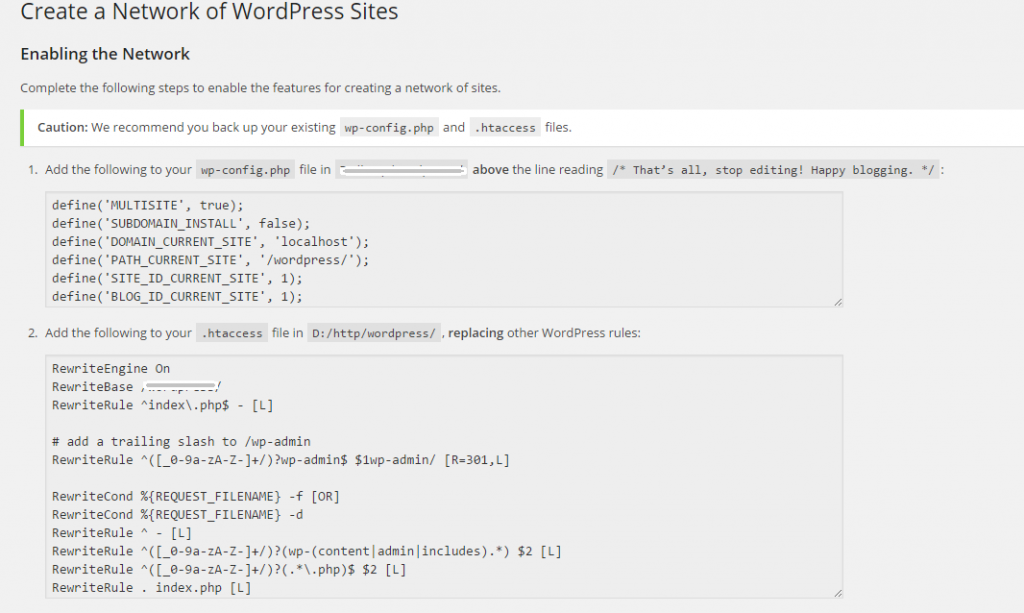
Now paste the codes provided for the wp-config.php file just above the line
"/* That's all, stop editing! Happy blogging. */"
Here is a sample code for Sub-directory Multisite for a domain with the name example.com
define('MULTISITE', true);
define('SUBDOMAIN_INSTALL', false);
$base = '/';
define('DOMAIN_CURRENT_SITE', 'example.com');
define('PATH_CURRENT_SITE', '/');
define('SITE_ID_CURRENT_SITE', 1);
define('BLOG_ID_CURRENT_SITE', 1);
Here is a sample code for Sub-domain Multisite for the domain with the name example.com
define('MULTISITE', true);
define('SUBDOMAIN_INSTALL', true);
$base = '/';
define('DOMAIN_CURRENT_SITE', 'mu.rtcamp.net');
define('PATH_CURRENT_SITE', '/');
define('SITE_ID_CURRENT_SITE', 1);
define('BLOG_ID_CURRENT_SITE', 1);
Now add the code provided for the .htaccess file.
Note: The above code may be different for you because your website is different from mine.
Finally, save and close the 2 files and go back to open your site admin page. Now you need to log in to your network with the same login credentials you usually use to get access, by clicking on the Network Setup link shown on the screen.
When you successfully can log in to your network page, you will find your admin screen is a little different and has changed a little. You will find “MY sites”, as well as Network admin, has been added at the top of the toolbar and
How to enable WordPress multisite on Existing WordPress installation?
To enable or activate WordPress multisite on Existing WordPress installation, all the above mention steps would be the same but first, you need to deactivate all the plugins you have installed and you won’t be able to use subdirectories if your website is older than a month.
It is because the older your website gets, the more content will add and it will increase the chances of encountering between the pages or posts URLs that are already existing with the new websites added to your network.
To better understand this, let us take an example, Suppose you have created a website for an eCommerce store Shopkart. And also has a subdivision named “for kids”. Fo that subdivision you have created a page at shopkart.com/for-kids.
Now, you have also created a new website on the same network for the kid’s section. While creating a network if you have chosen subdirectories, the website you have created on the network for the kid section will have the same URL. Due to this, it will be a clash between the website on your network and the page you have created on your website.
It will be quite a big problem for WordPress to decide which content to display. To avoid this issue, your network will use subdomains rather than subdirectories and the URL be for-kids.shopkart.com.
How to manage Multisite Network Websites?
Now you know how to enable a multisite network on your new WordPress install and the existing one. You can now add websites and manage them. However, you can add websites in either of the two methods, the first is via the admin panel or from the Frontend ( But you have to allow users to create their site through /wp-signup.php screen in the main website).
But first, let us see how can you add and manage Multisite Network through the WordPress Admin page.
Adding and managing Multisite Network websites through WordPress Admin Page
The first and foremost step is to log in to your WordPress admin page and click on the My Sites option located at the top of the dashboard.

When you click on The sites link, it will show you a list of the websites in your network (if you have already added some or it’ll be empty).
Now if you like to create a new site, all you need to do is to click on the “create a new site” link, which will show you an add new site screen as shown in the picture below:
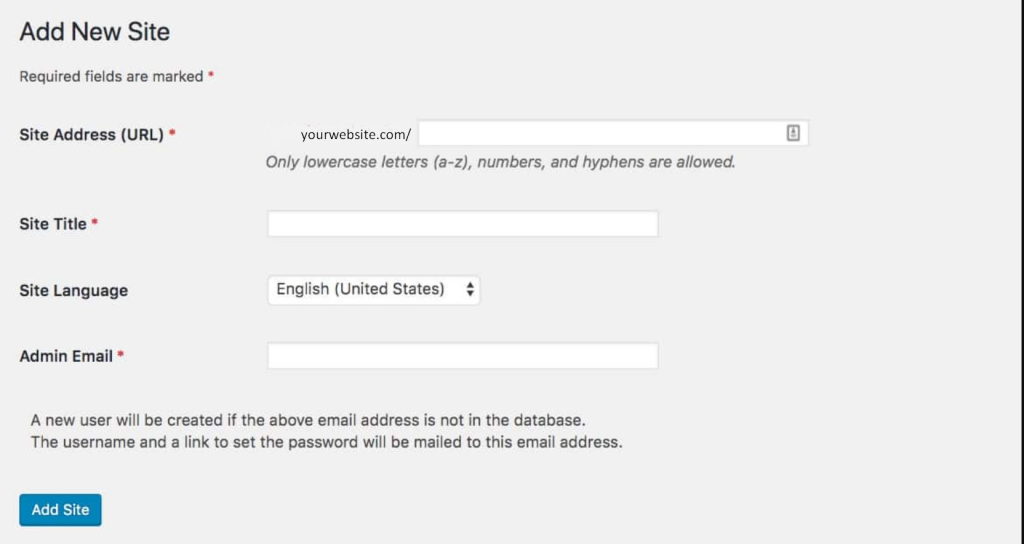
Fill up the required fields as shown in the picture above and click on the Add Site button. Now you have successfully added a website to your network and you can see a new site has been added on your Sites screen.
Now when you hover over the sites name, a few options will start showing such as:
- Edit – to change or edit the website settings
- Dashboard– visit the dashboard of that particular site, from where you can add pages or posts and configure your site settings.
- Deactivate– You can deactivate the site whenever you like to and let visitors not find them.
- Archive– To archive the site and don’t call anyone to visit
- Spam– To mark as spam and the user won’t be able to create a website furthermore.
- Delete- To delete the site completely.
- Visit- You can visi the login page of your site.
Adding and managing Multisite network websites through the front end
Just like WordPress.com, if you let users create a website on your multisite network, they can do it through wp-signup.php/ from the website’s main screen.
Through the screen, anyone can log in to the site by providing the existing username and password or create a completely new site with a new username and password.
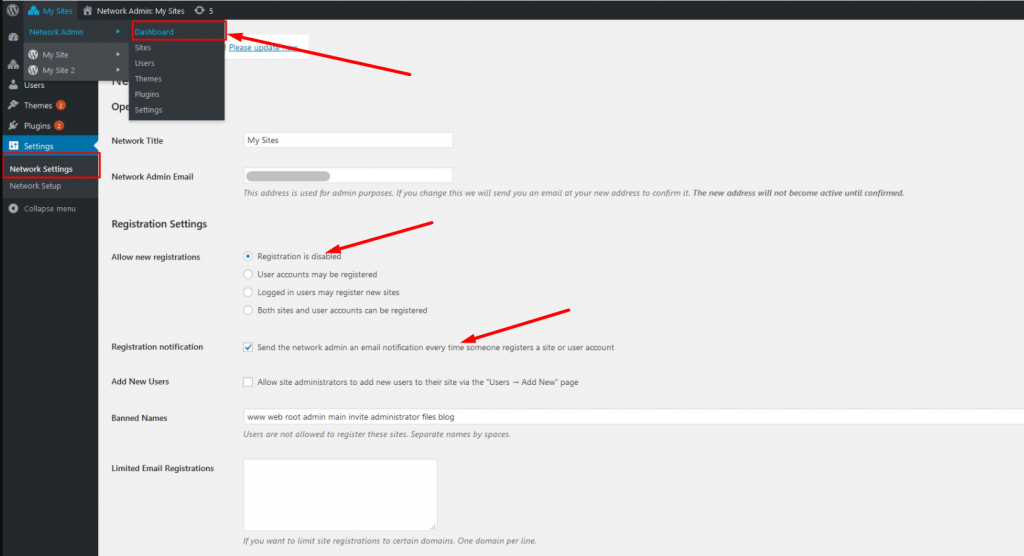
However, if you do not like anyone to create a website on your network, you can disable signups through the site admin screen. All you need to go to your website admin screen, click on Network Admin followed by Network settings and select the Registration is a disabled button.
The best thing about this is, when you create websites from the admin screen, you will have all the power to control other sites on the network. Whereas, if anyone creates a website from the front end, the admin will not have any control and privileges over it.
How to do Domain mapping on WordPress multisite?
Using the WordPress Multisite feature, you can create unlimited additional websites subjected to your web Hosting capability in the form of subdomains or subdirectories.
Subdomain: subsite.yourwebsite.com
Subdirectory: yourwebsite.com/subsite
But some users do not prefer their URLs to look like this but to create a different domain name for each website the best thing that can be done is to use the domain mapping feature. This feature lets you map websites within the multisite network to show a unique domain.
This is what a domain mapping look like,
subsite.yourwebsite.com = unique-domain.com or yourwebsite.com/subsite = unique-domain.com
To use the domain mapping feature, the first thing you need to make sure that the domain is pointing to your network or DNS. After successfully pointing your domain to your network, you need to add the domain name to the site settings.
Go to network admin screen > Sites > Select Edit option under the site you like to map. On that particular site editing page, add the domain name.
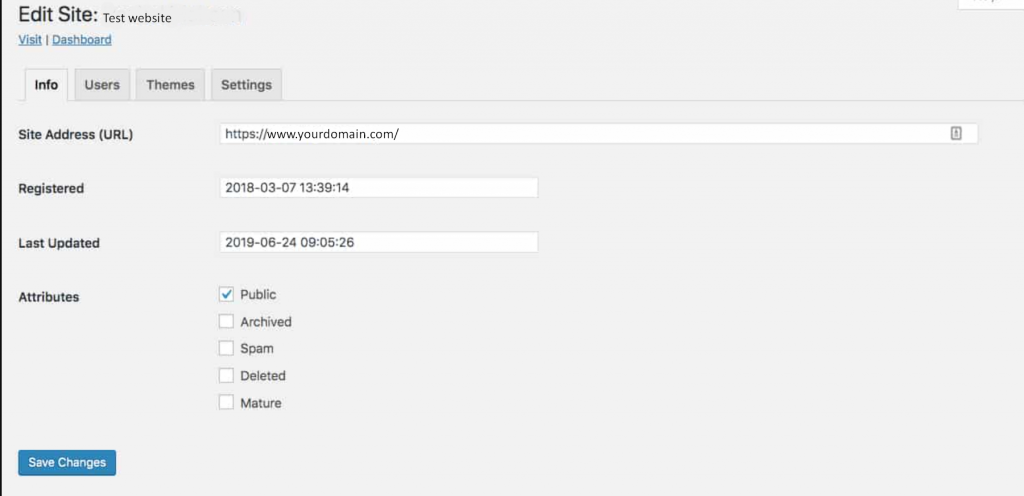
Now, click on the Save Changes button, from now on your website will use a new domain rather subdomain or subdirectory of your network.
Note: Domain mapping was not a built-in feature prior WordPress 4.5 version. But after WordPress 4.5 release it has become a mandatory feature.
User Registration settings
The User registration settings let new users register for new websites and also allow existing users to create or add new websites on your network. Through these settings, you will have control over your website and help you to manage your multisite network.
For example, if you check the box of Registration notification, whenever a user gets registered you will be notified via email notification instantly.
To begin with the process, the first thing you need is to click on the “My Sites” link located at the top of the admin toolbar. Follow the path, My Sites> Network Admin > Dashboard, and a Multisite network dashboard will open.
Now click on Settings > Check website title and admin’s email add to proceed further correctly and configure the settings.
If you check the Add new users box, I will let you allow individual website admins to add multiple other users to their websites.
If you check the Limited Email Registration. it will impose restrictions on a particular domain and allow only those users who are from your company. Similarly, there are a lot more options are there through which you can impose limitations and control activity on your multisite network.
How to configure new website settings?
To configure newly added website settings in the network, you need to follow the same procedure just you have followed in User registration. Go to My Sites> choose the site you want to configure its settings > Settings.
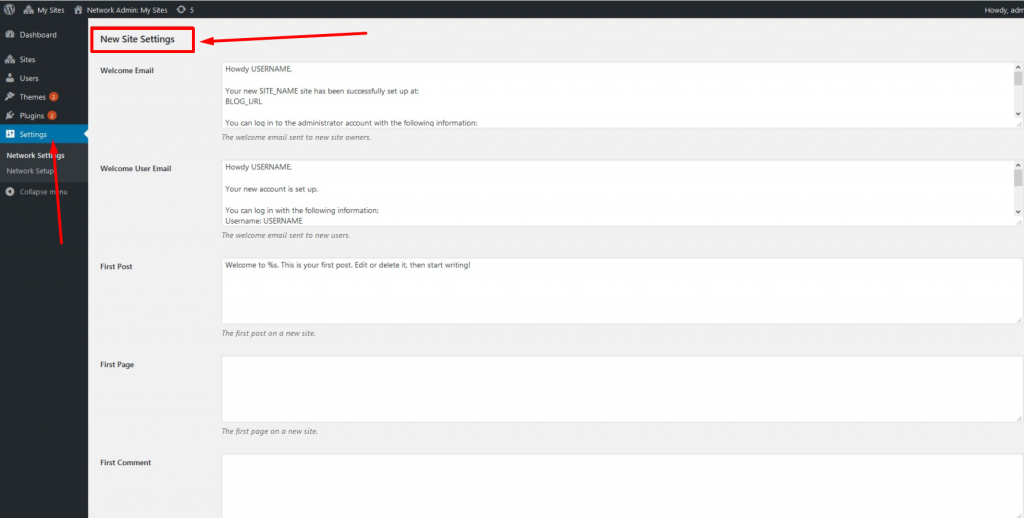
On this page, you will be able to configure all the default options, content settings, page settings, welcome emails, and comment sections for each website you added to your multisite network at any time.
Similarly, you can also limit or assign a limited amount of space for uploading media on each website on the Multisite network. This is one of the best practices for the use of server resources efficiently. In the Upload settings, you can set site upload limited which is 100MB allocated by default. Also Set the type of files or formats such as image files, .doc, pdf, and video files, you would allow uploading on your site.
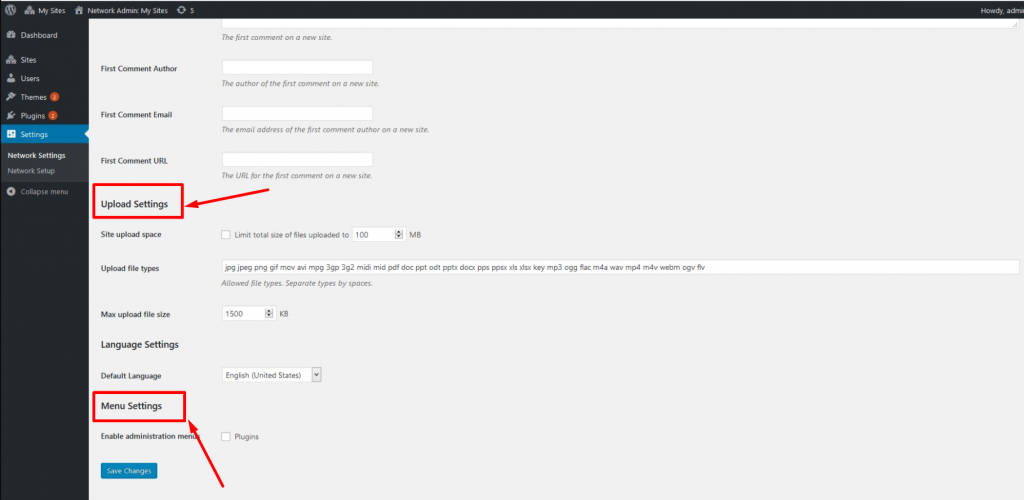
In addition to it, you can also set file size limits for individual file formats.
In the Menu settings, you can see you have the option to either disable or enable the administration menu option for the plugin’s action of websites on the multisite network. When you enable the administration menu by clicking on the check box and clicking on the Save Changes button. Now, the users will have the permission to either enable or disable the plugins but they won’t be able to add new ones.
Now the next thing is configuring plugins and theme settings. Let us see how you can set up WordPress Multisite Network.
Settings up Themes and Plugins in Multisite Network
You also need to configure settings for themes and plugins in the multisite network because admins of each site on the multisite network have no power to install plugins or themes on their own. For this, the main admin has to be set up on the network.
for Theme settings, you need to Go to My Sites> Network Admin > Themes. On this particular page, you will find a complete list of themes available that you have installed. And you will have settings through which you can make changes as per your need.
The settings are as follows:
- Network Enable: These settings let you enable a theme for each web admin on the network.
- Network Disable: Disallow the theme for web admins that you have earlier enabled for them.
- Add New: Let you add or install a new theme on your network.
However, if you like to change the default theme, you need to add the following code to your wp-config.php file by replacing your new theme with the theme folder name that you want to change.
define('WP_DEFAULT_THEME', 'your-new-theme');
For configuring Plugin Settings, Go to MY sites > Network Admin > Plugins, and click on the “Network Activate” option located just below each plugin that you like to add to the multisite network. One thing you must note is that, if you have already enabled the admin menu for plugins, the admin will have no power to either remove or add a new plugin. But they will have the power to either activate or reactive the existing plugins.
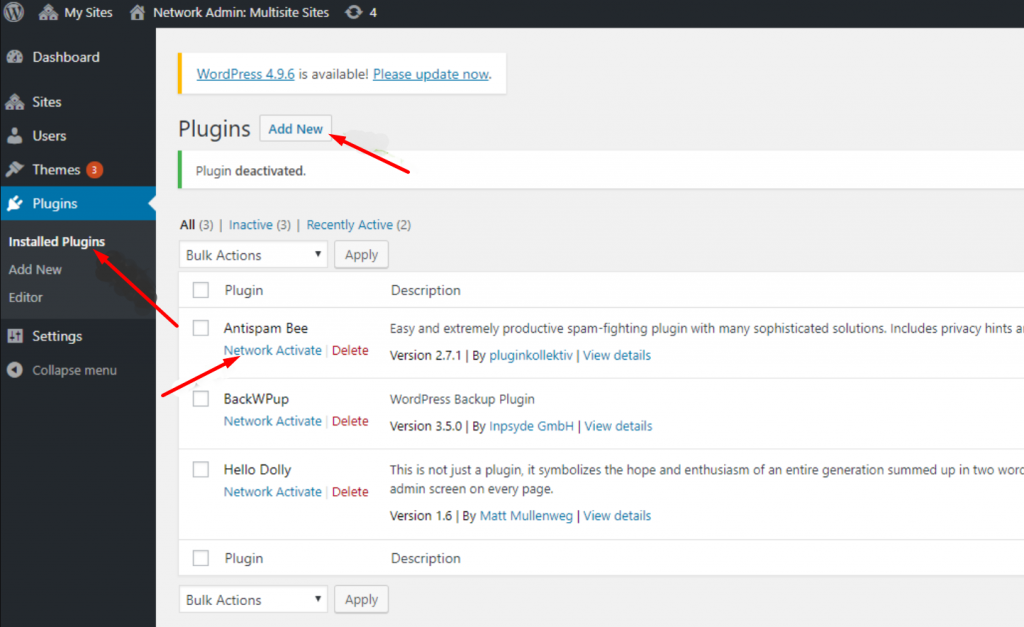
Please Note: On some occasions after enabling and setting up WordPress multisite, you may encounter login issues especially if your multisite network is on subdirectories. And you won’t be able to successfully log in to your website with their subdirectories. To overcome or fix this issue, you will be required to replace the line :
define ('SUBDOMAIN_INSTALL', true); in your wp-config.php file with
define ('SUBDOMAIN_INSTALL', 'false');
Summary
WordPress multisite is one of the best and most powerful features of WordPress, especially for users who like to create more than one website either for their own business, clients, or for the community. It opens a lot more opportunities to grow your websites on a larger scale without affecting your resources and space that are limited.
I hope this complete guide on WordPress multisite will help you to set up and configure the WordPress multisite network on your website without any roadblocks. However, if you found anything worth to mentioned in this post that we have missed or you would like to add some more valuable points of yours, please do let us know in the comment section below. We love to hear from you.
Frequently Asked Questions
What is a WordPress multisite?
WordPress Multisite is one of the powerful features of WordPress through which you can create a network of multiple sites. Through this feature, you can share all the features of WordPress through a single installation. Or in other words say, you only need to install WordPress once and you will be able to manage and add multiple websites you want.
Is WordPress multisite safe?
Multisite is safe unless or until you do not have taken some strict security measures. If at any moment you are required to make ensure the security of each site or any of the sites on the network due to an infected plugin or security flaw. Then all the websites on the network are also at risk and there are higher chances that all the sites on the network are also compromised.
Can I have 2 websites on WordPress?
WordPress provides with you an inbuilt WordPress multisite feature through with the help of which you can create as many websites using a single WordPress installation. Through this feature, you can run an unlimited network of websites and manage them from a single dashboard.

Puneet Sharma is a SMTP And WordPress optimization expert. With 10+ years of experience and a commitment, he creates effective email setups on various platforms that drive leads, and increase conversions.

![What Is WordPress Multisite? A Complete Guide [2024] What Is WordPress Multisite](https://www.wpoven.com/blog/wp-content/uploads/2022/07/What_Is_WordPress_Multisite.png)



Thanks for this awesome post, I was confused in domain mapping and structuring but this guide helped me a lot in setting up WordPress multisite on Cloudways platform. This guide helped me in setting up multisite and with the help of your guide I have setup domain mapping easily.