When you use WordPress to write content and publish them online, you usually heard the term WordPress permalinks. This term is critical to learn from the SEO point of view for every user. This is commonly known as a link that helps you to reach a specific section of the content.
In this post, we try to bring you Complete comprehensive content about WordPress Permalinks. What are they? How do they Work? How should you implement them? And any more. But before getting into deep, let us know What WordPress Permalinks actually are?
What are WordPress Permalinks?
As per the official definition provided by WordPress,” Permalinks are the permanent URLs to your individual weblog posts, as well as categories and other lists of weblog postings.” Whether your website has archive pages, posts, or even 404 error pages, all of them have their own WordPress permalinks.
Suppose your domain/homepage is www. example.com, then the archive pages or your blog pages would be www.example.com/blog to understand this term better.
Or if your website has other pages such as contact us, home, or about us page, then the WordPress permalinks of these pages would be as follows:
- Contact us – www.example.com/contactus
- Home – www.example.com/home
- About us – www.example.com/about-us
Or Www.example.com/?p=123
These both URLs are the types of WordPress permalinks you have which we will discuss later. In addition, whenever you post content on your blog, each post has its own permalink. It becomes accessible due to your theme template files, which have a template tag that fetches the Post URL and converts them into clickable links.
And Here WordPress comes into play, and it uses these clickable links to use in your blog listing by showing them within an <a> element.
To continue this post, we would like to let you know about the meaning of some more terms related to WordPress permalinks, and it will be easy for you to understand the difference between them. As we have already mentioned above, WordPress permalinks are the complete links to the post or any page of a website.
And the slugs are like the final, ready-to-use, and unique part of WordPress permalinks. For example, if the permalink of the About us page is www. example.com/about-us, then the slug would be about-us. These are generated by WordPress automatically based on the various parameters that you have in your permalink settings.
And if you are not happy about your default WordPress permalinks, you have the option to customize it as per your choice, which we will see in the later section of this post.
Types of WordPress Permalinks
There are generally three different types of permalinks available.
- Plain or Ugly WordPress Permalinks
- Pretty WordPressPermalinks
Plain or Ugly WordPress permalinks: Plain or ugly permalinks are the links WordPress assigns by default without any customization or alterations. It usually looks like the example given below:
|
1 |
<strong>http://example.com/?p=N</strong> |
Each element in the permalink given above have its own meaning, such as N denotes the Post ID number. To your surprise, these links work fine on all servers, but the only downside of plain permalinks is that it doesn’t look nice like other options available.
Pretty WordPress Permalinks: A well-structured, easy-to-read, understandable, and SEO-friendly URL termed Pretty WordPress permalinks. You can easily enable them in your WordPress settings. Let us take some examples to understand better how they are different from Ugly permalinks.
|
1 2 |
https://example.com/?p=123 - <strong>ugly permalink</strong> https://example.com/blog/posts - <strong>pretty permalink</strong> |
From the above-mentioned examples, you can easily see the main difference between them. In the ugly permalink, it shows you the P variable with the post id number. Whereas in the pretty WordPress permalink, you can see an easy-to-understand and read post slug.
WordPress has provided you with four formats that you can pick from permalink settings to make it more informative and structured. Just look at the image below and see all the options.
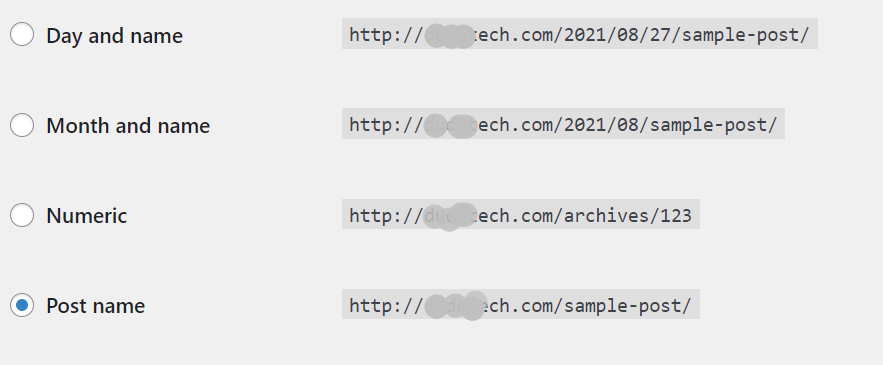
But another thing you must keep in mind is that you are not limited to using only the above pretty WordPress permalinks settings. WordPress provides you with customization options by using structure tags.
Why do you need to use Pretty WordPress permalinks?
Pretty WordPress Permalinks not just look good and are easy to remember, but they have two more benefits: it is SEO friendly, and they enhance UX. You might have curious to know how Pretty URLs help in SEO benefits. Well, search engines use your URL to determine what your page or content page is all about. And if they found your permalink related to the content or page, the search engines find it genuine and legitimate to give them priority in their search engine rankings.
In terms of UX(User Experience), Pretty WordPress permalinks not just help search engines understand the post or content it links to, but a user can also easily read and understand the post it links to. For example: If you about us have URLs like example.com/?p=245, it is tough to determine and remember such URLs rather than example.com/about-us.
How to implement better Permalinks, Slugs, and SEO?
As we have already mentioned in the above sections about the Slugs, these are the last part of your page or post URL. And if you have already gone through the WordPress permalink settings page, the title of the page or content is used in Url. For example, if your content is about “How to monetize your blog?”, it will be automatically generated as an example.com/how-to-monetize-your-blog/.
From the above example, you can see that anyone can easily tell what the content will be all about by looking at the URL. In addition, search engines can easily determine these URLs as pretty WordPress permalinks that have focus keywords.
But it is not enough; you can even improve the slugs for better results by following some tips such as your slug should be not soo lengthy, and it should be long enough to include your focus keyword and be easy to remember.
For example, if a post/page has a Pretty link as ” How to monetize your blog,” it might be better if you use slug as Monetize-blog. And if your website has multiple posts on the same focus keyword and you want to differentiate each one with a different slug. For example, if you have other content on the same focus keyword, ” monetize your blog,” with a different topic such as What are the benefits of monetizing your blog?
In this case, you could use “monetize-your-blog–benefits,” and the pretty permalink would be example.com/monetize-your-blog.
Slugs and User Experience
After knowing the SEO benefits of WordPress, and pretty permalinks, now we shall talk about its User Experience benefits (UX).
As per Jacob Nielsen, the following points have been mentioned about what a website must have.
- Easy to learn and type URLs
- Easy to remember and spell Domain names
- Permalink should not change
- Short and clean URLs
- URLs should not get hacked or provide security from all malware or hacker attacks.
In addition to the above worth points, A permalink should never be either removed or altered in any case; it has been shared and used in multiple ways on the internet that provided you credibility. Another point to remember is that an URL must be clean and easy to understand so that even a non-expert user can easily understand and remember it.
No doubt, it is not impossible to edit or alter your permalink completely of a post that you have already published. But it is not a good practice and can potentially harm your website’s DA and even search engine rankings. This is because the original permalink may have been shared on the internet.
Still, if you need to make some edits to change your old permalink with a new one completely, make sure you practice the WordPress directing methods.
How to set up Permalink in your WordPress Website?
WordPress has provided you with multiple options to change the WordPress permalinks and choose whatever you want your permalink should look like.
You can change WordPress permalinks as
- As soon as you setup your website, you can change your permalink settings to pretty permalinks.
- You have the option to edit or alter slugs for each post when you are writing a post and editing them.
- You can use WordPress’s best redirecting practices to point your old/outdated permalink to the new one.
- You can even compose or create your own plugin to change the way permalinks are designed.
- You have the option to change the permalink structure for tags and categories.
WordPress Permalink Settings Page
After you set up your website, the first thing you need to do is to configure your WordPress permalinks settings page. Go to your WordPress Dashboard > Settings > Permalinks.
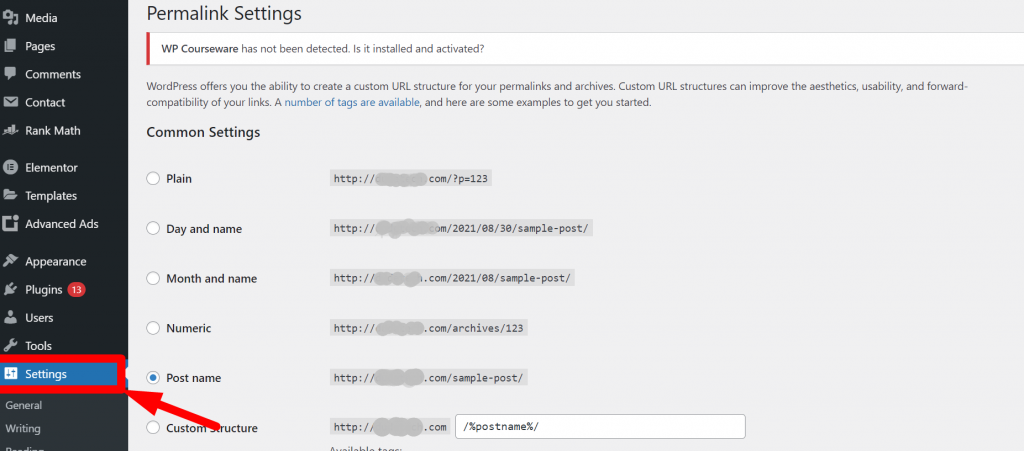
Common Settings are defined as:
- Plain: This option only uses post ID in the URL. However, it can be easily read by browsers but it won’t work for humans like us and search engines. e.g- yoursite.com/?p=123.
- Day and Name: This option uses the date of posts that were published and the name or title of the post. In the above picture, it is showing as: yourwebsite.com/2023/08/30/sample-post/.
- Month and Name: Similar to Day and Name, this option uses the Month and Name of the post that you publish. e.g- yourwebsite.com/2023/08/sample-post/.
- Numeric: Just like the Plain option, it also uses the post ID. It can also be easily readable by browsers but won’t work for humans like us. e.g- yourwebsite.com/archives/123.
- Post name: Unlike other options that have post ID, month, or date, this option uses the name of the post in the slug. e.g- yourwebsite.com/sample-post/
- Custom structure: With this option, you can create your custom structure. You can use certain tags that help you to grab the information from your that will doesn’t change in near future.
Optional Settings
Apart from the above permalink settings that you find, there is an optional settings field also provided that lets you set a custom structure for your category and tag archives.
If you like, you may enter custom structures for your category and tag URLs here. For example, using topics it as your category base would make your category links like http://example.com/topics/uncategorized/. If you leave these blank, the defaults will be used.
How can you edit or Change Permalinks and Slugs for each page and post?
After successfully setting up pretty permalinks on your website, the next thing you need to do is to edit your Pretty permalinks to get better results and optimize as per the search engine and users’ standards.
To optimize WordPress permalinks and slugs of each page and post of your website. It is highly recommended that you must practice this while editing or writing your content. If you have a directly edited slug of any content or page, you have unintentionally also changed its URL. And if the old link was shared anywhere on the internet by your users will be no longer exist and return a 404 error page.
Hence, to carefully carry out the same process, you need to go to your WordPress dashboard > posts > select the post you want to edit.
After that, on the right-hand side of the post creating a screen, you will find the permalink option under the post tab as shown in the picture below:
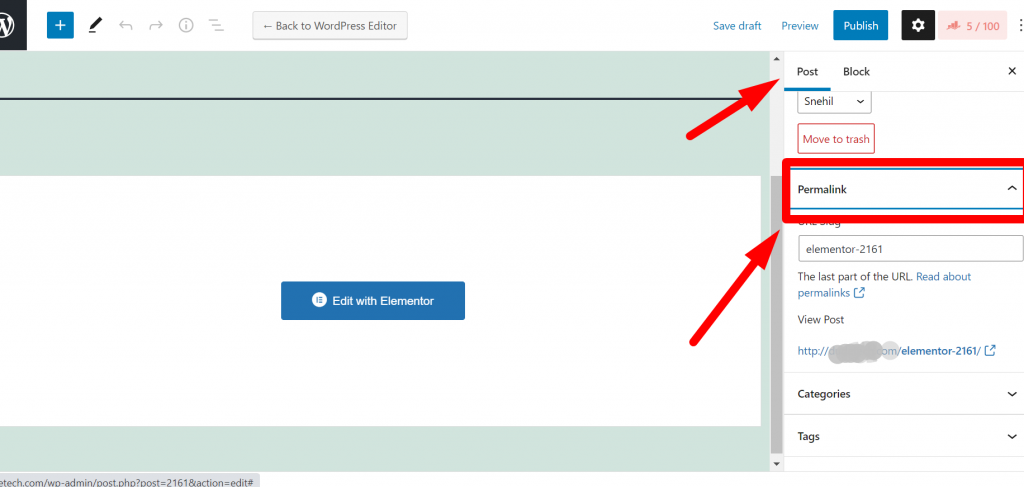
from the above image, you can see in the post-editing screen on the right-hand side a permalink option is provided under the post section. When you click on it, you fill an automatically generated slug displayed in the URL slug.
Now you can edit this section to make your permalink short, clear, and SEO-friendly that focuses on your target keyword. But before editing it, make sure you have copied the old slug in your notepad or somewhere else so that when you set up redirecting (In case you are editing the old content), the old link cab used.
After editing, now click on the update button to save the changes and hit on Publish button to make it live. But one thing must keep in mind is that you must not forget that if you have to make changes in the slug of an existing post, it could result in a 404 Error for the users who shared the original link. Hence after completion of editing, do not forget to set up redirection.
Changing WordPress Permalinks settings for Archive pages
If you are looking for WordPress permalinks settings, especially for individual archive pages, you need to change the “category” or “tag” in the permalink settings page. However, you also have an option to change the slug of each tag or category.
How to change slugs for Tags and Categories?
To change the slugs for tags and categories, you need to go to your WordPress dashboard > Posts > categories or Posts> Tags. Look out for the tags or category that you want to alter or chance and click on it. Now type in a slug if you want to, or else, the WordPress will automatically generate and assign one, per the tag or category.
However, it is not necessary to have this, it only makes sense when you have categories or tags, and if you choose it for later, you are required to complete the whole redirection.
WordPress permalink settings in Ecoomerce
If you are looking to change WordPress permalinks settings for an eCommerce website, if you are using the woo-commerce plugin, then it creates custom post types and all the taxonomies by itself, and all these permalinks are generated by default.
However, you can still make changes to the permalink and slugs for every custom post and taxonomy.
Changing Product Category, Tag, and Attribute Permalinks
To change product category, tag, and attribute permalinks, you can go either by using slug or the structure. However, both these works are almost similar for regular tags and categories.
Editing Product category Slug
For editing the product category slug, you need to go to your Products > Attributes. Still, before editing your attribute, you must keep in mind that it is a whole different process, and you have to also deal with attribute terms too.
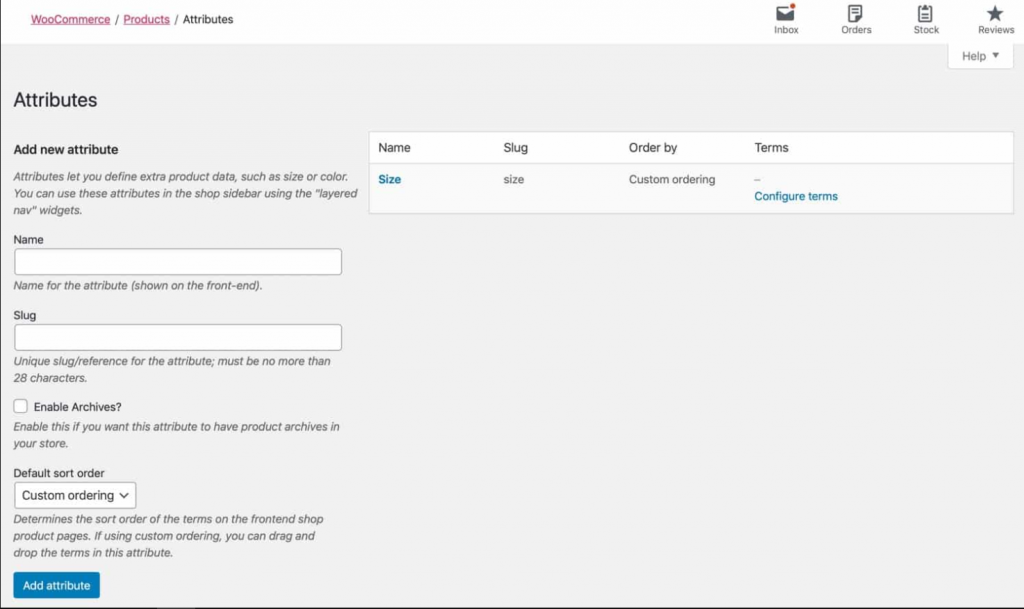
Editing Permalink structure
For editing the Permalink structure, you need to go to your Dashboard Settings > Permalinks and scroll down for the Optional field, where you will find more Woocommerce permalink options. And you can edit the permalink settings for woo-commerce custom taxonomies.
- Product cateogory base: By default it is set as product-category but it can be changed as per the terminologies you use in your online store. But one thing you must ensure that whatever you make amendments in your settings, it should not clash with your settings that you have set up for regular categories.
- Product tag base: By default it is set as product-tag, but it can also be changed as per your choice. And ensure that it should not also clash with your settings that you have set up for regular post tags.
- Product attribute base: Apart from the above two taxonomies, it works differently by having a different structure. The product you add it will by default asigned a slug for each and every attribute name with attributes itself.
Suppose you wish to make some changes in the slug for every tag or category. It would help if you went to your Product section followed by categories or Tags and make changes the way you do with categories and tags.
If you want to edit the slug for an individual category or tag, go to Products > Categories (or Products > Tags) and edit these in the same way you would post tags and categories.
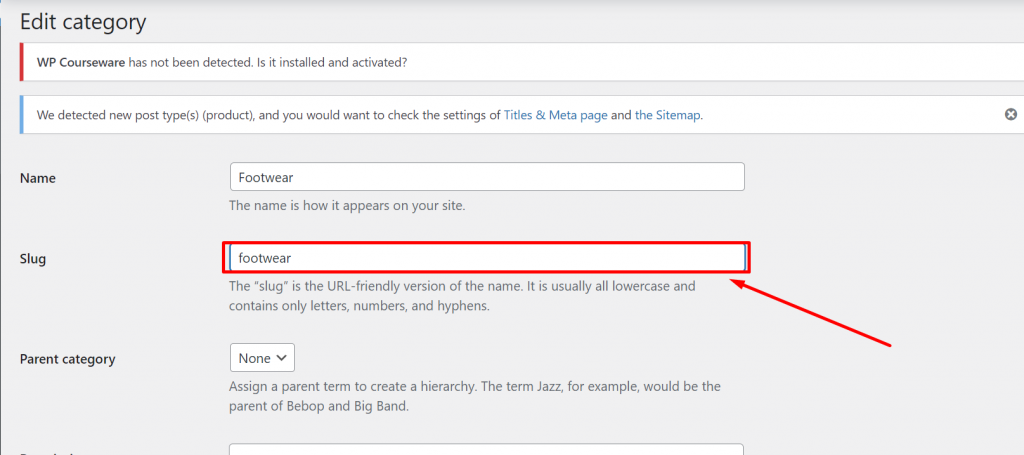
While editing or creating a new attribute, all the procedures will be the same, just as you would for editing categories and tags. i.e., you use the slug option to set up the slug. Or, in another way, if you’re looking to edit the slug for an existing attribute, you need to click on the Edit link just below the attribute you would like to edit.
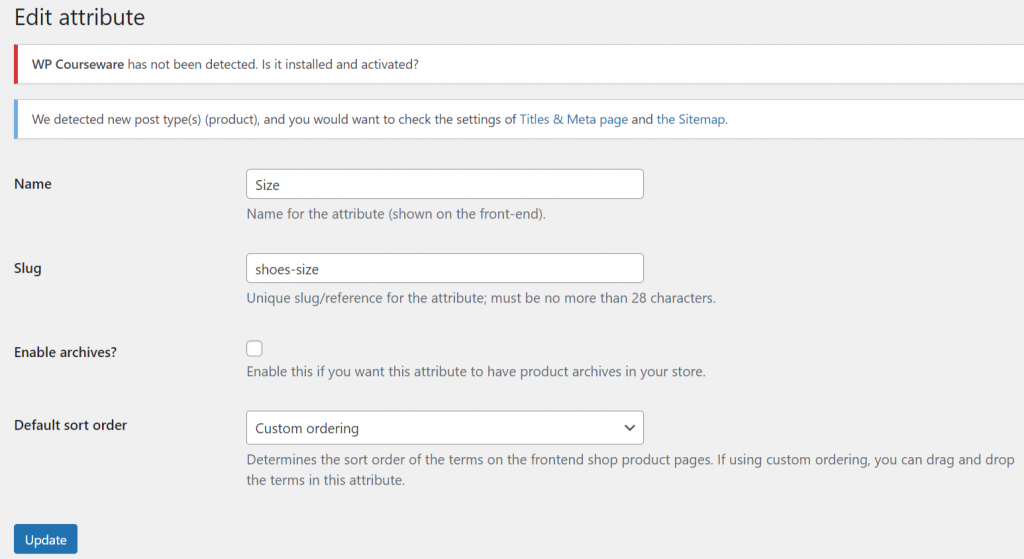
After completing editing attributes, the find thing you need to do is to click on the Update button to save your changes.
If you are looking to edit or make some changes in the Attribute term slugs, go to attribute > and click on configure terms link just beneath the attribute. You will find a complete list of the terms for that particular attribute.
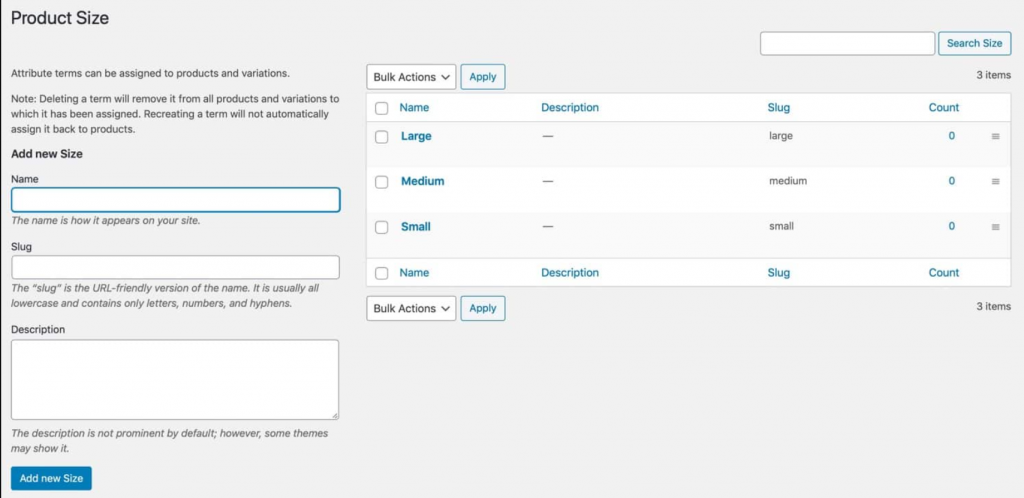
Now, you have the option to edit the slug for each term that is being listed, just like you edit for tags and categories.
How to change WordPress permalinks of products?
If you want to edit permalinks of products, go to your WordPress Dashboard > Settings > Permalinks and Lookout for Product Permalinks filed.
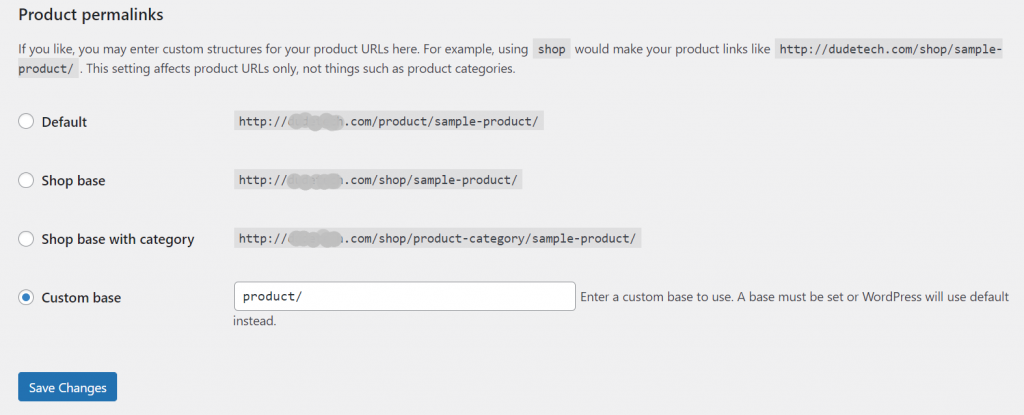
When you look at the product permalinks section, you will find the following fields to choose from:
- Default: These slug will be show if you have already activated pretty permalinks, and it will use slug of each product by default.
- Shop base: You will be using shop instead of product in the slug.
- Shop base with category: In addition to shop you will be also using category nam e of the product into the URL.
- Custom base: This section let you customize your own permalink structure, anyhow. And another important thing you must note that, you simply cannot left or remove the base completely.
When you are done with opting for the suitable option as per your requirement, the next thing you need to do is to click on the save changes button to save your changes.
Changing WordPress Permalinks Using WordPress plugins
If you found all these permalink settings quite tedious, WordPress has always provided you with alternative solutions in terms of WordPress plugins. Using a third-party WordPress plugin will help you out to make changes or editing your permalinks over what WordPress has provided you with default permalink settings options.
Permalink Manager Lite
Permalink Manager Plugin is considered one of the most advanced and highly rated WordPress permalinks editor plugins that let you customize and control the structures of URLs for all the pages, custom posts, and posts. And when a new custom permalink is active, the errors such as 404 and copy content errors will be avoided by automatically redirecting them to the new custom permalink you have defined.
2. Custom Permalinks WordPress plugin

The Custom WordPress Permalinks plugins are best suitable for customizing your URLs of any post, page, category, or tag the way want to. And you do not need to worry about 404 errors; all the old WordPress permalinks will be redirected to the new address without any issue.
Changing WordPress permainks in phpMyAdmin
If you have basic knowledge of WordPress files and using phpMyAdmin, then you can do almost anything through it, including editing permalinks. This comes to the handy and best alternative solution when there is something issue with your WordPress dashboard, and you are unable to access it through your WordPress permalinks Settings page.
But before that, you must make a complete backup of all the files and databases to avoid any mishap during permalink editing.
The First step is to access your phpMyadmin by logging in to your Cpanel by typing your database username and password. At the top of the page, you can see the Databases option. Click on it to open and select the database you want to work with.
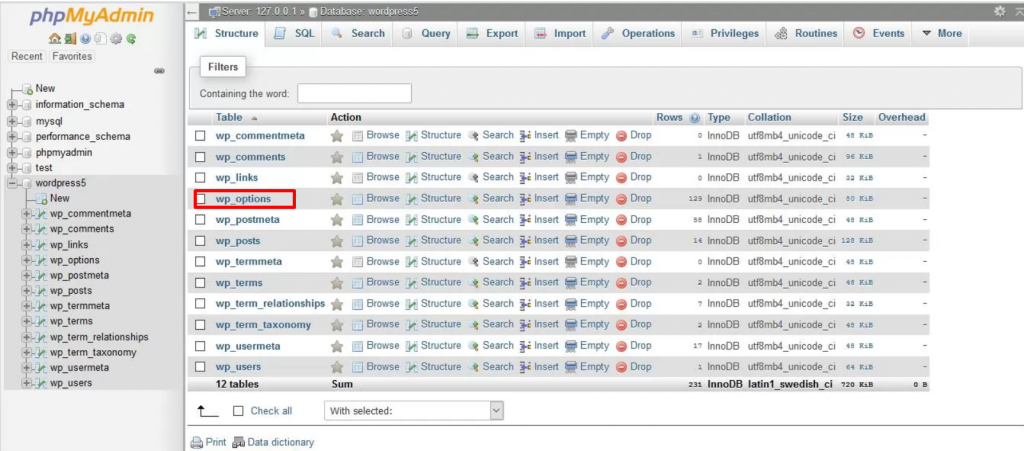
Select the wp_options as shown in the picture above and look out for the permalink_structure.
Select the wp_options table and find the permalink_structure entry in the option_name column. You might need to navigate beyond the first page of entries.
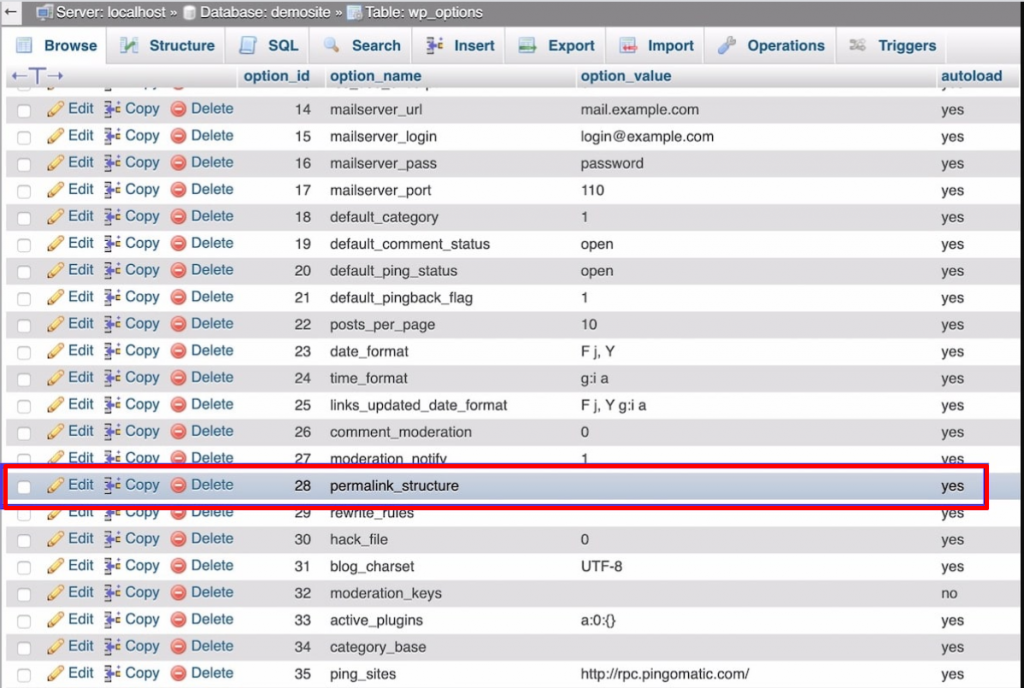
As shown in the above picture, you can see on the left side of permalink_structre; an Edit link has been provided. Click on it to add the permalink structure that you wish to use.
Click the Edit link on the left for that entry, then under the option_value field, add the permalink structure you want to use. Use the tags that we identified earlier for use in the Permalinks settings screen.
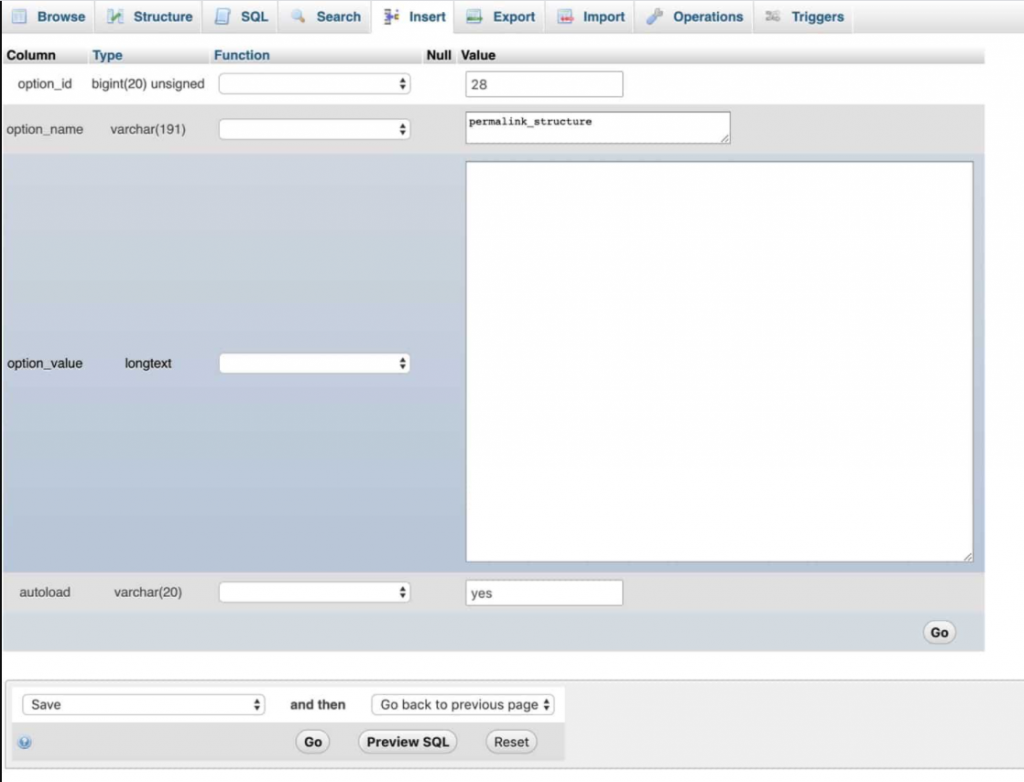
Once done with editing, You can click on the Go button to save your WordPress permalinks.
How to change WordPress Permalinks in Images?
To your surprise, images that you use in your post or content have their own permalinks. And when you upload any media file, such as images or videos, to your website, it will generate multiple links for each media file.
The first one is the link to the original image, and another is the links created when you set media sie settings.
How it created Link to the origal image or the image you upload?
As we have already mentioned that whenever you upload an image or any media, WordPress will create a unique link to the file it is saved on your server. You must have noticed a path named wp-content/uploads while configuring server files.
The image files or the pathname consists mainly of the date on which the image was uploaded. It helps to avoid conflict between the images. If you have uploaded an image of the same file name but on a different date, it won’t create any big issue.
For example, if you have uploaded an image with the name Image001.jpg on a month, say June 2021, the WordPress link will generate as example.com/wp-content/uploads/06/Image002.jpg where the number 06 in the link indicates the month of file upload.
It also works the same way with other media files or documents. For example, example.com/wp-content/uploads/06/emploees.doc. And you might have thought, what if you upload a file with the same name in the same month. Well, WordPress resolve this situation by adding up a number to the end of the file name.
So whenever you upload another file, either image001.jpg or emploees.doc, again in the same month, the file will be saved with the name image001-1.jpg and employees-1.doc.
If you wish to check out the working condition of the original file that you have uploaded or want to link to the original file, check out the procedure how you can find the link.
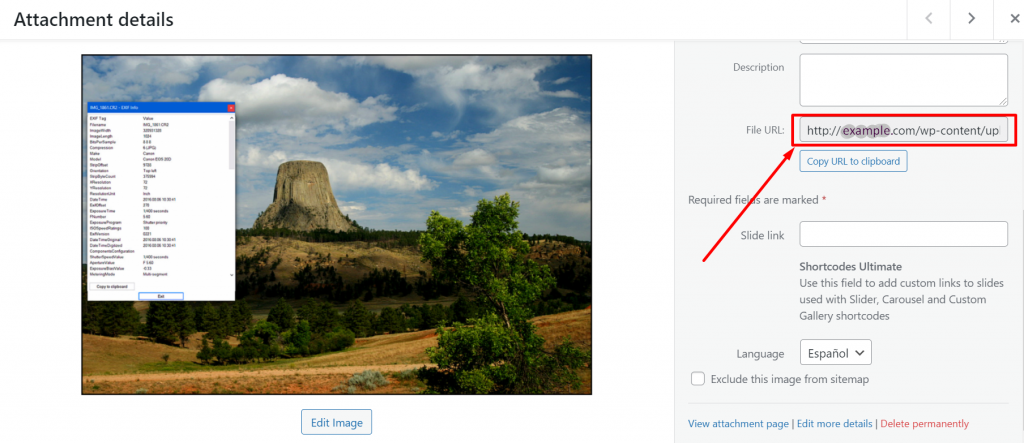
To find the link to the file, you need to go to your WordPress Dashboard > Media > Library and click on the file that you want to know its link to. A pop-up editing image window will open and showing the File URL and other file details on the right side.
WordPress Permalinks for different sized images or any media files
We have already mentioned in the previous section of this post that WordPress also creates permalinks for the images based on their file size. Whenever you set a file size for any image, a permalink will be created automatically. To do this, you need to go to your WordPress dashboard > Settings > Media.
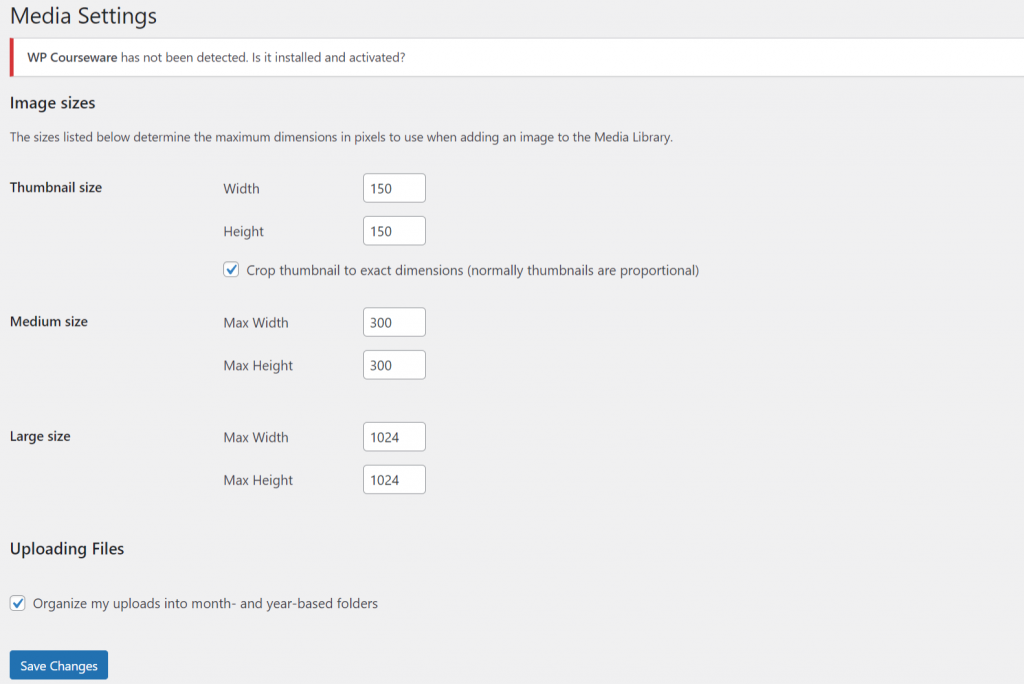
So whenever you upload an image with a large file size exceeding the large value settings, WordPress will automatically create copies with three different file sizes per the media settings, i.e., Large, Medium, and thumbnail.
However, WordPress won’t name these files as per their different sizes; a user may change its name as per their requirement shortly. Hence, alternatively, WordPress uses the dimension as in the file name and store them at the same place where the original image is being located. i.e in the wp-content/uploads.
To find the URL of all the images of different sizes, the easiest method will be by accessing the WordPress files via the FTP client and find out all the images you have uploaded in a particular month.
For example, let us suppose I have uploaded an image with the file name Image001.jpg. The WordPress will create a copy of the same file with different file sizes using the media settings as follows:-150×150.jpg
- Image001-150×150.jpg
- Image001-300×300.jpg
- Image001-1024×1024.jpg
Redirecting WordPress Permalinks
In the previous sections, we have discussed how you can edit your slug or change your WordPress permalinks. And we have also mentioned the consequences that you may face during editing WordPress permalinks. i.e., your users might face a 404 error page, or it can also affect your SEO.
However, to avoid this or to fix this problem, the best thing you can do is to redirect your old permalink or URLs to the new ones that you have edited or created.
How to Redirect each and every Pages or Posts that you have created?
Redirecting every page or post from the old permalink to the new one that you have edited or created, the first and the most important step you need to do is to set up a redirecting rule.
If you’re with WPOven, You can do redirecting by following these simple steps.
Redirects are server-side rules to handle incoming requests and redirect them for your visitors. The WPOven redirect tool redirects any incoming request for a Domain that is not added to your WPOven dashboard and redirects it to the destination set by you.
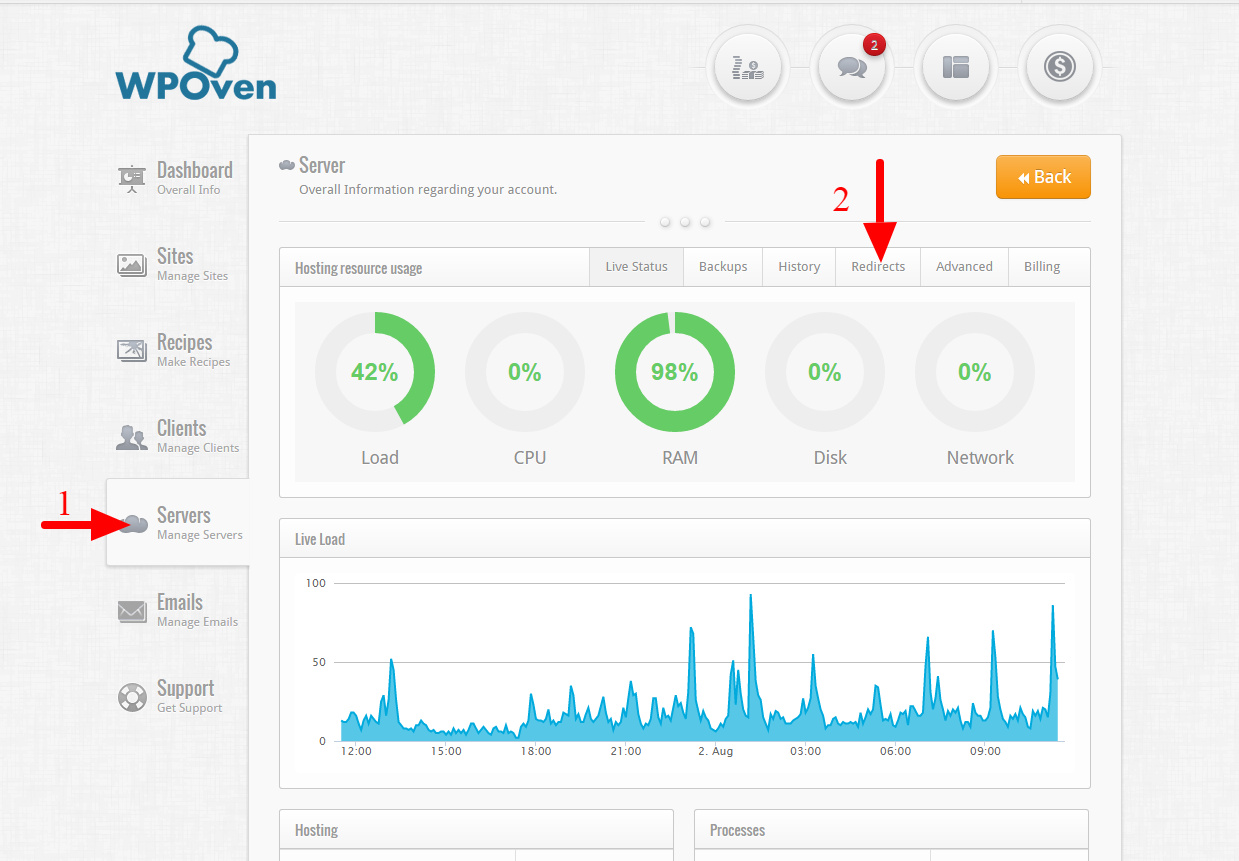
Step 1 : Access the Redirect section.
The redirect section can be accessed from your WPOven dashboard, from the ‘Server‘ section. You need to select the server to which you want the request to redirect. Now in this section, you will notice the ‘Redirects’ tab. Click on the ‘Redirects‘ tab to set up the redirect rule.
Step 2 :Create a Redirect.
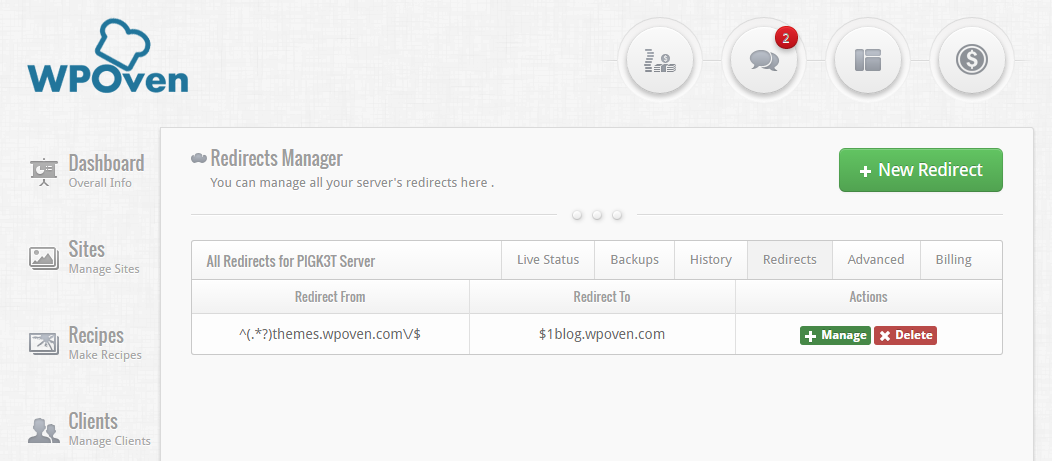
Once you open the ‘Redirects‘ section, you will see the Redirect Manager. Here you will be able to see all the redirect rules that you have set up for this server.

Click on the ‘New Redirect‘ button to add a new redirection rule. Here you will see a form that looks like the form shown below.
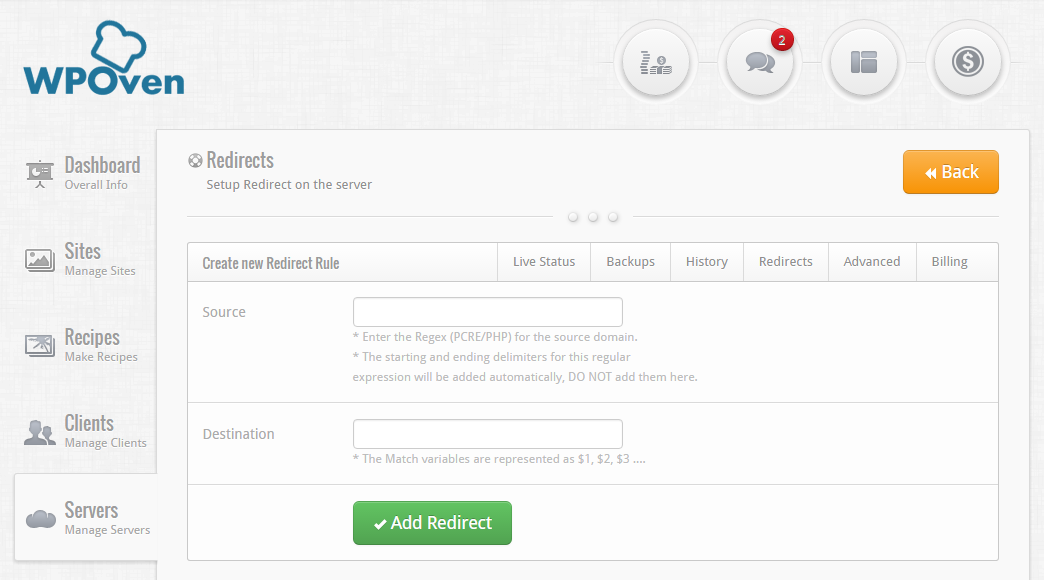
The 2 fields for the form :
- Source : This field will take the regular expression for the URL you wish to redirect from. Also note that the domain for this URL should not already be added to your WPOven dashboard, otherwise the redirection will not work.
The path entered should be a PCRE/PHP regular expression (you can learn about Regular expressions here) and it should not include any starting or ending delimiters.For Example, if you wish to redirect themes.wpoven.com to blog.wpoven.com, you would enter the source field as : ^(.*?)themes.wpoven.com/$
The ‘^’ indicates the starting of the regular expression and ‘$’ the end.
‘(.*?)’ Symbol catches the protocol of the request, i.e http:// or https:// - Destination : Here we will enter the destination path where the visitor will be redirect to,If you wish to add the matched variables from the regular expression from the source field, you can enter them as $1, $2, $3 …..For example, continuing with the previous example, the destination URL for the Redirect to blog.wpoven.com, would be : $1blog.wpoven.com
Where $1 is the matched expression from the symbol ‘(.*?)’
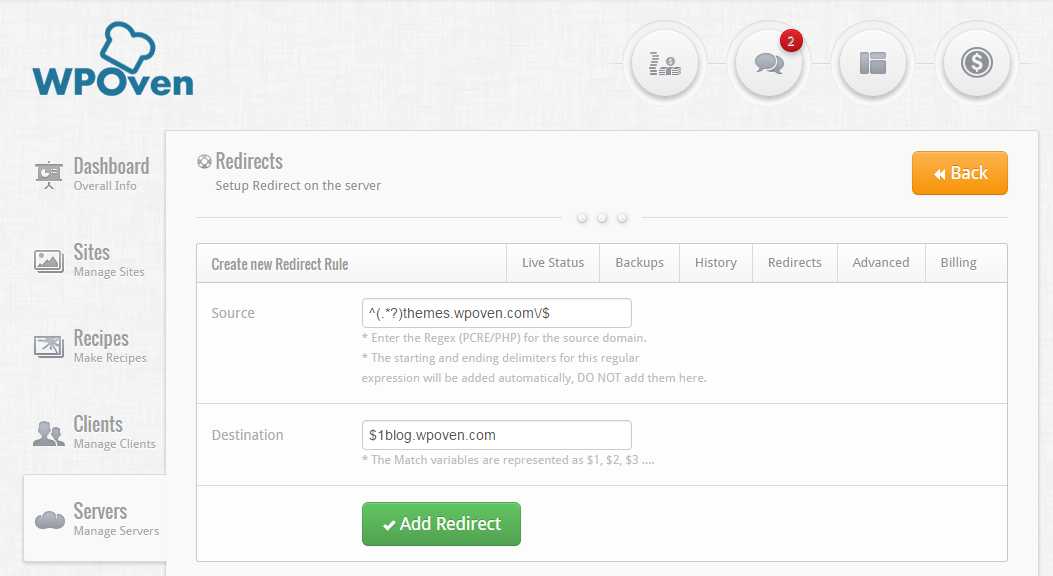
Once you have entered both fields, press the ‘Add Redirect’ button to save the redirect. You should now be able to see your redirect on the Redirect Manager page for the server. To edit an already existing Redirect, you can click on the ‘Manage’ button from the Redirect manager page.
In case you are not able to set up the redirect or require any assistance with it, please feel free to contact our support team. They will be happy to help you.
How to redirect Archive pages?
If you like to explore more easy and simple alternatives for WordPress permalinks redirection, you can go for the WordPress redirection plugin. This is an ultimate redirection tool that helps you out to redirect URLs easily.
But before using that, you need first to enable the Regex function. To enable it, Go to your WordPress dashboard > Tools > Redirection > Add new redirection.

Now on the right side, you have URL options to choose from. And Select URL Options/Regex from the Dropdown list.

In the Source URL field, You can enter ^(.*?)themes.wpoven.com/$. The entry for Target URL needs to take the source $1blog.wpoven.com. This will exactly be the way we have done through WPOven Dashboard.
What if WordPress Permalinks are not Working as planned?
Sometimes, even after taking all the necessary steps, you might still found some issues with WordPress Permalinks, and it will not work as planned. To troubleshoot such problems, you can follow our recommended solution:
At times, When you register a new post type or taxonomy, and it doesn’t work as expected. You do not need to worry about it. You can resolve this issue by Got to your WordPress dashboard > Settings > permalinks and refresh settings. And even you do not need to make certain changes to it or click on the save changes button. It can work even you open the Permalink Settings page once.
This happens because WordPress cannot determine whether a custom post type or taxonomy means there is a change in permalink settings.
And even the issue persists, you can also check out these alternate solutions.
- Check your Permalink settings, that you have done it correctly or not. Ensure that you have not missed anything or typed the wrong data.
- Check out whether you have typed the correct URL in the browser or not.
- Check is there any issue with your redirection plugin if you are using a redirection plugin. And cross verify all its settings too.
- Examine that you have made any changes to the slug of any post you have created and edit if required.
- Try clearing your website cache and check if the issues persists.
- verify via phpmyadmin and edit WordPress permalinks if requried.
Summary
WordPress permalinks can do wonders for your WordPress website if you know how to configure and properly implement them. Not just can it enhance user experience, it has the potential to boost your search engine rankings too.
Hence, you add quality information and help you to boost up your website performance. We tried to bring you detailed and comprehensive material on WordPress Permalinks. We have tried to cover all the aspects of WordPress permalinks that you can use in your Website. Whether it is for e-commerce websites, optimizing images, posts, or pages.
If you have anything worth mentioning about more WordPress permalinks, please share your valuable ideas in the comment section below. We love to hear from you.
Frequently Asked Questions
What are permalinks in WordPress?
Permalinks are the permanent URLs to your individual weblog posts, as well as categories and other lists of weblog postings.” Whether your website has archive pages, posts, or even 404 error pages, all they live their own WordPress permalinks.
Where do I find permalinks in WordPress?
You can find the WordPress permalink in the editor section of pages or posts. Usually located on the right-hand side of the editor where a default permalink can be easily shown.
Can I change permalinks in WordPress?
In short, Yes, you can change permalinks in WordPress after or before published the post or page. However, it is not recommended to edit or change the WordPress permalinks after publishing your content or making your page live. It can lead to a 404 error, and if the post has been shared multiple times, there are chances that your backlinks will be lost.

Rahul Kumar is a web enthusiast, and content strategist specializing in WordPress & web hosting. With years of experience and a commitment to staying up-to-date with industry trends, he creates effective online strategies that drive traffic, boosts engagement, and increase conversions. Rahul’s attention to detail and ability to craft compelling content makes him a valuable asset to any brand looking to improve its online presence.



Thanks for the article, Rahul. I found it very informative and you touched on some great points I hadn’t been informed about that.