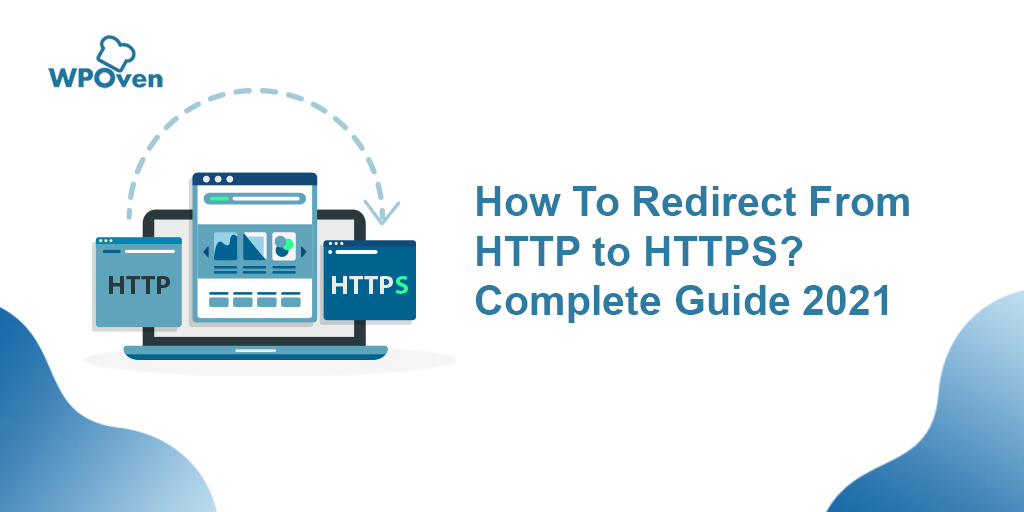
HTTP to HTTPS migration has become one of the essential parameters for any search engine now. It has been made mandatory after Google chrome announces, “from 24th July 2018, they will consider all the websites working on HTTP as “not secure.”
In this article, we will provide you an in-depth guide on Http to Https migration in WordPress. and give some tips on how to make the whole process easy and smooth. Even some leading Search Engines like Google are trying their best to encourage website owners to move into the more secure web.
Also, due to new guidelines regulate by leading search Engines and providing SEO benefits, it is the right time to migrate WordPress websites on a more secure side.
Let us check out More about Http in the sections down below:
What do you mean by HTTPS?
HTTPS or Hypertext Transfer Protocol Secure is a whole process required to communicate between browsers and website securely. It is a protocol that is regulated to keep your browser secure from all suspicious attacks. For example, online transactions, saving sensitive information like login credentials, credit card information, and logging in admin pages.
Major search engine giant Google is also targeting all their products and services to go 100% encryption. Since security is a top priority at Google, they invest and work to make sure that their sites and services provide modern HTTPS by default. The chart below shows how they’re doing across Google.

According to the survey conducted by w3techs, at present 72.4% of all the websites are on HTTPS.
What is the need for HTTP to HTTPS migration?
If Google is doing it, it is highly essential to migrate your website from HTTP to HTTPS. Below are the major reasons and why you need to change:
1. To provide security
As mentioned, earlier HTTPS is a mechanism through which communication between browsers and websites is maintained securely. It means, while migrating from HTTP to HTTPS, you are using your website on an SSL connection.
It means there is no data leakage or breach that can happen during the interval. This mechanism is highly required where sensitive information is being shared, such as ecommerce transactions and credit card data.
Although no legal laws have been made, it a mandatory process yet. As business owners, it is their responsibility to ensure the safety and security of their customer’s vital information.
It is not just eCommerce stores but also applicable to other websites, such as your WordPress admin pages, social media accounts, or online banking pages. If you are still on HTTP, the chances are your vital information is being shared on the server as plain text.
Hence, migrating from HTTP to HTTPS becomes a most important task to ensure the security of your website. Through this, you can restrict access to hackers and other suspicious activities.
2. Affecting Search Engine Optimization (SEO)
Many search engines such as Google has already officially stated that HTTPS is a ranking factor on their SERPs. Although it is not a major ranking factor, most of us would never leave any stone unturned to get a better ranking than competitors.
And it is worth mentioning that Google has itself aggressively following this migration from HTTP to HTTPS for its own products and asking others to follow it. It is likely to be a strong ranking factor soon.
3. Increases Users Trust
It has been observed that the majority of the users look out for SSL encryption on every website URL they visit. It gives them a sense of security and trust while sharing their vital credentials with the website as more than 75% of users are insecure about their data being compromised online.
HTTPS not only provides your website security but can also enhance your business brand and standard. Whenever users visit your website, they can freely browse and do the online transaction without any concern.
4. Enhance Speed
HTTPS does not just give an extra protection layer, but it has also been seen after migrating from HTTP to HTTPS. It boosts overall site speed. According to the new protocol implemented HTTPS/2, the well-optimized sites perform fast and better. It is due to HTTPS can better multiplexing, parallelism, HPACK compression with Huffman encoding, the ALPN extension, and server push.
5. Referral Data
The fifth reason why HTTPS is important is that google analytics has blocked HTTP to HTTPS referral data. That means if your website is still using an HTTP connection and suppose your website is being viral and popular on another website such as Reddit, which is an HTTPS website. All the Reddit traffic will be considered direct traffic. Which will be of no use, and referral data will be lost.
But, if someone is migrating from HTTP to HTTPS, the referral data can still be passed.
How to Migrate from HTTP to HTTPS?
Migrating from HTTP to HTTPS can be very tricky for a user, especially if their website is not running on WordPress. However, to not get tangled in the hassle migration procedures, you must follow the detailed process explained down below.
1. Choose and Buy SSL certificates
To start with the migration process of HTTP to HTTPS, you need SSL certificates for your Website. These certificates are small data files that bind keys with an organization’s crucial information. Most of the time, actually your website actually has them. It might not be already running.
But, Some Best hosting providers, such as WPOven, also offer free SSL Certificates. To check if your website has them or not, go to https://yourdomain.com rather than using regular HTTP. And see if there is any red warning.
The warning sign shows that you either don’t have any certificates installed or it has expired. To know more, click on the information icon as shown below:

After clicking on the information icon, a popup will appear showing the certificate is valid or not. If it is valid, then you have an SSL certificate.
For more details, click on more details to access the complete information about the certificate, i.e. validity date etc. And if it shows not valid, you probably do not have any SSL certificates installed.
If you want an SSL certificate for your website, there are plenty of vendors out there. You need to Google them, and a list of online vendors will appear selling SSL certificates online. Just search for the best deal and not forget to read user reviews before hitting the buy button.
It is also possible to buy certificate from your cPanel of your server.
Types of Certificates
There are Major three types of SSL certificates are available:
Domain validation: Single or Subdomain, easy email verification, lower price, and can be easily issued within minutes of purchase.

Business validation: Best suitable for Business or Organization websites and verifies for a high level of security and trust. Usually, it took up to 3 days of certificate issue.
Extended validation: Applicable to domains and sub-domains of business websites for a high level of security and providing a green address bar. It took around up to 7 days (depend on the vendor) for the certificate issue.

At WPOven, we provide free Cloudflare SSLs for all sites via our Cloudflare integration. Our Cloudflare SSLs are automatically issued after you configure a domain.
Using Let’s Encrypt
With the help of Let’s Encrypt, you can also get a free SSL certificate. For this, you must check with your hosting service provider and CDN provider whether they are providing Let’s Encrypt Integration or not.
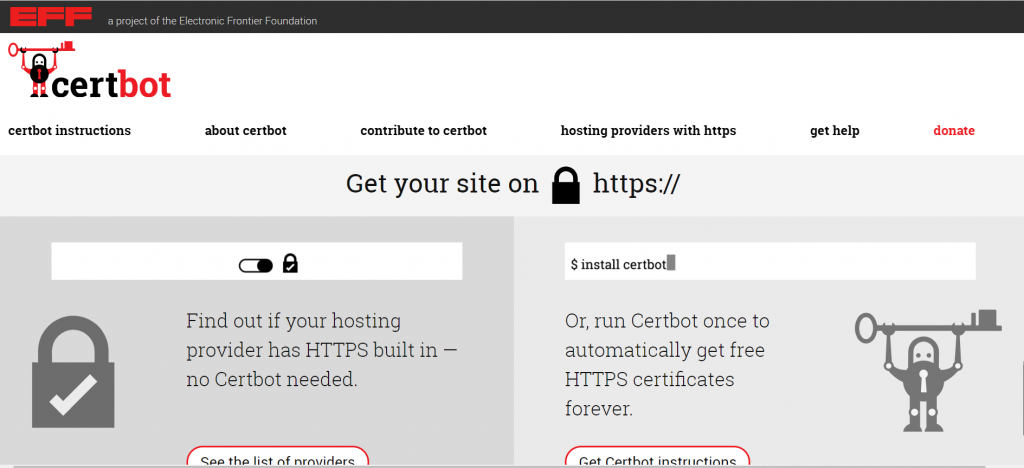
If you feel things are getting quite messy, you can also opt for Certbot. It is an automatic client that fetches and deploys SSL/TLS certificates for your webserver.
At WPOven, We provide free SSL certificate using Let’s Encrypt.
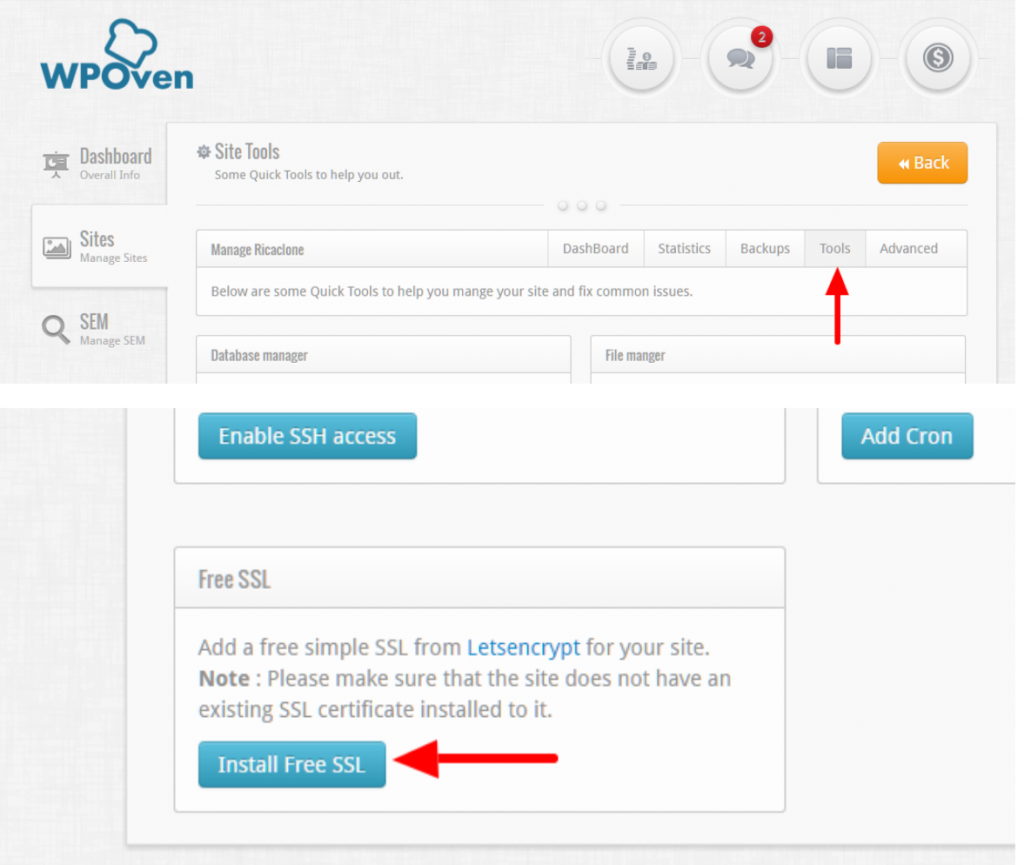
Using our Free SSL Tool, you can install a LetsEncrypt simple SSL certificate on your WordPress site. The tool can be found in your WPOven dashboard, under the ‘Sites‘ section in the ‘Tools‘ subsection.
A few prerequisites that you need to keep in mind before installing the Free SSL LetsEncrypt certificate are :
– Your site is hosted on a WPOven Server
– The site should have a valid Domain name, whose DNS record should be pointing to your WPOven server IP
– The site should not be behind any CDN services like Cloudflare.
– Make sure it is NOT a WordPress MultiSite install. Currently, the Free SSL tool is not applicable for WordPress MultiSite setups.
To install the Free LetsEncrypt SSl on your WordPress site :
Step 1: Log in to your WPOven dashboard and Navigate to the ‘Sites‘ Section. From there, click on the site you wish to install the LetsEncrypt certificate on.
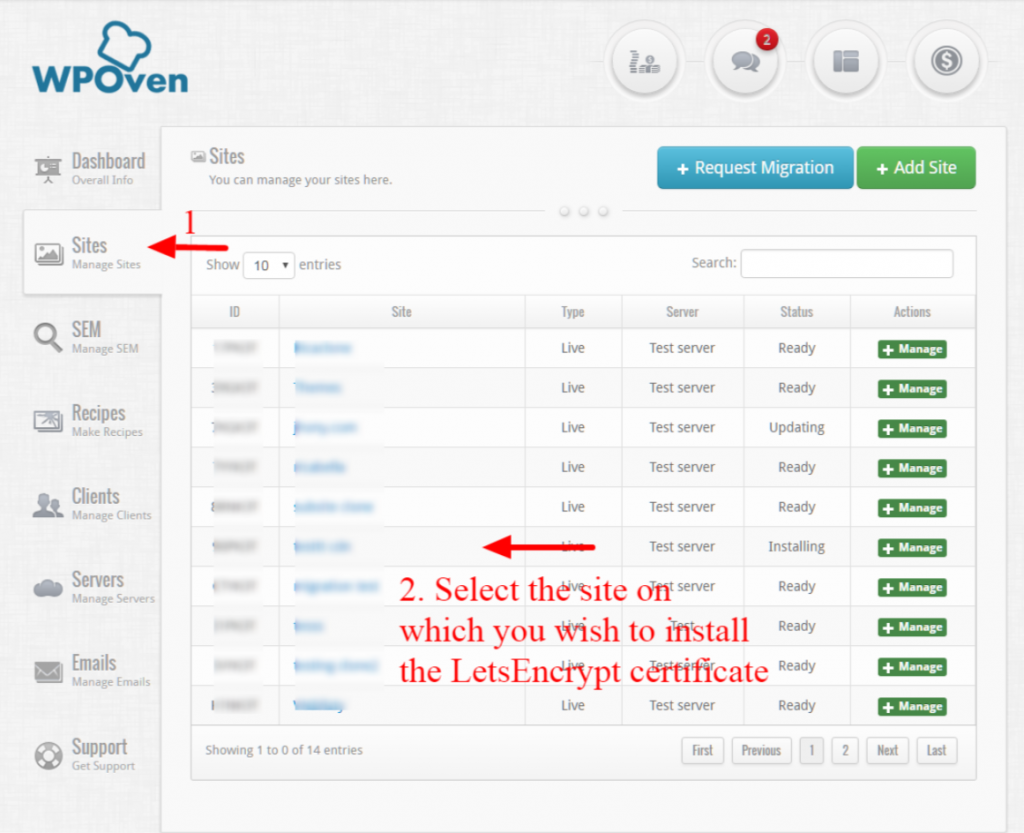
Step 2 : Navigate to the ‘Tools‘ subsection and scroll down to the Free SSL Tool. Click on the ‘Install Free SSL‘ button and that’s it.
If you face any problems with the SSL installation or have any queries regarding this, please raise a ticket on our support, and we will be happy to help you.

2. Installing SSL certificates
After you purchased an SSL certificate, it’s now time to install them on your WordPress website. While going through the certificate set up with the vendor, you are asked to provide the server type. If you are a WPOven customer, the type of our web servers is Nginx. If that option is not available, then “Other” will work as well.
To begin with the process, you will require a CSR code by an SSL provider to generate or sign Certificate. For this, you need to fill-up the form by SSL.com.
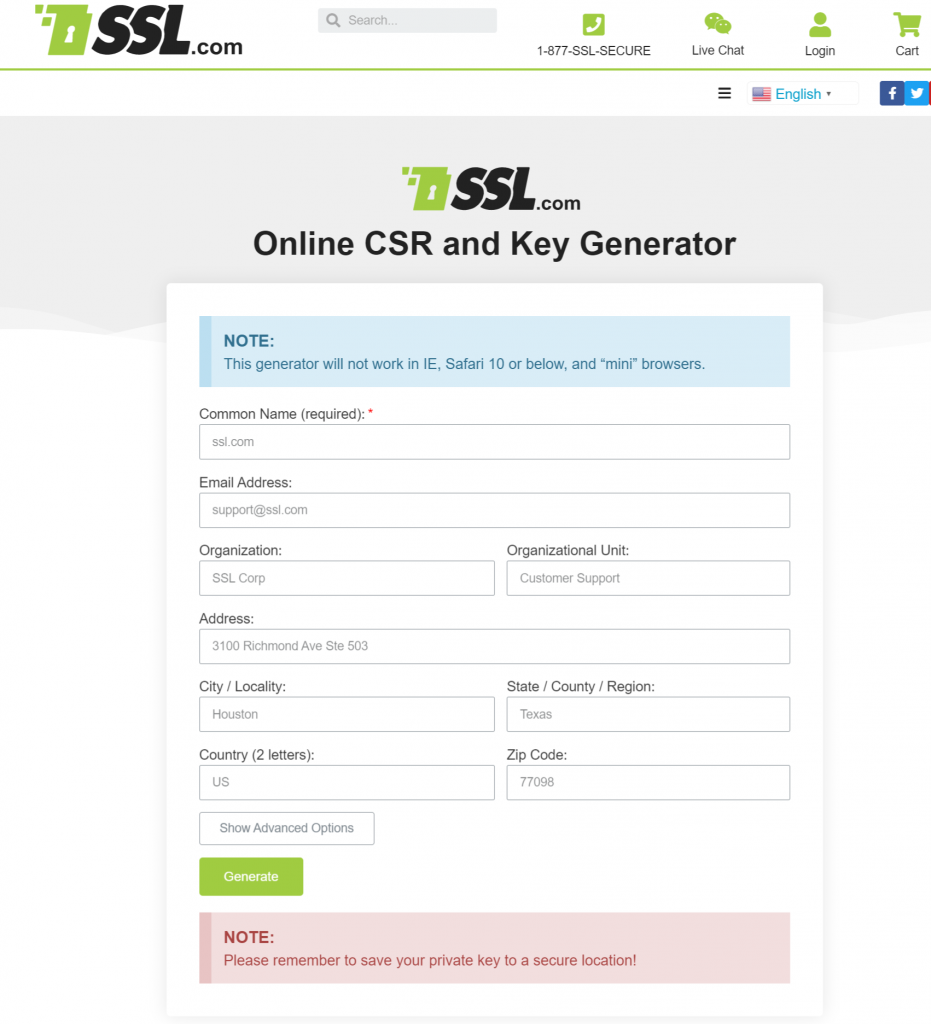
After filling up, all the required fields, click on Generate button. The form will generate a key and CSR, which you must save in some folder.
After completing all the above steps, it is now time to upload the key and CSR file to your SSL provider.
3.SSL Certificate Verification
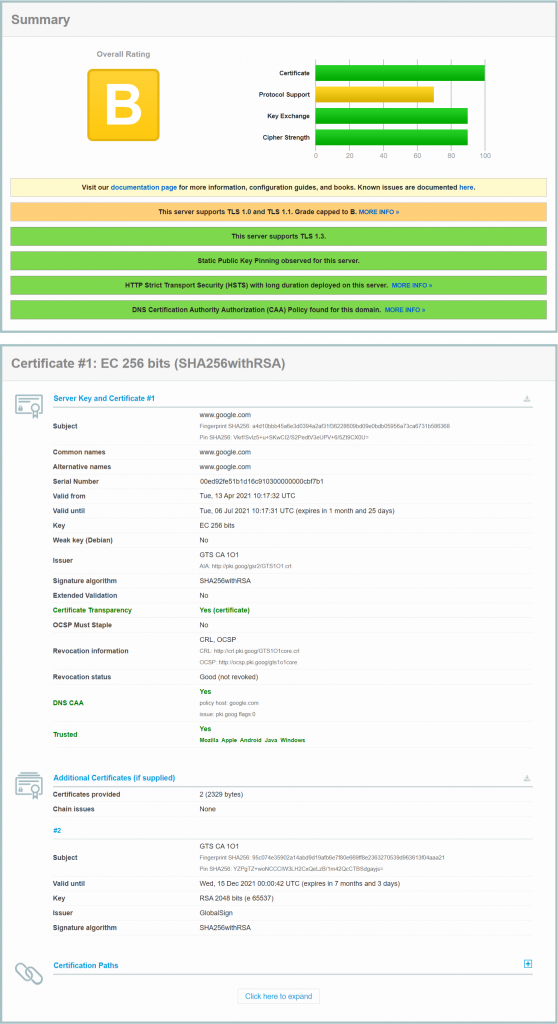
After purchasing and installing the SSL certificate, now it’s time to ensure the installation process has been successful or not. A quick and effective method is to use the free SSL check tool to carry out the Verification process. If the tool doesn’t detect any issues, it will provide Grade “A” in the test, which means everything is running fine and great.
4. Migrating HTTP to HTTPS
After completing the SSL certificate Verification process, it is time to redirect all your Traffic of HTTP to HTTPS. There are a lot of migration options available on WordPress.
301 redirecting to HTTPS
One of the most widely used methods is to manually do it in web configuration or using a Free WordPress plugin. It is to be noted that using different types of redirect processes from HTTP to HTTPS can harm your SEO and rankings. Always Follow from the authentic and genuine source before implementing them.
Also, it is to be noted that there is no 100% guarantee of getting all the 301 redirect juice(ranking power). To be practical, about 98% of the total web traffic will be redirected whether you redirect HTTP to HTTPS or the new location.
If you don’t do 301 redirecting, it might seriously hit your SEO and SERP ranking overnight. Although some Free WordPress plugins are available, which might do the work in few steps, we do not recommend using them for bulk redirecting URLs.
It is much simpler to implement 301 redirects at the server level, especially if you are dealing with hundreds of URLs.
For Ngnix Server File add the following Command:

And for Apache Server File :

At WPOven, Migrating from HTTP to HTTPS can be carried out by adding Nginx Redirect rules to the Nginx config file.
The server block for HTTP requests should look like this:
|
1 2 3 4 5 6 7 |
## our http server at port 80 server { listen 1.2.3.4:80 default; server_name example.com www.example.com; ## redirect http to https ## rewrite ^ https://$server_name$request_uri? permanent; } |
It would be best if you had another Server block for HTTPS requests, which should look like this:
|
1 2 3 4 5 6 7 8 9 10 11 12 13 14 15 16 17 18 19 20 21 22 23 24 25 26 27 28 29 30 31 32 33 34 35 36 37 38 |
## Our https server at port 443. You need to provide ssl config here### server { access_log logs/example.com/ssl_access.log main; error_log logs/example.com/ssl_error.log; index index.html; root /usr/local/nginx/html; ## start ssl config ## listen 1.2.3.4:443 ssl; server_name example.com www.example.com; ## redirect www to nowww if ($host = 'www.example.com' ) { rewrite ^/(.*)$ https://example.com/$1 permanent; } ### ssl config - customize as per your setup ### ssl_certificate path/to/ssl/certificate.crt; ssl_certificate_key path/to/certificate/private.key ssl_protocols SSLv3 TLSv1 TLSv1.1 TLSv1.2; ssl_ciphers RC4:HIGH:!aNULL:!MD5; ssl_prefer_server_ciphers on; keepalive_timeout 70; ssl_session_cache shared:SSL:10m; ssl_session_timeout 10m; ## PROXY backend location / { add_header Front-End-Https on; add_header Cache-Control "public, must-revalidate"; add_header Strict-Transport-Security "max-age=2592000; includeSubdomains"; proxy_pass http://exampleproxy; proxy_next_upstream error timeout invalid_header http_500 http_502 http_503; proxy_set_header Host $host; proxy_set_header X-Real-IP $remote_addr; proxy_set_header X-Forwarded-For $proxy_add_x_forwarded_for; } } |
After making the changes in Nginx, test the new Nginx config by running the following command :
|
1 |
nginx -t |
If this does not show any errors, restart nginx to bring the changes into effect :
|
1 |
service nginx restart |
Redirecting using Free WordPress Plugin
As mentioned earlier, we do not recommend this for bulk URL redirecting. Since third-party apps add up the burden on the server and introduce new problems and compatibility issues, if your website is small and looking for a temporary solution, you can use a Free WordPress plugin named Really Simple SSL.
This plugin will automatically detect your settings and configures your website to run over HTTPS. To keep it lightweight, the options are kept to a minimum. The entire site will move to SSL.
5. Hard-Coded Https Links Updation
After redirection of URLs, it’s time to update Hardcoded Https Links, as it is highly preferable to use ref URLs. But, Over time, everyone has to do it at so you have to. The following options are given below:
By using the WordPress plugin
One of the easiest ways to do it by using a WordPress Free plugin named “Better Search Replace. To begin with, search the plugin in the WordPress directory and click on install> activate. After activating the plugin, go to the Tools section and click on the better search replace option.
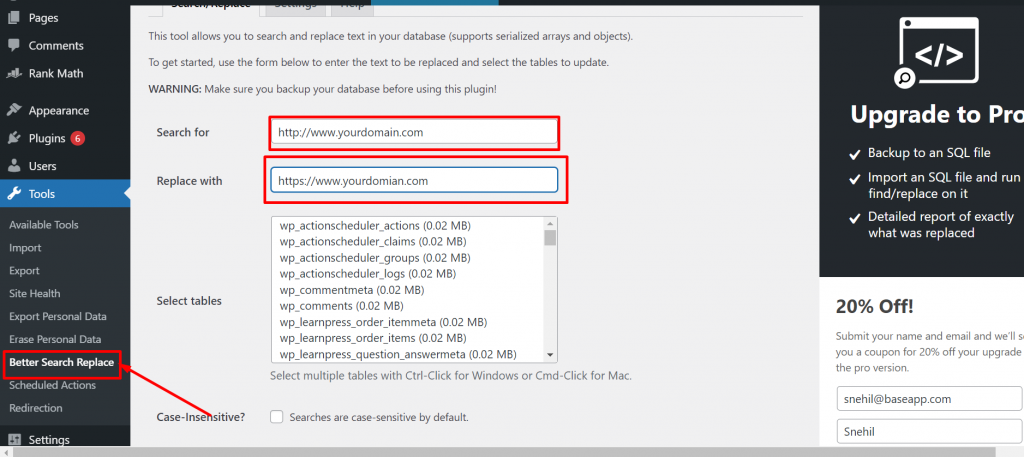
Some key features of this plugin are:
- Serialization support for all tables
- The ability to select specific tables
- The ability to run a “dry run” to see how many fields will be updated
- No server requirements aside from a running installation of WordPress
- WordPress Multisite support
Using Interconnect IT tool Database Search and Replace Script in PHP
This section will let you know how to update links in WordPress using Interconnect IT tool Database Search and Replace Script in PHP. However, all the search queries can be done by the user end, but there are many tables and metadata files that you might confuse and miss.

To avoid such, an exact list would help you. It is highly advisable to back up your database as a precautionary measure and start the whole process on a developer server.
To begin with the script, simply download and unzip the folder search-replace-db- and rename it as per your choice. To explain you better, we renamed it as search-replace-db. And upload it through FTP into the root of your website.

Then Navigate your renamed folder in your browser as http://mydomain.com/search-replace-db/
The script will automatically find the database filed, but we highly recommend you to check all the fields and make ensure that they are correct.

Now, you are free to insert whatever you want to replace. But before that, you must run a “dry run” test initially to check what it is trying to replace and update. When everything goes well, you are ready to run a live run to update the database, and it will replace/update all of your entries, such as WordPress URLs. Canonical tags, Hardcoded links, and posts.

It is also possible that you are using a CDN. Hence you will need to rerun the above process to find any hardcoded http://cdn.mydomain.com URLs and replace them with https://cdn.mydomain.com.

Please note, due to security reasons, do not forget to delete the script after running and completing the process. You can carry this process by clicking on the “delete me” button, as shown in the picture below.

Update libraries and Custom Scripts HTTP to HTTPS
Now you are done with updating hardcoded URLs. The next thing you must do is check if you have any customization on your WordPress install or add any external script to your header or footer. You need to ensure that all these scripts are also updated from HTTP to HTTPS.
For example: In case of Google’s jquery, the simplest way is to point it to HTTPS version.
|
1 |
<strong>https://ajax.googleapis.com/ajax/libs/jquery/2.1.3/jquery.min.js</strong> |
Update CDN from HTTP to HTTPS
After updating scripts and libraries now, you better make sure to update your CDN URL in your CDN plugin and turn it back on. Otherwise, it will start showing mixed content warning issues on your website. To enable the plugin, i.e. CDN enabler and click on the settings, change or update the URL from HTTP to HTTPS. Click on the Relative path and CDN HTTPS checkboxes, followed by clicking on the “Save changes” button.

Update Google Search Console site and sitemaps function file to point new HTTPS CDN URL
In sitemap, you need to update or change the function in your WordPress functions.php file and point to the HTTPS version that has been updated.

After updating the sitemap, you need to create a new Google search Console profile for the change you have done earlier HTTP to HTTPS.

Add a site with an HTTPS domain and click on the continue button to proceed further. After completing the above process and creating a new HTTPS version, you have to resubmit your sitemap files as shown below:

New Google search Console profile for CDN
For CDN, especially if you are using a KeyCDN, you must create a new Google search Console Profile replacing the old with HTTP to HTTPS CDN domain. Shown in the image below:

Fetch and Crawl for new HTTPS site
It is a must to do a fetch and crawl process on your updated HTTPS WordPress website. It has been observed that the recently HTTP to HTTPS migrated websites took several weeks to re-crawled by Google bots.
To resolve this, we recommend you to use Fetch as a Google tool to make it easy for Google bots to crawl. To better understand how the process works, let us take an example of fetching a homepage of any WordPress website.

To begin with the process. Leave the URL blank to fetch the homepage and click on the “Submit to index” button. A pop-up window will appear stating choose to submit method.
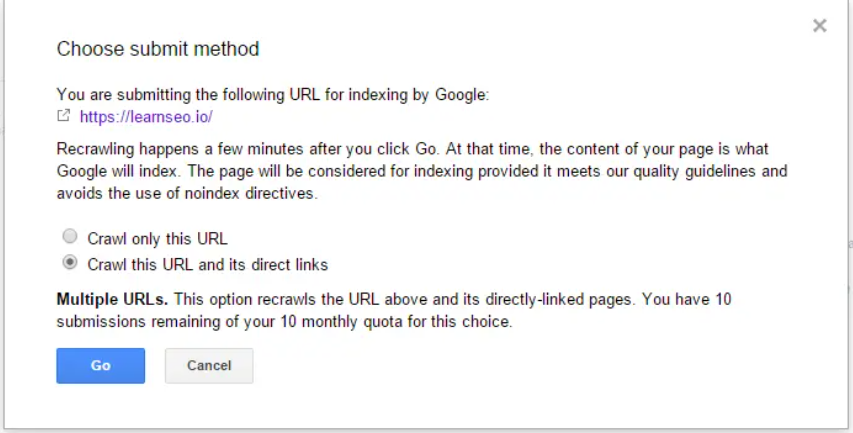
You have to select the ” Crawl this URL and its direct links” Option following by clicking in “Go” button.
Please note: If you have some other important Web pages that might not be linked to the homepage. You could still submit them individually for fetching and recrawling.
Disavow files from bad backlinks
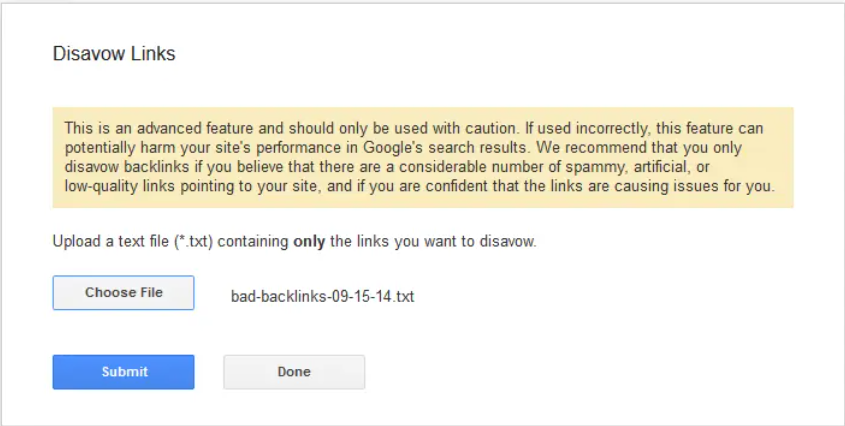
It is also possible that you have Disavow files from bad backlinks, and you have to resubmit these files under your new HTTPS website. Please note that you must not forget to skip this step, or you can potentially damage your website under any circumstances.
To begin with, open the Google Disavow tool and click into your HTTP profile and download any disavow file if you have.

Then go back to the disavow tool again and click on it to choose the file, followed by clicking on submit button. Please note that due to security reasons, never left your file as it always deletes it after completing the whole procedure.
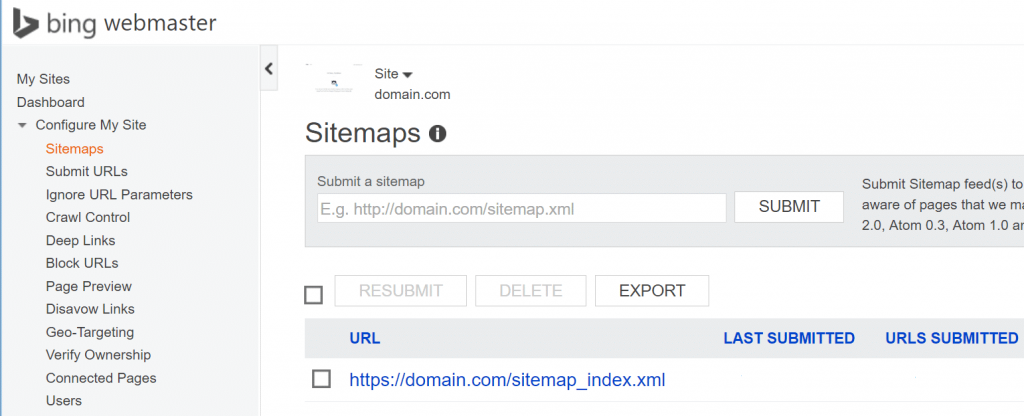
Updating Bing Webmaster Tools from HTTP to HTTPS
Bing Webmaster Tools is quite different from Google search console. There is no need to create a new sitemap profile in Bing, rather upload the new sitemap file and viola! It is done.
Updating Google Analytics Profile
The next step is to update or link your Google Analytics profile with the new HTTPS google search console. This will not alter or affect your google analytics data but make the whole linking process easier.
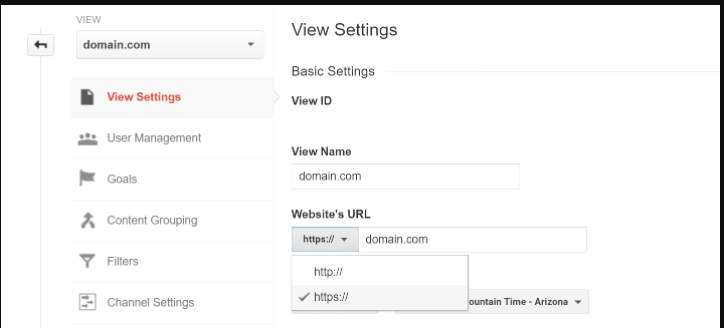
Open google analytics and click on the Admin section to begin the updating process, followed by clicking on Property settings. Scroll down, and under the property, settings click on “Default URL” to change the HTTP to HTTPS version as shown below:
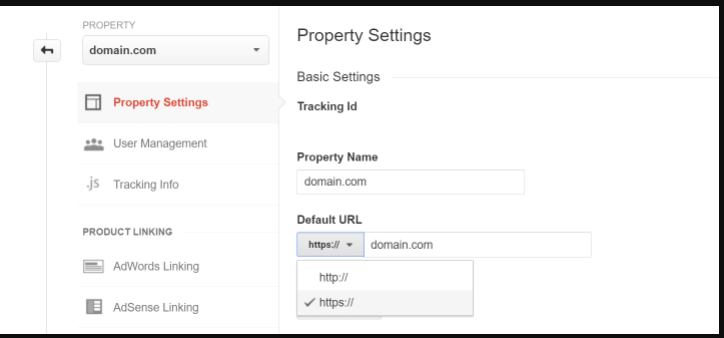
To Update the view, click on domain View settings followed by click on HttPs:// under Website’s URL section.
Facebook App
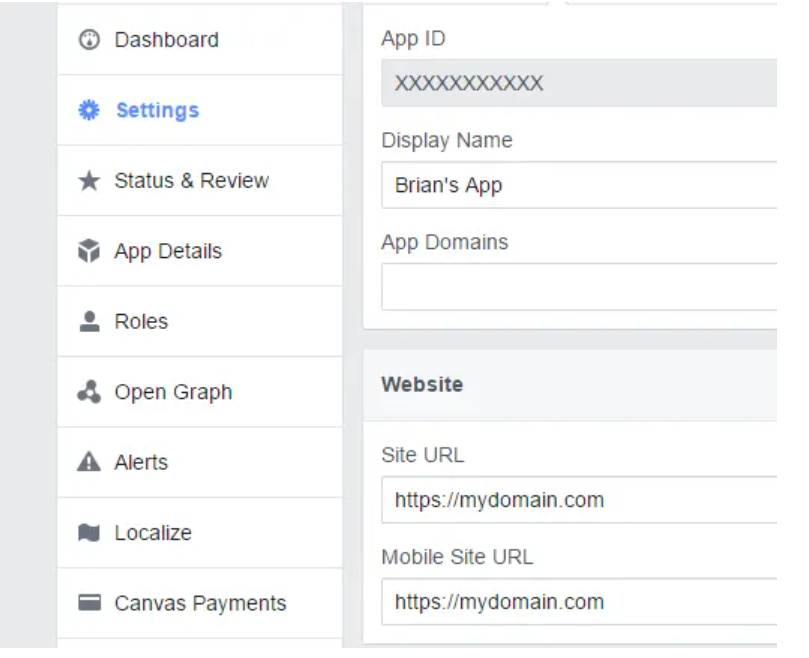
Many users are associated with Facebook App to run things like Social logins or some WordPress plugins. Hence, you need to also update your Facebook App’s URL from HTTP to HTTPS. For this, you need to visit https://developers.facebook.com/apps.
A list of apps will appear, click on particular app > Settings (left-hand side of web page), update all the Site URL with the new HTTPS version and click on save settings.
Youtube channel linking with a new website link from HTTP to HTTPS
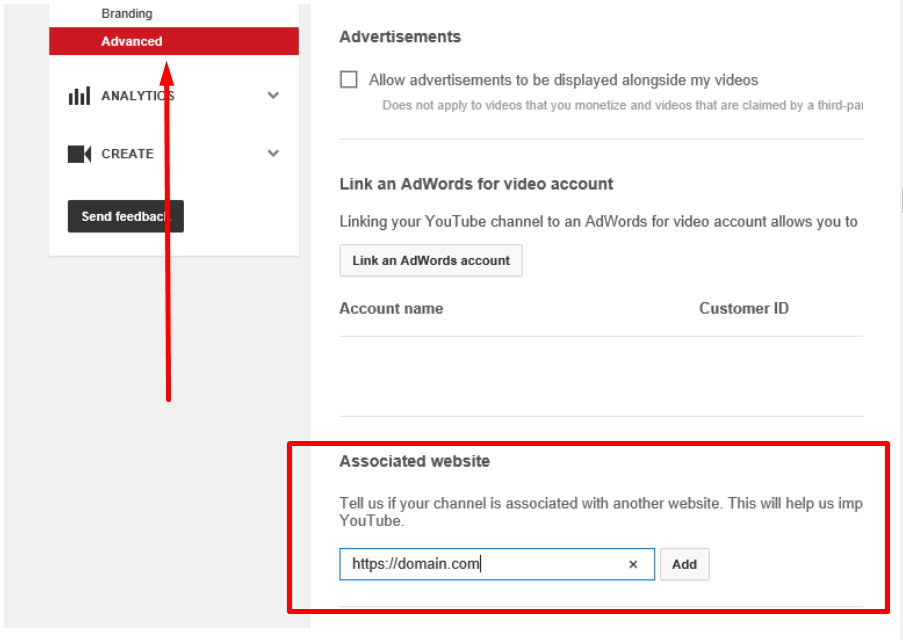
It is also possible that you have already linked your website with YouTube and running your own channel. If yes, you need to re-link your website with your new HTTPS version after migrating from HTTP to HTTPS with YouTube. Or else, your visitors will get an error message stated: “the link is invalid.”
To make changes, you need to open your YouTube channel dashboard, then click on channels > Advanced. Then in the associated Website section, change your website’s link from HTTP to HTTPS and click on Add button.
After adding the new URL on your YouTube channel, you need to validate in the google search console by clicking into your messages for that site and clicking on approval.
Check the entire Website for non HTTPS content
After updating HTTP to HTTPS from various platforms and resources, the final thing is to ensure that everything is done well or not. A handy and easy tool has been developed to carry the checking process, ” HTTPS checker.” This tool will look out the entire Website for any HTTPS possible errors and make a simple report of it.
Some additional points to be Noted or Remember
Apart from various aspects to look upon while making changes from HTTP to HTTPS. There are some additional things that you need to take care of.
- Always check if your Robot.txt file is working or not. Are there any issues while accessing it or not?
- Always remember to Update your Marketing third-party tools such as Google Adwords, Facebook Ads, etc.
- Update your Social media links such as YouTube, Linkedin, Facebook, etc., to your website.
- Do not forget to Update your Email marketing software ( Mailchimp, Sendinblue, etc.)URLs after changing HTTP to HTTPS.
- Update all external links and backlinks if possible.
Summary
We have tried our best to provide you with all possible ways to migrate HTTP to HTTPS and make your website more secure. And you have already seen that many things have to be done while migrating from HTTP to HTTPS. But with the help of our Complete guide, you can take advantage of HTTP/2 and SEO ranking factors for your website.
Not to forget, your website will be more secure before, and there is no possibility of data passing in the white paper. Suppose you think that we forget to mention some more HTTP to HTTPS migration methods. Please feel free to mention it in the comment section below.

Frequently Asked Questions
How do I change HTTP to HTTPS?
Migrating from HTTP to HTTPS is a whole process but, to make it easy, follow the steps given below:
1. Choose an SSL vendor and Buy an SSL certificate as per your requirement.
2. After Buying an SSL certificate, log in to your Web hosting CPanel account and Install it.
3. Cross verify if internal linking is changed to HTTPS.
4. Set up 301 redirects to notify search Engines.
What is better HTTP or HTTPS?
From both Security and SEO points of view, HTTPS is way better than HTTP. Actually, HTTPS is HTTP with encryption. The only major difference between the two is HTTPS uses TLS (SSL) to encrypt normal HTTP requests and responses. It also boosts up your SEO ranking and Website Trust.
Why is the HTTP bad?
HTTP is a simple Protocol used by webservers to communicate without encryption. It means the third parties can easily intercept the communication and breach data from the two systems. At the same time, HTTPS uses encryption or an SSL socket that creates a secure connection between the web server and browser.

Rahul Kumar is a web enthusiast, and content strategist specializing in WordPress & web hosting. With years of experience and a commitment to staying up-to-date with industry trends, he creates effective online strategies that drive traffic, boosts engagement, and increase conversions. Rahul’s attention to detail and ability to craft compelling content makes him a valuable asset to any brand looking to improve its online presence.

