Whether you are migrating or moving your website from one host to another or making some significant changes, WordPress Redirect can be the best and most effective method that can save your website from broken link errors.
In this post, we try to bring you all the aspects of WordPress redirect from its true meaning to How you can implement it on your website to pull out the maximum benefits of it. Let us get started!
What are the WordPress redirect methods you can use?
There are some effective methods through which you can easily do WordPress redirection on your web pages.
1. Manual Redirection through .htaccess file
The manual method might not be easy for many individuals, but if you are comfortable enough to access and edit your .htaccess file, then it would turn out to be one of the quickest ways to set up WordPress redirection. In this particular file, WordPress stores and manages all your website’s permalinks. This method turned out to be very effective as compared to other methods whether to redirect only one URL or a complete website.
Now let us see how you can start redirecting your URL using the .htaccess method. The first thing you need to find out is the URL that you want to redirect as well as its new destination for mapping.
Now the next part would be to make sure that you have successfully taken a backup of your WordPress site. This is required to make sure if anything goes wrong during redirection, you can easily restore your website back.
Now you need to access your website’s file directory. To do this you have various options such as using the FTP client FileZilla, through Cpanel, or WordPress file editor.
One thing you must note is that sometimes the files may be hidden due to security reasons, in that case, you need to reveal them and Open the .htaccess file in a text editor. And add the following lines to completely redirect a single URL.
Redirect 301 /old-page.html
http://www.Yourdomain.com/new-page.html
Now in the above lines, you need to change the old page with the old URL you like to Map. And in the second line, replace the new page with your target URL.
In case your website has an SSL certificate, it is better to redirect your website from HTTP to more secure HTTPS URLs. To make this happen you need to add the lines to your .htaccess file given below:
RewriteEngine On
RewriteCond %{HTTPS} off
RewriteRule ^(.*)$ https://%{HTTP_HOST}%{REQUEST_URI}
[L,R=301]
Note: You are not required to any modifications/changes in the above codes provided.
After adding the above line, you can finally able to redirect your entire website to its destination URL. Also, modify/change the URL in the third line so that it matches your target location:
RewriteEngine on
RewriteRule ^(>*)$ http://www.Yournewdomain.com/$1
[R=301,L]
Now, save all the changes and edits to your .htaccess file. However, if you have edited the file on your PC, you need to upload it to your website’s server. The last thing you need to do is to run tests and see if everything is working fine or not.
2. Manual WordPress Redirect by editing WordPress functions.php file
If you do not prefer to edit your .htaccess file, you have another method to create 301 redirects for your WordPress website by editing the functions.php file in your Child theme. You might have also known that any WordPress theme has its own functions.php file present in which you make all the changes or customizations.
Similarly, to avoid the changes getting overwritten in the parent theme, wherever you update them. It is very important to make whatever changes or customizations you want to make, do it only in your child’s theme. However, if your theme has not had a child theme present you can read our complete guide on WordPress child theme.
Now, the first thing you need is to locate the functions.php file exactly the same way you locate your .htaccess file. For your convenience, you can see the image given below:

Now WordPress redirects your website completely, to a single new location, open functions.php file in a text editor. Add the following WordPress redirect function at the end of the file:
wp_redirect( “http://www.yourwebsite.com/a-new-destination”, 301 );
exit;
3. WordPress Redirect with the help of a Plugin
Now, if you are not comfortable accessing and editing the functios.php file or the .htaccess file, like always WordPress has plugins that also help you to solve this problem. There are many WordPress redirect plugins available that will help you to set up WordPress redirect without risking your website. But the one which we highly recommend you use is mentioned below with complete details.
Redirection
One of the most popular WordPress redirect plugins to use is Redirection. It is a simple and easy-to-use plugin that will help you create 301 redirects. Along with this, you can keep a check on your site, and will help you track the 404 error. It is a great plugin that is useful for boosting your ranking and enhancing the user experience.
Furthermore, this plugin is developed for WordPress websites. It is a free plugin that can be used by anyone. You will not need any comprehensive technical knowledge to create redirects. With the help of the Redirection plugin, you can manage redirects without any trouble.
This plugin can be set to keep track of the permalinks of the posts. If the links change, the plugin will automatically set new redirects.
Some key features of the Redirection plugin
- Redirect Manager
- Conditional Redirects
- Full Logging
- Add HTTP headers
- Track 404 Errors
- Query parameter Handling
- Migrate Permalinks
- Apache and Ngnix Support
- Fine-grained permissions
- Import and Export and many more
Pricing and plan of the Redirection plugin
The redirection plugin is available absolutely free to download and use without any premium plans from the WordPress directory.
How To Setup Redirects Using Redirection Plugin?
The Redirection plugin is not complex or complicated. All you have to do is install the plugin and activate it. Go to your WordPress dashboard > Plugins > Add new > Search “Redirection”> Install> Activate.
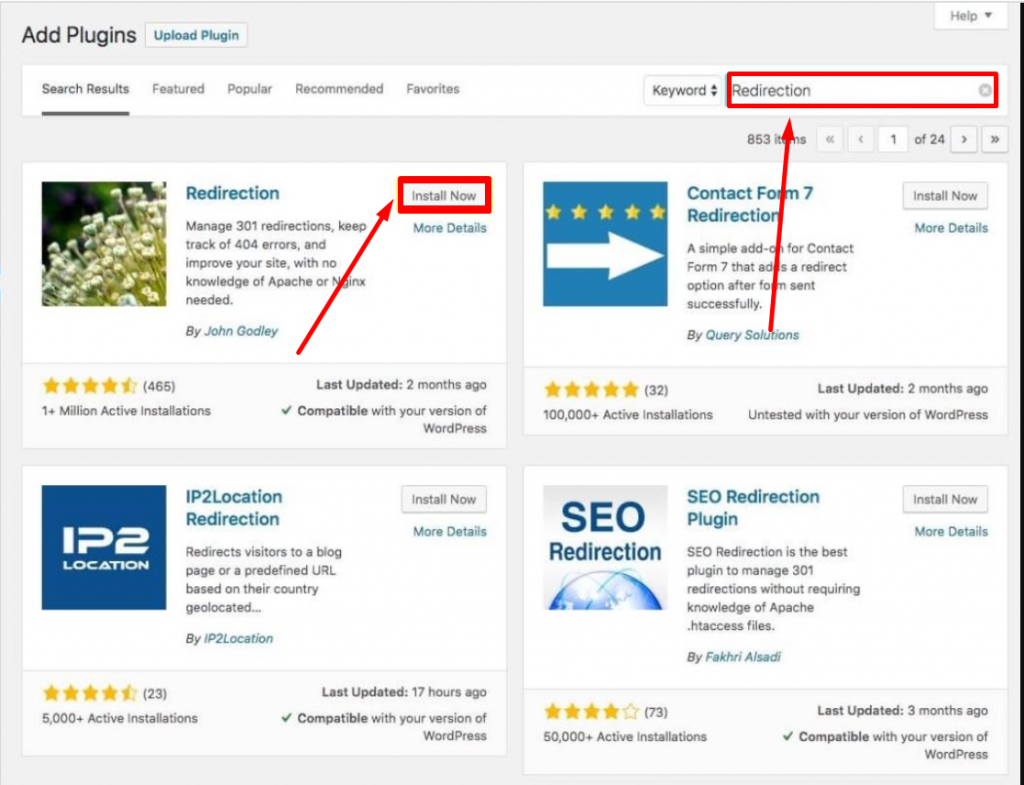
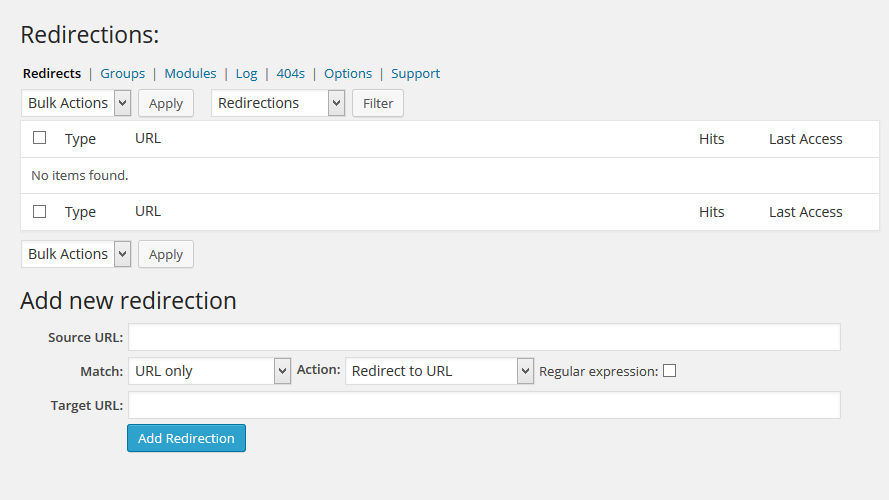
After the activation of the plugin, you have to open “Tools” and click on “Redirection” to create your URL redirects.
If you wish to type the redirect, you can type in the source URL and the new source in the Target URL. Then, click on the “Add Redirection” button. This is an ideal way to change a few URLs.
Redirection updates and Reviews
We checked with Redirection customer reviews on the WordPress Directory and have been pushing and found the following results for its latest version, 5.1.13.
- It has a whooping 2+ Million active installations right now.
- For us, it shows that it was updated 4 months ago. [ regularly updating ]
- It has been currently tested up to WordPress 5.8.2.
- According to the WordPress Directory, its average rating is 4.3/5. 444 users out of 571 gave it 5 stars.

4. WordPress redirect through cPanel
If you do not like to use any of the above methods for WordPress redirects, this option can be helpful for you. The method is very simple and easy. All you need to do is to
1. Go to your Web hosting’s cPanel and Under the Domains Section click on redirects.
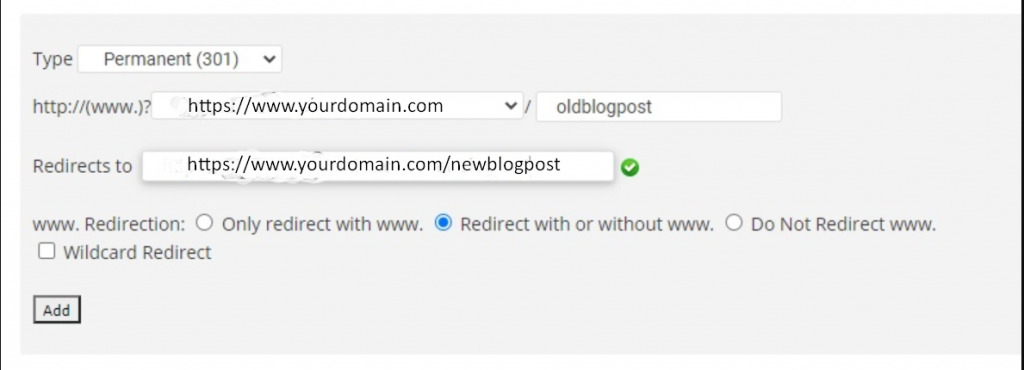
2. From the above image, you can see there are different options present. In the “Type” dropdown box, you have to select the type of redirection you would like to do, such as permanent or temporary.
3. In the second drop-down menu, you are required to select your domain and the page address you like to redirect.
4. After selecting the appropriate options, in the last box you need to provide the web address or destination URL to redirect the current page. Once you are done with providing all the information click on the “Add” button and you are done.
5. WordPress Redirect on Cloudflare
In case, your website uses Cloudflare, then you have also an option to WordPress redirect through Cloudflare as well. All you need to do is go to the homepage, select the domain you wish to redirect to

2. The next thing you need to do is to click on the “Page Rules” tab as shown in the picture below:

3. Now click on the “Create Page rule” button and a popup dialog will appear. Now enter the URL which you would to redirect. Select the “Forwarding URL” option located under the settings and choose either 301 or 302 redirects as per your choice. And at the last provide the destination URL to where you would like your current URL redirect to.
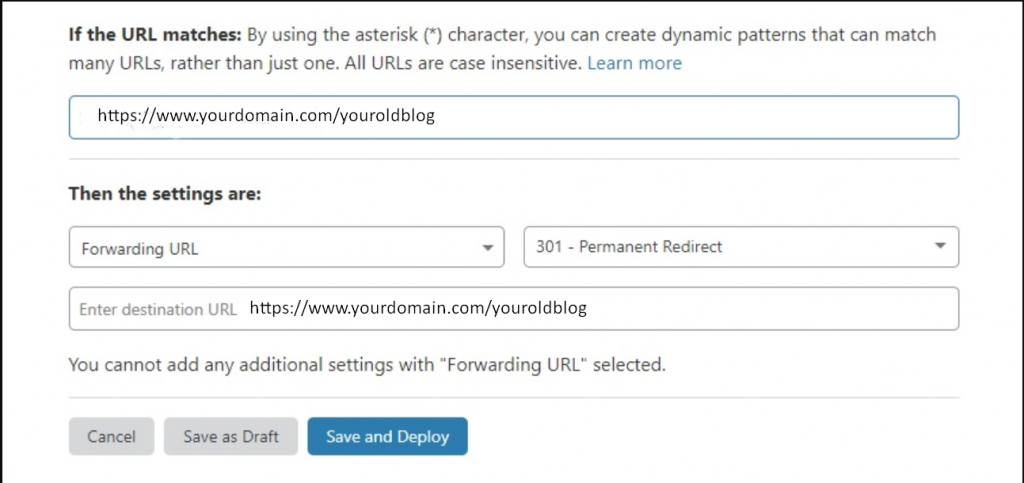
4. After providing all the essential information, the next thing you need to do is to click on the “Save and Deploy” button to complete the WordPress redirection process.
Read: 🚩 How To Setup WordPress Redirect Plugins
What is WordPress Redirect all About?
The term Redirect means to send a message to the visitors that the page they are trying to visit has been relocated. This is a method by which your website redirects or moves visitors to another location automatically.
This method is mainly implemented when you are either deleting a post/page for the new content, changing the permalinks of a page or you are completely moving your website to another domain. The major benefit of setting up WordPress redirect is to get SEO benefits as well as to improve user experience.
But if you do not choose to set WordPress redirect, it can potentially harm your domain’s SEO rankings as well as your website will have broken links, that you won’t like to happen with your website. Hence, in this post/article we try to cover all the aspects of WordPress redirecting such as its advantages and the different types of WordPress redirects you can explore.
Reasons behind using WordPress Redirects
There are various reasons behind using a WordPress redirect and it all depends on which type of redirecting you are implementing. But, the majority of the redirects are used to provide benefits to your website and the business associated with it. While some of them are used to resolve various technical glitches or issues.
Some common and main reasons for using WordPress Redirects:
- 404 errors (Page not found error)- One of the most common errors that almost every user has to face daily. These errors usually occur when a user visits a page that is not found. This mainly happens due to, either the user has typed the wrong URL or the page has been moved to a new address. However, you have also an option to make your 404 error pages more informative and entertaining to keep your visitors engaged.
- SEO Aspects- You know how links or URLs need to be well-optimized for better visibility on Search engines. No matter whether you are rebranding your website or want to implement SEO techniques on URLs, 301 redirects to another way through which you can boost your SEO. For example, if you want to make your website URLs more clean and readable, redirecting can let this happen without compromising your website’s SEO.
- Change in Permalinks- Editing or changing your permalink can be more beneficial for the SEO aspect of your website. If you want to make certain changes in the existing live URL or to completely change its structure, you need to use the redirect method to avoid a 404 page not found error.
- Updating URLs– If your website has become old and you have some popular posts or pages present in them. And you have decided to optimize the URLs for the users who use the latest devices such as smartphones. It would be great to optimize your old Urls for smartphones with better readability and make redirection for those who might have bookmarked your website as their favorites.
- Directory changes– Sometimes due to some security or any other reasons, you might need to relocate or move your website directory. In this case, 301 redirects will help your visitors to reach the right place.
Whatever the reasons for the redirection of either pages or posts, you must consider some points before proceeding with redirection. It is better you must make a complete plan about how you are going to redirect the pages/posts and their SEO aspects.
Different Types of WordPress Redirect
When you came across the term redirect, we usually understood it as a simple process in which one URL is being mapped to a different or alternate one. In simple words, using this method you can redirect users from address A to address B.
However, this method has different variations, which you can see below:
There are mainly 5 types of WordPress redirects you can use:
- 301– The most common type of redirect is 301. It is a permanent redirect and is used when the location of the page has changed permanently. Most of the time, this is the only redirect that you will need.
- 302– This is a temporary redirect that will tell the reader’s browser that the location of the page or post has been changed for the time being.
- 303– It is usually used for high-traffic shopping sites. This is helpful for ensuring that the pages that contain one-time data like the checkout page, are not refreshed or bookmarked.
- 307– This is another temporary redirect that is similar to 303. The difference is in the way information is passed from one page to another.
- 308– It is a permanent redirect that is just like 307 but has permanent status. This status code is similar to 301 (Moved Permanently), except that it does not allow changing the request method from POST to GET
All the above WordPress redirects have their own use and advantages. But for now, we will be discussing the most common and widely used 301 redirects.
Conclusion
No matter if you are going to move your website to a new address, want to make certain changes in your permalinks, or fix your website’s broken links to optimize your search engine rankings, it all depends on you and your skills to which method would be best suitable. As I have already mentioned some best 5 methods for WordPress redirect such as:
- Webhosting provider Dashboard: If your web hosting service provider gives you a dedicated link for WordPress redirection.
- Editing the .htaccess file: Best suitable option if you are looking to redirect the whole website.
- BY editing functions.php file: Best suitable option if you are looking for specified redirections.
- WordPress redirect plugins: Best suitable for beginners or users who are not comfortable in editing core files.
- By WordPress redirect on Cloudflare: If your website is using Cloudflare.
- By using cPanel: You can do if right from cPanel too.
You can choose whichever option you are comfortable with. If you have any questions regarding using redirects on your WordPress website or you find some more valuable points that we didn’t mention in this post, please do let us know in the comment section below!
Frequently Asked Questions
How many types of redirects are there?
There are mainly 5 types of redirections that are used commonly.
1. 301– Permanent Redirection
2. 302– Temporary Redirection
3. 303– For high-traffic shopping sites
4. 307- Similar to 303 but the difference in information sharing
5. 308- Similar to 307 but has permanent status
How do I set up a redirect?
1. Go to your Cpanel > Domains > Redirects
2. Select the type of redirection you want from the “Type” drop-down menu.
3. Select the domain and page address you would like to redirect in the second drop-down menu.
4. In the last box provide the destination URL to where you like to redirect your website/page to.
and you are done.
Which is better 301 or 302 redirect?
Both 301 and 302 have their own benefits for redirecting, when you are moving your website to a permanent location 301 would be the best option to do rather than using 302 reactions. However, 302 redirections are only used if you want to redirect your website temporarily, it will tell search engines to keep the old domain as it is and the page indexed.

Rahul Kumar is a web enthusiast, and content strategist specializing in WordPress & web hosting. With years of experience and a commitment to staying up-to-date with industry trends, he creates effective online strategies that drive traffic, boosts engagement, and increase conversions. Rahul’s attention to detail and ability to craft compelling content makes him a valuable asset to any brand looking to improve its online presence.

