As a Cloudflare partner, we recommend using Cloudflare as a DNS, firewall, and CDN for the sites we host at WPOven. This guide serves as a small reference for setting up Cloudflare and its official WordPress Plugin to leverage the best Cloudflare features for your WordPress site.
It covers how to use Cloudflare and configure its settings, both on the web version and through the Cloudflare WordPress plugin, to improve speed and security. This guide applies to everyone using WordPress and interested in using Cloudflare, regardless of whether your site is hosted at WPOven.
Cloudflare Domain Name Server (DNS)
This is the core feature of Cloudflare offers, where they will host your DNS and in doing so will also enable the reverse proxy on your site (this can be disabled if required) and offer various services and enhancements. If you have set up Cloudflare like above, it will import your existing NS records by default and you can easily add more if required. Cloudflare also comes in very handy to host DNS if your domain registrar does not provide any options to set advanced NS records or provides limited functionality.
DNS records are instructions provided by DNS servers that contain information on how to process a domain or a hostname. Different services use various types of DNS records. In our case, we are mainly interested in the Address name commonly known as the A name, and the Canonical name commonly known as the C Name.
- A Name: This record tells how the Domain name maps to the IP Address of the server
- C Name: tells how one domain points to another domain.
Listed below are some common domain name records –
http://www.electricmonk.org.uk/wp-content/uploads/2013/06/dns_records.bmp ( Convert it into table )
For our current requirements, we will only set up the A name and point the www C name to the IP of our server –

As the default setup is sufficient for most users, we will not cover this in detail, for more information you can visit the Cloudflare help section.
About Cloudflare Content Delivery Network (CDN)

A CDN or Content Delivery Network refers to a group of servers that are geographically distributed around the globe. These servers work together to provide access to your website based on the visitor’s location.
Cloudflare CDN is a free service to sites whose DNS is hosted on Cloudflare. By default, all static assets are cached, and this helps improve load time for your site because the main page is still fetched from your server (you can change this behavior as we will see later on).
Cloudflare then serves these static assets from the data center nearest to the user, reducing loading time and decreasing bandwidth and server load on our server. To enable CDN on your site, the only thing required is that Cloudflare is enabled on your site and it is not in bypass mode, it will show an orange cloud in your NS Record if it’s behind Cloudflare.
As a WordPress user, you also have an option of using other CDNs, we have written about it in the past, which you can read here.
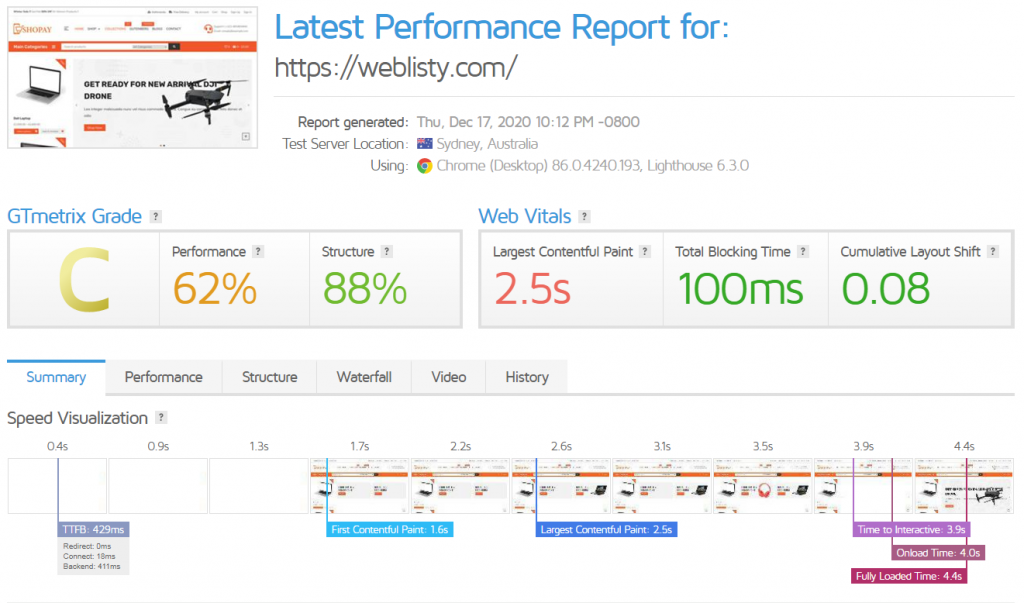
Here is a quick comparison of loading time with CDN enabled and CDN for a Vanilla eCommerce site currently, there are no optimizations applied (Since the site is hosted in a Dallas data center, we did the test from Sydney) –
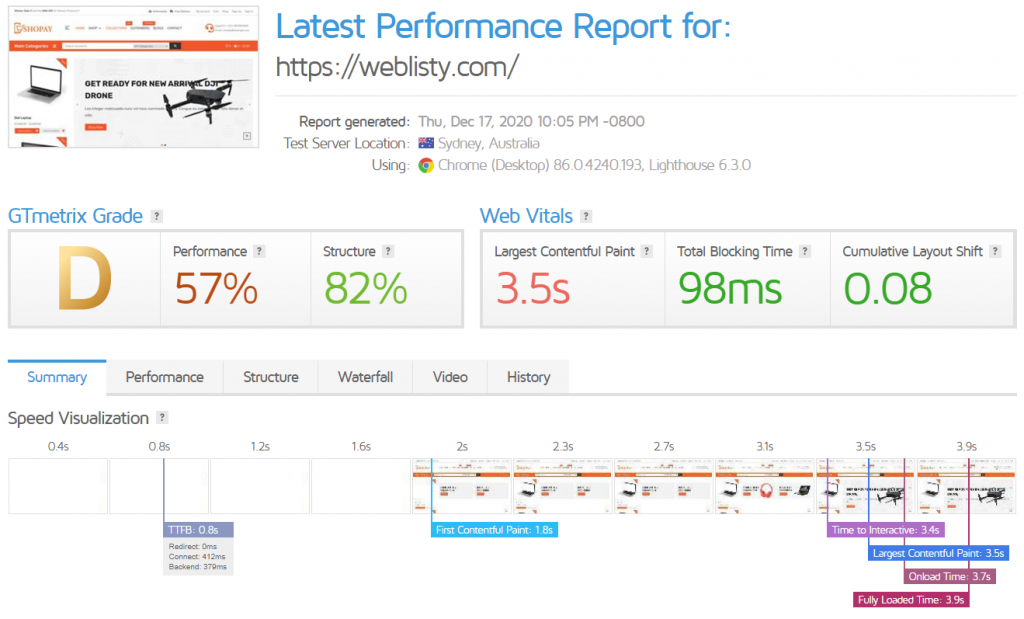
As you can see the site is not doing too great by default (we are using Gtmetrix ), Now we will enable the CDN after 2 – 3 refreshes, and we get the following (Things have improved)
If you wish to go even further and mainly run a static HTML site, you can improve things further and have Cloudflare completely cache your site and load fast the world over. To do this, you will need to add a few page rules in Cloudflare, this will make Cloudflare cache the main pages and reduce the Time to First Byte (TTFB) even further.
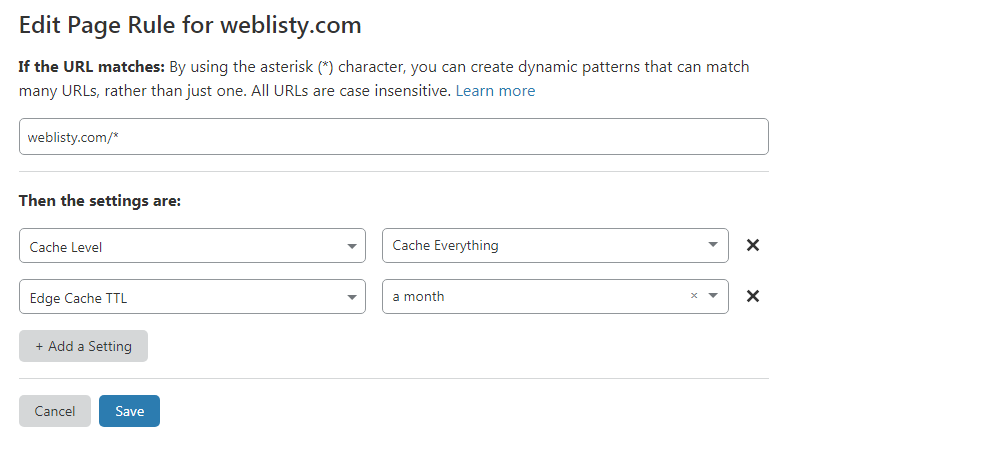
As page rules will not allow you to work on your site directly, you will need to set up a local host file entry on your machine, which points your domain directly to your server. You can read about setting these host records. This will also require a Cloudflare plugin installed on your site to clear the cache when you have made the changes. You can download it here or using the internal WordPress Add new plugins search.
Here is a quick comparison of the rule enabled and load time before and after the rules were put in place. You can think of this as your own free Cloudflare APO alternative.
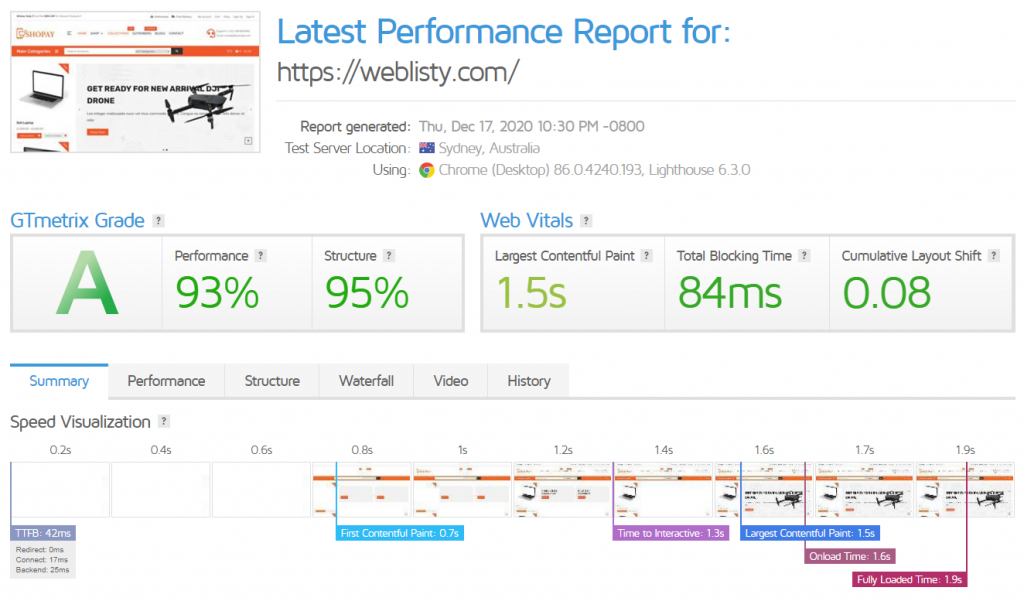
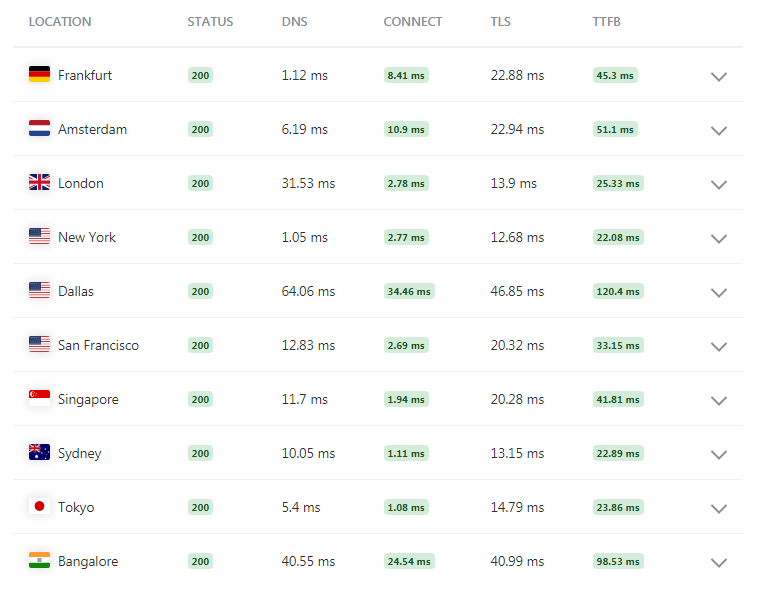
If you wish to take the numbers even further up with nearly 100 ratings on GTMetrix you can explore the nitro boost feature on our WPOhub plugin which delays the JavaScript load and increases both Page speed and GTMetrix performance.
How to configure Cloudflare settings for optimum results?
Cloudflare has plenty of options available that can help your website and make it safe and faster, but the problem is not all of them work perfectly with WordPress. But you do not need to worry, given below are some of the best Cloudflare settings that work best for your WordPress site.
- Cloudflare SSL
- HTTPS settings
- Cloudflare Speed Optimization
- Caching settings
- WordPress Firewall using Cloudflare
- Cloudflare’s Network Settings
1. Cloudflare SSL
Another great feature of Cloudflare is the free SSL offered to all websites hosted through it. This feature ensures that communication between your site and the clients is secure and cannot be snooped. Cloudflare supports multiple ways on how to set it up.
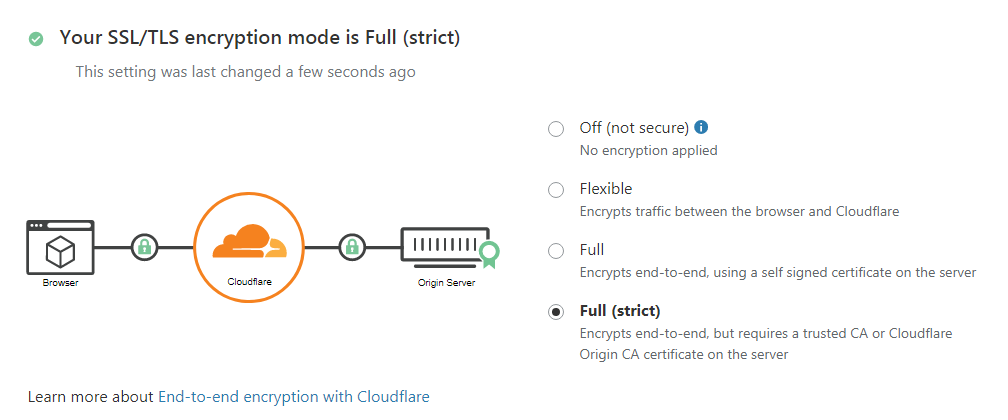
Cloudflare provides four SSL/TLS encryption modes:
- Off: This mode disables encryption entirely.
- Flexible: Encrypts only the connection between the browser and Cloudflare.
- Full: Implements end-to-end encryption but permits the use of a self-signed certificate on the origin server.
- Full (Strict): Offers end-to-end encryption and mandates a free origin certificate from Cloudflare or a certificate from a trusted Certificate Authority (CA). We strongly advise using the Full (Strict) SSL mode for optimal security.
2. Always Go for HTTPS
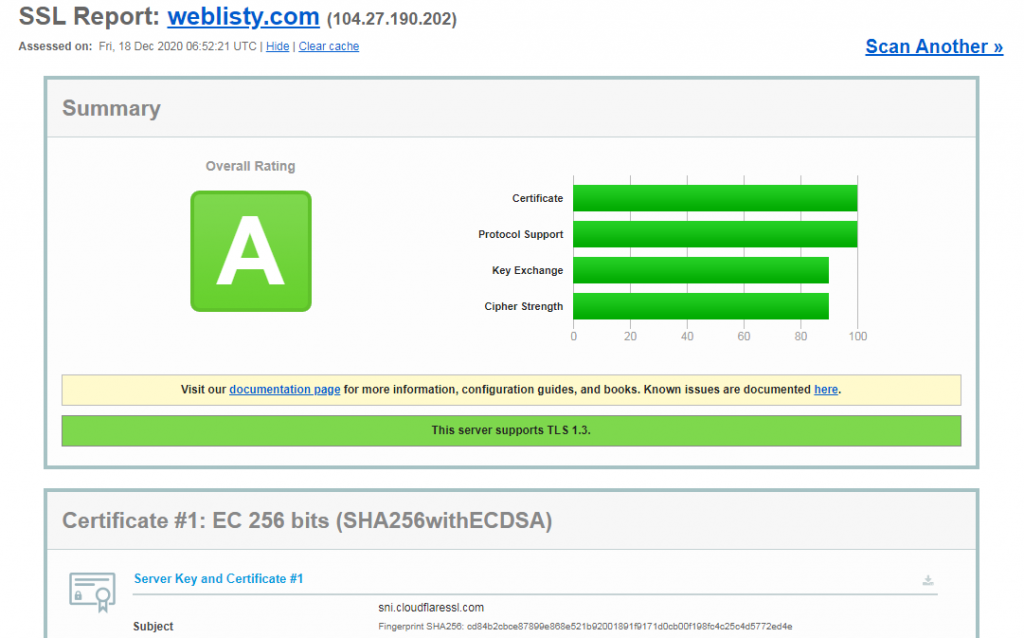
We recommend the Full or the Strict mode, The default settings are usually fine for most setups, but if required, you can Tweak the following settings –
- Under Edge Certificates, enable “Always Use HTTPS”, this will not allow unsecured access to your site.
- Similarly, set “Minimum TLS Version” to 1.2 as below that it is not considered secure, also if your compliance standard requires it.
- Similarly, enable “Automatic HTTPS Rewrites” This will make sure you do not get a mixed content warning when you migrate from an HTTP to an HTTPS site.
3. Cloudflare Speed Optimization
If you are looking for Website Speed Optimization, Cloudflare has a dedicated tab for it. All the settings related to speed optimization can be found under the “Speed” tab.
3.1 Image Resizing
Cloudflare’s image resizing feature is exclusive to Business plans and when it is configured correctly, it has the following advantages,
- It helps offload image thumbnail making to Cloudflare from WordPress.
- Saves CPU usage, letting more users visit your site without needing extra CPU power.
- Reduces disk space because you don’t have to store thumbnails on your server.
- It works by adding something to your image links to resize them.
For example, if you want to resize the image URL: ” https://example.com/wp-content/uploads/2024/09/sampleimage.jpg “
After Resizing it will be changed into something like this: ” https://example.com/cdn-cgi/image/fit=contain,format=auto,metadata=none,onerror=redirect,quality=70,width=720/https://yourdomain.com/wp-content/uploads/2024/09/sampleimage.jpg “
3.2 Auto Minify
This particular Cloudflare feature is very helpful in minifying cached CSS, JSS, and HTML. In case, you are not using any type of third-party WordPress plugin like WP Rocket to minify assets, it is better to go with Cloudflare’s Auto Minify feature.
WPOven users have an additional advantage in this regard. Apart from Cloudflare’s integration, they can also use WPOven’s Proprietary Minification Plugin and enable integrated WP Rocket, which comes bundled with hosting plans for free.
3.3 Cloudflare Polish
Cloudflare’s polish feature is exclusively available for pro plan users and automatically compresses any supported image format your WordPress site has.
- Cloudflare Polish compresses image files like JPG, PNG, and GIF automatically.
- It works at Cloudflare’s edge, so it doesn’t slow down your WordPress site’s server.
- Polish also supports the WEBP format, serving optimized WEBP images to compatible browsers like Chrome and Brave.
- It’s helpful for WordPress sites because it reduces server CPU usage, especially if you use other image optimization plugins.
- Polish-optimized images are not stored on the server and save disk space since you don’t need to store WEBP versions on your server.
3.4 Brotli compression
Brotli compression is somewhat similar to Gzip compression but follows a different algorithm that makes files smaller for faster transmission over the internet. It was developed by Google and has a better compression ratio than Gzip.
The downside of Brotli is that it’s not widely supported, but that doesn’t mean you shouldn’t enable it. You should go for it, and if the browser doesn’t support it, it will automatically switch to Gzip compression.
3.5 Rocket Loader
Rocket Loader is another feature of cloudflare that helps make websites faster by loading JavaScript files more smartly.
- This reduces a page’s render-blocking content, leading to faster page load times.
- Instead of waiting for one JavaScript file to load before moving to the next, it loads them all at once.
- This means pages can load quicker because they don’t have to wait for all the JavaScript to finish loading.
- It’s especially handy for websites that use a lot of JavaScript for fancy features.
- It’s recommended to test your site with Rocket Loader enabled to see if it improves page speed.
3.6 Mirage
Mirage is another cloudflare’s pro feature that mainly focuses on mobiles and slow-speed connections. This is how it works:
- When the web page is loading, Mirage shows blurry images first, After the page loads, it replaces the blurry images with original ones.
- It can also put multiple images into one request, making the page load faster.
- If your website has lots of images and many people visit it on their phones, Mirage can make your site load faster.
3.7 Enhanced HTTP/2 Prioritization
Enhanced HTTP/2 Prioritization is a feature available only for Cloudflare Pro users.
- HTTP/2 made websites faster by loading resources simultaneously.
- Cloudflare’s enhanced HTTP/2 prioritization goes beyond that by analyzing your website’s HTML to decide which resources to load first for the fastest performance.
- According to Cloudflare, this feature can cut page load times by up to 50%.
4. Caching Settings
For better caching, you can follow these settings:
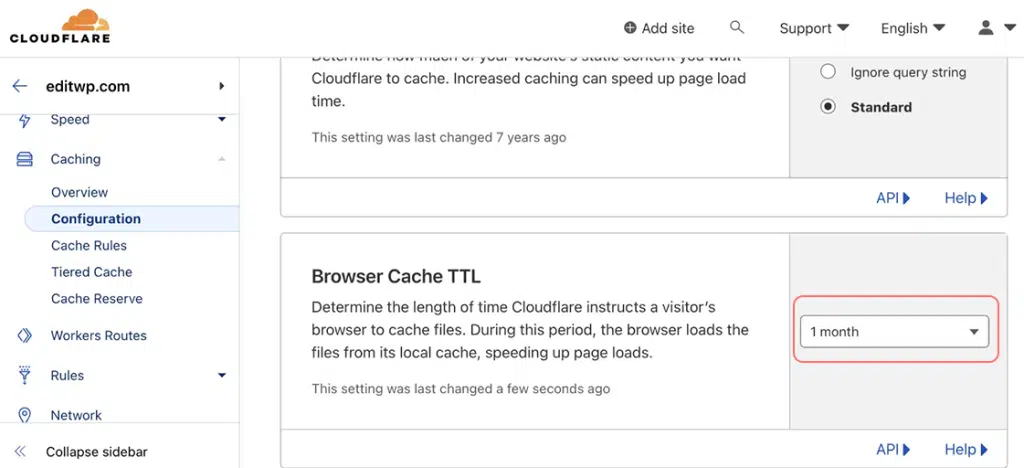
- Go to the “Caching” menu and click on “Configuration”.
- Set your “Browser Cache TTL” to at least 1 month to follow Google’s rules.
- Longer cache times mean more visitors can see your site quickly using Cloudflare.
- If you use Cloudflare APO, keeping cache times longer can speed up your site even more.
4.1 Enable Crawler Hints
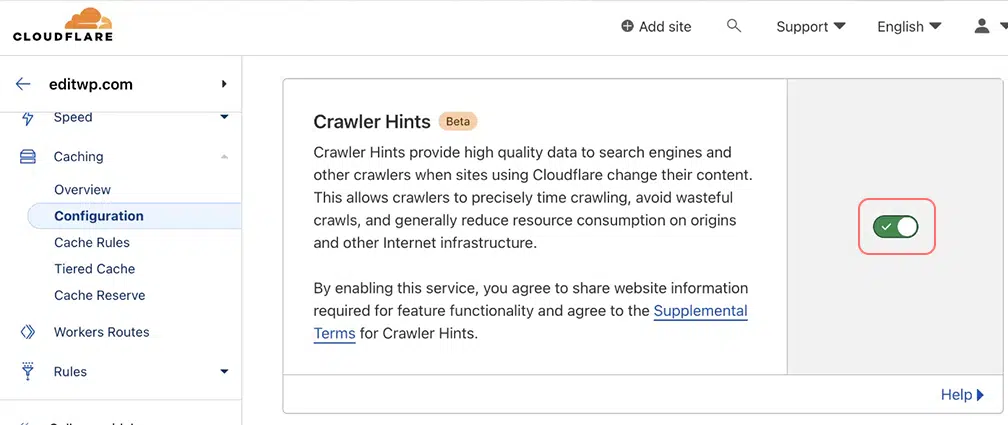
- Turn on “Crawler Hints” to help search engines work better and lighten the load on your server.
4.2 Enable Always Online
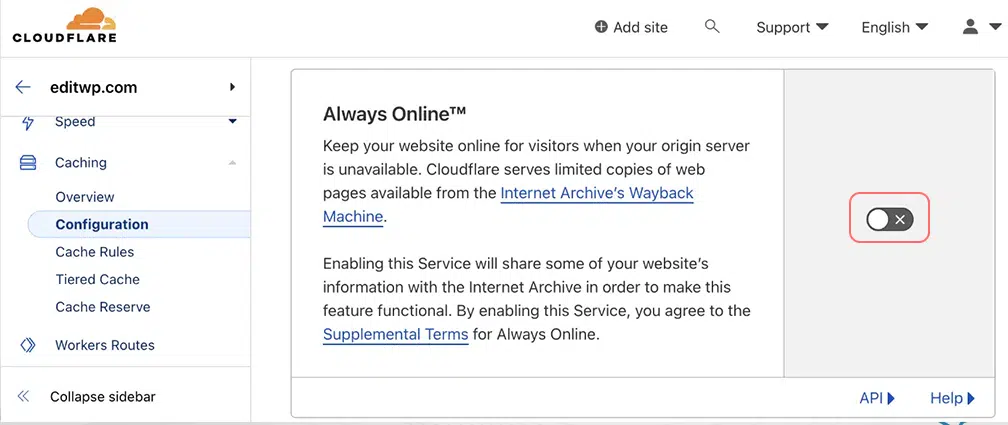
- “Always Online” keeps a copy of your site in case it goes down, but it might not be good for online stores.
4.3 Caching level
It is recommended that you should Keep “Caching Level” as “Standard”.
4.4 Enable Smart Tiered Cache Topology
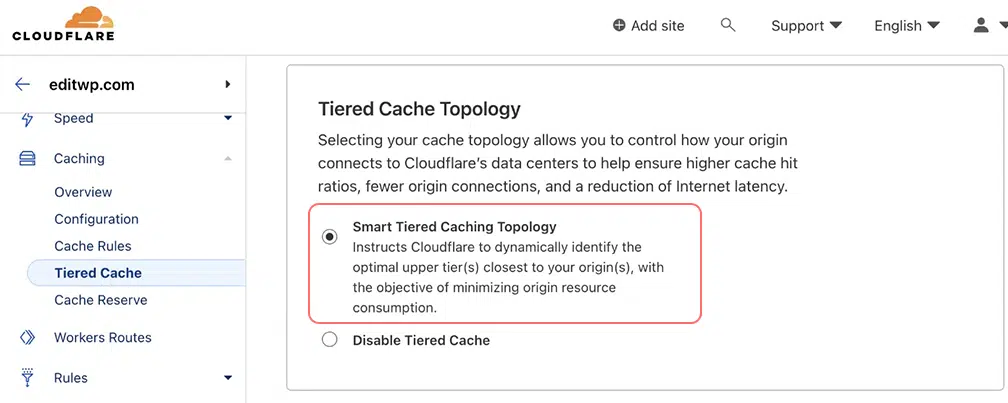
- Use “Smart Tiered Caching Topology” to save bandwidth and make your site cheaper to run.
4.5 Enable Cache Reserve
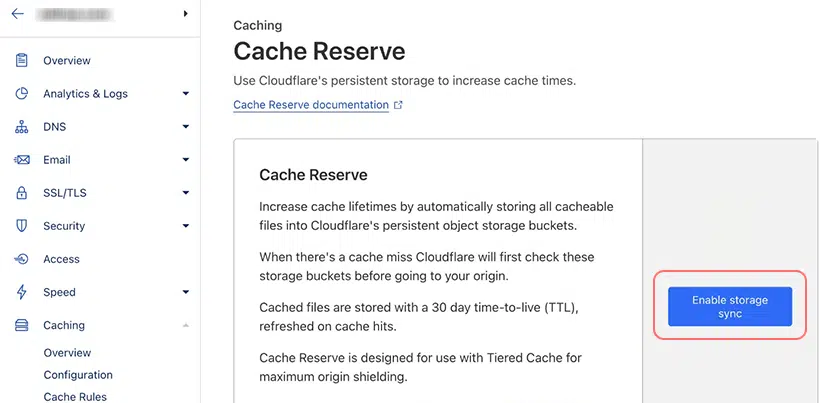
- You can also use “Cache Reserve” to keep some parts of your site in the cache for longer, but it might cost a bit and only works for certain types of files like images.
5. WordPress Firewall using Cloudflare
Another plus point of using Cloudflare is, that you will have its Web Application Firewall offered on all websites.
We recommend you to follow at least 2 rules, that will help you to protect your website from the majority of the attacks. e.g. DDoS, Brute force, etc.
If you are already using a strong password for your website, then you should not be worried. However, a lot of requests from bots or attackers can harm your CPU and excessive resource usage.
To begin with the rules, first, you need to whitelist your IP address. To do this, Go to Cloudflare Panel > Click on “Firewall” Tab > Tools.
In the Tools section, you can add your IP ( google “what’s my IP” to know your public IP), if you have a dynamic IP you can put in an IP range similar to the IP you are assigned at different times.
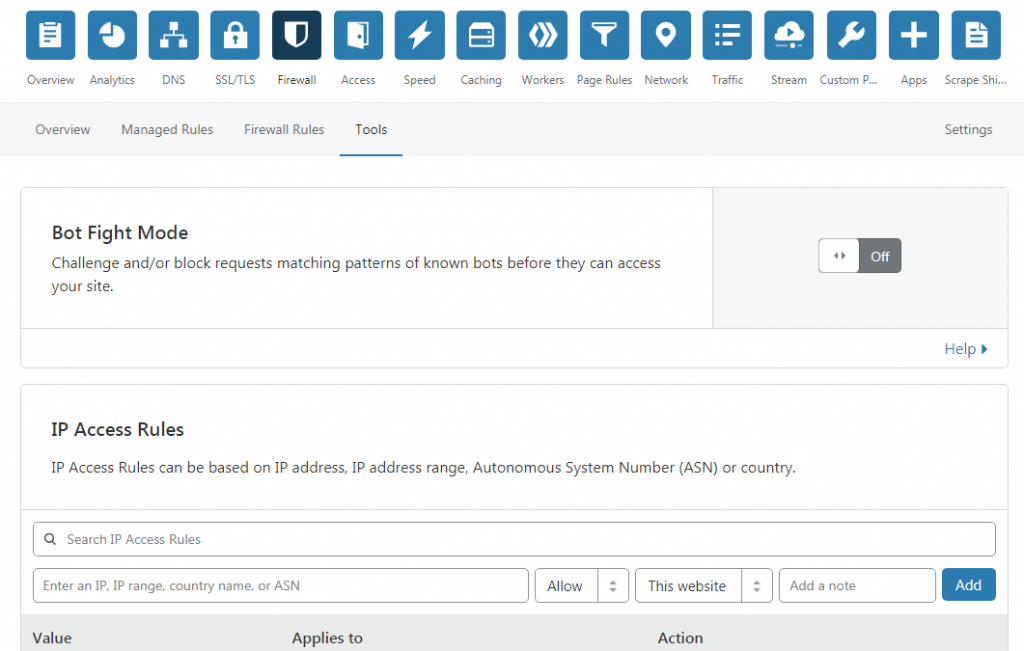
Next, we will add a few page rules to address the most common issues we usually see with a standard WordPress Site.
1. Block access to the wp-login.php, this page is used to log into your site and is a common endpoint for attackers to perform brute-force attacks on, so we will create a rule to check if the browser is being used and also perform additional checks to make sure it is not a bot.
Create a Page rule like given below and deploy it –
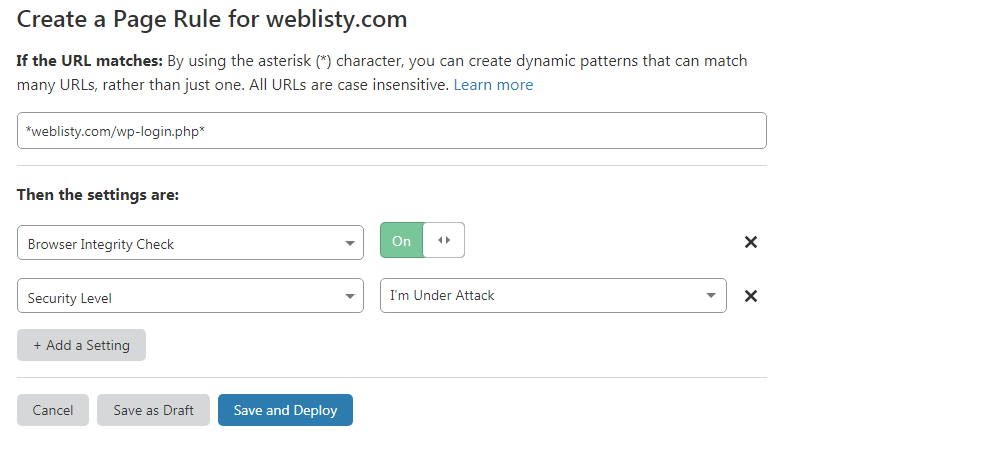
You can also use a plugin to hide WordPress login to avoid adding this rule.
2. We will also restrict access to xmlrpc.php, so it is also not used for brute-force attacks on the site, in Firewall under firewall Rules you can create the following rule, we will block all access other than to JetPack (You can find a list of JetPack IP range on this page )
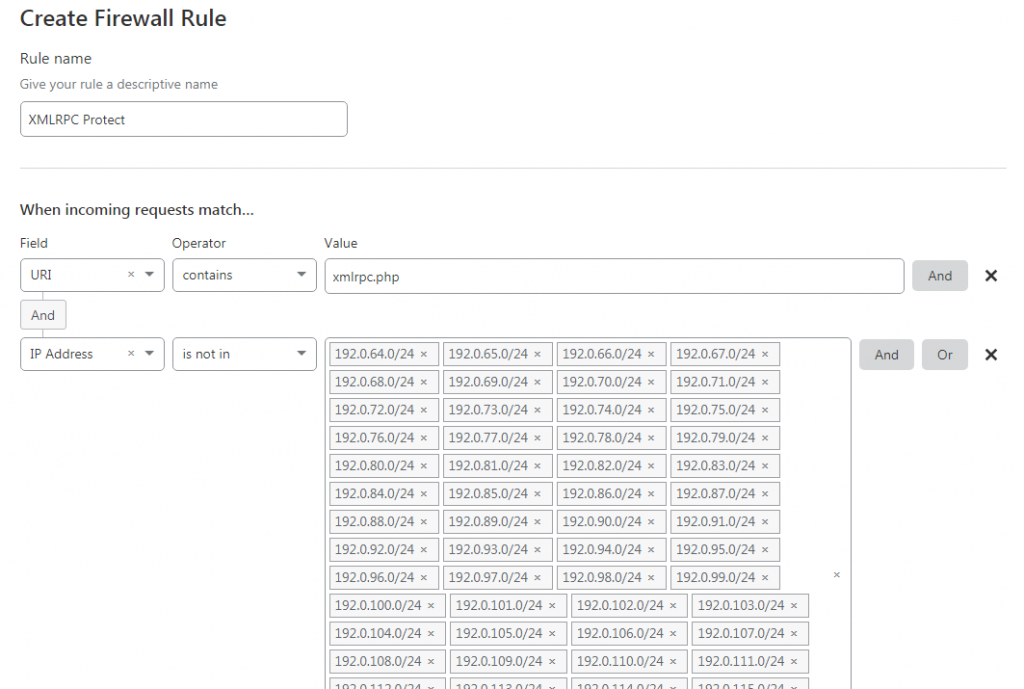
You can also use the expression below and build the rule –
|
1 |
(http.request.uri contains "xmlrpc.php" and not ip.src in {192.0.64.0/24 192.0.65.0/24 192.0.66.0/24 192.0.67.0/24 192.0.68.0/24 192.0.69.0/24 192.0.70.0/24 192.0.71.0/24 192.0.72.0/24 192.0.73.0/24 192.0.74.0/24 192.0.75.0/24 192.0.76.0/24 192.0.77.0/24 192.0.78.0/24 192.0.79.0/24 192.0.80.0/24 192.0.81.0/24 192.0.82.0/24 192.0.83.0/24 192.0.84.0/24 192.0.85.0/24 192.0.86.0/24 192.0.87.0/24 192.0.88.0/24 192.0.89.0/24 192.0.90.0/24 192.0.91.0/24 192.0.92.0/24 192.0.93.0/24 192.0.94.0/24 192.0.95.0/24 192.0.96.0/24 192.0.97.0/24 192.0.98.0/24 192.0.99.0/24 192.0.100.0/24 192.0.101.0/24 192.0.102.0/24 192.0.103.0/24 192.0.104.0/24 192.0.105.0/24 192.0.106.0/24 192.0.107.0/24 192.0.108.0/24 192.0.109.0/24 192.0.110.0/24 192.0.111.0/24 192.0.112.0/24 192.0.113.0/24 192.0.114.0/24 192.0.115.0/24 192.0.116.0/24 192.0.117.0/24 192.0.118.0/24 192.0.119.0/24 192.0.120.0/24 192.0.121.0/24 192.0.122.0/24 192.0.123.0/24 192.0.124.0/24 192.0.125.0/24 192.0.126.0/24 192.0.127.0/24}) |
Using these two basic rules we can block the most common brute force and automated threats the WordPress faces.
6. Cloudflare’s Network Settings
In Cloudflare’s “Network” settings, turn on HTTP/2, HTTP/3 (with QUIC), and 0-RTT Connection Resumption.
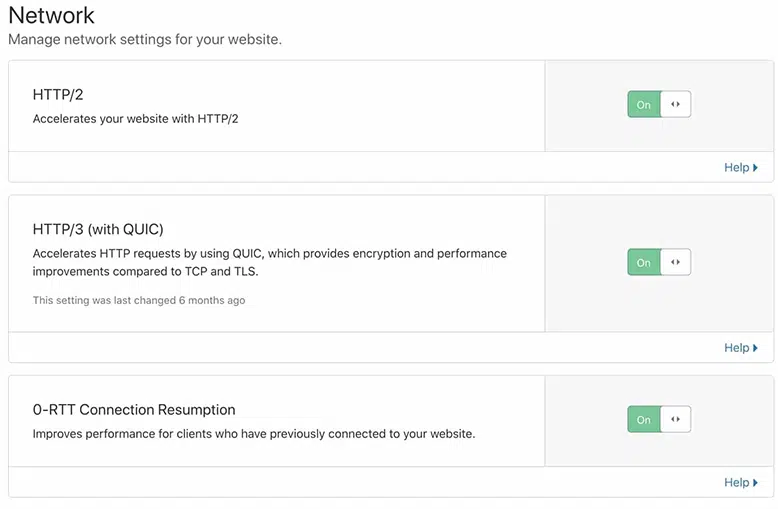
- HTTP/2 makes things faster by doing multiple things at once, while HTTP/3 goes even further using a new way of sending data called QUIC.
- When you use HTTP/3, your site connects to Cloudflare faster because it uses a better setup.
- Also, Cloudflare’s 0-RTT Connection Resumption makes your site load quicker for people who have visited it before.
How to configure Cloudflare WordPress plugin settings for optimum results?
As you will be using Cloudflare to cache your static assets or even dynamically generated ones, it is best to install the WordPress plugin provided by Cloudflare. This allows you to clear the Cloudflare cache easily in case you make any updates to your site, it is also needed if you are using the Automatic Platform optimization (APO) feature provided.
To get started with the installation it is quite easy, visit the Add New Plugin section of WordPress and search for Cloudflare, once the plugin is found, simply click Install then activate the plugin, the only configuration required for the plugin is to connect it to Cloudflare so that our site can notify it about the changes.
To connect the site to our Cloudflare plugin we will use the Token Method as we do not wish to share global API so use the following settings to create the custom token –
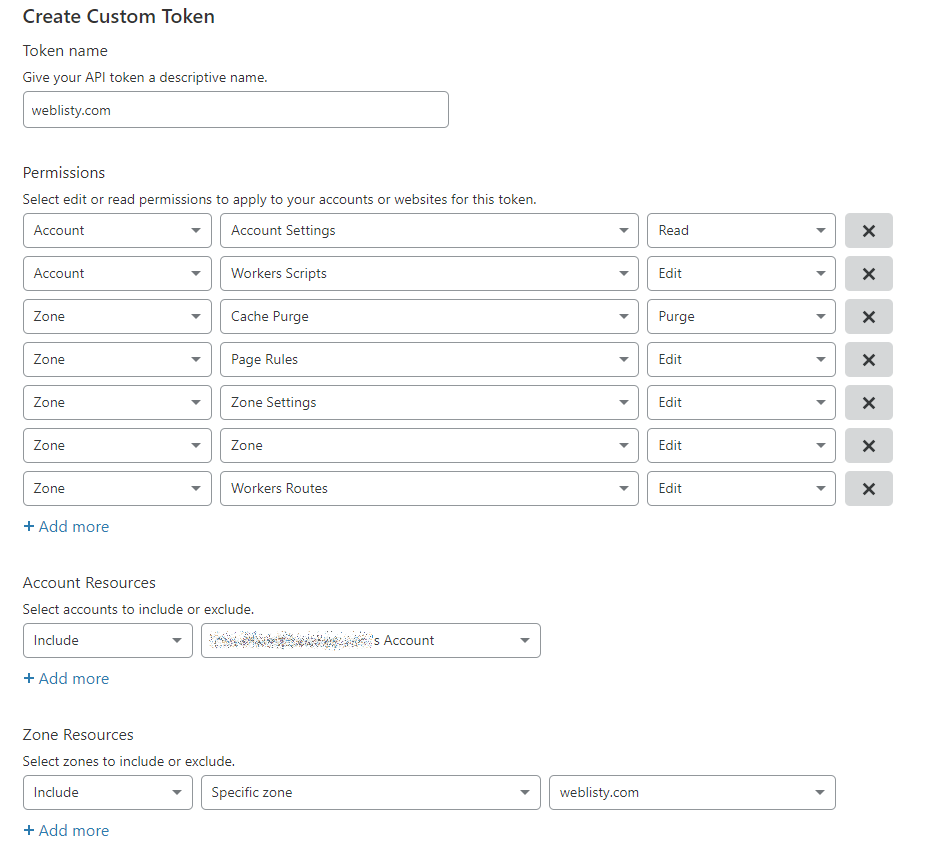
Once the token is created, copy the token and active the plugin you will see the following page –

Most settings will be already configured for best use.
For complete Step by Step Read: How to install Cloudflare on Your WordPress site?
1. Cloudflare Automatic Platform Optimization (APO)
If you use Cloudflare, by default it caches only static assets of a website. But it can also cache webpages if required. The only problem is, that you have to go for some extra steps to update and work with the website.
But this problem can also be solved if you choose to use Cloudflare WordPress Plugin. The plugin will make everything automatic for you and reduce these extra steps.
Let us see how it works.
With APO, all website asses, that include pages are moved to the edge nodes. It reduces the TTFP of the website globally and enhances the overall user experience.
This functionality is available as a 5$ paid addon on the free plan and requires an additional Cloudflare WordPress Plugin to be added to the site.
As this is a paid addon we will not be covering it here at the moment.
2. Argo and Railgun
Argo and Railgun are two performance-enhancing features offered by cloudflare.
Argo
- It is an additional service from Cloudflare that can help your website’s traffic find the fastest route.
- With Argo, your visitors avoid slow spots in Cloudflare’s network, making your site load quicker.
- Tests show Argo can make pages load 20-30% faster.
- It’s a great feature for Cloudflare users who want to boost their website’s speed even further.
Railgun
Railgun is another Cloudflare tool that speeds up how fast your website’s content gets to visitors. This is how it works:
- It creates a secure path between your server and Cloudflare’s servers.
- Railgun sends only the parts of your site that change between requests, making things load faster.
- This feature is exclusive to higher or pro plans and needs extra software on your server.
- For most websites, Railgun isn’t necessary, but it’s valuable for busy e-commerce stores and high-traffic websites that can’t be cached.
Summary
Understanding how to configure Cloudflare settings properly, along with its official settings for WordPress sites, can enhance the speed, security, and performance of your website.
Cloudflare is one of the best things that could happen to any WordPress site, regardless of the type of business you run. It can be a boon that adds a tremendous amount of value to your website. Pairing it with WordPress and the fastest WordPress-managed hosting, nobody can beat your website’s success in the long run.

Frequently Asked Questions
Should I use Cloudflare with WordPress?
Yes, using Cloudflare with WordPress is generally recommended. It can improve your site’s performance, security, and reliability through features like content delivery network (CDN), security protection, and DNS management. Plus, Cloudflare offers a free plan with basic features, making it accessible to all WordPress users.
How do I protect my WordPress with Cloudflare?
Cloudflare is best known for providing security and content delivery networks (CDNs). Therefore, when you enable Cloudflare on your WordPress site, it can protect against various threats such as DDoS attacks, malware attacks, etc. However, it doesn’t mean you should not take any action on your end. You should also host your website on secure and reputable dedicated servers.
Does Cloudflare improve SEO?
Yes, Cloudflare can indirectly improve SEO by speeding up page loading times, enhancing website security, reducing downtime, and providing SSL encryption. These factors contribute to a better user experience and increased trust from search engines, potentially leading to improved SEO rankings.

I am a Co-Founder at WPOven INC currently living in Vancouver, Canada. My interests range from Web Development to Product development and Client projects. I am also interested in web development, WordPress, and entrepreneurship.



![How to Fix Error 523 "Origin Is Unreachable"? [Solved] Error code 523](https://www.wpoven.com/blog/wp-content/uploads/2023/12/Error_523.png.webp)
