You must have encountered some common errors while trying to access your WordPress site that show a forbidden message. You likely came across a 403 forbidden error. In this guide, we will take you through how to fix the 403 error code. We will cover detailed information on how to resolve the issue so without any further delay let’s get started.
How to Fix 403 Forbidden Error on Your WordPress Website?
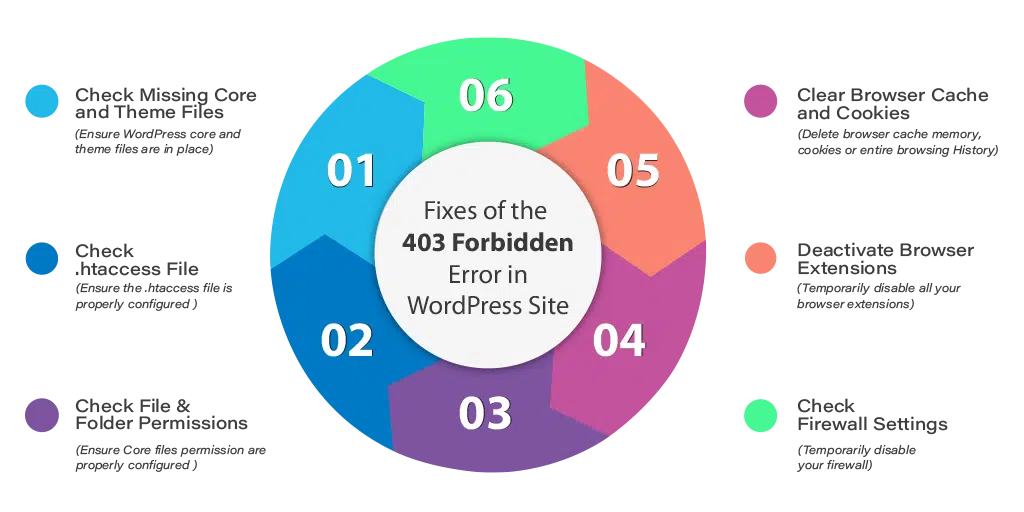
Irrespective of the platform, most of the troubleshooting methods apply to all the websites. You can use these methods to resolve the “403 forbidden access to this resource on the server is denied!” Error –
First things first, before making any changes we recommend you take a backup of your files and database. In case you are using WordPress and can access the WordPress Dashboard you can take the help of a backup plugin. We recommend using a backup plugin that creates automatic backups at regular intervals.
1. Check Missing Core Files and Theme Files
Please check that all WordPress Core Files are in place, you can upload the core files manually using a File Transfer tool.
Also, check that all these files are properly uploaded. Specially check the index.php files at root, inside wp-admin, theme folder, and individual plugin folders.
2. Check .htaccess File Configuration
.htaccess is a hidden file in the public_html directory of your Apache-based web server. The function of the .htaccess file is to define the web response to various queries, especially to set up the redirects, restrict access to various bots, etc. In some cases, there are differences .htaccess files for the root directory and subdirectories in WordPress like wp-admin and wp-includes.
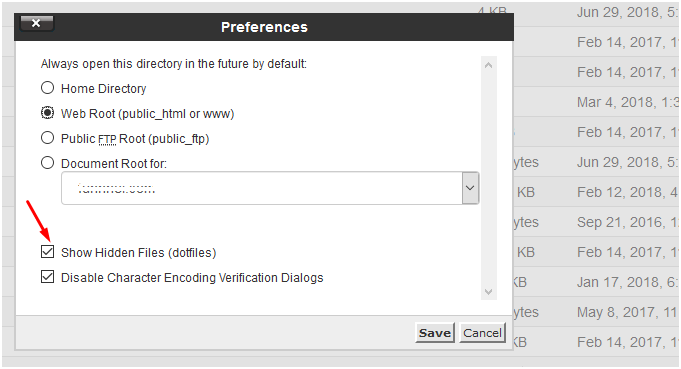
To access this hidden file you can go to File Manager, and select the hidden checkbox in the options provided in the pop-up as shown in the image below:
If a pop-up doesn’t appear you can go to Settings under File Manager at Top Right as shown below:
Once you have selected to show the hidden files you will be able to see the .htaccess file

You can download it to your local machine and edit using an editor, a Notepad, Dreamweaver, or any other similar editing tool.
You can also right-click on it and Edit it as shown below:
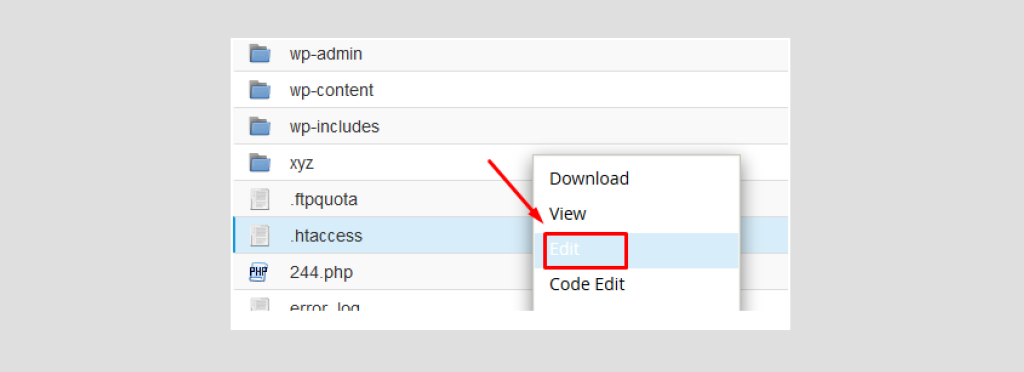
This will open up an editable file like this:
If a .htaccess file is not yet created on your system, you can create it as well. To create it go into your public_html folder, or the website-specific default folder if you have hosted multiple websites on your Cpanel, and click on Add New File:
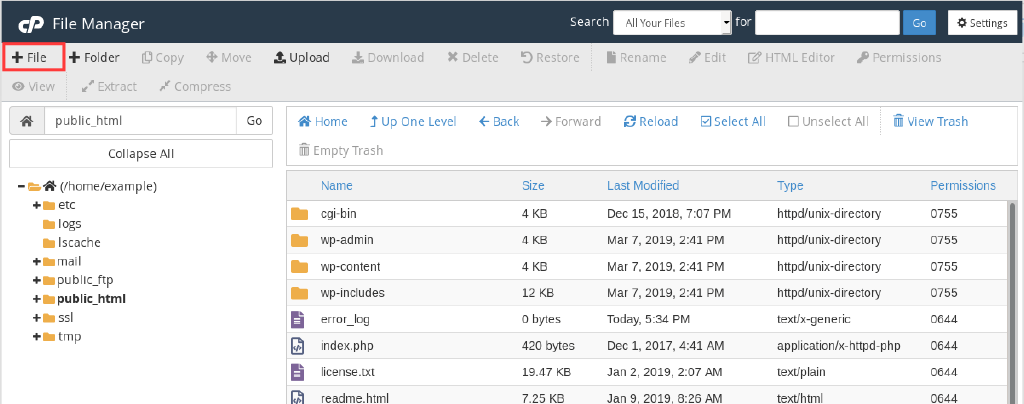
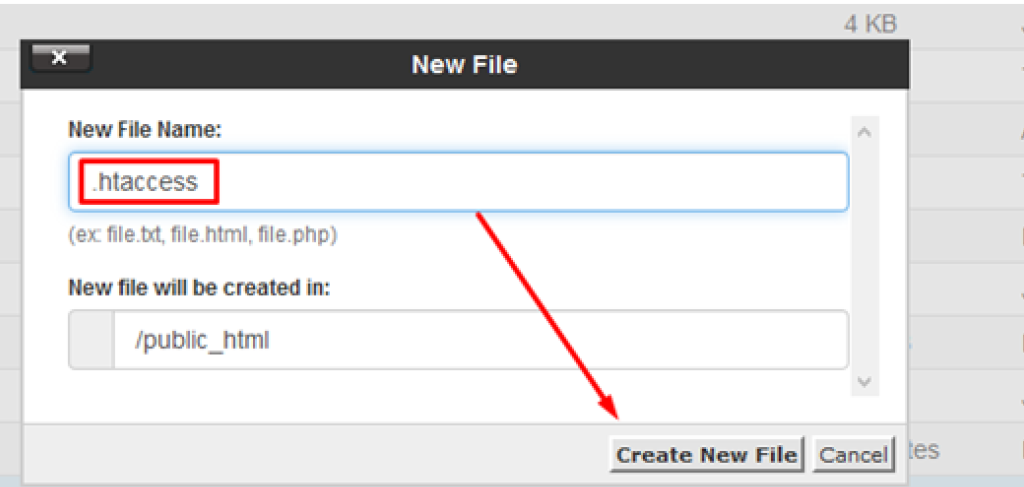
So, if your WordPress website is facing a 403 forbidden error issue, and a .htaccess file exists, delete it and try to access the website or the specific page with the issue. If it works fine, it means that your .htaccess file was not configured correctly. If you don’t want to delete the .htaccess file, you can just remove all the code and save the empty file instead.
You can regenerate the fresh .htaccess file now from your WordPress Dashboard. You will have to go to Permalinks under Settings, as shown below:
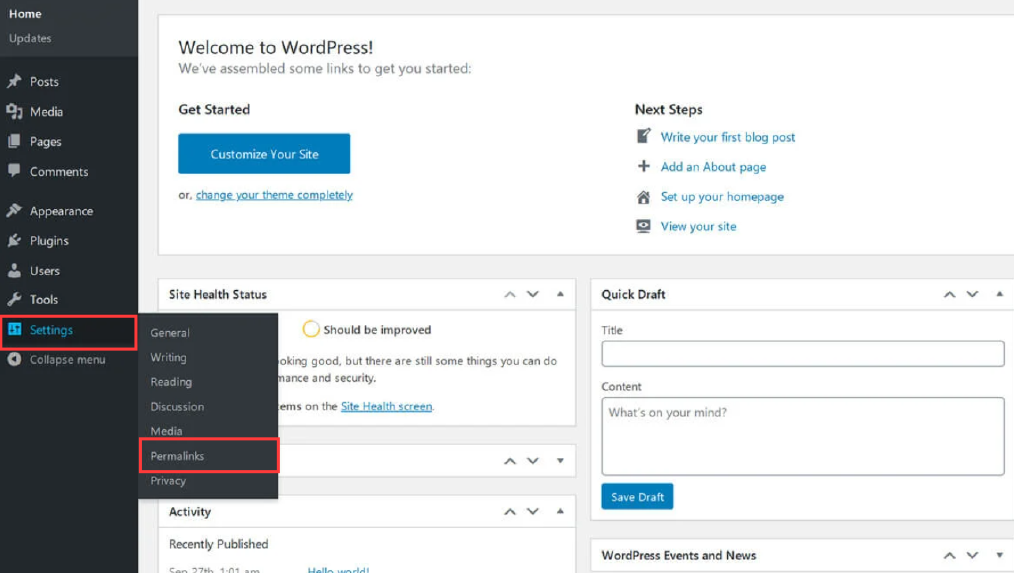
And Click on the Save Changes button. Please note, that you don’t have to change the settings here unless you want to change the permalink settings or URL structure.

3. Directory Browsing and 403 Error
Directory browsing simply means in the absence of a default home page file (index.php or index.html) the server will display the directory content to the visitor. A visitor will be able to see files and subfolders of the main folder and certainly, you don’t want to display it, as shown below:
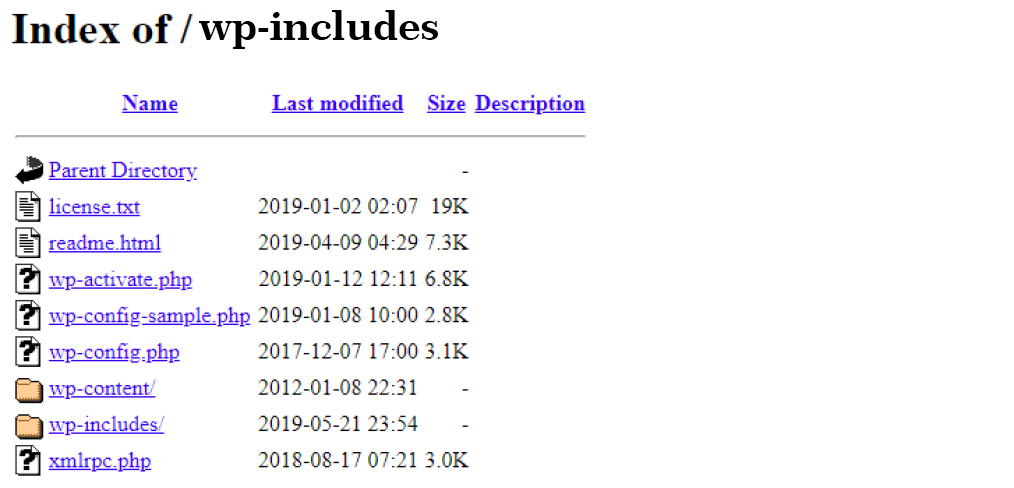
Most of the servers by default disallow directory browsing to hide the content of the folder. In such cases, if the default root file (index.html or index.php) is missing the server will return a 403 Forbidden error.
How to Disable Directory Browsing using the .htaccess file?
Open the editable .htaccess file, as described in the previous section. (Note: remember to back up the existing .htaccess file)
By default, the WordPress .htaccess file looks like this:
#BEGIN WordPress
RewriteEngine On
RewriteBase /
RewriteRule ^index\.php$ - [L]
RewriteCond %{REQUEST_FILENAME} ! - f
RewriteCond %{REQUEST_FILENAME} ! - d
RewriteRule . /index.php [L]
#END WordPress
Just add this line of the code after the last line:
Options -Indexes
Update or Upload the edited .htaccess file, and refresh the page to see if the problem is resolved.
4. Check File and Folder Permission
The default file permission settings are applied to the core file and folders when WordPress is installed or a new file or folder is created in your cPanel.
You can go to each folder and change the permission settings. You can do it for specific files as well. Some hosting providers also provide tools to reset the permission settings.
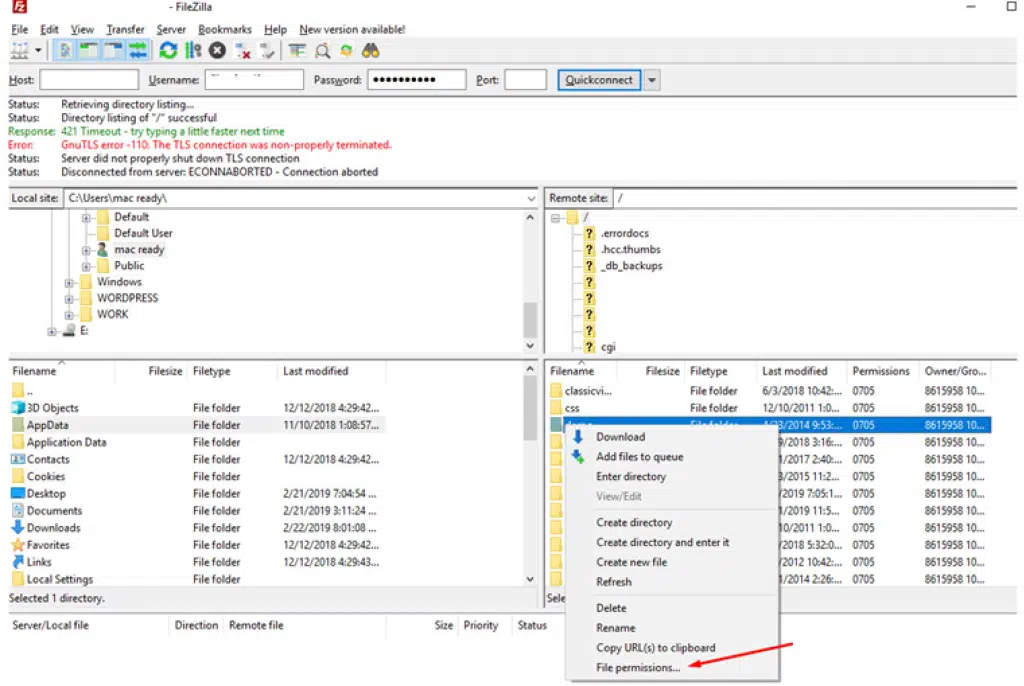
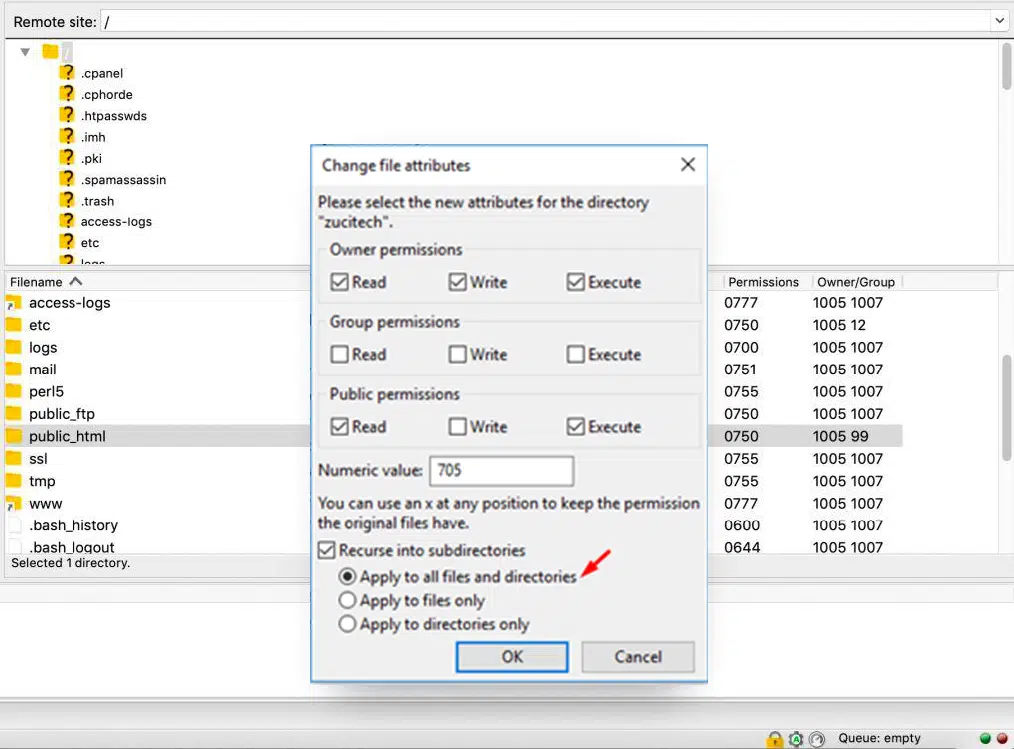
You can also edit permission settings using the FTP tool (Filezilla for example). It will give you additional options as follows:
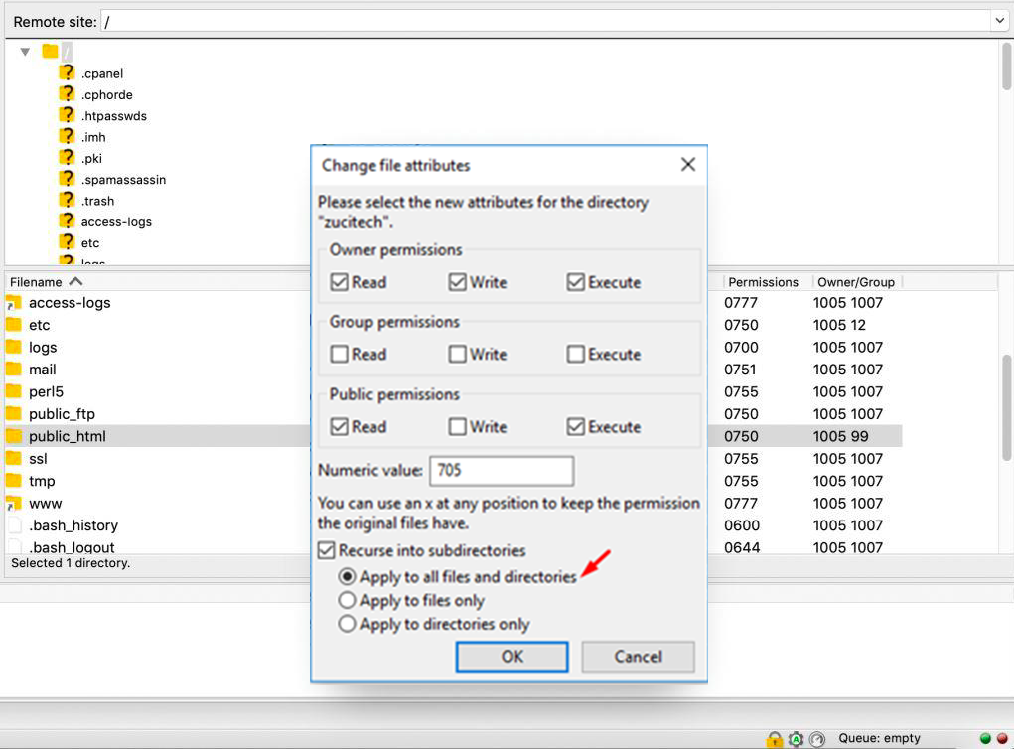
- Permission settings to be only applied to selected directories or files
- It is to be applied in all subdirectories and files within the selected directory
- Also, it is to be applied only in all subdirectories within the selected directory
- Permissions settings are to be applied only in all files within the selected directory
Following are the default permission settings for WordPress Files:
- First of all change permission settings to 755 or 750 for all the directories
- Change permissions settings to 644 or 640 for all the files (select the “Apply to files only” option)
Note: There is an exception to the above rule for the wp-config.php file. The WP Config file is used to connect WP files to the Database. It includes the necessary database name, DB username, and password. The file permission for wp-config should either be 440 or 400.
Changing the permission settings accordingly should resolve the 403 forbidden error issues.
Caution: Perform this step when you are sure about what you are doing. It is an expert job. Playing around with file permissions can lead to compromising your website or server’s security. Incorrectly configured file permissions can leave a gate open for hackers or malware.
5. Check Plugin
If the issue is still not resolved you need to check if there is a plugin that is causing the issue.
To do this first deactivate and uninstall any of the recently installed plugins. If it resolves the issue you can identify the incompatible plugin.
If still, the problem persists, deactivate the other plugins one by one and check the website. You will be able to identify the problematic plugin, and you can replace it with another plugin that provides similar functionality.
- Deactivate all the plugins from your WordPress Dashboard
- Check the website if it works now.
- If it works Re-activate the plugins one by one to identify the problematic ones.
- Repeat steps two and three until the 403 error is shown.
- Congratulations, you have identified the plugin that is causing the problem.
- You may need to delete it entirely and replace it with another plugin with similar functionality.
One of the other lesser recommended methods of deactivating plugins is changing the name of the Plugins folder to something else.
You can also change the name of individual plugin folders one by one If you follow this process of changing folder names, you will see several errors in your WordPress dashboard stating that “Plugin file doesn’t exist”.
Don’t panic seeing this error message as it will be fine once the folder name is changed back to what it was originally. You will have to activate them again from the WP Dashboard after changing them back to their original name.
Note: Most of the time the issue is found with either one of the caching plugins or the security plugins. So, keep an eye on these plugins.
“403 forbidden access to this resource on the server is denied!” Error in WordPress Multisite
If you have WordPress Multisite installation and getting a 403 error the chances are you have created a wildcard subdomain.
Just change it to remove the wildcard setting for a subdomain, and it should resolve the issue.
You also need to check the subdomain redirects.
How to Fix 403 Forbidden Error on Google Chrome?
Sometimes your Chrome browser can also be the culprit to trigger 403 forbidden errors. So, you resolve this issue from the Chrome browser, there are certain methods you need to follow:
Some Quick and easy Solutions you must try at first:
- Refresh or Reload: Sometimes, the 403 forbidden error can trigger due to temporary glitches that can be eliminated by simply refreshing or reloading the webpage on Google Chrome. Just click on the refresh button on the Chrome browser and you are done.
- Try accessing the page after some time: sometimes, the server issue or the glitch can extend and might take a longer time than usual to resolve. If accessing the website is not on your priority list, you can wait for a few hours or even a day and try accessing it again. However, if you can’t wait and accessing the website is the utmost priority you can move on to other methods mentioned below:
- Incorrect Typed URL: It truly said, ” hurry-hurry spoils the curry”. Generally, users in a hurry type incorrect or misspelled URLs in the browser address bar, and the outcome results in these types of errors. So, you must review your typed URL before pressing the enter key, and make sure the URL is 100% correct.
- Check on multiple devices or connections: You must also try to access the same website on multiple devices using the same network. If the error persists, move on to another internet connection and check if the error is due to the device or the internet connection.
- Reset to default settings: If none of the above methods work, try to reset everything from the browser to your Wi-Fi router to their default settings.
6. Clear Chrome Browser Cache and Cookies
If you are still seeing a 403 Forbidden error, try deleting the specific cookies of your web browser. This is how website-specific cookies are deleted in Google Chrome:
- Open Chrome.
- Click on More Settings
- Next, click on Advanced.
- In this menu, find ‘Content settings’ Under “Privacy and Security”
- Click on ‘Cookies’.
- Under “All cookies and site data,” search for the website’s name.
- To the right of the site, click Remove
To clear all the cookies, you can just go to Google Chrome History, and delete the Cache completely. A similar process can be followed in other leading web browsers.
Go to History, and click on Clear Browsing Data as shown below:
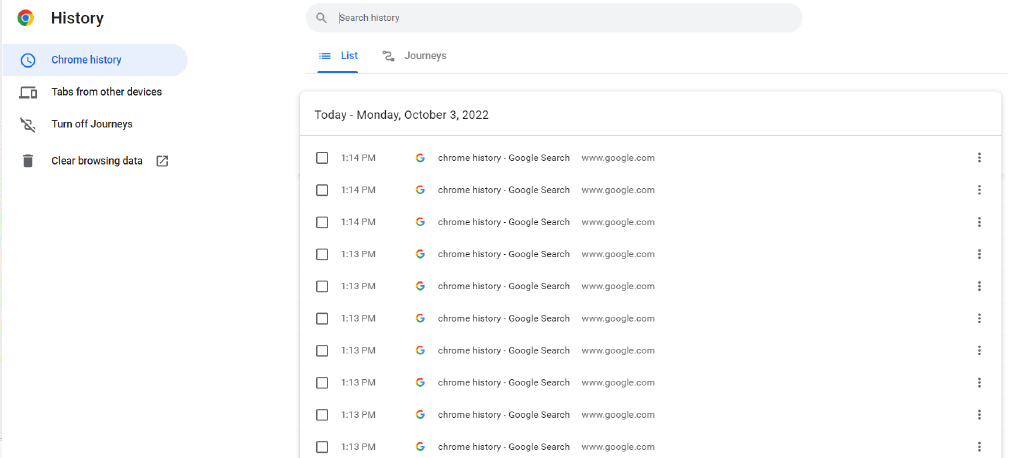
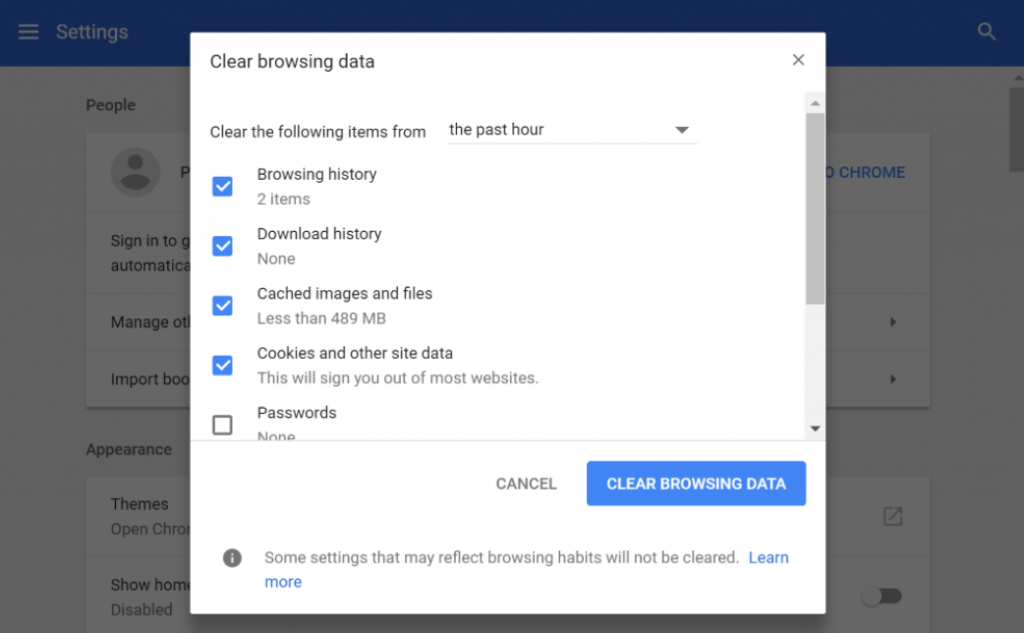
You can select the time range, select the option of Cookies and other site data, select Cached Images and files, and then click on the “Clear data” button.
7. Deactivate Chrome Browser Extensions
All the browsers have some extensions installed on them by the user. While troubleshooting the 403 Forbidden error it is recommended to deactivate browser extensions.
8. Check Firewall Settings
There is a possibility that due to one of your Firewall settings, the server is not displaying the requested page. You can momentarily disable the firewall while troubleshooting the 403 Forbidden error issue.
What does 403 Forbidden mean?
403 forbidden error or 403 forbidden access to this resource on the server is denied! This is one of the HTTP errors that you face while working on WordPress. There are some HTTP status codes defined by Microsoft’s Internet Information Services which are considered standard internet codes.
These codes are used by web servers to communicate with your web browsers (like Chrome, Firefox, Opera, etc.). These codes are defined within the HTTP header. In normal circumstances when the website is working fine, the server sends a Status Code of 200.
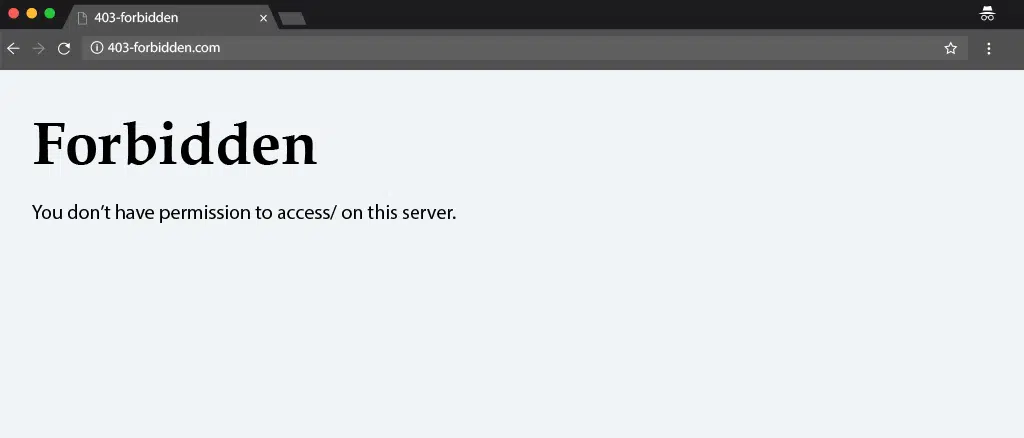
In case there is something wrong with the requested resource, it returns an error code. There are lots of error codes used by HTTP, for example, a 404 error is returned for a resource not found and a 500-error code signifies an internal server error. Another such HTTP response code is 403 which signifies that the user is prohibited or forbidden to access the requested web resource, which exists on the web server. We have tried to resolve all the common errors like 404 errors, 504 gateway timeout errors, 502 bad gateway errors, etc while working on WordPress.
These types of errors are classified into two categories, they are either “client-side” errors or they are “server-side” errors.
Example of Client-Side Errors:
- 400 Bad Request
- 401 Unauthorized
- 403 Forbidden
- 404 Not Found, and
- 408 Request Timeout Error
Example of Server Side Errors:
- 500 Internal Server Error
- 502 Bad Gateway
- 503 Service Unavailable and
- 504 Gateway Timeout
To make the identification of these HTML errors easier 4xx are client-side errors, while 5xx are server-side errors.
In this article, we will learn about the reasons for 403 errors, and possible ways to troubleshoot them so your visitors to easily access your website or web application without any errors.
Different browsers show different messages for the 403 error :
- Forbidden: You don’t have permission to access / on this server.
- HTTP Error 403: Forbidden
- 403 forbidden requests forbidden by administrative rules
- 403 Forbidden
- Access Denied You don’t have permission to access
- 403 – Forbidden: Access is denied
- Error 403 – Forbidden
- 403 forbidden nginx– You are not allowed to access this address 403 Forbidden – Nginx HTTP Error 403 – Forbidden – You do not have permission to access the document or program you requested
- 403 Forbidden – Access to this resource on the server is denied
- 403. That’s an error. Your client does not have permission to get URL / from this server
- You are not authorized to view this page
What are the Causes of 403 Forbidden Error?
1. Incorrect File Permission
The most common reason behind this error is files and folder permissions on the webserver. This can be easily fixed by going into your File Manager under cPanel and checking the permission settings. We will discuss the issue in detail in the subsequent sections.
The ideal folder permissions on a web server should look like this:
- Permission Status for Folders: 755
- Static Content: 644
- Dynamic Content: 700
Understanding File Permissions
- 7: Stands for full access (Read, Write, Execute)
- 6: for the Only Read and Write Access
- 5: Stands for Reading and Execute
- 4: Only Read Access
- 0: Stands for No Access Rights
The 3 digits in the permission codes specify Owner | Group | Public in that order
So, if a folder permission code looks like 7|5|4 it means the owner has full access (7), while Group can Read and Execute (5) while Public/Everyone else can only Read (4) the resource.
These codes can be changed under File Manager if you are using a Cpanel. File permissions can also be changed using an FTP tool like Filezilla.
What does the Read/Write/Execute mean?
- Read – view the files and subfolders within the folder.
- Write – add, edit, or delete the files and subfolders inside the folder
- Execute – process/execute the resources using a script or commands to change their value.
Setting File Permission using FTP Tool like Filezilla
Setting File Permission using File Manager in Cpanel
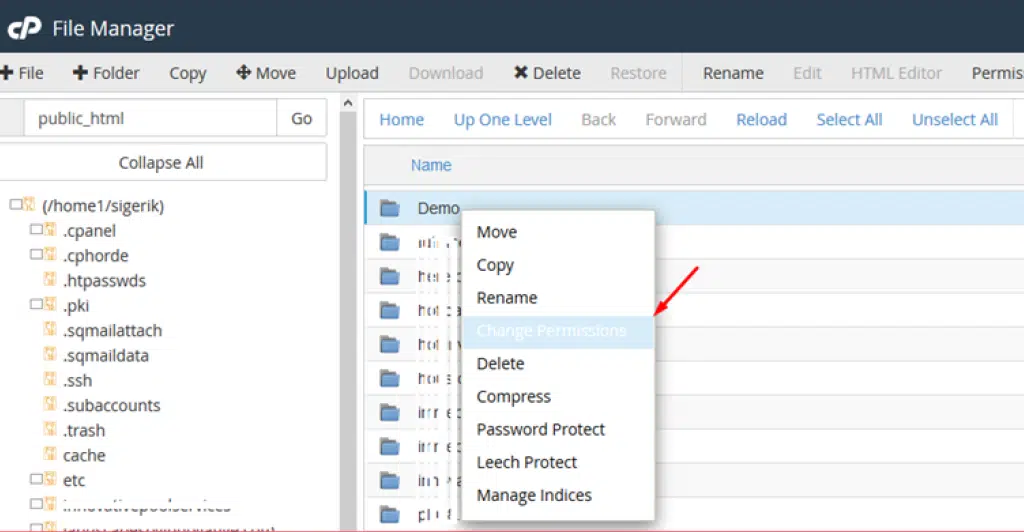
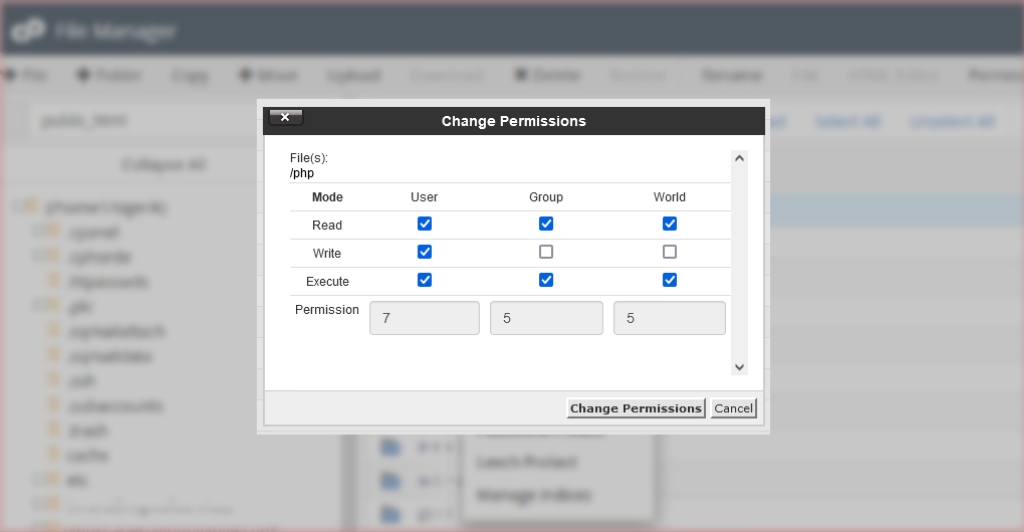
Folder permissions can also be changed using SSH under chmod commands.
2. No Index File or Empty Folder
One of the other reasons for this error is the empty HTTP directory, or in other words, no website or web application files are uploaded to the server directory.
The default landing page for a website or web application is index.html or index.php. The server will return a 403-error status if none of the 2 exists on the server. Or you have defined some other file in Nginx config or .htaccess as the home page, and that file is not uploaded in the directory.
These are some of the common reasons behind the 403 Forbidden errors.
The other specific reasons and level of resource access forbidding can be determined by identifying the sub-status code, which is as follows (though they are not standard codes):
- 403.1 – Execute access forbidden.
- 403.2 – Read access is forbidden.
- 403.3 – Write access forbidden.
- 403.4 – SSL required
- 403.5 – SSL 128 required.
- 403.6 – IP address rejected.
- 403.7 – Client certificate required.
- 403.8 – Site access denied.
- 403.9 – Too many users.
- 403.10 – Invalid configuration.
- 403.11 – Password change.
- 403.12 – Mapper denied access.
- 403.13 – Client certificate revoked.
- 403.14 – Directory listing denied.
- 403.15 – Client Access Licenses exceeded.
- 403.16 – Client certificate is untrusted or invalid.
- 403.17 – The client certificate has expired or is not yet valid.
- 403.18 – Cannot execute request from that application pool.
- 403.19 – Cannot execute CGIs for the client in this application pool.
- 403.20 – Passport logon failed.
- 403.21 – Source access denied.
- 403.22 – Infinite depth is denied.
- 403.502 – Too many requests from the same client IP; Dynamic IP Restriction limit reached.
- 403.503 – Rejected due to IP address restriction
Based on one of the identified above sub-status error codes you can easily troubleshoot the error.
On WordPress, there can be additional events that can cause a temporary 403 Forbidden error in cases like:
- Access denied to WordPress Dashboard. In that case, you have to check the settings for the wp-admin directory.
- Access may be denied during WordPress installation
- Access may be denied during theme or plugin updates
3. Misconfigured Server Settings
If your web server files are poorly configured or have some issues, it can lead to an Error 403.
For example, if your website is on the NGinx Web server and the NGinx configuration files have some issues in them it will trigger a 403 Forbidden NGinx Error.
The issue could arise if the configuration files are missing, incomplete, or incorrect settings. Such as if you have poorly configured your security settings it can prevent your access to certain resources.
This particular scenario often happens when you have recently made some changes to your Nginx configuration file or you have recently migrated to a new server.
4. Incorrect URL or Directory Structure
If you have an Incorrect URL or Directory structure it can also lead to a 403 Forbidden Error. It can happen when you are trying to access a resource that doesn’t exist or has been moved to a different location. Another reason can be if you have misconfigured the server, it can cause it to look in the wrong location for the resource.
5. Server and Firewall issues
The last reason that can cause a 403 error, can be an issue with your server or Firewalls. For example, the server could be experiencing a spike in high traffic and aggressive firewall settings that could be blocking access to certain resources. If this is the case, it’s important to check your server logs and find out the root cause of the issue.
How to Fix 403 Forbidden Nginx Error on Your Site?
When the error 403 specifically pertains to the Nginx web server, which is a popular web server software used to serve web pages and applications. You will encounter an error message “403 Forbidden Nginx Error,” on the screen.
Note: The error 403 is a broader term and can happen on any web server but when it particularly occurs in the NGINX web server, the error message would be ” 403 Forbidden Nginx Error”. Both errors indicate a lack of permission to access a resource.
It is also true that you will find it difficult to understand the exact cause of the 403 Forbidden error in nginx. It becomes even more difficult to fix it.
However, If you’re experiencing this particular type of error, there are several steps you can take to troubleshoot the issue. Let us check them out one by one.
Here is the list of troubleshooting methods:
1. Incorrect configuration for the index file
As we have already mentioned earlier, one of the most common reasons that cause 403 Forbidden Nginx errors is the Incorrect configuration for the index file.
If you are not familiar with index files, let us make it simple for you. The index file is the file that Nginx serves to the client when the client requests the root URL of the website or directory.
This particular file has specified rules that control which index file to load and in what order. By default, Nginx looks for files named
“index.html”, “index.htm”, “index.php”, or “index.cgi” to serve as the index file.
location / {
index index.html index.htm index.html inde.php;
}
If none of the mentioned files are found in the directory, the Nginx will return a 403 forbidden error.
2. Check File Permissions
When you try to access a resource, the first thing you need to do is to check the File Permissions. It is because, if the file or directory doesn’t have the correct permissions, the Nginx will not be able to serve you.
To make sure everything is working great and the Nginx can serve specific files and resources to the clients. It is essential to have the correct read, write, and execute (RWX) permissions set on the entire path.
If you set the permissions incorrectly it will result in a 403 Forbidden Nginx Error.
To fix this particular issue, you need to change the directory permissions to 755 and the file permissions to 644. Plus, make sure that if you are running Nginx, it must have its files.
sudo chown -R www-data:www-data *
sudo chmod 755 {dir}
sudo chmod 644 {files}
3. Verify Nginx configuration
The Nginx configuration file can contain errors that cause the 403 Forbidden Nginx error. To check the configuration file, run the command:
sudo nginx -t
This command tests the configuration file and reports any errors. If there are errors, fix them before restarting Nginx.
4. Restart Nginx
If you have made any changes to the Nginx configuration file, you need to restart Nginx to apply the changes. Use the command following command to restart Nginx.
sudo systemctl restart nginx
5. Check for IP-based restrictions
Nginx can block requests from certain IP addresses. To check if your IP address is being blocked, use the command
sudo tail -f /var/log/nginx/error.log
This command shows the Nginx error log in real-time. If your IP address is being blocked, you can add it to the “allow” list in the Nginx configuration file. For example,
location / {
deny 124.33.126.127;
allow 55.159.63.90/24;
deny all;
}
6. Check the web location
When you try to access a website or web resource, it is important to make sure that you are accessing the correct location on the web. It includes double-checking the URL or web address to make sure that the spellings are correct and accurate.
However, if you have entered the wrong or incorrect URL or web address, you might be redirected to a different location on the web. This can result in errors and prevent you from accessing the desired resources.
7. Contact the website admin
If none of the above solutions work, contact the website administrator to see if any server-side issues are causing the error. The website administrator may be able to provide more information about the cause of the error and how to fix it.
How to prevent 403 Forbidden Error in Nginx?
The best way to deal with 403 Forbidden Nginx errors is to prevent them from occurring in the first place. Some of the best ways to do this include,
- Using access controls and authentication
- Setting appropriate file and directory permissions
- Implementing SSL/TLS certificates
- Monitoring Server health and performance
- Staying up to date with Nginx Updates and patches.

Effects of 403 Forbidden Error on Search Engine Rankings
If your website has started showing a 403 error page which is already ranked, then it is for sure that it will end up losing search engine rankings on prominent websites like Google, Bing, etc. As per the algorithm of search engines, they first downgrade the rankings and then eventually remove the pages from their index which are no more accessible to users or bots.
To avoid such a situation it is recommended that you keep a close watch on your website’s analytics, search console, and webmaster data, and see if there are no such errors.
You can simply log in to Google Search Console (previously known as Google Webmasters), Select your website, and click on Coverage under Index, as shown below:
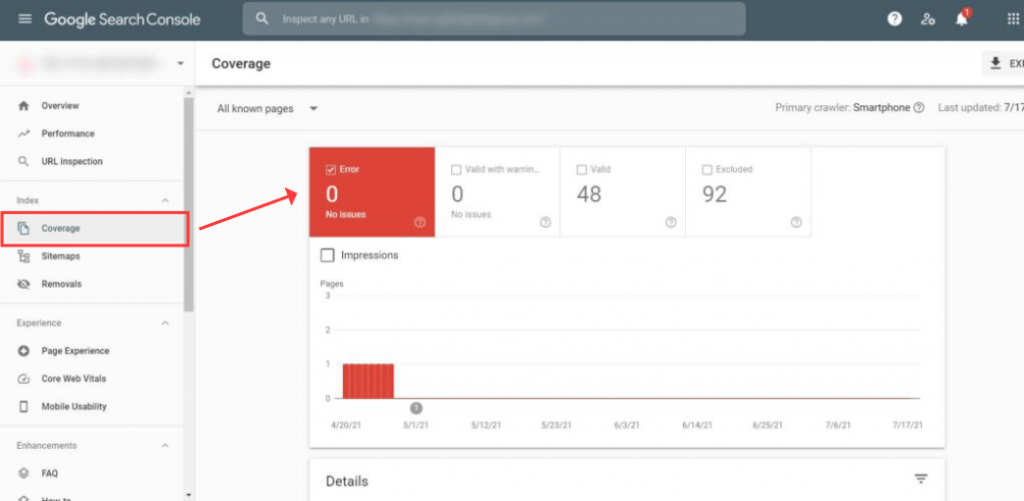
It will display the number of errors as well as the type of errors faced by your visitors.
You can just keep an eye on it to keep your website Indexing healthy and avoid getting lower ranks on search engines.
In case you have recently changed the URL of a page make sure to use a redirection plugin, and redirect the old URL to the new one. Also, update the XML sitemap in the search console.
We also recommend following the above-described troubleshooting methods under the guidance of a WordPress expert if you are a beginner.
Conclusion
Understanding it, in a nutshell, a 403 forbidden error means the resource or requested file exists on the server but is not accessible to the visitor due to one of the above-specified reasons.
Following the above-described method will most probably solve the issue quickly if you are still not able to troubleshoot using any of the above methods we suggest you contact the tech support of your hosting provider immediately and see what the problem is.
During maintenance or other phases, the server technical team possibly makes configuration changes accidentally. Also, there is a possibility that your IP has been blocked by the server. Ask the technical team to check and unblock your IP Address.
Hope you are enjoying our article. if you find anything missed or would like to add some value to it, please do let us know in the comment section below.
If you have any queries or would like to add any valuable points to it, please do let us know in the comment section below.
Frequently Asked Questions
How do I fix the 403 Forbidden error?
Here are some things you can try.
1. Refresh the Page.
2. Double-check the Address.
3. Clear Your Browser Cookies and Cache.
4. Check if You Have Permission to Access the URL.
5. Try Again Later.
6. Contact the Website.
7. Contact your ISP.
What causes a 403 Forbidden error?
The simple reason why we are seeing this error is that you are trying to access something you don’t have permission for. Throwing a 403 forbidden error is your site’s way of stating that you don’t have enough permissions to proceed further. This error is basically due to Incorrect file or folder permissions.
What does 403 Forbidden mean?
401 Unauthorized: If the request already included Authorization credentials, then the 401 response indicates that authorization has been refused for those credentials. 403 Forbidden: The server understood the request, but is refusing to fulfill it.

Rahul Kumar is a web enthusiast, and content strategist specializing in WordPress & web hosting. With years of experience and a commitment to staying up-to-date with industry trends, he creates effective online strategies that drive traffic, boosts engagement, and increase conversions. Rahul’s attention to detail and ability to craft compelling content makes him a valuable asset to any brand looking to improve its online presence.




![How to Fix 401 Error "Unauthorized Access"? [7 Methods] Error 401](https://www.wpoven.com/blog/wp-content/uploads/2023/05/Error-401.png.webp)
