Accelerated Mobile Pages (AMP) is an open-source project launched by Google that aims to make mobile web browsing faster and smoother. AMP is a stripped-down version of HTML, designed to load quickly on mobile devices, and it comes with several benefits for website owners and users.
In this blog post, we will explore what AMP is, how it works with WordPress, and the benefits of using AMP for your website.
What Are AMP and Its Benefits?
AMP is a way to create mobile-friendly versions of web pages that load quickly and consume fewer data. With the majority of web traffic coming from mobile devices, it’s more important than ever to have a mobile-friendly website.
AMP provides a way to create fast, lightweight mobile pages that provide a better user experience. Implementing AMP in WordPress can help to improve website speed, increase search engine rankings, and provide a better user experience for your visitors.
Read: 🚩 22 Best Ways to Speed Up WordPress Performance
How Does AMP Work With WordPress?
WordPress is one of the most popular content management systems (CMS) used by website owners around the world. Fortunately, implementing AMP with WordPress is relatively easy, thanks to several plugins available.
These plugins allow website owners to create AMP versions of their pages and posts with minimal effort, without affecting the overall design and functionality of the website.
Benefits Of AMP
There are several benefits to using AMP for your website. Here are some of the main benefits:
- Faster page load times: AMP pages are optimized for mobile devices, resulting in faster loading times and a smoother browsing experience for users.
- Improved search engine rankings: Google has indicated that AMP pages may receive preferential treatment in search engine rankings, meaning that implementing AMP can help to improve your website’s visibility in search results.
- Better user experience: By providing fast-loading, mobile-friendly pages, AMP can help to improve the overall user experience on your website, leading to higher engagement and conversion rates.
- Reduced bounce rates: Slow-loading pages can lead to higher bounce rates, as users may become frustrated and leave your website. AMP can help to reduce bounce rates and keep users on your website for longer.
- Lower data consumption: AMP pages use fewer data than traditional web pages, making them ideal for users with limited data plans or slower internet connections.
- Open-source project: AMP is an open-source project, meaning that it is constantly being improved and updated by a global community of developers. This ensures that AMP pages will continue to provide fast, reliable performance in the future.
Overall, implementing AMP in WordPress can provide a range of benefits for website owners and users, including faster page load times, improved search engine rankings, and a better user experience.
Google Suggest The Use Of AMP
Google wholeheartedly suggests that you implement AMP and some analysis suggests that it can significantly help you rank better in its search results without losing traffic.
- Similar projects were launched by Facebook and Apple in 2015, called Instant Articles and News Format initiatives respectively.
- The goal of these projects is the same as Google AMP – to improve the experience of downloading news and articles.
- Facebook and Apple’s projects are closed systems meant for publication only on their networks, while Google AMP is a service for its search engine.
- Implementing Google AMP is becoming almost mandatory because pages with AMP implementation will likely rank higher in search results.
- If you have a blog or business on the internet, it’s important to implement Google AMP shortly.
Pros and Cons Of Google AMP
| Pros of Google AMP | Cons of Google AMP |
|---|---|
| Faster loading times for mobile web pages, improving user experience | Reduced design flexibility due to strict guidelines for AMP pages |
| Potential boost in search engine rankings and visibility, as Google has indicated a preference for AMP pages | Limited support for dynamic content, such as forms and comments |
| Higher engagement and conversion rates for website owners who rely on mobile traffic | Difficulty in implementing AMP for complex websites or those with custom features |
| Ability to track user behavior through AMP Analytics, providing valuable insights for website optimization. | Potential negative impact on website monetization, as AMP pages may not support certain ad formats or tracking mechanisms |
Overall, the benefits of Google AMP in terms of improved mobile user experience and potential search engine advantages may outweigh the drawbacks, but website owners should carefully consider the impact of AMP on their specific needs and goals before implementing it.
How To Implement Google AMP On WordPress
The shortest and fastest way to implement AMP pages in WordPress is through plugins. Find the AMP by Automattic plugin from your console in the plugins section from the official repository, run the installation, and activate this plugin.
- The WordPress AMP plugin generates correct AMP article pages for each of your blog posts.
- The AMP version of each post is available on the permalink with the extension “/amp”.
- If you are not using a pretty permalink structure, the extension is “/?amp=1”.
- You can install the Google Chrome extension AMP Validator to test the correctness of your AMP pages.
- It’s possible to partially modify AMP pages by adjusting the color of the header and links using a customizer in your theme settings.
Step1: Install The Official AMP Plugin
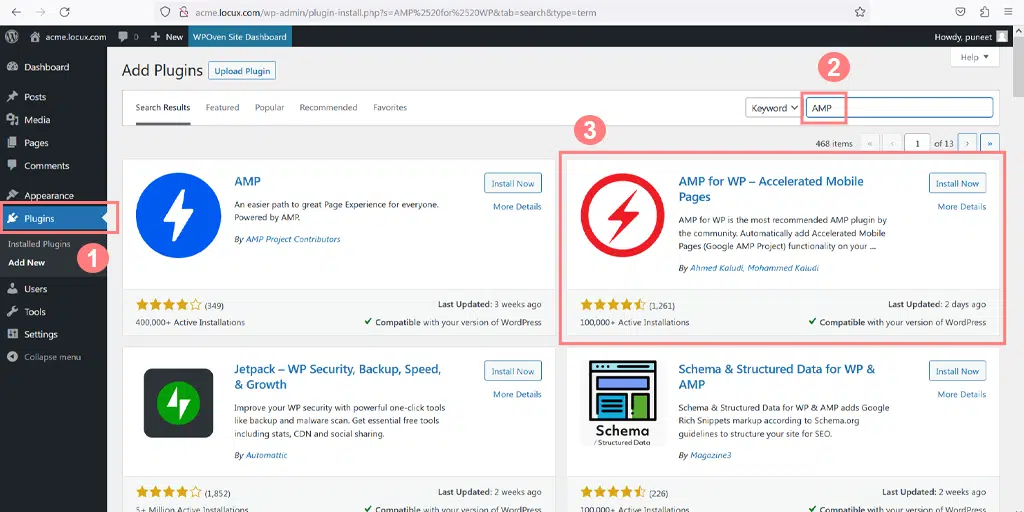
The first step is to install the official AMP plugin from the WordPress directory. The whole installation process will be the same as installing any other WordPress plugin.
i.e Go to your WordPress Dashboard > Plugins > Add new and search “AMP” in the Search bar. After that click on the install button > Activate and you are done.
Step 2: Go To AMP Plugin Settings
Upon successful Activation of the plugin, the next step is to go to the plugin settings and adjust the default settings as per your requirements. To do this, Go to AMP > General in your WordPress dashboard.
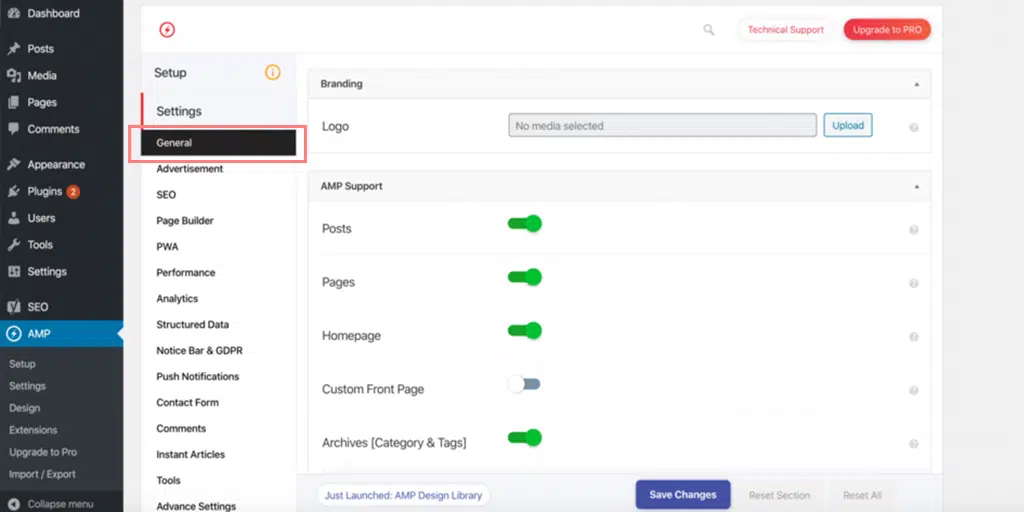
Once you are done customizing the AMP plugin settings, click on the “Save Changes” button. Now your website is ready for your users as well as easily discoverable by Google.
On the AMP plugin settings page, you also must have noticed that there are not many customization options available. But the best part is, there are plenty of plugins available, with the help of which you can extend its possibilities.
Adding Glue for Yoast SEO & AMP
The “Glue for Yoast SEO & AMP” plugin allows you to integrate the Yoast SEO plugin with the AMP format. This integration is important because it helps to improve the user experience on mobile devices by ensuring that your pages load quickly and smoothly.
- Install and activate the Yoast SEO plugin.
- Search for and install the “Glue for Yoast SEO & AMP” plugin from the WordPress plugin repository.
- Once installed and activated, the plugin will create AMP-compatible versions of your pages automatically.
- This ensures that your pages are optimized for mobile devices.
- You can customize the appearance of your AMP pages by going to the plugin’s settings page in the WordPress dashboard.
Once you have configured the settings, do not forget to click on the “Save changes” button.
Step 3: Check How AMP Pages Or Posts Look Like
You now have the option to preview your AMP site before it goes live. All you need to do is go to any of your pages or blog posts and append /amp/ at the end of the URL.
i.e. http://yourdomain.com/blog-title/amp/
This will allow you to view a preview of your site in the AMP format, and make any necessary adjustments before publishing.
Note: The use of AMP may or may not be suitable for your website, depending on its content. If implementing AMP causes significant changes to the functionality and look of your blog posts, it may be better to avoid it.
If most of your website’s traffic comes from mobile users, it may be worthwhile to prioritize the user experience over certain visual or functional aspects.
Step 4: How To Check If Google AMP Is Functioning Properly
Now, the final step is to check whether Google AMP is working correctly. There are mainly two ways through which you can check your WordPress AMP and also Let you know the codes and errors to work upon.
Google’s AMP testing tool
- Open a web Browser and Navigate to the Google AMP Testing Tool website.
- Enter the URL of your site, the AMP page, or the post you want to test into the text box on the page.
Alternatively, you can also paste the code of your website > Test URL.
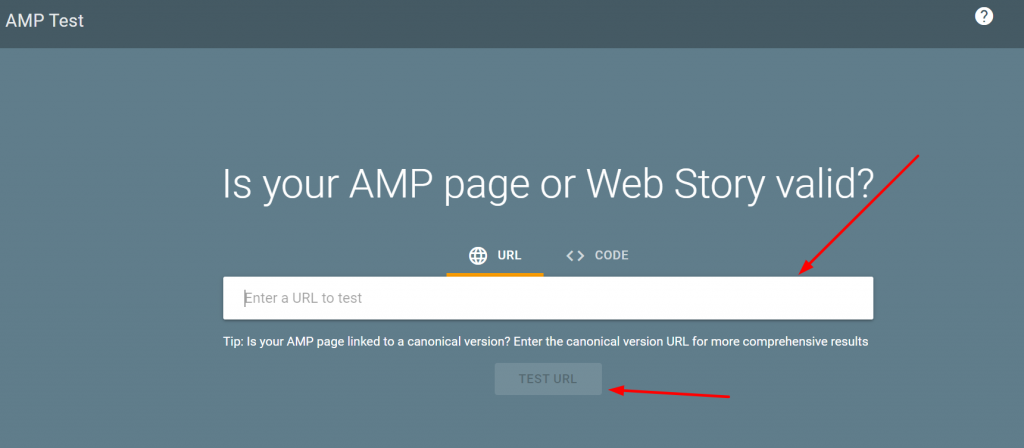
- Click on the “Test URL” button to initiate the test.
- Googlebot will evaluate your site’s AMP optimization, including the validity of your AMP markup and structured data.
- If your site is properly optimized for AMP, the tool will display a preview of how your AMP pages might appear on the Google search results page.
- Wait for the tool to analyze the AMP page’s code and report back any issues.
- Review the report to identify any errors or warnings that need to be addressed.
- Make any necessary changes to the page’s code to fix the issues identified in the report.
This AMP testing tool is very helpful to identify AMP errors on your website and also helps you to know exactly what line of code is causing the error.
Manual checking
If you do not want to use the AMP tool, you can validate manually too. All you need do is
- Open your web browser > Open any AMP page/post and add the following to the URL.
#development=1 http://yourwebsite.com/blog-title/amp/#development=1
- Open up the developer tools console in your web browser.
- Look for any errors related to your AMP page. These will be highlighted in red within the console.
- Read the error explanation to understand what caused the issue.
- Identify the specific code, prefix, or tag that caused the error.
- Follow the guidance provided next to the error explanation to correct the issue.
- Repeat the process until there are no more errors detected on your AMP page.
Using AMP Validation Tools
Another method you can use to validate your AMP is by using AMP validator extensions for Google Chrome and Opera web browsers. These tools are simple to use and provide All the errors if found.
Common Issues With AMP For WordPress
Google AMP for WordPress is a powerful tool for improving the mobile user experience, but it can also create compatibility issues with certain plugins or themes. Here are some of the most common issues and tips for resolving them:
- Compatibility issues with plugins: Some plugins may not work properly with AMP, causing errors or conflicts that can affect the functionality of your website. To resolve this, try disabling any non-essential plugins or using an alternative plugin compatible with AMP.
- Theme conflicts: Similarly, some themes may not be fully compatible with AMP, causing layout or formatting issues on AMP pages. To resolve this, try using a theme that has been specifically designed for use with AMP, or work with a developer to customize your existing theme for optimal AMP compatibility.
- Validation errors: AMP requires strict adherence to certain coding standards, and any errors or warnings can cause pages to be invalid and not display properly. Use the AMP Validator tool to identify and resolve any validation errors.
- Custom coding conflicts: If you have custom code on your website, it may conflict with AMP and cause issues. Work with a developer to review your code and ensure that it is compatible with AMP.
- Slow loading times: AMP pages should load quickly, but if your website has a lot of content or heavy images, it may still take some time to load. Optimize your images and consider using a caching plugin to improve loading times.
By addressing these common issues, you can ensure that AMP works smoothly with WordPress and provides an improved user experience for mobile visitors to your website.
Conclusion
In conclusion, implementing AMP for WordPress is a great way to improve the mobile web experience for users, increase engagement and conversions, and potentially receive preferential treatment in search engine rankings.
By using the official WordPress AMP plugin or other options available, website owners can create stripped-down versions of their web pages that load quickly and smoothly on mobile devices.
However, it’s important to be aware of potential compatibility issues with certain plugins or themes and to follow best practices for resolving these issues.
Overall, using AMP for WordPress is a valuable tool for website owners looking to optimize their mobile sites and provide a better user experience.
Frequently Asked Questions
How do I integrate AMP with WordPress?
If you want to integrate AMP with WordPress, the quickest and easiest method you can follow is to install an AMP WordPress Plugin. All you need to do is to go to your WordPress dashboard > Plugins > Add New > Search “AMP”. Once you find your desired AMP plugins, click on install >Activate.
Do I need AMP for my WordPress site?
AMP for WordPress may benefit website owners who receive significant mobile traffic by improving user experience and potentially increasing visibility and traffic through preferential treatment in search engine rankings. However, it may require additional work and have compatibility limitations with some plugins and themes. Ultimately, the decision to implement AMP should be based on specific needs and goal
What is the best AMP plugin for WordPress?
Here are some popular AMP plugins for WordPress that you may consider:
1. AMP for WP – Accelerated Mobile Pages
2. WP Fastest Cache
3. AMP by Automattic
4. AMP for WP – Google AMP Plugin
5. Glue for Yoast SEO & AMP

Snehil Prakash is a WordPress enthusiast and web development expert who previously served as the Marketing Manager at WPOven. He believes that business owners should spend their time investing in their core business missions, not setting up and maintaining a WordPress site.
Snehil has been instrumental in providing all-inclusive managed WordPress solutions to businesses of all sizes, ensuring that they have the resources they need for a robust online presence.

