Are you looking for WordPress redirect plugins? As the name suggests, the redirect is a method to send a message to the users that the page they are trying to visit has been moved. When you set redirects, your website will automatically direct the readers to the alternate page.
You will need to set redirects when you thinking of deleting a page for new content. Another reason for creating redirects is when you want to change the permalinks of a page. You need to set redirects to improve the user experience as it will have a direct influence on your SEO. Moreover, if you don’t set redirects it will negatively affect your domain’s SEO ranking.
In this article, we have created a guide that will help you set redirects for your WordPress website.
Before moving on to the method to create redirects, have a look at the different types of URL redirects.
Types of URL Redirects
There are 5 kinds of redirects, take a look at them.
- 301– The most common type of redirect is 301. It is a permanent redirect and is used when the location of the page has changed permanently. Most of the time, this is the only redirect that you will need.
- 302– This is a temporary redirect that will tell the reader’s browser that the location of the page or post has been changed for the time being.
- 303– It is usually used for high-traffic shopping sites. This is helpful for ensuring that the pages that contain one-time data like the checkout page, are not refreshed or bookmarked.
- 307– This is another temporary redirect that is similar to 303. The difference is in the way information is passed from one page to another.
- 308– It is a permanent redirect that is just like 307 but has permanent status. This status code is similar to 301 (Moved Permanently), except that it does not allow changing the request method from POST to GET
Read: 🚩 How To Redirect A WordPress URL? 6 Best Methods
How to Setup Redirects Using WordPress Redirect Plugins
There are several reasons for setting redirects on your website. However, it is a feature that is not available on WordPress as a standard. For creating redirects there are 2 ways, using a plugin and using a .htaccess file.
There are numerous plugins that will help you create redirects for your WordPress website. Here are a few of the top WordPress redirect plugins that you can use.
1. Redirection Plugin
Active Installs: 1,000,000+
Ratings: 4/5
Price: Free
One of the most popular WordPress redirect plugins to use is Redirection. It is a simple and easy-to-use plugin that will help you create 301 redirects. Along with this, you can keep a check on your site, and will help you track the 404 error. It is a great plugin that is useful for boosting your ranking and enhancing user experience.
Furthermore, this plugin is developed for WordPress websites. It is a free plugin that can be used by anyone. You will not need any comprehensive technical knowledge for creating redirects. With the help of the Redirection plugin, you can manage redirects without any trouble.
This plugin can be set to keep track of the permalinks of the posts. If the links change, the plugin will automatically set new redirects.
How To Set up Redirects Using Redirection Plugin?
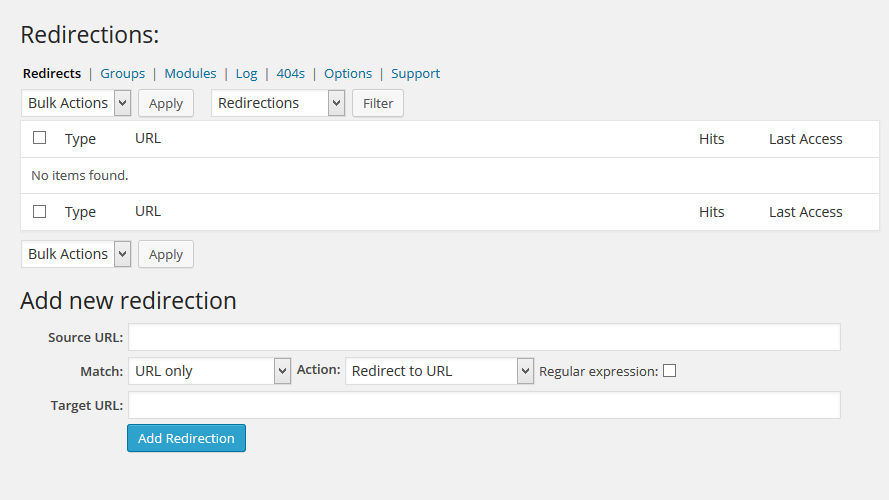
The Redirection plugin is not complex or complicated. All you have to do is install the plugin and activate it. After the activation of the plugin, you have to open “Tools” and click on “Redirection” to create your URL redirects.
If you wish to type the redirect, you can type in the source URL and the new source in the Target URL. Then, click on the “Add Redirection” button. This is an ideal way to change a few URLs.
In case, you are looking for a WordPress redirect plugin, Redirection is one of the best choices.
2. Safe Redirect Manager
Active Installs: 40,000+
Ratings: 5/5
Price: Free
Another amazing WordPress redirect plugin is Safe Redirect Manager. This is a wonderful redirect manager that will make it easy for you to create redirects. Unlike many WordPress redirect plugins, this plugin is designed to provide a smooth user experience. With this plugin, you can create redirects using HTTP status codes. The plugin is perfect to be used for multisite.
This is a free plugin that contains a Whitelist feature. It is a wonderful feature that enables redirection to hosts that are whitelisted. This feature is ideal for offering extra security and the list will be automatically updated.
How to set up Redirects Using Safe Redirect Manager?
The first thing you need to do is install the plugin and activate it. After that, you should open the plugin by going to “Tools” and clicking on “Safe Redirect Manager”. You will see a tab at the top of the screen, “Create Redirect Rule”, click it.
Then, you should copy your old URL and paste it into the field, “Redirect From”. If you don’t know about “Enable Regular Expressions”, it is better to take no notice of it. Afterward, copy and paste the target URL in the “Redirect To” box.
You will be asked to choose the HTTP Status Code, there are the following choices:
- 301 Permanently Moved
- 302 Found
- 303 See Other
- 307 Redirect Temporarily
- 403 Forbidden
- 404 Not Found
You must select the option that suits you the best. If you are unaware of the HTTP Status Code, it is better to choose the “301 Permanently Moved” option.
3. Simple 301 Redirect
Active Installs: 300,000+
Ratings: 4/5
Price: Free
One of the easiest WordPress redirect plugins is Simple 301 Redirects. This is an amazing tool for someone who needs to create redirects quickly. You are not required to have extensive knowledge of using this plugin. This tool doesn’t have any complicated settings, you will be able to create redirects without any trouble.
This plugin is great to be used for 301 redirects. When you have moved your content to a new location, you will need to set redirects. With Simple 301 Redirects, you can change the hosts or domain. without it negatively affecting your ranking. The previous URLs will be intact, but the readers will be directed to the new URL.
Simple 301 Redirects is useful when you need to transfer your site to WordPress. This is because you will not be able to keep the original structure of your website. To make sure your user doesn’t experience broken links, you need to set redirects. So, the users will be transferred to the new link seamlessly.
Create Redirects Using Simple 301 Redirects
Simple 301 Redirects is one of the easiest WordPress redirect plugins. You can install it and activate the plugin to start using it. After that, you have to visit Settings and choose 301 Redirects. Once you have selected it, you can type your URLs or even copy-paste them.
How to setup Redirects using .htaccess in WordPress
There is another way to create redirects for your WordPress website if you are running your site on an Apache server. This method requires you to code and make changes in the ‘.htaccess’ file. In case, you don’t have extensive knowledge, you can follow these steps and set up redirects.
If you want to create redirects that are fast, you can use the .htaccess configuration. You have to keep in mind that even a minor mistake in the coding can make your WordPress website inaccessible. This is the reason why you have to be very diligent when updating the .htaccess file. If there is a mistake in the .htaccess file, the site can show an Internal Server Error also. We suggest creating a backup file of your .htaccess file before you start making changes.
Steps For Redirection Using .htaccess
Here are the simple steps to create redirects.
- First, you need to connect to your WordPress website using an FTP client. This will enable you to edit your .htaccess file. This file can be found in the root directory of your WordPress website.
- In case the .htaccess file is not visible, you might want to check the hidden files.
- There is no need to have any special editor, you can write the code in any text editor such as Notepad.
- You have to write this code and add it to the .htaccess file. It is advised to add it at the end of the .htaccess file.
RewriteEngine On
Redirect 301 / a-very-old-post/ http://nameofyoursite.com/a-very-new-post/
Hence, with the help of this, you can create redirects manually without any difficulty.
How to setup redirects using Nginx in WordPress
In case your website is running on an Nginx web server, you can not use the above ‘.htaccess’ method to set up redirects, as Nginx servers do not have .htaccess files. Just like for Apache servers, this requires you to code and also requires SSH or FTP access to the Nginx Configuration files. You can find the Nginx site config file usually in ‘/etc/nginx/sites-available/site_config_file’
Steps to setup Redirect for Nginx WordPress site
- Access the Nginx site config file either via FTP or SSH. Usually, this file will be in the Nginx folder on the server e.g /etc/nginx/sites-available/site_config_file
- Open the file in the editor of your choice, like Nano, notepad, vim, etc
- Add the redirection code in the ‘location /’ block. The format for it will be like this:
rewrite regex URL [flag];
where
regex – Is the regular expression for the URL from where you wish to redirect
URL – This is the destination URL where you wish to redirect.
[flag] – This is basically which redirect you wish to make. For 301 you can use ‘ permanent’ and for 302, ‘redirect’
Here is an example of an Nginx redirect:
rewrite ^/old-url/$ http://newurl.com/ permanent;
A Final Word
Redirects are imperative for every website as they will help in providing a smooth user experience. It will be useful for enhancing your search engine ranking as well. There are two ways through which you can create redirects. Since creating redirection for the WordPress website is not an ordinary feature, you can use plugins to set up redirects without any hassle. These are extremely helpful as they will save you from broken links. All these WordPress redirect plugins are easy to use and will make redirection stress-free. If you wish to have redirects set directly on the server, you can use the .htaccess code or Nginx redirects. Have you used any WordPress redirect plugins before? Let us know how was your experience in the comments below.

I am a Co-Founder at WPOven INC currently living in Vancouver, Canada. My interests range from Web Development to Product development and Client projects. I am also interested in web development, WordPress, and entrepreneurship.

