While browsing a website, you must have noticed a tiny image that appears next to your WordPress website title, these tiny images are popularly known as WordPress Favicon. First Introduced in March 1999 by Microsoft along with Internet Explorer 5’s new added feature “Favorite” tab.
Microsoft has changed the name of bookmarks as Favorites in their Internet Explorer 5 version and provided with an option to include favorite icons just beside the URLs. These Favorite icons are now spoken out as “Favicon“.
However, you can also find that these WordPress Favicon are located at your web browser’s bookmark and on your browser’s home screen as shortcut buttons.
These WordPress Favicons not just look beautiful, but also help to enhance user experience, easy to brand recognition, and build trust. So, in this article we will try to cover all the aspects of WordPress Favicon and How can you easily create and add to your website.
But first, you must learn, what is the exact definition for WordPress Favicon? Let us get started!
What is WordPress Favicon?
WordPress Favicons are small icons usually of size 16×16 pixels that represent your brand and are located near your page that you can easily see at your browser’s tab.
Earlier, when Google Analytics was not a thing, Favicons are used as a tool to determine web traffic. But now, it is well known for enhancing UX and brand recognition.
In addition to it, having a WordPress Favicon helps in brand recognition. Since it can be easily visible on your browser tabs, bookmarks, history archives, and so on. They can also be used as a website’s shortcut on small devices such as smartphones or tabs. It helps to save users’ time and lets them easily identify the website to browse without any difficulty.
Why are the advantages of using WordPress Favicon?
Apart from Brand recognition and enhancing user experience, which we have already discussed the advantage of using WordPress Favicon is it assures a visitor that they are browsing the right website and are on the right page.
Suppose, you have opened many tabs in your browser, as the number of tabs increases, it will hide your website’s title as shown below:

At this point, Favicon helps you to identify your website quickly so that you can easily switch over it. Even, you can ask your visitors to add the website shortcut on their browser home screen or small devices such as smartphones for easy and quick access to your website.
After all, one of the major goals for every website is to provide a unique user experience so that the visitors can easily visit the website again and again. This is what WordPress Favicon helps in your WordPress website, helping in establishing strong brand recognition and enhancing user experience to the next level.
Now let us see, how can you create a beautiful WordPress Favicon for your website.
How to create WordPress Favicon?
To create WordPress Favicon the first thing you need to do is to decide the size of WordPress Favicon and for what devices it should support. However, there has been a complete list of the different resolutions of Favicons are available that support various browsers and platforms.
But in this post, we will use the most recommended and widely accepted resolution, so that it becomes easy for you to create a WordPress Favicon for your website easily without any confusion.
Some best tips to create WordPress Favicons
- The most recommended resolution for Favicon is 512×512 pixels.
- Choose an image that must look great even it is shrunk to 16×16 pixels resolution.
- Always go by the Guidelines provided by Google to be eligible for a favicon next to your search results.
- You can choose either rectangle or square images, since you will be provided with an option to customize it either after or before uploading it to the WordPress.
There are many ways through which you can create WordPress Favicon. You can hire a designer who can better understand your brand and design a professional-looking favicon. You can use WordPress Favicon Plugin to create Favicon. You can even design by yourself if you know how to use Adobe photoshop.
In addition to it, there are various online tools are also available such as the Favicon generator and Favicon.cc, with the help of which you can easily create Favicon.
Suppose, you are going to create a favicon for your website, xyz.com. You do not know how to use adobe photoshop and even you do not have enough budget to hire a professional designer. In this case, you are going to use the Favicon generator.
first, you need to visit the website and upload the image that you want it to convert into your website favicon as shown in the picture below:
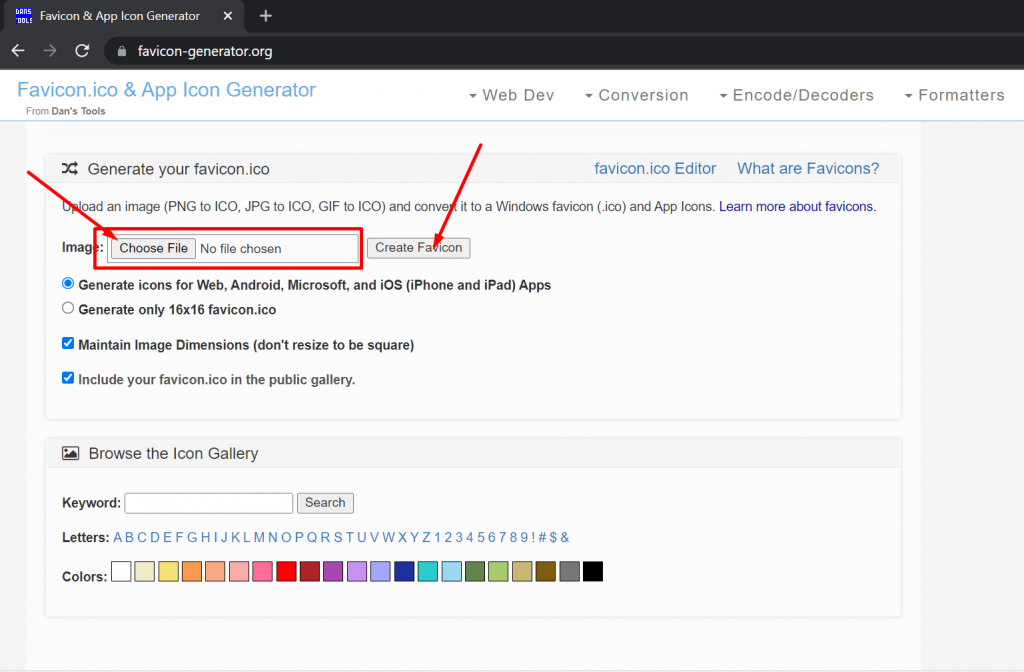
Choose the appropriate settings, such as
- Generate icons for Web, Android, Microsoft and iOS apps
- Generate icons only for 16×16 WordPress Favicon.ico
Check the boxes and click on create favicon button. The webpage will reload into a download page from where you can easily download your Favicon zip file as shown below:
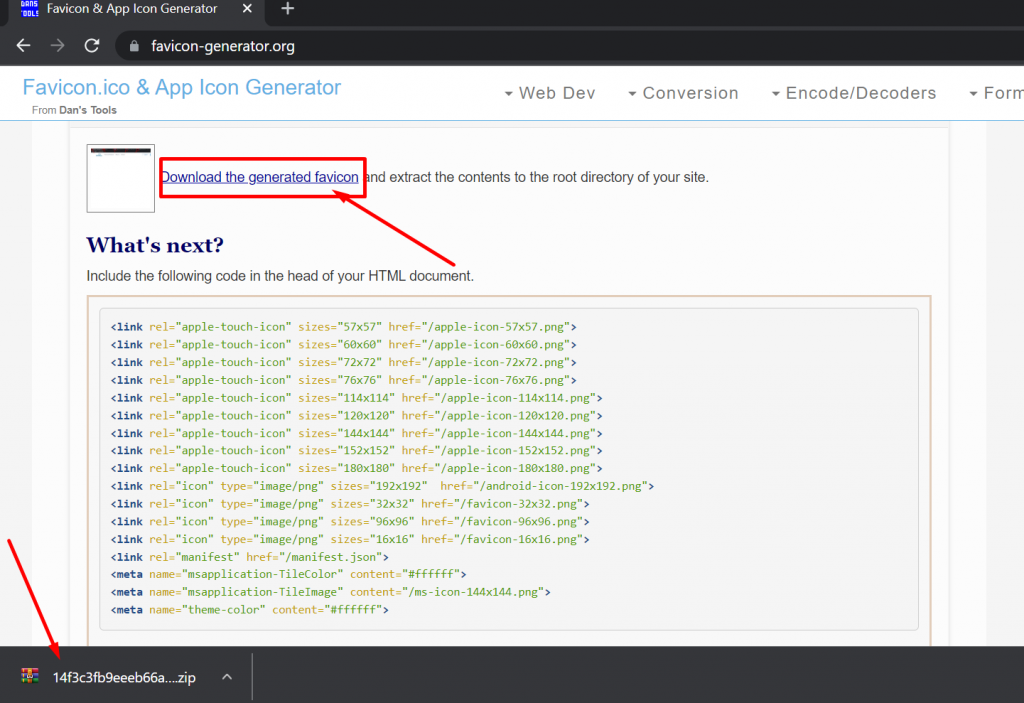
However, you can also add the Favicon to your website manually by copying the code as shown above and pasting it in the head of your HTML document.
If you have not chosen any tool to design your favicon and opted to design by yourself, there are some points you must keep in mind before starting designing.
- Keep the design simple and clean, since it will be shrunk that others, details might get lost.
- Your favicon design must be of same Color, graphics or fonts as of your website main logo or must represent your brand.
- Design your Favicon in larger resolution first, then resize it as per your requirements.
After you have finished designing your Favicon, you need to save the file in supported file format. Earlier, there was a particular WordPress Favicon file type “WordPress Favicon.ico” widely used. But now things have been changed and nowadays all the modern web browsers are now supporting, PNG, GIF, and ICO file formats.
However, JPEG file formats are also available and widely used formats to save Favicon files. But there are some older versions of Internet Explorer that don’t support them. So, it is better to stick to only those who have universal support.
How to upload WordPress Favicon on your site?
After successfully designing and saving your Favicon, it is time to upload or add Favicon to your WordPress site. There are three ways through which you can do it,
- Via WordPress customizer
- Using a plugin to add Favicon
- Adding Favicon Manually
Adding Favicon using WordPress Customizer
After the WordPress 4.3 version release, a new option has been introduced through which it becomes an easy and quickest way for you to upload and crop images to use as Favicon.
The only thing you need to do is to upload a high-quality clear image, preferably of 512X512 resolution. First of all, login to your WordPress dashboard > Appearance > customize, as shown below:
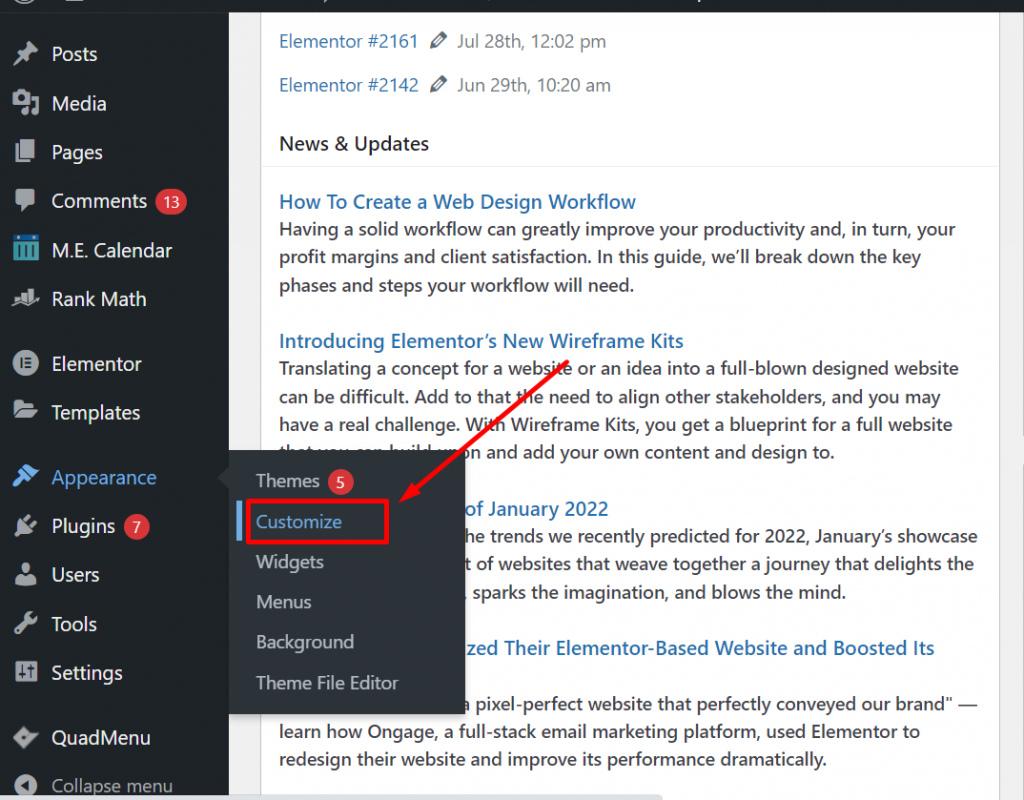
The page will load to customize page where you need to click on Site identity tab as shown below:
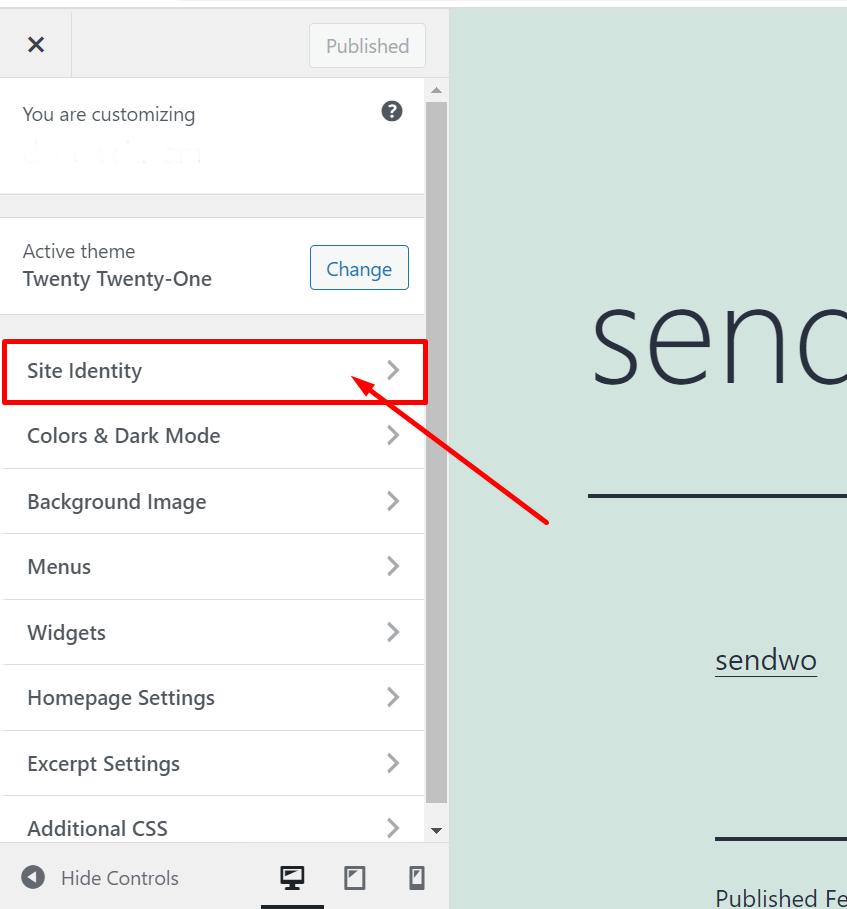
After you clicked on the Site Identity tab, you need to look out for the “Select site icon” button as shown.
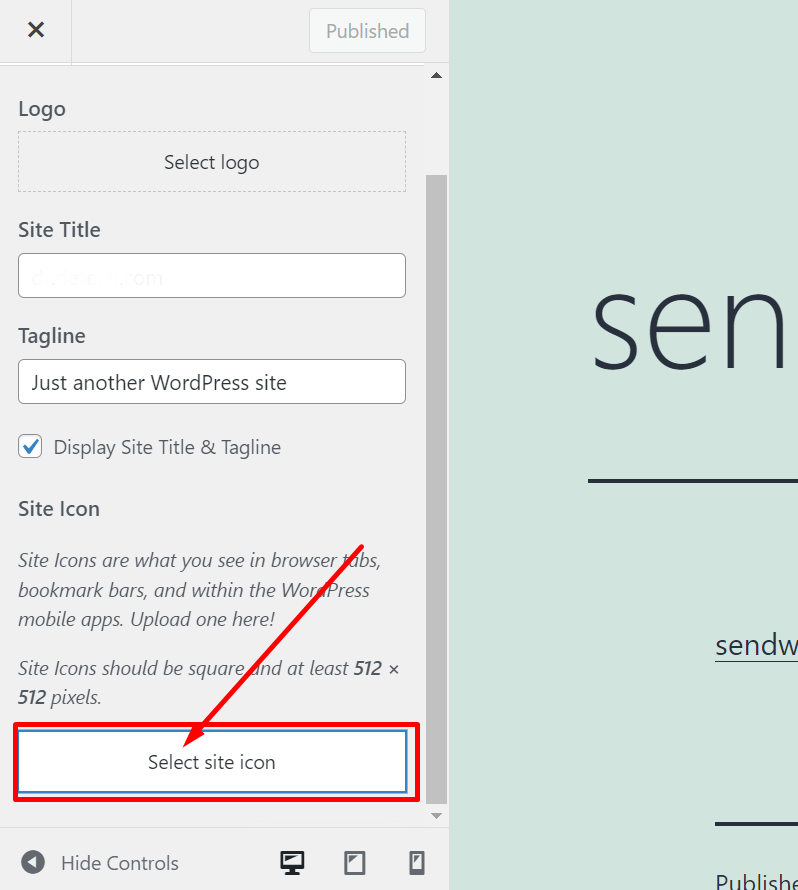
After that, a WordPress Media interface will pop out from where you can upload images or use the existing images from the media library to make your Favicon. Now click on the “Select” button located at the bottom right corner.
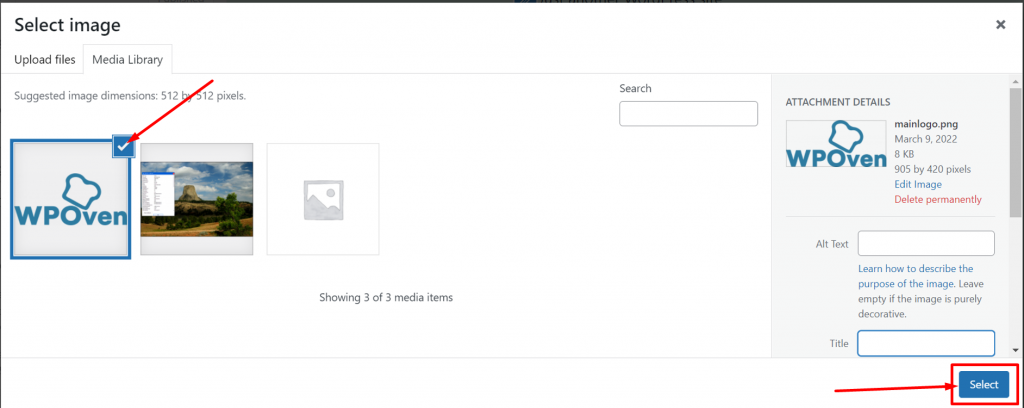
After that, you can crop or resize the selected image to make it a perfect fit for your Favicon, proceed by clicking on the Crop Image button to finalize it.
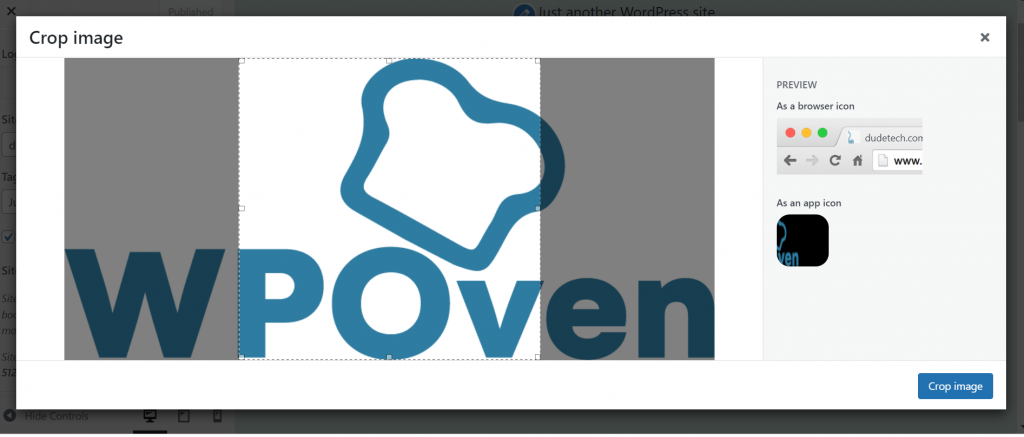
After completing all the above steps, it is time to save all the changes and hit on the publish button to make it live. However, at any moment if you are not satisfied with your Favicon, you need to repeat the above steps for the WordPress Favicon change.
Using a WordPress Favicon Plugin for adding Favicon to your site
If you are looking for more options other than the default WordPress site icon feature, then you can take the help of WordPress Favicon plugins. There are various Free and popular Favicon Plugins are available that have the same easy functionality but offer you a lot more compatibility options and a more customized experience.
One of the most popular and widely used WordPress Favicon plugins you can use is Favicon by RealFaviconGenerator.
This plugin took compatibility too seriously so that you can set up responsive Favicon that is compatible with the majority of the popular web browsers.
To begin with, first, you need to install the ReavFaviconGenerator plugin through WordPress dashboard > Plugins > add New.
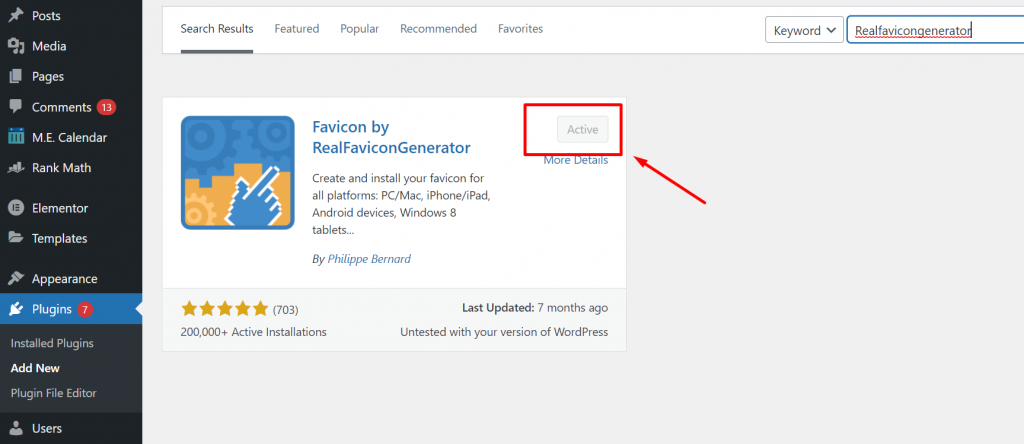
Followed by clicking on the Install button and activating it. Now go to Appearance > Favicon and Select a picture that should be at least 70×70 from the media library and click on Generate Favicon button as shown below:
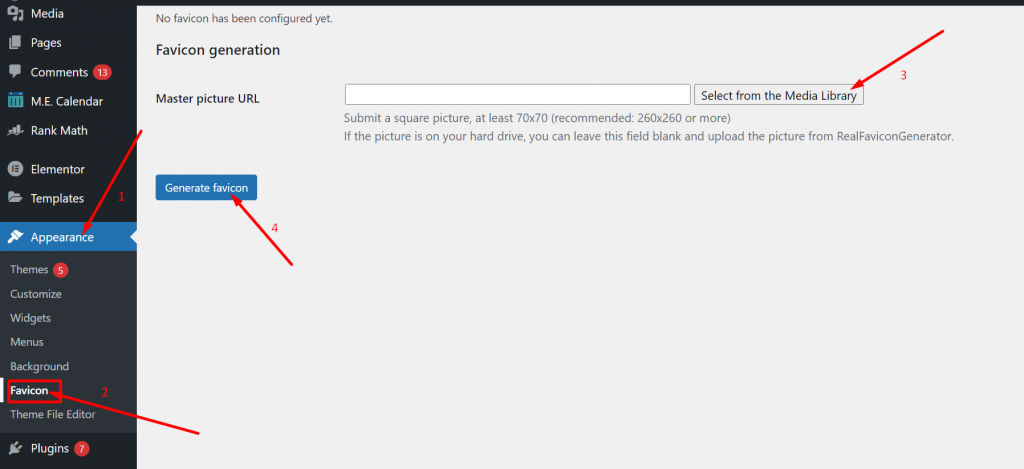
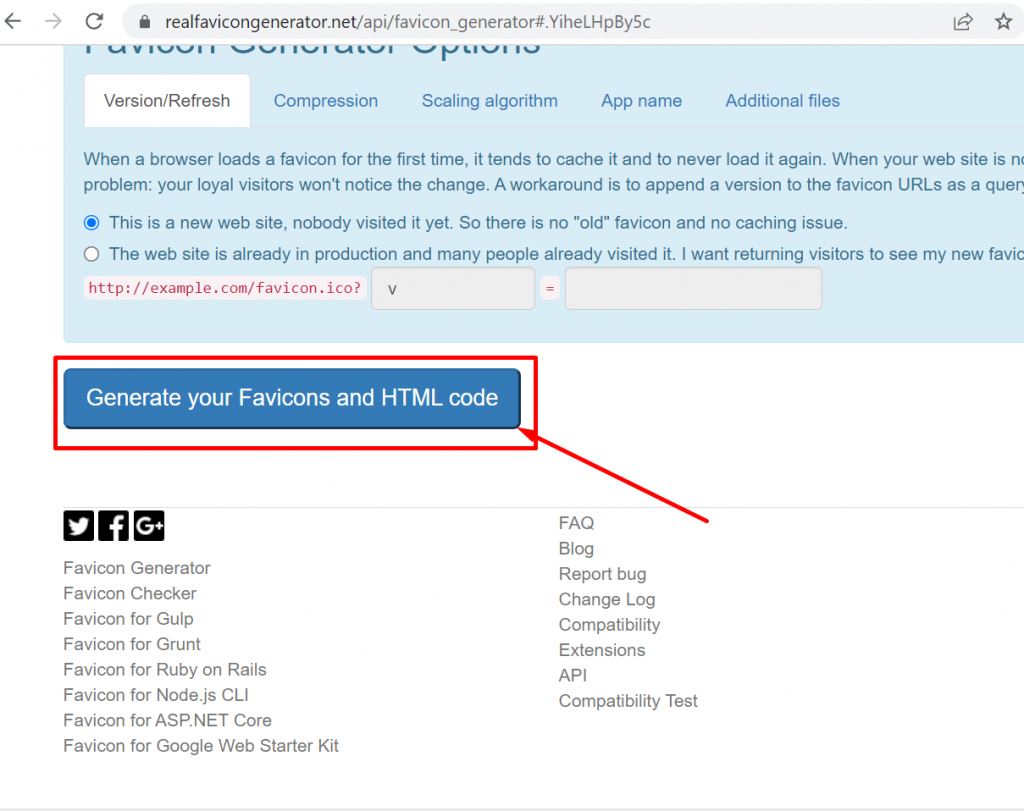
The moment you click on Generate favicon, you will be redirected to the plugin website where you need to scroll down and click on the ” Generate your Favicons and HTML code” button.
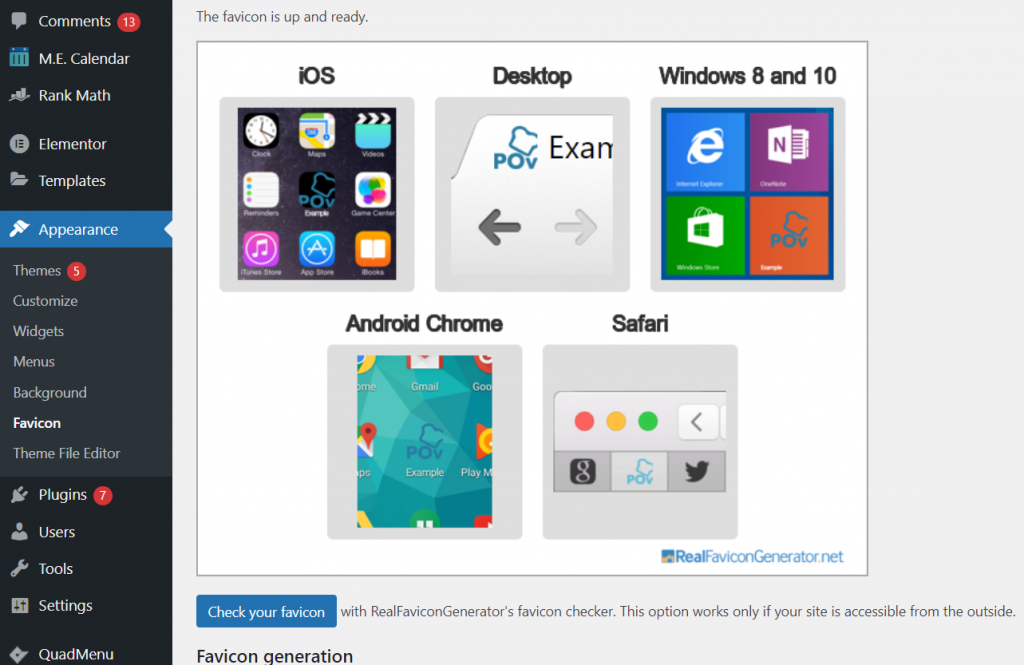
While the tool work in the background, it will redirect you back to the WordPress dashboard. Now your favicon is up and ready.
Adding WordPress Favicon Manually
If you do not know how to access the root directory, we highly recommend you stick with the above two easy methods. But if you still prefer to use the manual method, then you will be required to do it either via an FTP client or cPanel provided by your Web hosting provider.
Step 1: But before that, you need to go to the Realfavicongenrator website. Click on the ‘Select your Favicon image” button to generate your Favicon.
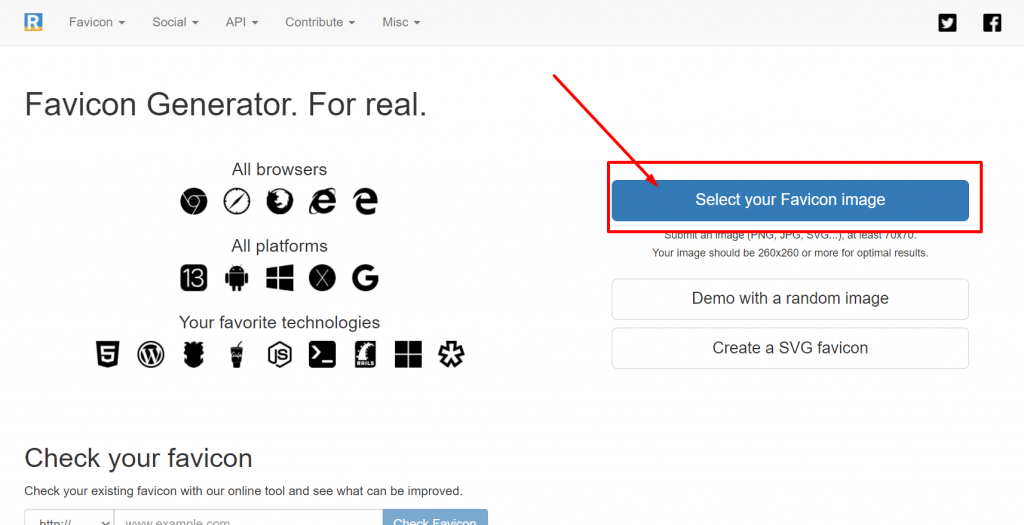
Once you upload the image, you will notice the same user interface just like while using RealFaviconGenerator Plugin. Customize or make changes if you like and scroll down the webpage and click on the “Generate your Favicons and HTML code” button as shown below:
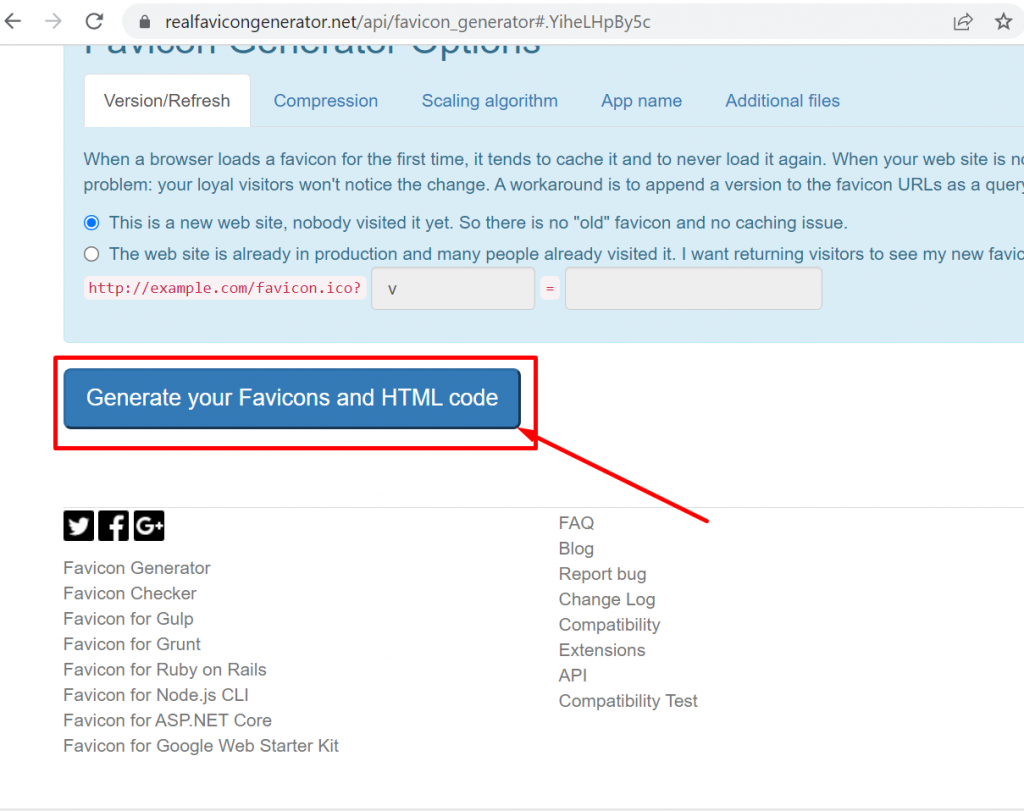
Step 2: When you click on the Generate your Favicons and HTML code button, the page will move to the next page from where you can download the Favicon Package.
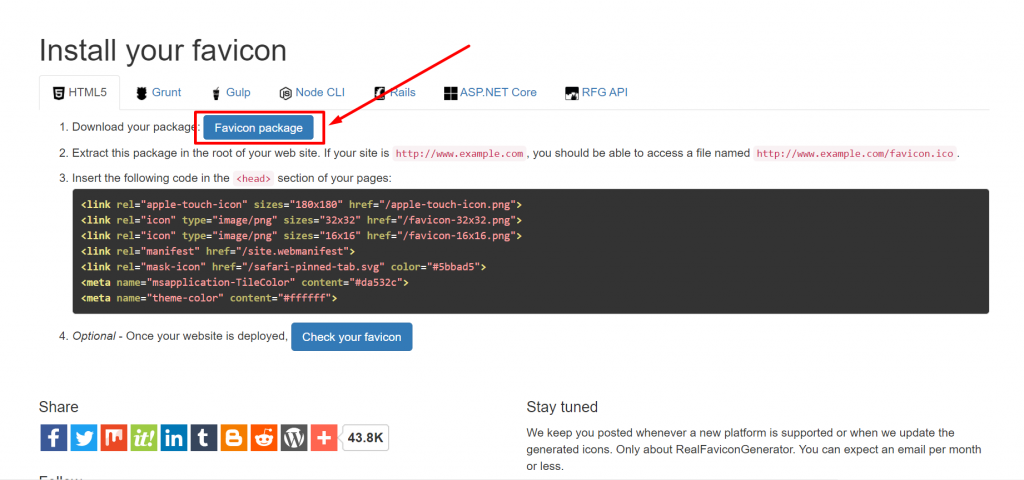
Extract the downloaded Favicon Package and upload it to your website root directory either via an FTP client or cPanel provided by your hosting client.
At WPOven, we try to deliver a unique experience to our users and their convenience is our utmost priority. Hence, we provide a New File Manager to easily manage your site files and folders.
Introducing our new Site Tool, the File Manager.
Using the WPOven’s File Manager it will become easy for you to manage your site’s Files and Folders. You can be able to perform the following various task easily.
- Install WordPress Plugins and Themes
- Create, edit, Delete, rename, move and add files and folders
- Create archives with zip or unzip and decompress files
- Sort files
- Search Files and Folders
- Upload files
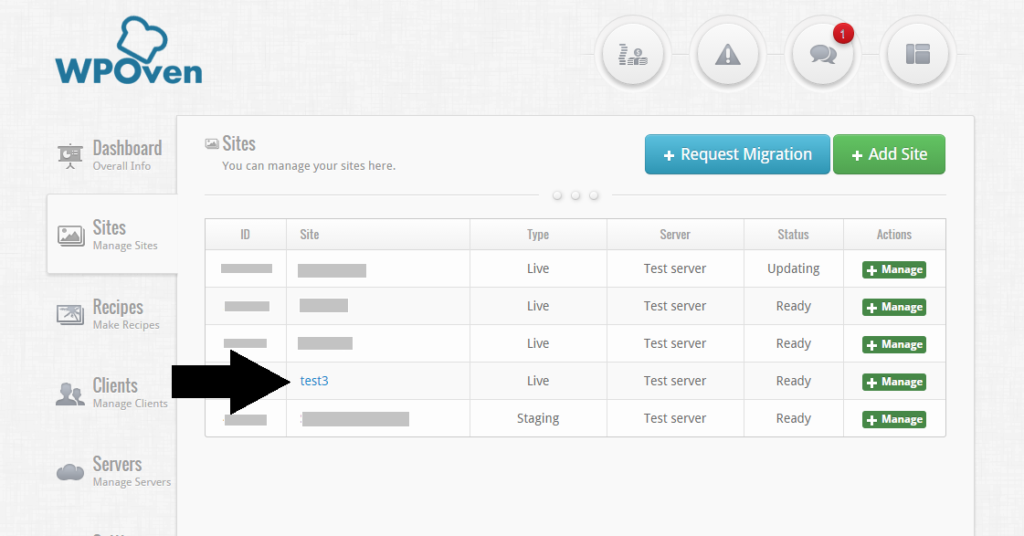
To access your site’s files and folders through the File Manager tool, you need to first log in to the WPOven dashboard. Then select the Site you wish to work on.
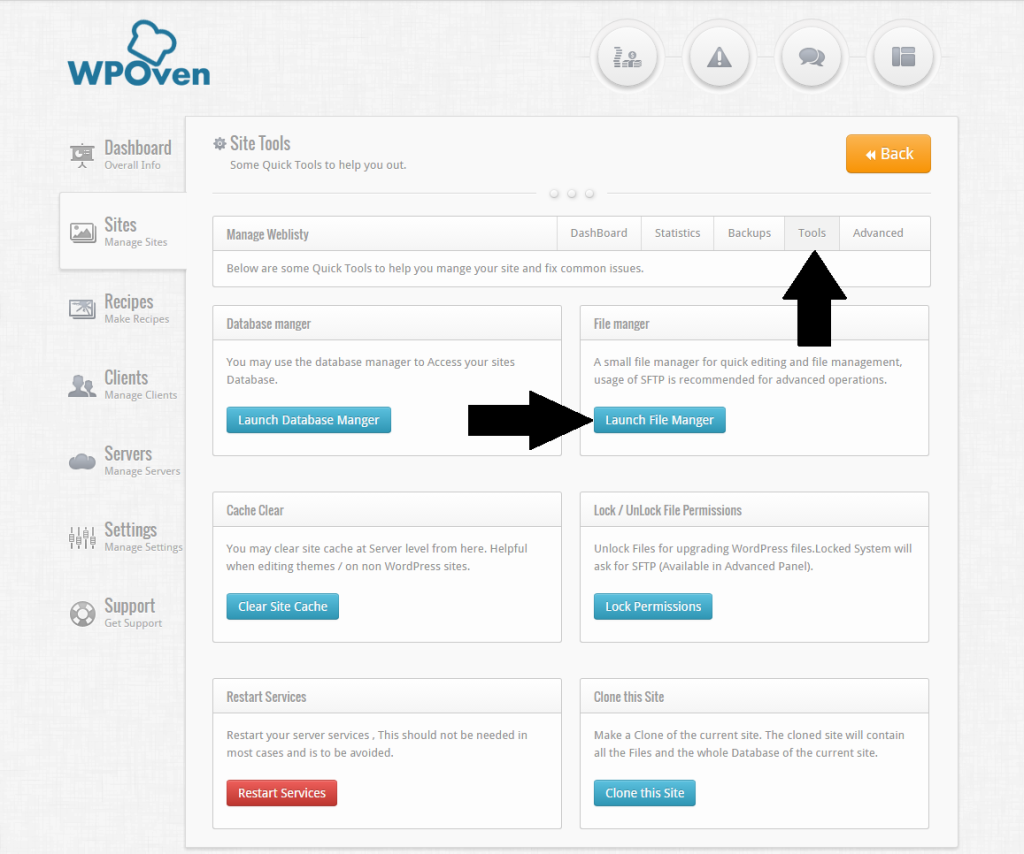
Then select the “Tools” sub-menu and click on the “Launch File Manager” Button.
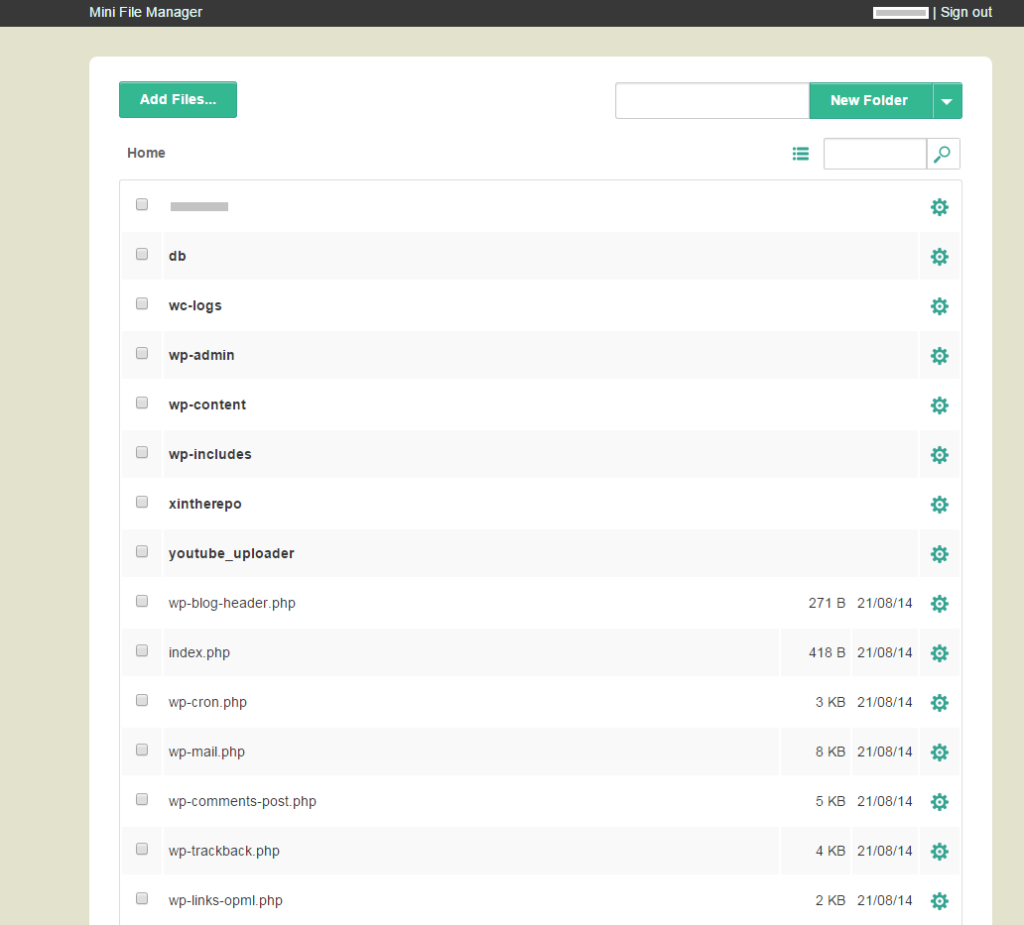
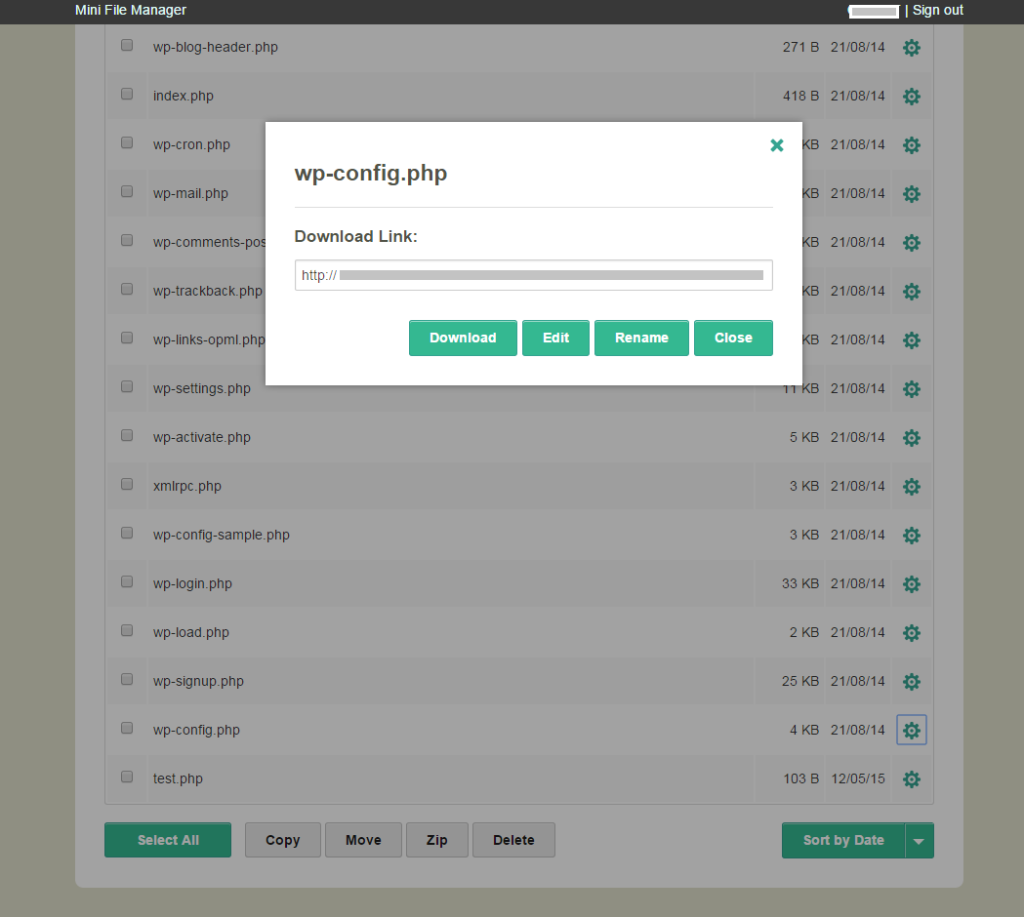
You will now be able to see the files and folders of your site in the File Manager
Click on the “Add files” button and select the extracted files to upload.
But you must be aware that, the file which you are going to put must be in the root folder or it won’t work.
Step 3: To finish up the whole process and make things work properly, the last step you need to do is to add the code snippet generated from RealFaviconGenerator to the head section of your WordPress theme.
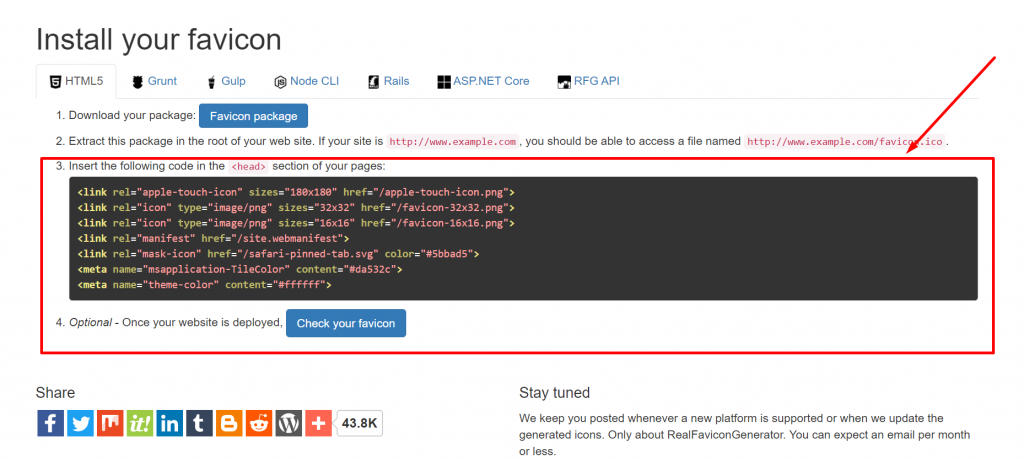
To add the following code snippet to the header section, you need to install and activate the headers and footers plugin. Then navigate to Settings > Insert Headers and footers and paste the code snippet in the header section as shown in the picture below and click on save.
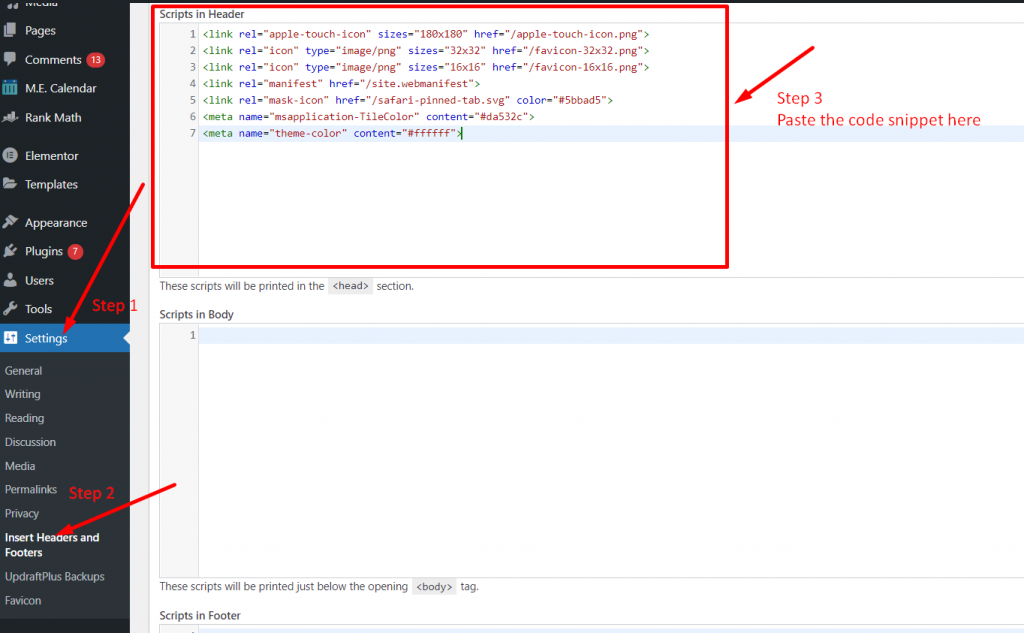
After finishing up all the steps, your favicon should start appearing.
What if WordPress Favicon not showing?
If your WordPress Favicon not showing up, even you have followed all the above-mentioned steps, then it can be due to the following reasons:
- Used a Wrong WordPress Favicon file type– PNG, GIF and JPEG are some of the image file formats that are now supported by Modern browsers for Favicon. But they are not supported by old browsers. In addition to it, even Majority of the web browsers prefers the use of WordPress Favicon.ico file format, so it is better to go for. Ico formats to avoid any compatibility issues.
- Unable to configure appropriate favicon size– Another reason for not showing Favicon to your website can be incompatibility of the favicon image size with the device screen size. This can be eliminated by using favicon.ico file type which stores multiple versions of an image in different sizes and resolution. So that, the favicon can be easily visible on any screen size.
- WordPress Favicon Plugin incompatible with theme– It is also possible that if you are using a WordPress Favicon generator plugin, it is showing incompatibility issues with the current theme you are using. So, it is better to check the plugin updates and it is compatibility with your current theme and WordPress version.
Summary
Now, you have come across, How WordPress Favicon can help in Brand recognition and enhancing user experience. And the best part is, anyone can easily create and implement Favicons on their website by following all the guidelines and these simple steps:
- You can create Favicons easily with plenty of the options available such as, using online Favicon generator tools, plugins and with the help of professionals.
- You can also easily add them to your website via WordPress customize option, use a plugin or do it manually.
At last, if you have anything more valuable points to add that we have missed mentioning in this post, please do let us know in the comment section below:
Frequently Asked Questions
How do I add a favicon to WordPress?
You have mainly three ways through which you can add a favicon to your WordPress site:
1. Using WordPress customization option
2. You can take the help of the WordPress Favicon Plugin
3. You can add it manually using the FTP client.
What size should a WordPress favicon be?
The highly recommended WordPress Favicon size is 512×512 pixels.
How do I make a good favicon?
You can follow these tips to make a good Favicon:
1. Create a design that shows your brand.
2. The Favicon must be similar to the website logo.
3. The Fronts, color, and design must match with the website theme.
4. The design must be clean and unique.
5. And save the file in Ico format so that it contains multiple versions of favicon with different sizes and resolutions.

Rahul Kumar is a web enthusiast, and content strategist specializing in WordPress & web hosting. With years of experience and a commitment to staying up-to-date with industry trends, he creates effective online strategies that drive traffic, boosts engagement, and increase conversions. Rahul’s attention to detail and ability to craft compelling content makes him a valuable asset to any brand looking to improve its online presence.

