WordPress offers unlimited options for both technical as well as non-technical users to explore all the corners of WordPress to manage. To squeeze out the maximum of your WordPress site, you need to learn about the backend processes. And to figure out this, one of the most important steps is to understand what is the WordPress .htaccess file and how you can explore it?
To run WordPress sites successfully, these websites completely rely on several vital core files, that are stored at the backend, in which WordPress .htaccess file is one of them. By default, this file performs certain tasks related to the permalinks. But you can also edit this file and make certain customizations such as setting up 301 for redirections and enhancing your website security by Forcing HTTPS.
So, in this post, you will be going to learn all about the WordPress .htaccess file, and cover all the important topics related to it such as its complete meaning, how you can access them? How can you edit them? And how can you use it to get the most out of it?
What is the WordPress .htaccess?
The WordPress .htaccess file is one of the most powerful and useful configuration files on your WordPress site. It is considered the most powerful configuration file that is responsible for controlling or managing the most vital configurations of your website.
These files consist of several rules or protocols for the Apache web server, that it needs to obey. You will find this file located either in the root directory of your website or the central directory. It is such a vital file that by default it is kept hidden in your root directory so that no one can get easy access to it to make changes without authorization.
What are the things you can do with the WordPress .htaccess file?
As we have already told you that WordPress .htaccess files are one of the most important configuration files of a website, you can add some special rules that instruct your web server to perform special tasks. Let us check out what they are:
- Default tasks: By default, the WordPress .htaccess files instruct web servers to manage and control your website’s permalinks appearance. That means, if you make any changes or edit your permalinks, the .htaccess file will also get updated with new rules and will instruct the web server to follow. In addition to it, there are some WordPress plugins available which also use the .htaccess file to add their special rules and perform tasks.
- Redirection: You can also set up redirection in the .htaccess file either permanent (301) or temporary (307). Even if you have recently added an SSL certificate, you can setup redirect from HTTP to HTTPS in the .htaccess file.
- Beefup Security: You can restrict access to certain directories of your website by setting up password in the .htaccess file and also ban or allow specific IP addresses to access your website admin page.
- Enable hotlinking protection: You can also protect your website by preventing hotlinking by adding some special rules and prevent other websites from utilizing your resources.
- Add custom error pages: With the help of the .htaccess file you can also load custom-designed error pages such as error 404 page not found page, to your website.
Where is the WordPress .htaccess file located?
If your website uses an Apache web server, you can easily navigate, locate and edit your WordPress .htaccess file by either connecting your website’s server with an FTP client or by accessing cPanel.
But before proceeding further, there are certain important points and safety measures you need to keep in mind. i.e. Accessing .htacces files can be risky. If anything went wrong while editing the .htaccess files, the result can be catastrophic and you may either lose certain key functionalities of your website or in the worst case it can get completely damaged.
Hence, there are certain safety measures you need to follow so that you can eliminate the risk and prevent your site from being damaged:
- Make a complete backup of your website: Making regular backup of website should be included into your priority list, so that if anything went wrong with your website, you can immediately get things back on track without any fail.
- Download a copy: You can also download the original WordPress .htaccess file and save it to your local computer. In case anything went wrong, you can simply reupload the original file and get things back like it was before the edits.
- Perform test on staging platform: There are certain web hosting platforms like WPOven, which offers an unlimited staging platform to perform tests before final publishing. Similarly, you can also make edits to your WordPress .htaccess file and run tests if it’s working before making it live and avoid risking your website.
Now, to reach the exact location of your WordPress .htacess file, you can either follow the two given methods:
Locating the WordPress .htaccess file using FTP client
First of all, you will be required to have downloaded an FTP client such as FileZilla on your local computer and login credentials from your web host.
At WPOven, you can easily find your SFTP login credentials by following the given easy steps below:
Step 1: Open the “Sites” tab and choose the Site you want to know the details of.
Step 2: Click on the “Advanced” sub-tab, enter your WPoven login password and click the “Show Site SFTP Details” button.
Step 3: After entering the password you will see all the required details you require to gain SFTP access to the site.
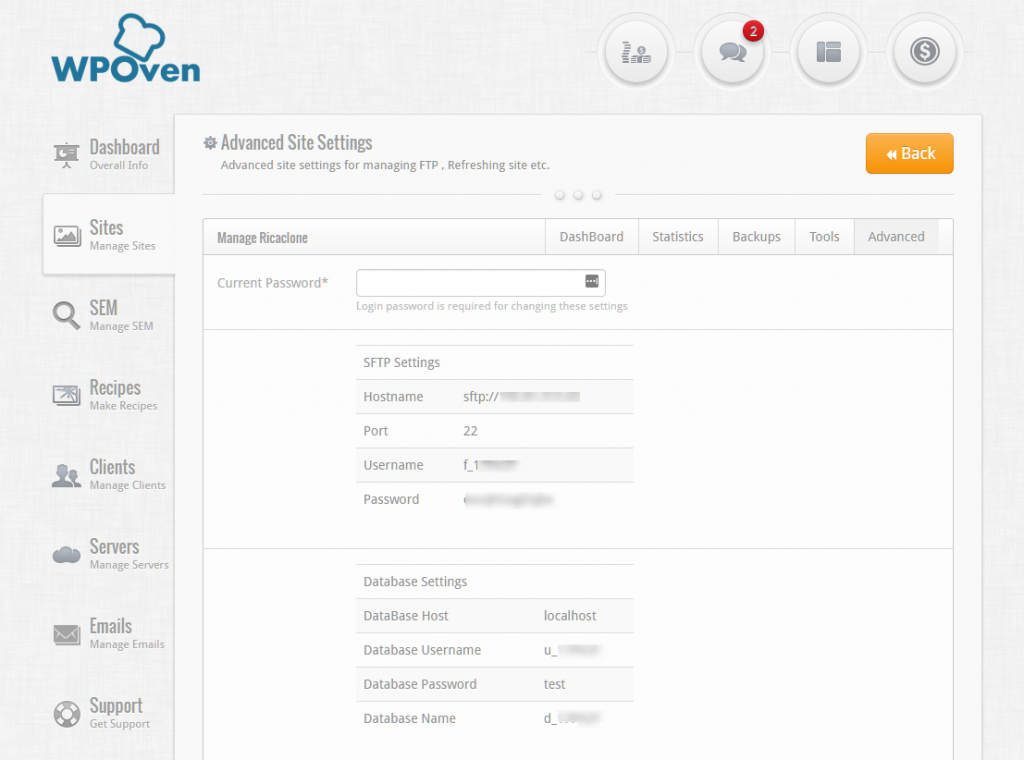
Now, you need to connect your web server with the FTP client using the login credentials, once successfully connected, you will see a window as shown in the picture given below:
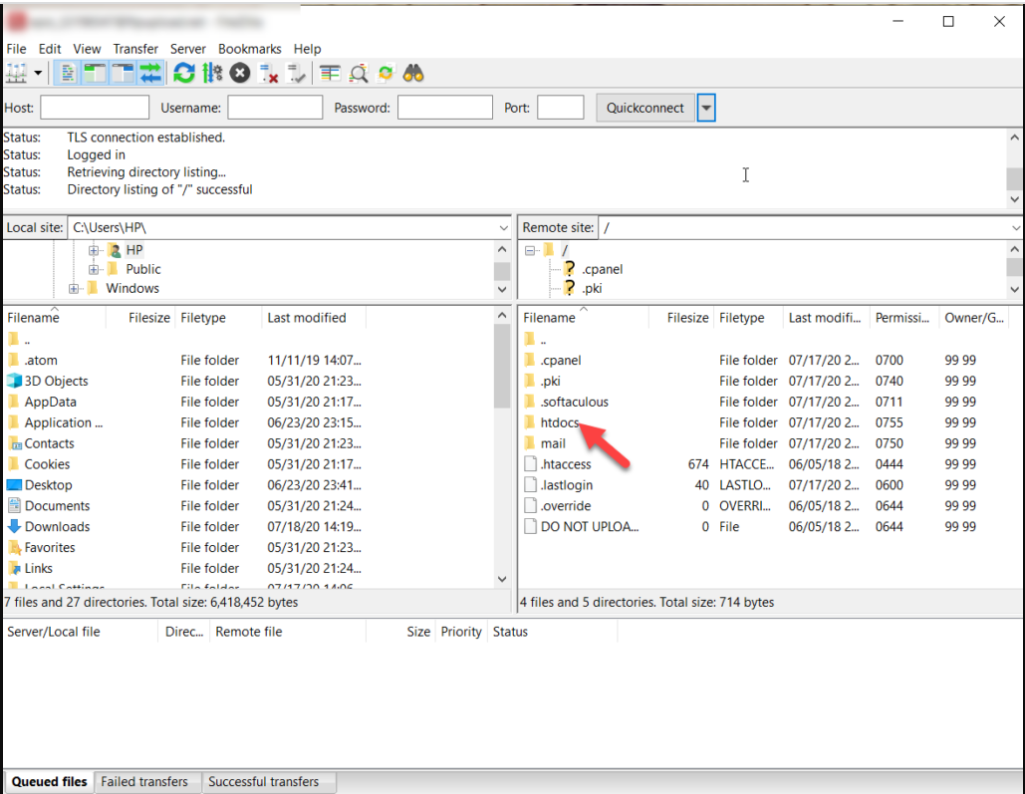
After that check out the top right quadrant, where you will see a folder named your website’s domain, which is called the root directory of your website. Click on this particular folder and you will have a complete list of all the folders and files that will display.
Then click on the public_html folder or htdocs folder (Names can be different depending on the webserver you use) to open, where you can see all the WordPress core files, including the .htaccess file as shown below:
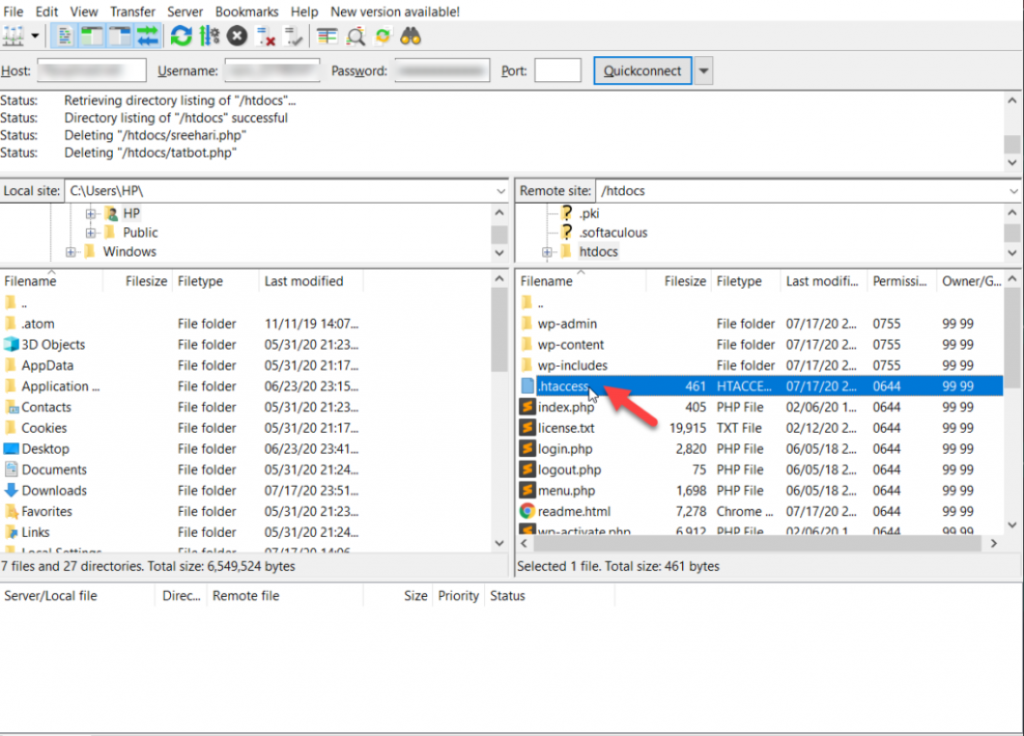
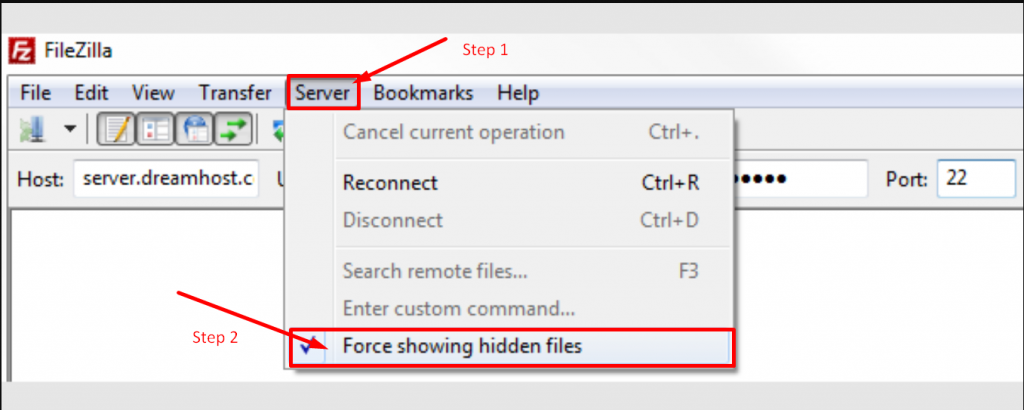
One thing you must also keep in mind is that usually WordPress .htaccess files are kept hidden. So, when you look out for it in the WordPress directory, you won’t be able to see them.
For that, you will be required to enable ‘Show hidden files” options, and to do that in the FTP client, go to server > Force showing hidden files.
Locating the WordPress .htaccess file using cPanel
If your web hosting provider offers you cPanel accessibility, it will become easy for you to locate WordPress .htaccess files without using an FTP client.
- To do this, first, you need to login into your cPanel as shown below:
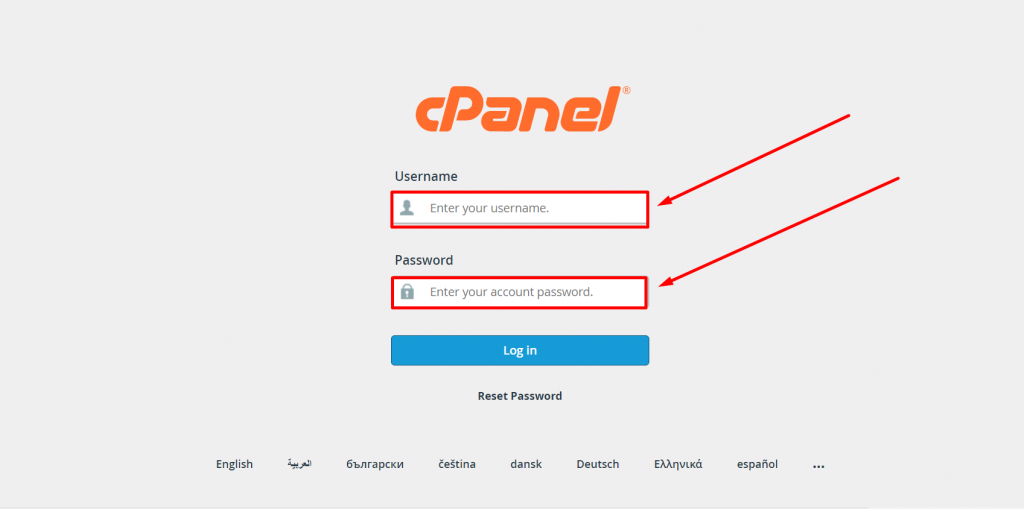
2. Lookout for the Files section and click on the File manager option as shown.

3. Now you will be able to see a list of all the core files displayed on your screen. Select and click on the public_html folder to open.

4. Now if you have an existing .htacess file available, it will reflect in the public_html or htdocs folder, if not then either it is hidden or doesn’t exist yet.
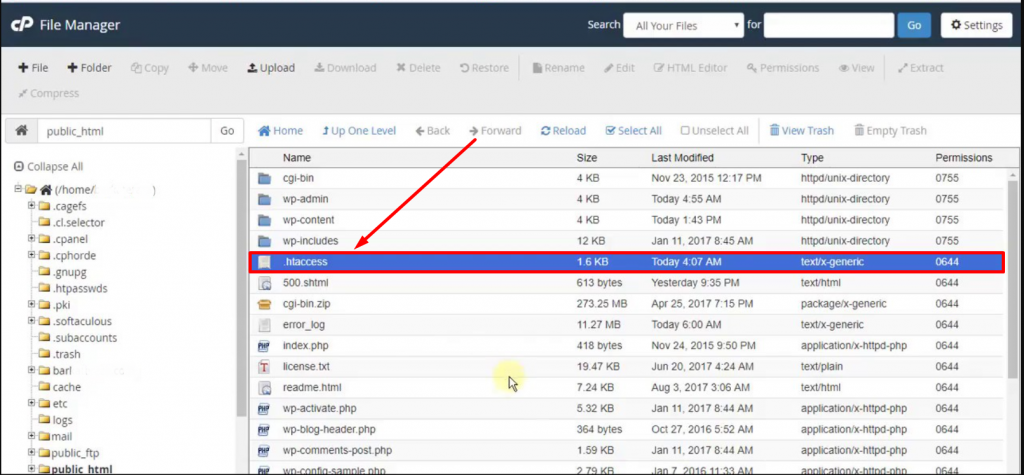
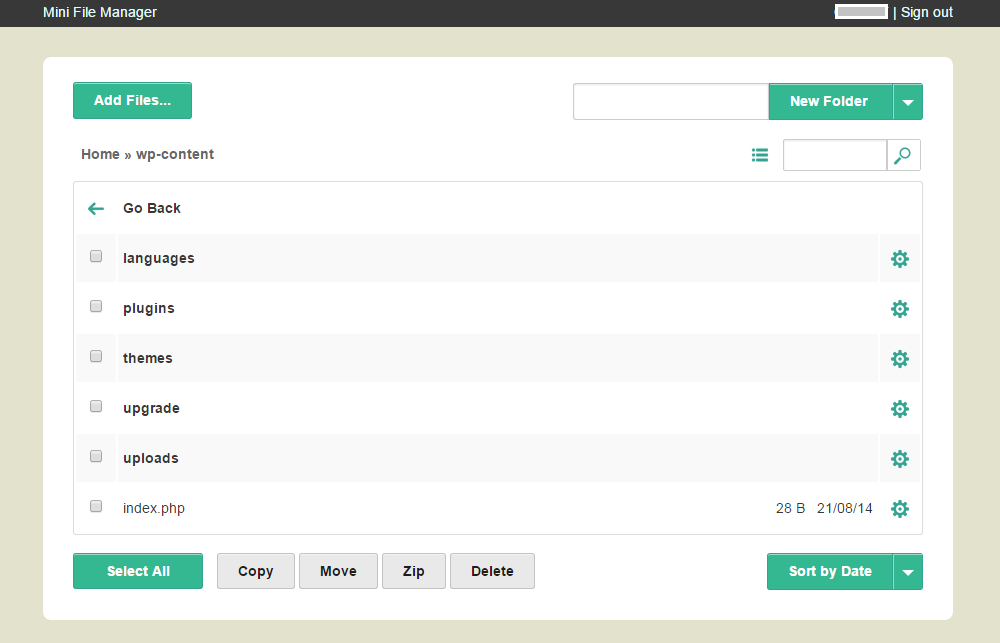
However, if your WordPress .htaccess file is hidden, you can unhide it by simply going to the Settings section located at the top right corner of the “files manager window” as shown in the image below:

A preferences window will pop out as shown in the picture below:
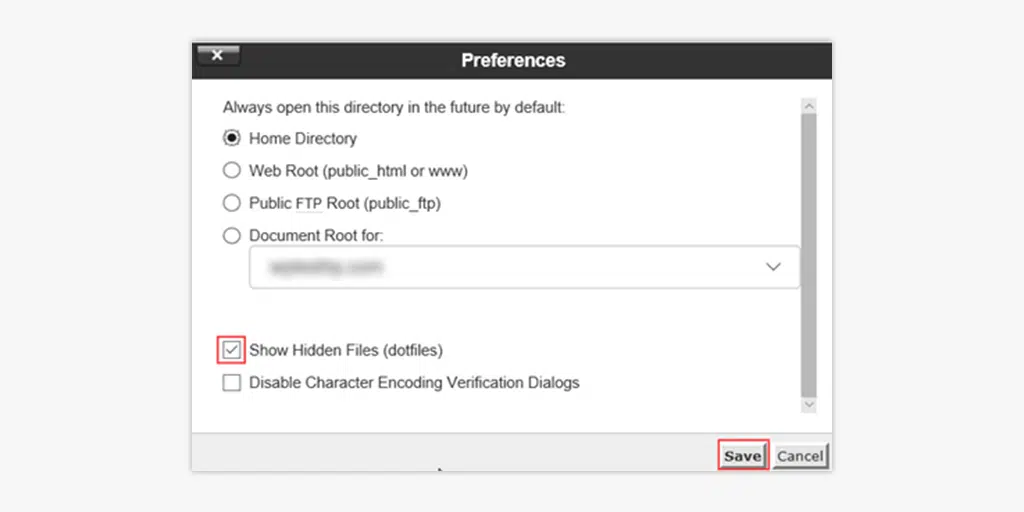
Now simply, check the ” Show Hidden Files (dotfiles)” box and click on Save. All the hidden files will start reflecting on your file manager window.
How to create and edit the WordPress .htaccess file?
To create a WordPress .htaccess file if your website has not any, you need to locate your .htaccess file by either of the two methods (via FTP client or cPanel) that we have already mentioned in the above section and follow these simple steps given below:
1. Creating and editing WordPress .htaccess file in cPanel
First, to create a new .htacess file, you need to click on the ” +File” option located at the top left corner of your File Manager window, as shown in the picture:
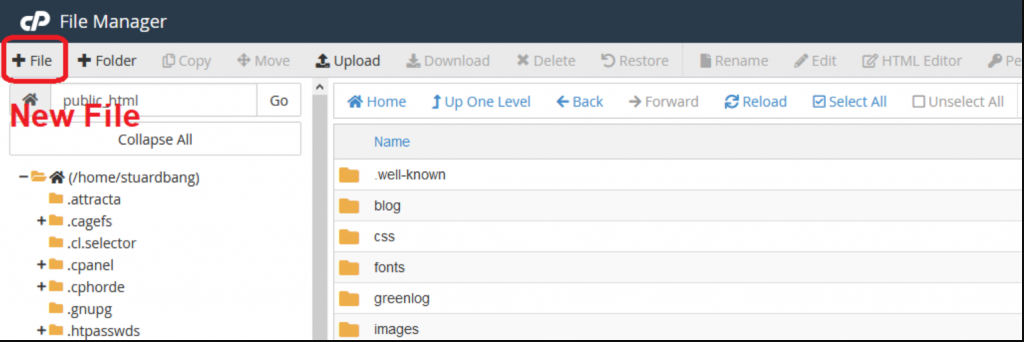
After that, a new popup New File Window will prompt on your screen, in which you can write the file name as .htaccess and click on the Create New file button as shown.

And you are done. Now you can add rules to this new file or edit the existing one by right-clicking on your .htaccess file and selecting the Edit menu.
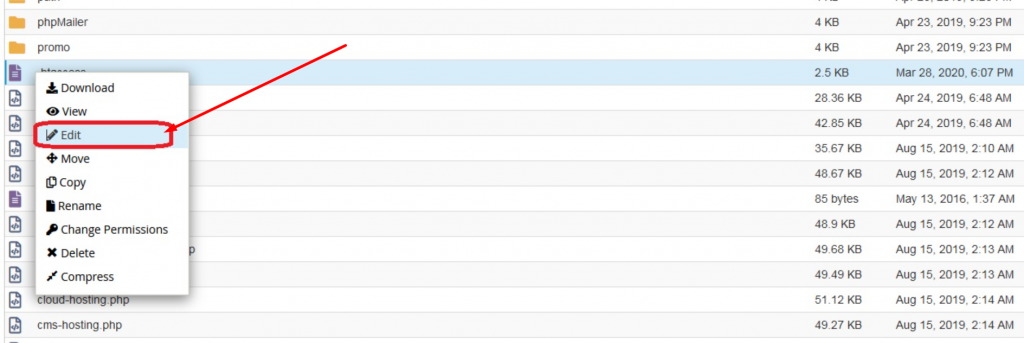
After that, the file will open in a web-based text editor, where you can either add some rules or edit the existing ones. Which is by default the rules in the WordPress .htaccess file looks like in the picture below:

2. Creating and editing .htacess file in FTP client (Filezilla)
First, you need to log in to your FTP client (FileZilla) using FTP credentials, which we have already mentioned the steps in the above sections. Double click on the public_html or htdocs folder to open all the listings.
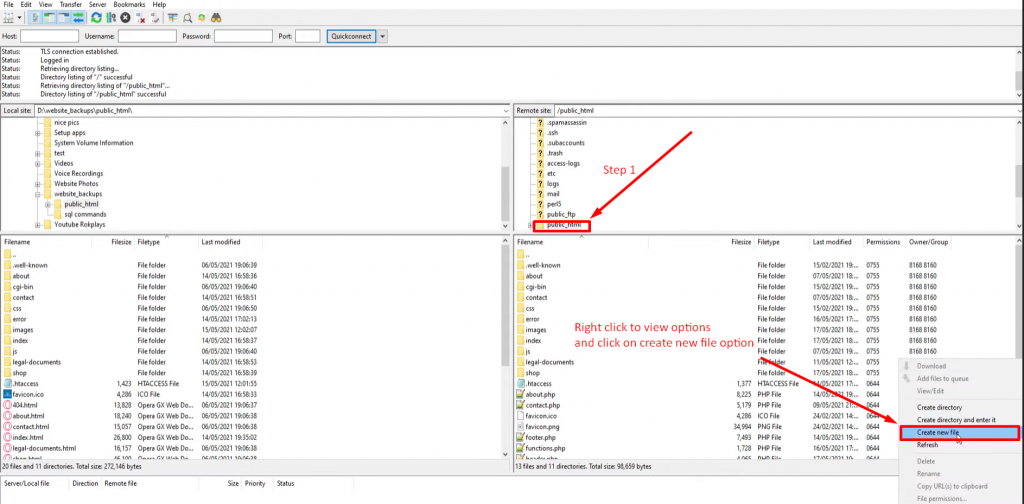
In the same file listing, you need to right-click and select create new file option as shown in the picture above.
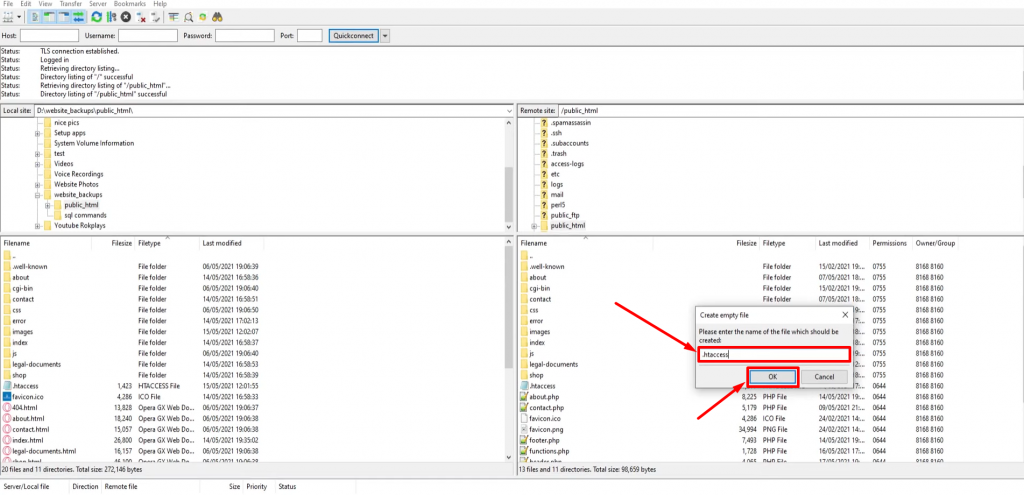
After that enter the file name as “.htaccess” followed by clicking on the OK button and you are done.
Now if you want to edit a .htaccess file in FTP client, right-click on the .htaccess file and select the View/ Edit option.
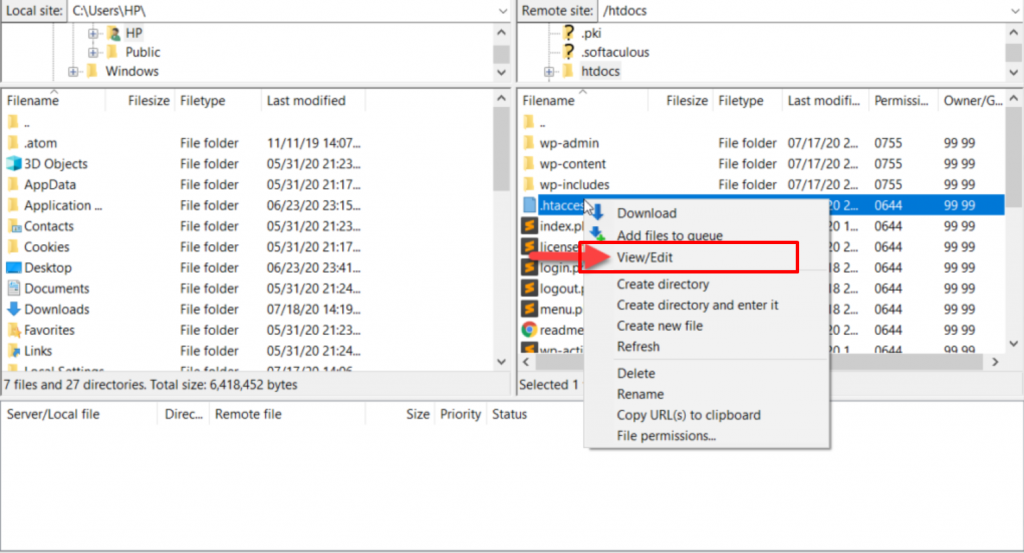
Then the .htaccess file will open in a text editor where you can either add some more rules or make certain changes to it and save it to the server.

However, if you do not like to go through all these complex steps and do not like to touch your website core files. There are plenty of WordPress .htaccess file editor tools are available such as .htaccess file editor in the WordPress directory

Additional Info: Creating multiple .htaccess files
You can create multiple .htaccess files for your website and apply different settings to different directories on your server. All you need to do is create a new .htaccess file or upload a plain text file in any directory on your server.
But there are a few things that you must keep in mind regarding creating multiple .htaccess files.
- Usually, try to avoid creating multiple numbers of .htaccess files on your server, because it can seriously impact your server speed.
- It can increase server resource usage.
- The .htaccess files that are put at higher order will get first preference in the pathway.
Now let us check out the possibilities that you can do with .htaccess files.
What can you do with WordPress .htaccess file?
After knowing about the true meaning of the .htaccess file, how it works and how you can locate or edit them. But after that, A most common question will arise in the beginner’s mind ” How do I use .htaccess file in WordPress? “.
Well to answer that question, let us check out all the possibilities that you can do with the .htaccess file by adding your own rules.
But before that keep in mind, make sure to create a backup of your .htaccess file or download it on your local computer before making any customization or editing for your safety.
1. Redirection
If you have recently changed the domain name of your site. You can set up redirection so that it will be easy for your visitors to reach the new URL rather than the old one.
To enable this, all you need to do is to add the following lines to your .htaccess file and upload it to your server.
|
1 2 |
# enable basic rewriting RewriteEngine on |
for 301 permanent redirections (Redirecting all the traffic) add the following lines:
|
1 2 3 |
RewriteEngine On RewriteCond %{HTTPS} off RewriteRule ^(.*)$ https://%{HTTP_HOST}%{REQUEST_URI} [L,R=301] |
2. Disable Hotlinking
If you do not want any other website owner to use your web server resources. You can simply disable hotlinking by adding the following lines to your .htaccess file.
|
1 2 3 4 |
RewriteEngine on RewriteCond %{HTTP_REFERER} !^$ RewriteCond %{HTTP_REFERER} !^http://(www\.)yourdomain.com/.*$ [NC] RewriteRule \. |
3. Custom 404 Error pages
If you do not want your users to see the same boring Error 404 pages on your website and want to replace them with some interesting or creative way, add the following lines.
|
1 2 |
# serve custom error pages ErrorDocument 400 400.html |
Make sure to replace 400.html with your actual page name.
4. Blocking IP address
If you do not like some particular users to access your website. You can easily block their IP address by adding the following lines.
|
1 2 3 |
order allow,deny deny from 192.158. 1.38. allow from |
Replace ” 192.158. 1.38” this IP address with the IP address of the user that you want to block.
5. Forcing HTTPS
If you want to force every user who is visiting your website to use a Secure connection. You can add the following lines to your .htaccess file and ensure secure traffic. This will redirect from http://www.yoursite.com to https://www.yoursite.com.
|
1 2 3 4 |
#force SSL on entire site RewriteEngine On RewriteCond %{HTTPS} !=on RewriteRule ^/?(.*) https://Yoursite.com/$1 [R=301,L] |
Note: This will only work if you already have an SSL certificate installed on your website.
6. Add password to protect some areas of your website
You can also protect your website from users accessing your website using passwords. So that they cannot be able to access certain areas of the website. All you need to just add the following rules in your .htaccess file.
|
1 2 3 4 |
AuthType Basic AuthName "My Protected Folder" AuthUserFile ../../.htpasswd require valid-user |
But you also need to create a password file (.htpasswd) separately that contains a username and password separated by a colon (:).
How can you make changes in .htaccess file on WPOven?
Since WPOven uses an NGINX rather than an Apache web server, the websites hosted on WPOven have no .htaccess file. But it does not mean that you cannot performs all additional tasks such as redirection, hotlinking, or Customizing 404 error pages.
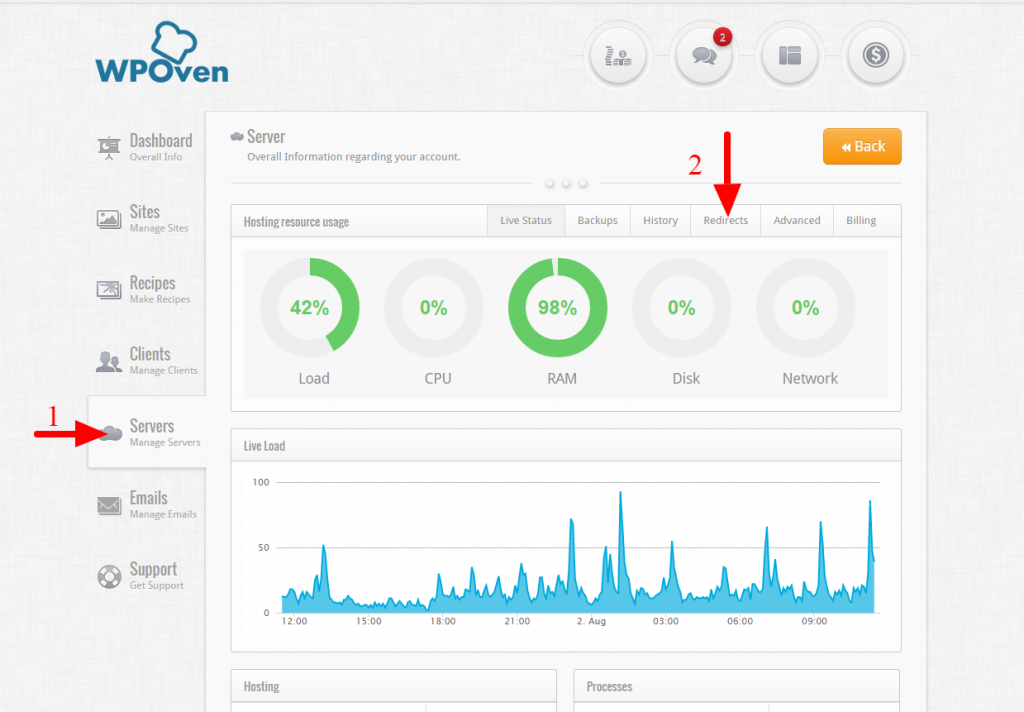
At WPoven you can easily set up a redirection from the WPOven dashboard as shown below:
Step 1: Access the Redirect section.
The redirect section can be accessed from your WPOven dashboard, from the ‘Server‘ section. You need to select the server to which you want the request to redirect. Now in this section, you will notice the ‘Redirects’ tab. Click on the ‘Redirects’ tab to set up the redirect rule.
Step 2: Create a Redirect.
Once you open the ‘Redirects‘ section, you will see the Redirect Manager. Here you will be able to see all the redirect rules that you have set up for this server.

Click on the ‘New Redirect‘ button to add a new redirection rule. Here you will see a form that looks like the form shown below
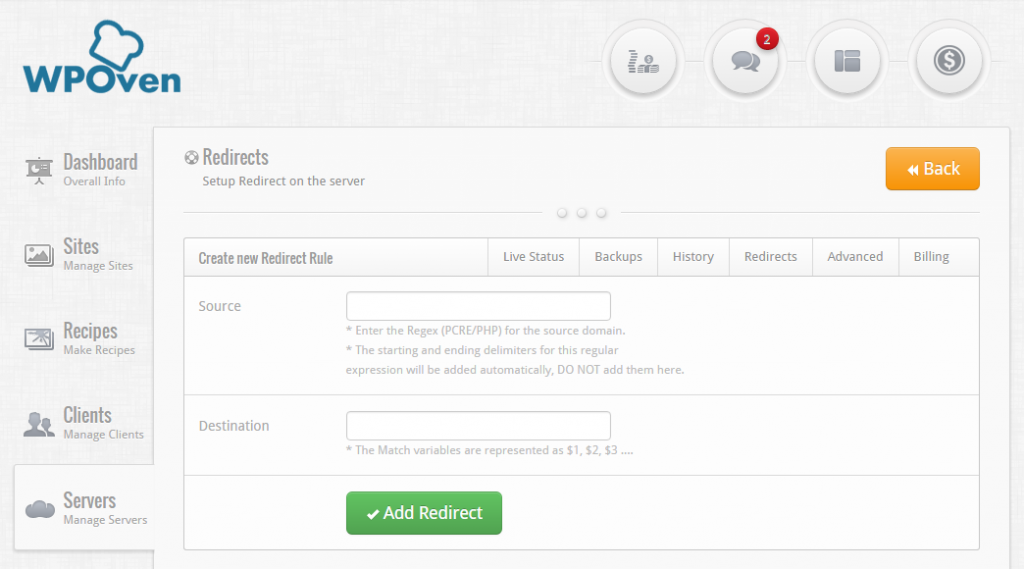
However, some tasks such as hotlinking and enabling password protection can be done by adding certain rules in the config file of the NGINX web server. But still, it would be better you get all these things done from our side. Where you can simply raise a ticket and our support team will reach out to you and do the job.
Summary
Summarizing all the facts and features of the .htaccess file, it turned out to be a very powerful configuration file. In which making some changes or adding rules can enhance the security and solve some of the serious issues of your website.
Here is are some of the tasks you can do with it by adding some rules:
- Disable hotlinking
- Force HTTPS
- Password protect your website
- Redirection
- Custom 404 Error pages
- IP blocking
In addition to that, we have also shown you how can you view and edit your .htaccess file by the following methods:
- via cPanel
- via FTP client
- Usign WordPress Plugins
In case, if you are locked out of your website and are unable to access cPanel, you can alternatively follow the FTP method and edit or view the file.
So, this is all about the .htaccess file, if you are looking for more content related to WordPress, feel free to check out our other Blog.
Do you have any more valuable points to share? Please do let us know in the comment section below!
Frequently Asked Questions
What is the WordPress .htaccess?
The WordPress .htaccess file is one of the most powerful and useful configuration files on your WordPress site. It is considered the most powerful configuration file that is responsible for controlling or managing the most vital configurations of your website.
These files consist of several rules or protocols for the Apache web server, that it needs to obey. You will find this file located either in the root directory of your website or the central directory. It is such a vital file that by default it is kept hidden in your root directory so that no one can get easy access to it to make changes without authorization.
Where is the WordPress .htaccess file located?
The wordPress .htaccess file is located in the root folder of your website.
How many .htaccess files should I have?
Although there can be multiple .htaccess files a website has. But it is highly preferable to have a single .htaccess file for your wordpress site.

Rahul Kumar is a web enthusiast, and content strategist specializing in WordPress & web hosting. With years of experience and a commitment to staying up-to-date with industry trends, he creates effective online strategies that drive traffic, boosts engagement, and increase conversions. Rahul’s attention to detail and ability to craft compelling content makes him a valuable asset to any brand looking to improve its online presence.

![WordPress .htaccess File: How to Create And Edit it? 3 select site How To Use SSH To Connect To Your Server Securely [Guide]](https://blog.wpoven.com/wp-content/uploads/2016/09/select_site.png)
![WordPress .htaccess File: How to Create And Edit it? 4 sftp database details 0 How To Use SSH To Connect To Your Server Securely [Guide]](https://blog.wpoven.com/wp-content/uploads/2016/09/sftp_database_details_0.png)

