If you’ve ever encountered the DNS_PROBE_FINISHED_NO_INTERNET Error, you know how frustrating it can be. This error occurs when your computer is unable to connect to the internet because of issues with the Domain Name System (DNS).
But sometimes, it is not always the same case. The DNS_PROBE_FINISHED_NO_INTERNET error can also be caused by any VPN you use or the router. In addition, these issues can appear out of nowhere and disappear on their own.
Therefore, you cannot only rely on fixing the DNS. You also have to figure out the other causes that trigger it and then try to work on it accordingly.
In this blog post, we’ll explore what DNS Probe Finished No Internet means, what causes it, and provide you with troubleshooting methods to help you fix it. But before we start, there is some prerequisite knowledge you must know about DNS, that helps you to better understand the DNS_PROBE_FINISHED_NO_INTERNET error.
Let us get started!
How to Fix DNS_PROBE_FINISHED_NO_INTERNET Error?
Now that you are aware of what DNS_PROBE_FINISHED_NO_INTERNET Error is and what the possible causes are, let’s explore the various troubleshooting steps you can follow to fix this issue immediately.
Check your Internet connection
The “DNS probe finished no Internet” error can sometimes occur due to a poor or unstable Internet connection. To check your internet connection,
- Ensure that your device is connected to a reliable network by verifying your device’s network settings and confirming that you are connected to the correct network.
- If you’re still encountering the error, attempt to resolve any internet connectivity issues that may be causing it by restarting your modem or router. To do this, unplug the power cord from your modem or router, wait for a few seconds, and then plug it back in.
- Once you have restarted your modem or router, wait for a few minutes to allow your device to reconnect to the network. Once your device is connected, attempt to browse the internet again and check if the “DNS probe finished no Internet” error has been resolved.
- If you have verified your internet connection and the error still persists, there may be other underlying issues causing the problem. In such a scenario, you can attempt the alternative solutions mentioned below.
Clear your browser cache
If you’re still experiencing the “DNS probe finished no internet” error message, you may want to try clearing your cache and cookies. Here are the steps you can follow:
Step 1: Depending on your browser, Go to the settings menu.
Read: 🚩 How to fix the DNS_PROBE_STARTED Error? [8 Ways]
In Google Chrome, for example, you can find the settings menu by clicking on the three vertical dots located in the upper right corner of the window.
Step 2: To proceed, select “More tools” and then click on “Clear browsing data”.
![How to fix the DNS_PROBE_STARTED Error? [8 Ways] 7 Clear browsing data in Chrome](https://www.wpoven.com/blog/wp-content/uploads/2023/03/7.png)
Step 3: A pop-up window will be displayed, and you can choose all three options located under the “Basic” section as depicted in the picture below. These options consist of “Browsing history,” “Cookies and other site data,” and “Cached images and files.
Step 4: Click on “Clear data” to initiate the process.
![How to fix the DNS_PROBE_STARTED Error? [8 Ways] 8 Clearing data in Google Chrome](https://www.wpoven.com/blog/wp-content/uploads/2023/03/8.png)
Clear your DNS cache and Renew your IP address
An outdated DNS cache can store corrupt files which can cause network problems, such as the DNS Probe Finished No Internet error. To resolve this issue, you can flush your DNS to reset it and restore everything to normal.
For Windows 10 and Windows 11 users:
Step 1: Open the Run command by pressing the Windows key and R. Alternatively, you can search for it in the Start menu.
Step 2: Type “cmd” and hit Enter to open the Command Prompt.
![How to fix the DNS_PROBE_STARTED Error? [8 Ways] 13 Opening Command Prompt in Windows](https://www.wpoven.com/blog/wp-content/uploads/2023/03/6.png)
Step 3: Once the Command Prompt window is open, type “ipconfig/release” to release your current IP address.
![How to fix the DNS_PROBE_STARTED Error? [8 Ways] 14 Using Ipconfig command on CMD](https://www.wpoven.com/blog/wp-content/uploads/2023/02/ipconfig-release.png)
Step 4: Next, type “ipconfig/flushdns” to release the DNS cache.
Step 5: Type “ipconfig /renew” to obtain a new IP address.
![How to fix the DNS_PROBE_STARTED Error? [8 Ways] 15 ipconfig renew](https://www.wpoven.com/blog/wp-content/uploads/2023/02/ipconfig-renew.png)
Step 6: Type “netsh int ip set dns” and hit Enter to reset your IP settings.
Step 7: Finally, type “netsh winsock reset” to restore the Winsock Catalog.
![How to fix the DNS_PROBE_STARTED Error? [8 Ways] 16 netsh winsock reset](https://www.wpoven.com/blog/wp-content/uploads/2023/02/netsh-winsock-reset.png)
Step 8: After completing these steps, restart your computer to ensure the changes take effect.
For MacOS users:
Step 1: First of all, open the system preference options on your Mac. If you have Gas Mask installed, it can make searching for system-related tasks easier.
Step 2: Next, navigate to the Ethernet tab and click on the advanced options.
Step 3: Under the TCP/IP tab, you will find the option to release a DHCP lease. Clicking on this option will allow you to clear out the local DNS on your Mac.
![How to fix the DNS_PROBE_STARTED Error? [8 Ways] 17 Renew DHCP in MacOS](https://www.wpoven.com/blog/wp-content/uploads/2023/02/renew-DHCP-lease.png)
Step 4: To clear the local DNS cache, go to Utilities > Terminal and enter the command.
Step 5: The command for flushing the local DNS cache is “dscacheutil -flushcache”.
Step 6: Once you have entered the command, there will be no separate success or failure message that pops up. However, in most cases, the cache will be cleared without any major issues.
Change your DNS server
If you want to fix any DNS network issues such as the DNS_PROBE_FINISHED_NO_INTERNET error, one of the most common solutions you can follow is to change the DNS address to either IPv4 or IPv6. However, it’s worth noting that while IPv6 is the newer version, IPv4 is still more commonly used. Follow these steps to change your DNS address:
For Windows 10 and Windows 11 users:
Step 1: If you are Windows 10 or 11 User, you have to open the control panel by simply typing “Control Panel” in the search bar.
Step 2: In the Control Panel select Network & Internet > Network and Sharing Center.
Step 3: From the menu on the left, select Change adapter settings.
Step 4: Right-click on your network and select Properties.
Step 5: In the window that opens, click on Internet Protocol Version 4 (TCP/IPv4) from the list, then select Properties again.

Step 6: Click on Use the following DNS server addresses.
Step 7: Enter “8.8.8.8” for the Preferred DNS server and “8.8.4.4” for the Alternate DNS server.

Step 8: Click on the OK button to save your changes.
Step 9: Close all the windows and try re-accessing the website to see if the error is still present.
If the problem persists, you may need to try other solutions. However, changing your DNS address can often resolve internet connection issues.
For MacOS users:
Step 1: First, navigate to the System Preferences on your Mac. You can find this by clicking on the Apple icon in the top-left corner of your screen, then selecting “System Preferences“.
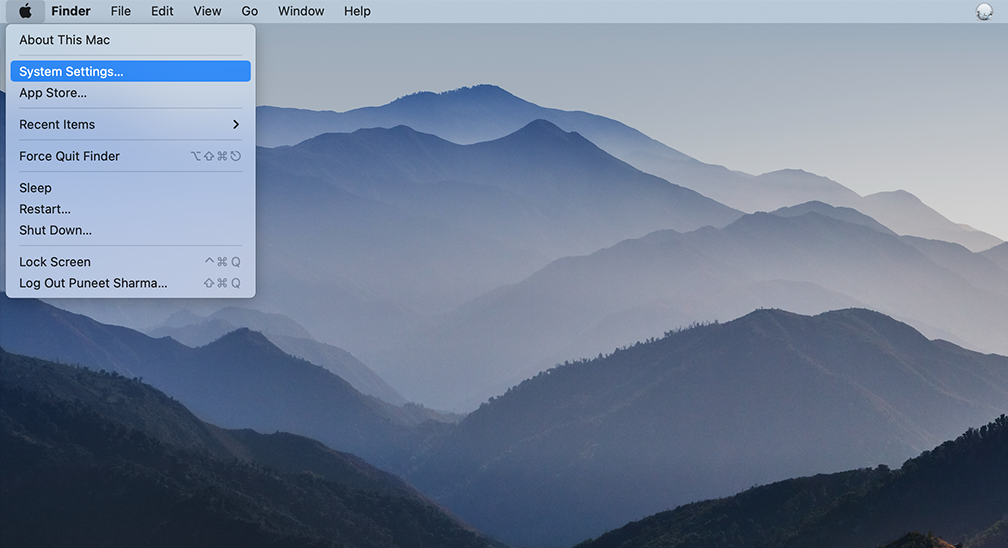
Step 2: Once you’re in System Preferences, locate the “Network” icon and click on it. From there, select the network connection that you want to modify (e.g., Wi-Fi or Ethernet).
Step 3: In the Network settings, you should see a button labeled “Advanced“. Click on that, and then navigate to the “DNS” tab.
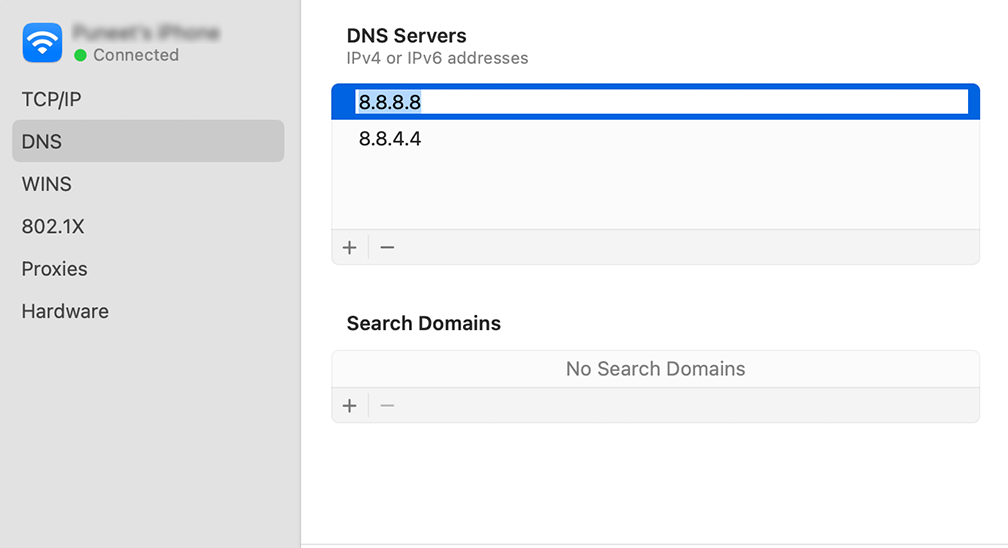
Step 4: Here’s where you’ll add the DNS server addresses. Click on the “+” button at the bottom-left of the DNS settings window, and then type in the IPv4 address for Cloudflare’s DNS servers: 1.1.1.1. Press enter, then repeat the process to add another address: 1.0.0.1.
Step 5: Finally, click “OK” to save the changes you’ve made. You should now be all set with your new DNS settings!
Disable IPv6
To disable IPv6 in Windows 11, follow these steps:
1. Press the Windows key + R on your keyboard to open the Run dialog box.
2. Type “ncpa.cpl” in the Run box and hit Enter to open the Network Connections window.

3. Right-click on your network adapter and select “Properties”.

4. Scroll down and locate “Internet Protocol Version 6 (TCP/IPv6)” in the list of items. Uncheck the box next to it to disable IPv6.

5. Click “OK” to save the changes.
Note: It’s generally not recommended to disable IPv6 unless there is a specific reason to do so, as it can cause issues with certain applications and services.

Update Network Adapter
It is also possible that an outdated Network Adapter gets corrupted over time and can also trigger a DNS Probe Finished No Internet Error. So, it would be best to update your Network Adapter by simply uninstalling it first and reinstalling it through your Device manager.
Check out the steps you must follow:
Step 1: First of all you need to press the Windows key + R on your keyboard simultaneously.
Step 2: Type “devmgmt.msc” into the Run box and hit Enter.
Step 3: In the Device Manager window, click to expand Network adapters.
Step 4: Right-click on your network adapter, and select Uninstall device.
Step 5: Confirm the action and wait for the process to complete.
Step 6: Close the Device Manager window and restart your computer.
Step 7: Once your computer has restarted, open the Device Manager again and select your network adapter.

Step 8: Click on Action > Scan for hardware changes from the menu bar. This will reinstall your network driver(s).

Step 9: Now try loading the website again. If the issue persists, you may need to update your drivers manually or seek further assistance.
Run a Malware Scan
Sometimes, malware can also interfere with the network connectivity and as a result, trigger DNS Probe Finished No Internet Error.
So running a malware scan could help identify and remove any potential malware that might be causing the problem.
How to Prevent DNS_PROBE_FINISHED_NO_INTERNET Error?
To prevent DNS_PROBE_FINISHED_NO_INTERNET Error, you can follow these tips:
- Regularly clear your DNS cache to prevent issues with the DNS cache.
- Update your network drivers to ensure they are up-to-date and compatible with your system.
- Use reputable antivirus software and keep it up-to-date to prevent malware or virus infection.
What is DNS and How Does It Work?
DNS, or Domain Name System, is a protocol whose main job is to translate domain names into IP addresses. When you enter a website address into your browser, the browser sends a request to the DNS server to resolve the domain name into an IP address. The IP address is then used to connect to the website server and load the web page.
Read: 🚩 How To Fix DNS_PROBE_FINISHED_NXDOMAIN Error?
What is DNS_PROBE_FINISHED_NO_INTERNET Error Means?
DNS_PROBE_FINISHED_NO_INTERNET is a common network error that occurs when your computer or device is unable to establish a connection to the Internet due to an issue with the DNS configuration.
If there is any incorrect DNS address or a problem with the DNS server, your device may fail to connect to the internet, and you may see the “DNS Probe Finished No Internet” error message in your browser.
Why Does DNS Probe Finished No Internet Error Occur?
DNS Probe Finished No Internet Error appears when your computer is unable to resolve the domain name into an IP address. This can happen for several reasons such as,
- Misconfigured DNS settings
- Corrupt or Outdated DNS cache
- Problem with Network settings
- Malware or virus infection
Misconfigured DNS Settings
If your DNS settings are incorrect, you may encounter the DNS Probe Finished No Internet Error. To fix this issue, you can try resetting your DNS settings to default or manually entering a different DNS server address.
Issues with DNS Cache
A DNS cache is a temporary storage of website addresses and their corresponding IP addresses. If there is an issue with the DNS cache, it can cause the DNS Probe to have No Internet Error. To fix this issue, you can try clearing the DNS cache on your computer.
Problems with Network Settings
Network settings can also cause the DNS Probe Finished No Internet Error. To fix this issue, you can try resetting your network settings or disabling any VPN or proxy settings.
Malware or Virus Infection
In some cases, malware or virus infection can cause the DNS Probe Finished No Internet Error. To fix this issue, you should run a malware scan on your computer using reputable antivirus software.
Summary
Encountering any error message or issue with network connectivity can be frustrating and disruptive to your internet browsing experience, particularly the “DNS Probe Finished No Internet Error.” Fortunately, by following the tactics and steps outlined in this blog, you can easily resolve this issue and resume browsing the internet uninterrupted.
To fix the error, there are several troubleshooting steps you can take, including checking your internet connection, clearing your browser’s cache, and resetting your network settings. Additionally, regular malware scans are crucial to keep your computer protected and prevent future issues.
By keeping these tips in mind, you can enjoy a smooth and uninterrupted internet browsing experience. If you have any queries or would like to add any valuable points to it, please do let us know in the comment section below.
Save your time, money, and resources, and give your website mammoth growth with WPOven’s Enterprise WordPress Hosting for Agencies.
- 24X7 WordPress Expert support
- Cloudflare integration
- High-end Security
- Datacentres around the world, etc.
You can have all these features and much more in a single plan with unlimited Free migrations, unlimited staging, and a 14-day risk-free guarantee. Check out our plans or contact our support team which assist you in choosing the right plan.
Read: 🚩 chrome://net-internals/#dns – How to Clear DNS Cache Chrome
Frequently Asked Questions
Why is my DNS working but no internet?
Is DNS working but no internet? It could be due to router/modem issues, network connectivity, DNS server problems, firewall settings, or malware/virus infections. Restarting the router/modem, changing the DNS server, checking firewall settings, or running a malware scan may help. If none works, contact your internet service provider or technical support.
How to fix DNS_PROBE_FINISHED_NO_INTERNET in Windows 7?
To fix the “dns_probe_finished_no_internet” error in Windows 7, you can try the following steps:
1. Restart your modem or router and wait for it to fully reboot.
2. Clear your browser’s cache and cookies.
3. Flush DNS cache
4. Check your firewall settings to ensure that they are not blocking your internet connection.
5. Temporarily disable your antivirus software and see if the issue persists.
6. Change your DNS server
If the issue still persists after trying these steps, you may need to contact your internet service provider or a technical support specialist for further assistance.
How to fix DNS_PROBE_FINISHED_NO_INTERNET on Chromebook?
To fix the DNS Probe Finished No Internet on Chromebook, follow these troubleshooting methods.
1. Check your internet connection and make sure that it is working properly.
2. Restart your Chromebook and see if the issue persists.
3. Clear Chrome browser’s cache and cookies.
4. Try accessing the website using a different browser.
5. Disable any extensions that you have installed on your Chromebook and see if the issue persists.
6. Check your firewall settings to ensure that they are not blocking your internet connection.
7. Try changing your DNS server.
8. Reset your Chromebook’s network settings by going to Settings > Network > Wi-Fi > (select your network) > Forget network.

Rahul Kumar is a web enthusiast, and content strategist specializing in WordPress & web hosting. With years of experience and a commitment to staying up-to-date with industry trends, he creates effective online strategies that drive traffic, boosts engagement, and increase conversions. Rahul’s attention to detail and ability to craft compelling content makes him a valuable asset to any brand looking to improve its online presence.

