Have you ever experienced slow website loading times or encountered errors when accessing a website? These issues could be caused by problems with DNS resolution, the process by which a domain name is translated into an IP address that a computer can use to access a website.
Fortunately, Google Chrome includes a tool called chrome://net-internals/#dns that can help diagnose and troubleshoot DNS issues.
In this guide, we’ll understand what exactly chrome://net-internals/#dns is, explore the features and the benefits of using it, and show you how to use it effectively.
Let us get started!
How you can use Chrome://net-internals/#dns to clear the DNS cache in Chrome?
On various operating systems including Windows, macOS, and Linux, if you use Google Chrome as your web browser, you have the option to use the feature chrome://net-internals/#dns to clear the DNS cache within the Chrome browser.
All you have to do is,
Step 1: Open your Chrome Browser
Step 2: Enter the chrome://net-internals/#dns to the chrome address bar and hit the “Enter” button to open the interface.
Step 3: Now click the Cler Host cache button as shown in the picture.

Step 4: After that restart Chrome and go to the link chrome://net-internals/#sockets to flush the socket pools.

You have successfully been able to flush the DNS cache in Chrome. The above method also works on various platforms and devices such as Windows, Linux, macOS, Android, and iPhone or iPad.

How can you use chrome://net-internals/#dns Mobile devices?
The great thing about the chrome://net-internals/#dns tool is that you can also use it to clear the DNS cache on your mobile phone (Android, iPhone, or iPad) running Chrome.
Now, the question arises – how to clear the host cache in Chrome net internals DNS on mobile? Well, the answer is simple and straightforward.
Just like you follow the steps in the above section, you have to do the same on your mobile phone. All you have to do is to open Chrome browser regardless of any mobile phone (Android or iPhone or iPad) and enter the chrome://net-internals/#dns page to clear the host cache on Chrome browser.


In case it doesn’t work, you can follow the simple steps given below:
- Open the Chrome app on your Android/iOS phone or tablet.
- Tap the “More” button located at the top-right corner of the screen.
- Select “History” from the list of options.
- Choose a time range by tapping on the drop-down menu located at the top of the screen. To clear all browsing data, select “All time.”
- Check the boxes next to “Cookies and site data” and “Cached images and files.”
- Tap the “Clear data” button located at the bottom of the screen.
What to do if chrome://net-internals/#dns doesn’t Work?
It is also possible that the tool chrome://net-internals/#dns may not work or may not be able to fix DNS issues. In such situations, you can try the alternative methods that we have mentioned below to flush DNS.
1. Purge DNS cache Using the Command Prompt
If you’re using Windows, MacOS, or Chrome, you can easily flush your DNS cache by following these simple steps.
For Windows Users
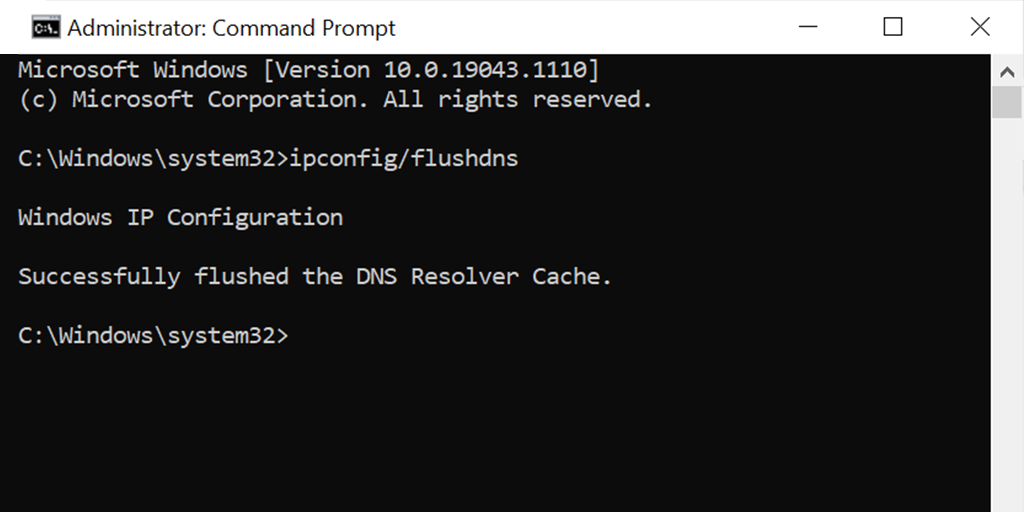
Step 1: Go to your Start menu > Search “Command Prompt” > Right-click on it and select “Run as Administrator“.
Step 2: When the Command prompt window appears, type the given command below and press Enter.
ipconfig /flushdns
For MacOS Users
Step 1: In your Mac open the Terminal application.
Step 2: Now type the given command below and hit the Return Key.
sudo dscacheutil -flushcache; sudo killall -HUP mDNSResponder
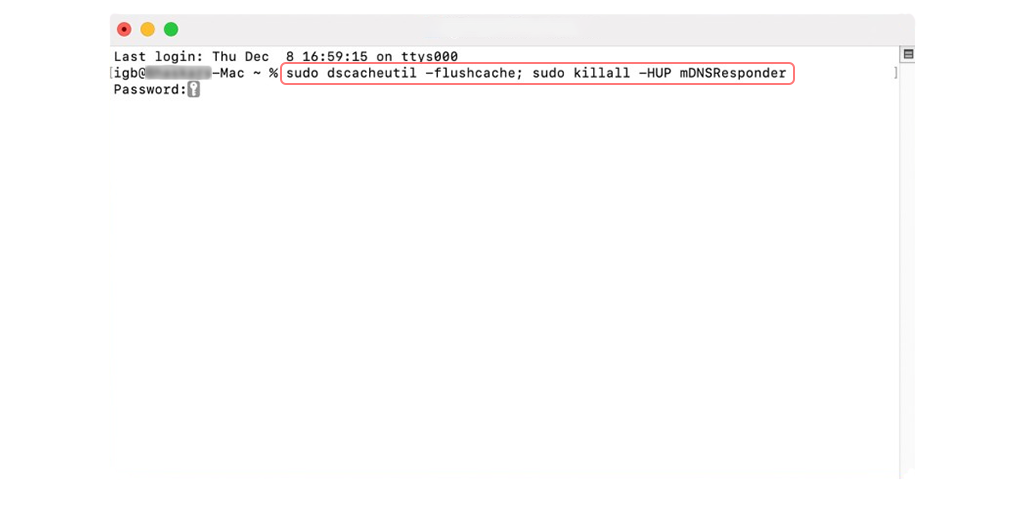
Step 3: Now enter your password and hit the Return Key.
Step 4: Now open your browser and attempt to access the website again. This will allow you to check whether or not the error has been resolved.
2. By Resetting DNS Client Services
Option 1: Open up the Command Prompt window using key combinations of Windows Key+R
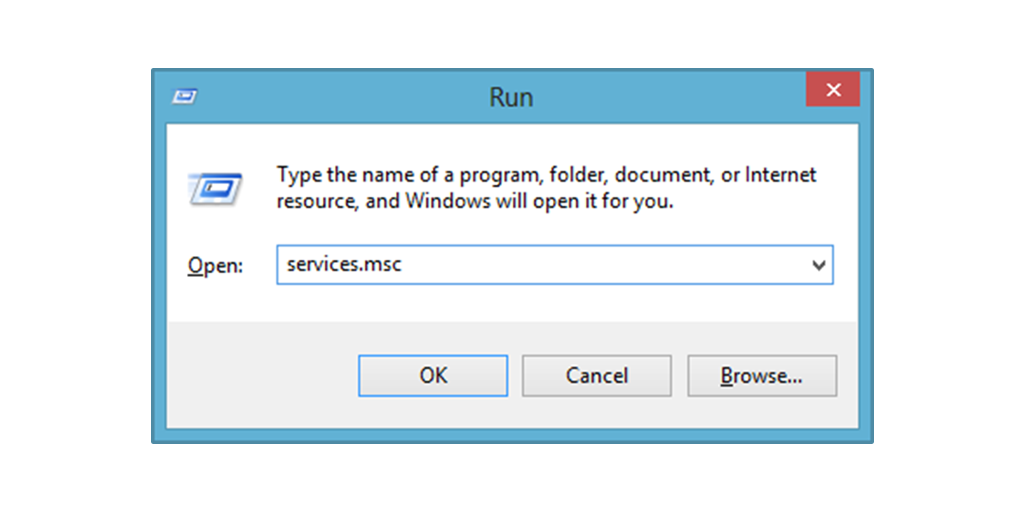
As soon as the terminal opens up, type services.MSC will immediately lead to the local Services Page. Once on the page, the user will search the ‘DNS client’ option, where on a right-click, there will be an option to restart, which is to be exercised. By performing the function, the cache files in DNS names will be refreshed and the errors might be removed.
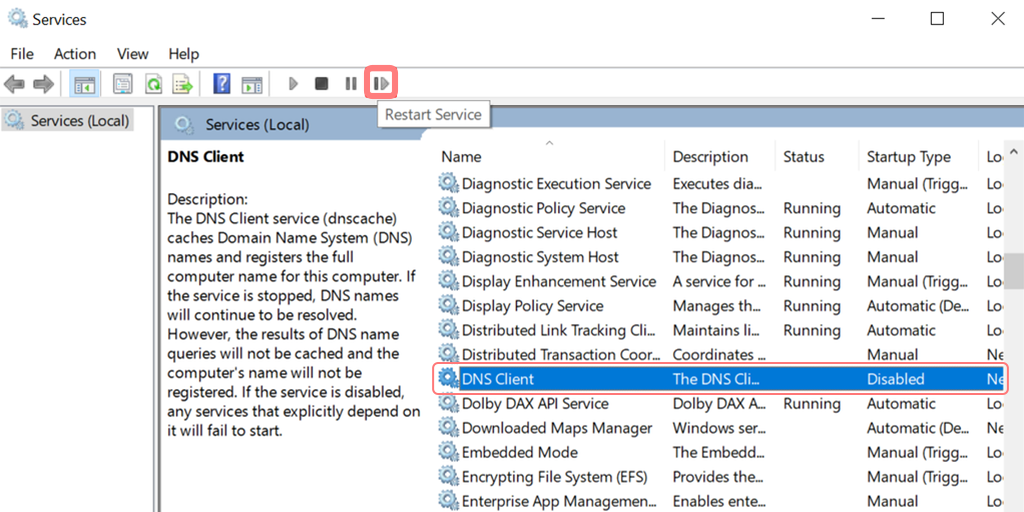
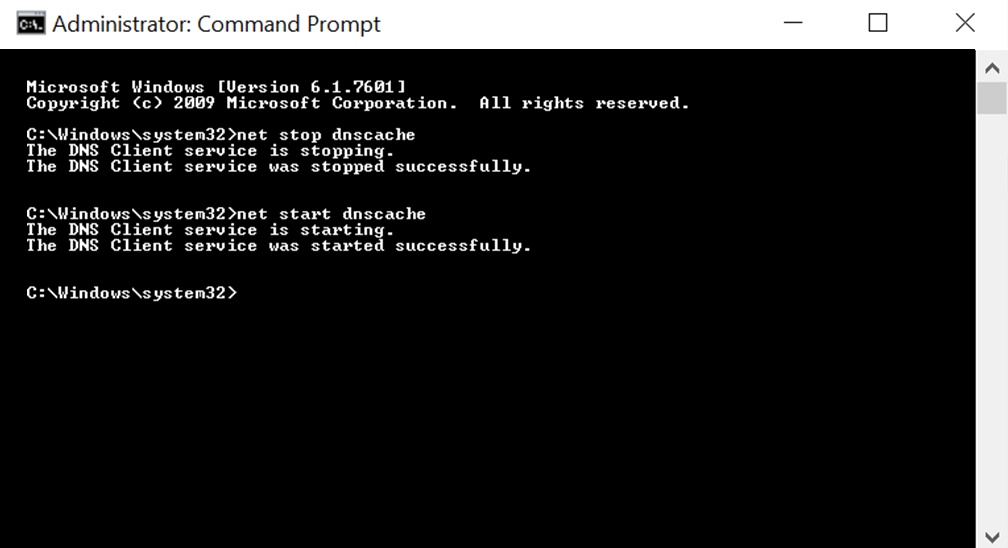
Option 2: Alternatively, depending on the Windows O/S versions, the other way involves using the command prompt to resolve the issue. All a person requires is to search cmd or command in the run tab, which will open up the DOS layout. In this interface, typing net stop dnscache and net start dnscache a will do the refreshing of DNS files.
3. By Resetting Chrome Flags
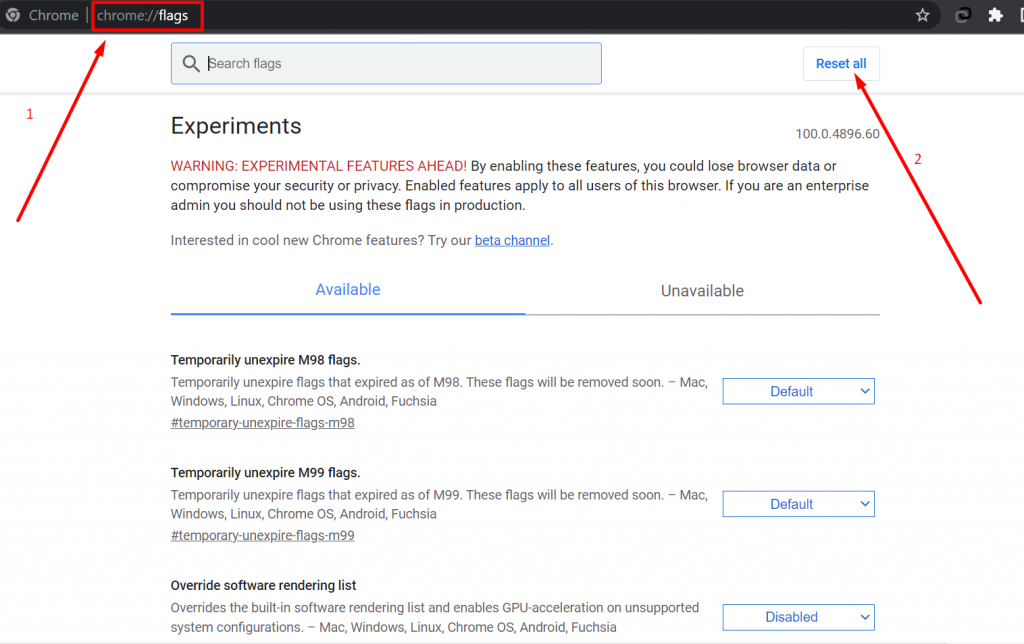
Chrome Flags are experimental settings or features in the Google Chrome browser that are not enabled by default but can be accessed and enabled by users for testing purposes. Enabling certain Chrome Flags may lead to the DNS_PROBE_FINISHED_NXDOMAIN error.
To reset Chrome Flags to their default settings, follow these steps:
- Open the Chrome browser on your device.
- In the address bar, type
chrome://flagsand press Enter. - Locate the “Reset all to default” button at the top of the page and click on it.
- A prompt will appear asking you to confirm the reset. Click on “Reset all” to confirm.
- Once the reset is complete, you will be prompted to relaunch Chrome to apply the changes.
Flushing DNS cache on macOS
1. Enter “Terminal” into Spotlight
2. Go to the Terminal window and enter the following command:
sudo dscacheutil -flushcache
sudo killall -HUP mDNSResponder
Flushing DNS cache on Linux
Flushing the DNS cache on Linux can be done through the terminal using the “systemd-resolve” command. Here are the steps to follow:
1. Open the terminal on your Linux system.
2. Type the following command and press Enter
sudo systemd-resolve --flush-caches
3. This command will flush both the negative and positive DNS cache entries.
4. To verify that the DNS cache has been cleared, type the following command and press Enter:
sudo systemd-resolve --statistics
This command will display statistics of the resolved DNS queries. If the cache has been cleared, the count of “CacheHit” should be zero.
Pros and Cons of using chrome://net-internals/#dns tool
Here are some pros and cons of using the //net-internals/#dns feature in Chrome:
Pros:
- It allows you to clear the DNS cache in Chrome, which can help resolve issues with website loading and connectivity.
- The process is straightforward and can be performed quickly.
- The tool is built into Chrome and doesn’t require any additional software.
Cons:
- Clearing the DNS cache using this feature may delete all the stored website domain name and IP address associations, which can result in slower website loading times for a short period while the browser rebuilds the cache.
- The feature is intended for advanced users and can be confusing for those who are not familiar with the inner workings of the browser.
- Using the feature incorrectly or inappropriately may cause unintended issues or data loss.
Best Practices for Using Chrome Net Internals DNS
To get the most out of Chrome Net internals DNS, it’s important to use it in the right situations and follow best practices for effective use.
For example, you should use Chrome net internals DNS when you are experiencing DNS resolution issues, but not for routine browsing. You should also be aware of security and privacy considerations when using Chrome net internals DNS.
What is chrome://net-internals/#dns?
Chrome Net Internals DNS or chrome://net-internals/#dns is an incredibly useful tool for anyone who wants to get a deeper understanding of how their web browser resolves domain names.
It’s like having a backstage pass to the inner workings of the internet! You won’t believe how much information you can find on this page, i.e. from the DNS resolver cache to DNS request and response data.
It is a powerful tool for troubleshooting network-related issues in web browsers that you might be experiencing. This tool lets you view real-time logs and load NetLog dumps from earlier dates, providing insight into the browser’s network events and state.
By using Net-Internals, web developers and other users can better understand how their browser is working and identify any issues that may be affecting its performance.
You can use the “//net-internals/#dns” feature on all Chromium-based browsers such as Chrome, Opera, Microsoft Edge, and others.
To clear the host cache, simply enter “[browser name]://net-internals/#dns” in your browser’s address bar, and then switch to “[browser name]://net-internals/#sockets” to flush socket pools. This process can be helpful in clearing the DNS cache on your Chromium browser.
Read: 🚩 What is a DNS? How does Domain Name work?
Accessing “chorme://net-internals/#dns”
When you enter the URL chrome://net-internals/#dns in your Chrome Address bar, you will be landed on a page where you can click on “Clear host cache” to clear the DNS cache on Chrome. The interface consists of several tabs that provide different views of DNS resolution data.
Understanding DNS Resolution
DNS resolution is a critical part of the internet infrastructure that allows computers to communicate with each other using domain names instead of IP addresses. When you enter a URL into your web browser, your computer requests a DNS server to translate the domain name into an IP address.
The DNS server responds with the IP address, allowing your computer to connect to the website. If there is a problem with DNS resolution, you may experience slow loading times, errors, or be unable to access the website altogether.
Understanding Some Features of Chrome://net-internals/#dns
The “chrome://net-internals/#dns” page in Google Chrome provides advanced features that can help diagnose and resolve issues related to the Domain Name System. Some of the main features are listed below:
DNS Lookup
One of the main features of this page is the DNS lookup tool, which allows you to perform a DNS query for a specific domain name and see the resulting IP address. This can be useful for troubleshooting network connectivity issues, as it can help you determine if the DNS server is resolving domain names correctly.
DNS resolver cache
It displays a list of cached DNS entries and their time-to-live (TTL) values. This can help you determine if a DNS cache refresh is necessary, or if a domain name is being resolved from the cache instead of being looked up from the DNS server.
DNS prefetching
It is a technique used by Google Chrome to speed up web browsing by preloading DNS entries for links on a webpage. This can help reduce the time it takes to load web pages, but can also result in additional DNS queries being made, which can impact network performance.
Sockets
The “chrome://net-internals/#dns” page also provides information about open network sockets and their state, as well as host and proxy resolver rules that are used to map hostnames to IP addresses and determine the proxy server to use for a given URL.
Note: The “chrome://net-internals/#dns” page is intended for advanced users and should be used with caution. Making changes to DNS settings or cache can impact network performance and stability, so it is recommended to have a good understanding of DNS and network protocols before using these features.
Why do you need to clear the Host cache?
If you’re experiencing connectivity issues that usually happen due to outdated DNS records, purging the host cache can do the job. For example, if a website changes its IP address, but your device’s cache still stores the previous IP address, you may encounter connection problems.
Clearing the host cache will ask your device to perform a fresh DNS lookup for the updated IP address, resulting in a successful connection to the website.
Conclusion
Chrome net internals DNS is a powerful tool that can help diagnose and troubleshoot DNS resolution issues. By understanding how to use Chrome net internals DNS effectively, you can improve your browsing experience and avoid common issues.
If you want further learning and troubleshooting, we highly recommend you explore additional resources such as Google’s support documentation and online forums.
You can also check out our comprehensive guide on how to fix the DNS_PROBE_FINISHED_NXDOMAIN error, which is one of the most common DNS-related issues you may encounter while browsing.
If you noticed anything that we might have missed mentioning in this post, or if you would like to add your valuable insights to it, please feel free to share your thoughts in the comment section below. We always welcome your feedback and suggestions!
Host businesses of all sizes on one of the Fastest, Reliable, and Secure servers. Our High performing and featured full Dedicated WordPress Hosting packages include:
- Fastest Private Servers
- Fully WordPress optimized Servers
- Upto 100% server uptime
- Server stack
- Hardened Servers with high-end security
- 24X7 WordPress Expert support
- Datacentres around the world, etc.
Get all these features and many more benefits such as unlimited Free migrations, unlimited staging, and a 14-day risk-free guarantee. Check out our plans or Contact our support team which assist you in choosing the right plan.
Frequently Asked Questions
What is Chrome net internal DNS?
Chrome Net internal DNS is a tool within the Google Chrome browser that allows users to view and manage the DNS cache and related network settings. It can be accessed through the URL chrome://net-internals/#dns and is used to troubleshoot network issues related to DNS.
How do I clear DNS cache in Chrome?
Step 1: Open your Chrome Browser
Step 2: Type the following “chrome://net-internals/#dns” in the address bar and hit Enter.
Step 3: Now click on the clear host cache button and you are done.
How do I clear DNS cache in Chrome mobile?
1. Open the Chrome app on your Android or iOS mobile phone.
2. Tap the “More” button located at the top-right corner of the screen.
3. Select “History” from the list of options.
4. Choose a time range by tapping on the drop-down menu located at the top of the screen. To clear all browsing data, select “All time.”
5. Check the boxes next to “Cookies and site data” and “Cached images and files.”
6. Tap the “Clear data” button located at the bottom of the screen.

Rahul Kumar is a web enthusiast, and content strategist specializing in WordPress & web hosting. With years of experience and a commitment to staying up-to-date with industry trends, he creates effective online strategies that drive traffic, boosts engagement, and increase conversions. Rahul’s attention to detail and ability to craft compelling content makes him a valuable asset to any brand looking to improve its online presence.

