Today’s internet is much more flexible than it was a decade ago. There is an abundance of unnecessary data and resources available, and we have become habitual to uninterrupted access to the Internet.
As a result, even a slight error message, such as “Your DNS Server Might be Unavailable” or “DNS Server Unavailable,” can be frustrating for you.
The feeling of being disconnected from the internet can be overwhelming, especially when you’re in the middle of important work or trying to access important information.
But don’t worry, we’ve got your back! In this blog post, we bring you some troubleshooting methods that can help you to resolve your DNS server issues. We will try to answer your most common questions such as What causes this error message, why it happens, and most importantly, how to fix it.
Our main goal is to help you to get back online as soon as possible so that you can focus on what really matters to you.
Let’s dive in and get started!!
What is DNS Server?
When you encounter DNS server issues, understanding the concept of DNS can help you easily resolve any problems. So, first, check out the meaning of DNS server.
A DNS or Domain Name System server is a computer server that translates website domain names into IP addresses. An IP address is a unique identifier assigned to each device connected to the internet. When you enter a website name in your browser, the DNS server helps to locate the website’s IP address and directs your request to the appropriate server.
If you’d like to learn more about DNS and how it works, check out our dedicated blog post on ‘What is DNS? How do Domain Names Work?“.
‘Your DNS Server Might Be Unavailable’ means that your device cannot connect to the DNS server to translate domain names into IP addresses. This can occur for various reasons, such as a misconfigured network setting, a problem with your internet service provider (ISP), or an issue with the DNS server itself.
Symptoms of DNS server unavailability may include web pages failing to load, slow internet connection, or error messages displaying “DNS server not responding” or “DNS server unavailable.”
DNS problems can be serious and can prevent you from accessing the Internet. Speaking of DNS problems, users reported the following issues:
- The DNS server might be experiencing problems – If this error occurs, be sure to wait for a couple of minutes and try to access the Internet again.
- DNS_PROBE_FINISHED_BAD_CONFIG – IT appears in web browsers when they cannot access a website due to a problem with the DNS configuration.
- DNS server not responding – Sometimes you might get this error message if your DNS server isn’t properly configured; to fix the problem, check your DNS configuration.
- DNS server timed out – If you’re getting this error message, your PC might not be able to reach the DNS server.
- DNS_PROBE_FINISHED_NXDOMAIN – DNS probe error finished domain is an issue that takes place when mismatching of the IP address takes place with the DNS of your computer.
Now check out the various troubleshooting methods to fix the “Your DNS server might be unavailable” error.
Read: 🚩 How to Fix HTTP 504 Gateway Timeout Error?
There may be several possible causes that could trigger the “Your DNS server might be unavailable” error. It could be that your DNS server is temporarily down or that the DNS server configuration is incorrect. Whatever the reason, there are certain troubleshooting methods you can try to fix this issue from your side.
- Restart your System and Router
- Disable Any Security program and Firewall
- Try using Windows Internet Troubleshooter
- Update your Network Adaptors
- Clear the DNS
- Try Google’s DNS Server
- Enable Automatically Obtain DNS detail
- Provide your Desired IP address
- Refresh your DNS service
- Check for Windows Update
Let us see what are they in detail.
1. Restart your System and router
One of the basic yet effective troubleshooting methods you can try is to restart your system or PC. You can also restart your router, which will allow it to start fresh.
Check out the steps to restart Windows 10 and 11 PC.
- Click on the “Start” button (Windows icon) located in the bottom left corner of the screen.
- Click on the power icon, which looks like a circle with a vertical line on top of it, located on the left side of the Start menu.
- Click on “Restart” from the options that appear.
- Windows will then prompt you to save any unsaved work before it restarts your PC.
- Once you have saved your work, click “Restart” again to confirm.
- Your Windows 10 PC will then begin the restart process, which may take a few minutes to complete.
Alternatively, you can use the keyboard shortcut “Ctrl + Alt + Delete” to bring up the shutdown options, and then select “Restart” from the drop-down menu.
To restart your router, check the steps you should follow:
- Press the power button to turn off the router
- Wait for at least 10 seconds to ensure that the router has completely powered off.
- Press the power button again to turn it back on.
- Wait for the router to power back on and connect to the internet, which may take a few minutes.
- Once the router has reconnected to the internet, check to see if the issue you were experiencing has been resolved.
Note: If you want to check whether the router is causing issues, try connecting to Ethernet instead. If you’re able to connect to the internet via Ethernet, then it seems that the router is having some issues.
2. Disable Any Security program and Firewall
Antivirus and firewalls are undoubtedly essential tools for protecting your PC against malware and hacking threats. However, sometimes these security tools are configured too strictly and start interfering with your Network connection and blocking certain apps from running properly. Causing DNS server issues.
Therefore, you can try temporarily disabling them and check whether it fixes the “Your DNS Server Might be unavailable” error or not.
For Windows users:
Step 1: First, you need to open your computer’s control panel. To do this, click on the “start” menu on your desktop and type in “control” in the search field.
Step 2: Next, select “System and Security” from the control panel options. This will take you to a new page.
Step 3: On the new page, you’ll see an option for “Windows Defender Firewall.” Click on “Allow an app or feature through Windows Firewall.”

Step 4: In the next window, you’ll see a list of apps and features that are allowed to communicate through your firewall. To change these settings, click on “Change settings.”

Step 5: If you don’t see your DNS client on the list, you can add it by clicking on the plus (+) icon.
Step 6: To temporarily disable your firewall, uncheck the box next to “Windows Defender Firewall” and click on “OK” to save your changes.
Step 7: Alternatively, you can adjust your firewall settings by finding the DNS client or any other application you want to configure and checking or unchecking the boxes next to the desired settings.
Step 8: Once you’re done adjusting your settings, click on “OK” to save your changes.
Note: It’s important to only disable your firewall temporarily if you need to troubleshoot a connectivity issue. Leaving your computer without a firewall can expose it to potential security threats.
3. Try using Windows Internet Troubleshooter
The best part about Windows OS is that there are multiple Internet connection Troubleshooter options available that can help you identify and fix any Internet connection issues you may be experiencing.
So, if you’re encountering the “Your DNS Server Might be unavailable” error on your Chrome browser, don’t worry! Just follow the simple steps outlined below:
For Windows 10 users:
Step 1: Open the Settings menu by simply Pressing the Windows + I key simultaneously.
Step 2: On the same page, select “Update & Security“.
Step 3: Scroll down to the left-hand menu and select “Troubleshoot“.
Step 4: Under the “Get up and running” section, click on “Additional troubleshooters“.
![How to fix the DNS_PROBE_STARTED Error? [8 Ways] 4 Windows Internet Connection Troubleshooter](https://www.wpoven.com/blog/wp-content/uploads/2023/03/13.png)
Step 5: From the list of troubleshooters that appears, select “Internet Connections“.
Step 6: Click on the “Run the troubleshooter” button.
![How to fix the DNS_PROBE_STARTED Error? [8 Ways] 5 Running the Internet Connection troubleshooter in Windows 10](https://www.wpoven.com/blog/wp-content/uploads/2023/03/14.png)
Step 7: Then the troubleshooter tool will start finding issues with your internet connection.
Step 8: Once it has completed the scan, any issues that it finds will be listed, along with the steps on how to fix them.
For Windows 11 users (Some steps differ from Windows 10)
Open the Start menu on your Windows device and Type “troubleshoot settings” in the search bar.
From the list of results that appear, click on “Other Troubleshooters“.
On the Internet connections option click on the “Run” button.
![How to fix the DNS_PROBE_STARTED Error? [8 Ways] 6 Windows 11 Internet Connection Troubleshooter](https://www.wpoven.com/blog/wp-content/uploads/2023/03/15.png)
A prompt will appear that will automatically start detecting problems.
4. Update your Network Adaptors
Your PC or Computer cannot control and run its internal hardware such as audio card, sound card, or wireless without the help of software i.e. Drivers.
Sometimes, an outdated network Adaptor or Driver can also be the culprit for triggering the Your DNS Server Might be unavailable error. Hence, if you are still facing the error try uninstalling and reinstalling your network drivers through your Device Manager:
Step 1: Press the Windows key + R on your keyboard.
Step 2: Type “devmgmt.msc” into the Run box and hit Enter.
Step 3: In the Device Manager window, click to expand Network adapters.
Step 4: Right-click on your network adapter, and select Uninstall device.
Step 5: Confirm the action and wait for the process to complete.
Step 6: Close the Device Manager window and restart your computer.
Step 7: Once your computer has restarted, open the Device Manager again and select your network adapter.
![How to fix the DNS_PROBE_STARTED Error? [8 Ways] 18 9 How to fix the DNS_PROBE_STARTED Error? [8 Ways]](https://www.wpoven.com/blog/wp-content/uploads/2023/03/9.png)
Step 8: Click on Action > Scan for hardware changes from the menu bar. This will reinstall your network driver(s).
![How to fix the DNS_PROBE_STARTED Error? [8 Ways] 19 Scanning for Hardware Changes in Network Adapter](https://www.wpoven.com/blog/wp-content/uploads/2023/03/10.png)
Step 9: Now try loading the website again. If the issue persists, you may need to update your drivers manually or seek further assistance.
5. Clear the DNS
An outdated DNS cache can sometimes lead to network issues, such as the “Your DNS Server Might be unavailable” error. To fix this problem, you can flush your DNS to reset it and get everything back to normal.
For Windows 10 and Windows 11 users:
Step 1: Open the Run command by pressing the Windows key and R. Alternatively, you can search for it in the Start menu.
Step 2: Type “cmd” and hit Enter to open the Command Prompt.
![How to fix the DNS_PROBE_STARTED Error? [8 Ways] 13 Opening Command Prompt in Windows](https://www.wpoven.com/blog/wp-content/uploads/2023/03/6.png)
Step 3: Once the Command Prompt window is open, type “ipconfig/release” to release your current IP address.
![How to fix the DNS_PROBE_STARTED Error? [8 Ways] 14 Using Ipconfig command on CMD](https://www.wpoven.com/blog/wp-content/uploads/2023/02/ipconfig-release.png)
Step 4: Next, type “ipconfig/flushdns” to release the DNS cache.
Step 5: Type “ipconfig /renew” to obtain a new IP address.
![How to fix the DNS_PROBE_STARTED Error? [8 Ways] 15 ipconfig renew](https://www.wpoven.com/blog/wp-content/uploads/2023/02/ipconfig-renew.png)
Step 6: Type “netsh int ip set dns” and hit Enter to reset your IP settings.
Step 7: Finally, type “netsh winsock reset” to restore the Winsock Catalog.
![How to fix the DNS_PROBE_STARTED Error? [8 Ways] 16 netsh winsock reset](https://www.wpoven.com/blog/wp-content/uploads/2023/02/netsh-winsock-reset.png)
Step 8: After completing these steps, restart your computer to ensure the changes take effect.
Read: 🚩 How to Fix DNS_PROBE_POSSIBLE Error? (6 Quick Methods)
6. Try Google’s DNS Server
For Windows 10 and Windows 11 users:
Step 1: If you are Windows 10 or 11 User, you have to open the control panel by simply typing “Control Panel” in the search bar.
Step 2: In the Control Panel select Network & Internet > Network and Sharing Center.
Step 3: From the menu on the left, select Change adapter settings.
Step 4: Right-click on your network and select Properties.
Step 5: In the window that opens, click on Internet Protocol Version 4 (TCP/IPv4) from the list, then select Properties again.

Step 6: Click on Use the following DNS server addresses.
Step 7: Enter “8.8.8.8” for the Preferred DNS server and “8.8.4.4” for the Alternate DNS server.

Step 8: Click on the OK button to save your changes.
Step 9: Close all the windows and try re-accessing the website to see if the error is still present.
If the problem persists, you may need to try other solutions. However, changing your DNS address can often resolve internet connection issues.
7. Enable Automatically Obtain DNS detail
Enabling the “automatically obtain DNS detail” option in the network property can solve any DNS server-related issues easily.
Go to the Windows search bar and type ” View Network connections” as shown in the picture below”. Now click on the View network connections to Open.

Navigate to “Change adapter settings” and click on it. A new window will open showing all your Available Network Connections.

Select and right-click on the network that you are using and Click on the properties option as shown below:
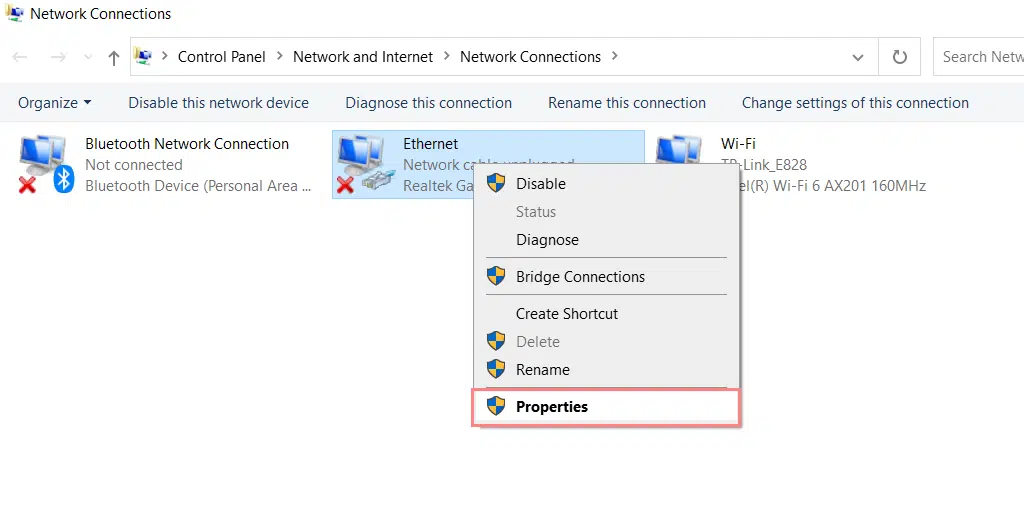
Look for the “Internet Protocol Version 4 (TCP/IPv4)” option and mark check the box next to it. Click on the “Properties” button.
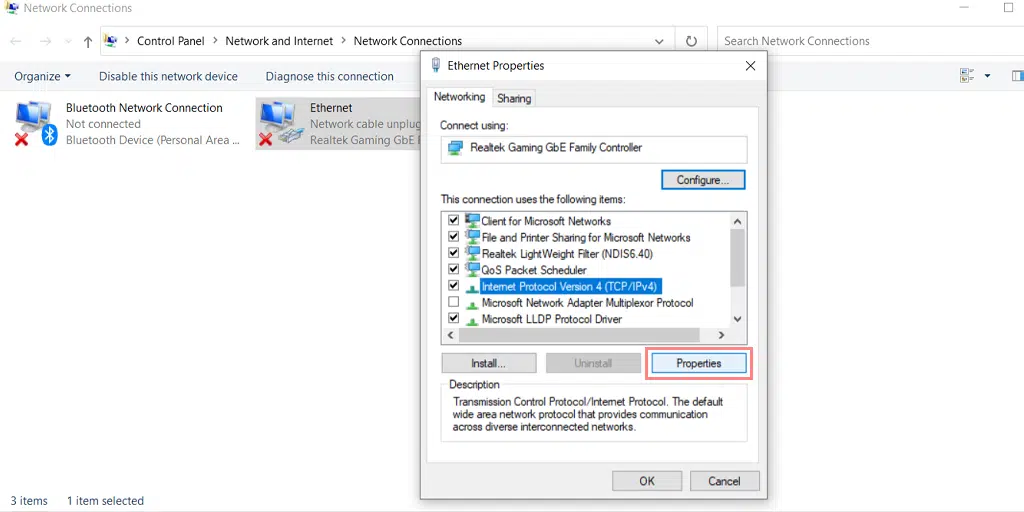
Select the “Obtain an IP address automatically” and “Obtain DNS server address automatically” options.
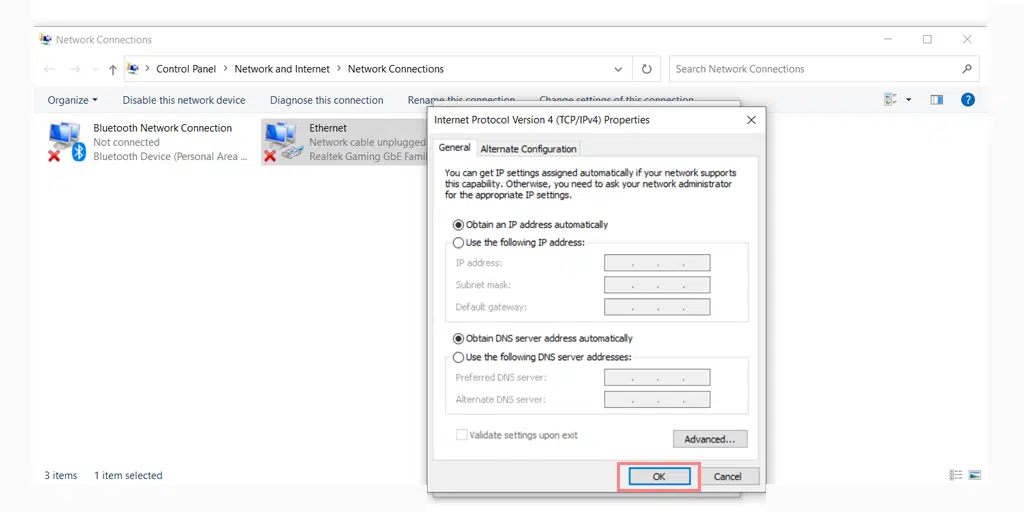
Click “OK” to save the changes and restart your computer.
8. Provide your Desired IP address
To enter the IP address manually on your Windows 10 and 11, you can follow these steps:
Press the “Windows” and “R” keys simultaneously.
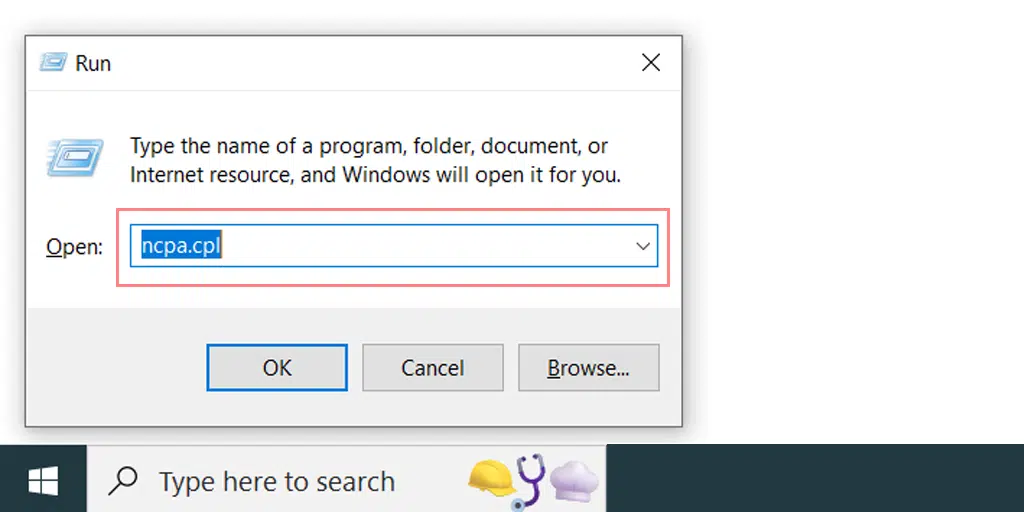
Enter “ncpa.cpl” in the run box and hit enter.
Select and right-click on the connection type you are using, for example, Ethernet or Wi-Fi.
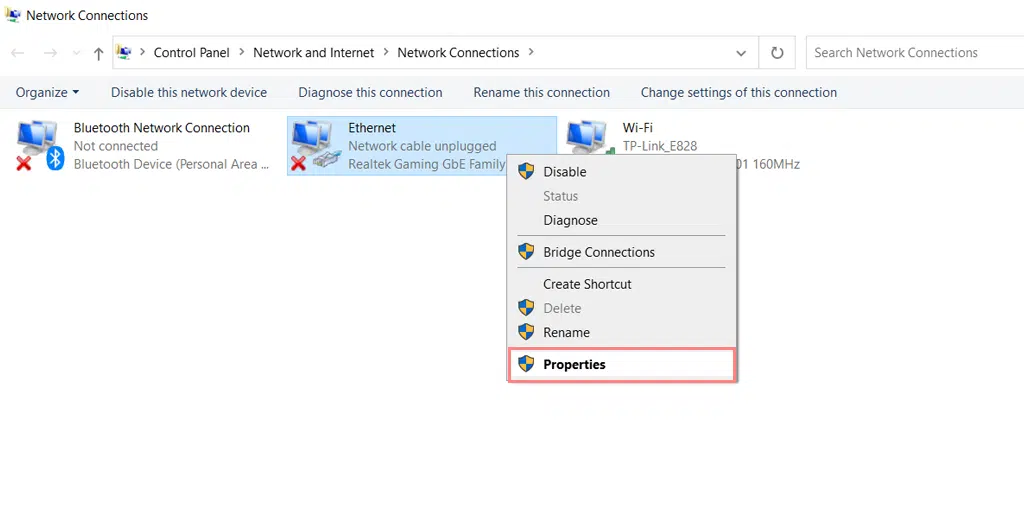
Click on the “Properties” button.
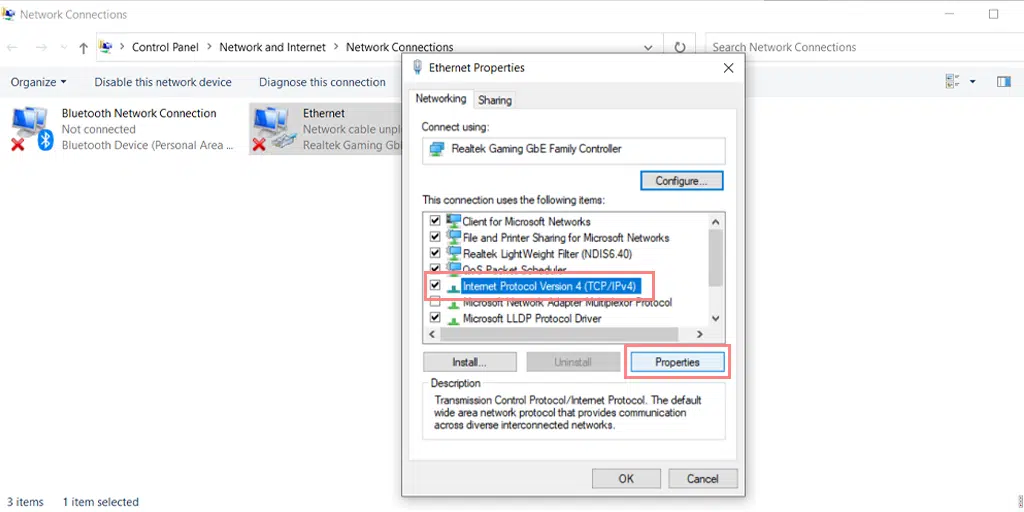
Look for the “Internet Protocol Version 4 (TCP/IPv4)” option and mark check the box next to it and click on the “Properties” button.
Select the “Use the following IP address” option.
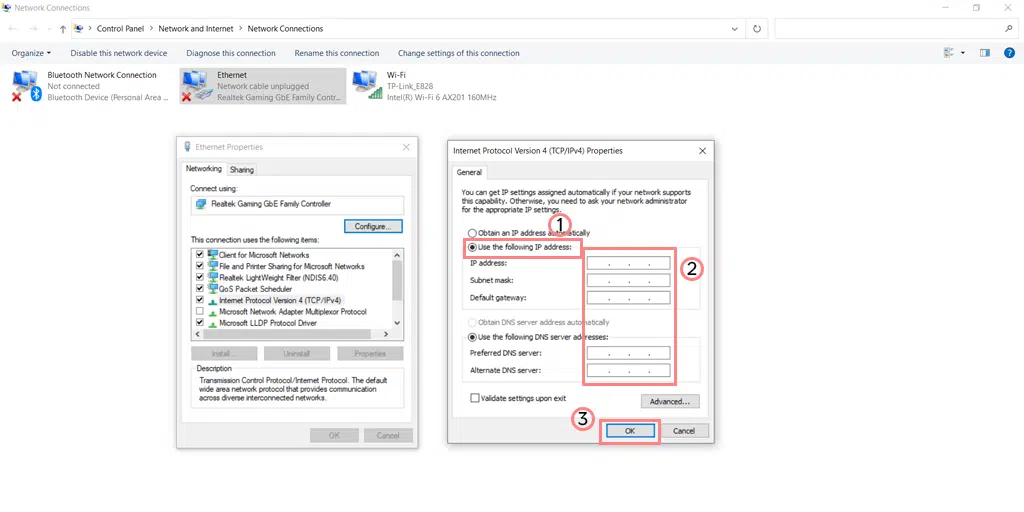
Enter the IP address you want to use in the “IP address” field.
Enter the subnet mask and default gateway if required by your network setup.
Enter the preferred and alternate DNS server addresses in the respective fields.
Click “OK” to save the changes.
9. Refresh your DNS service
You can also try refreshing your DNS client directly on your Windows 10 and 11 devices.
Press the “Windows” and “R” keys simultaneously.

Enter “Services.msc” in the run box and hit enter.
A services window will launch where you have to look out for “DNS client“.
Select and right-click on “DNS client”.

Click on “Refresh” from the context menu.
This will automatically Restart your DNS service.
After that, check whether the issue is resolved or not.
10. Check for Windows Update
If none of the above methods work, the last resort is to check for Windows updates and install the latest available version.
If no updates are available, you can try reinstalling the Windows OS to the system without deleting your data as per your configuration settings.
Note: Some apps or system configurations may get deleted during the reinstallation process to give your system a fresh start.
Read: 🚩 chrome://net-internals/#dns – How to Clear DNS Cache Chrome
Conclusion
Dealing with DNS issues such as the “Your DNS Server Might be unavailable” error can be a frustrating experience that can leave you feeling helpless and confused. But don’t worry, you’re not alone! This article has provided you with a range of solutions to help you get your computer back online quickly and easily.
If you’re feeling overwhelmed or unsure about which method to try, please know that help is always available. Don’t hesitate to reach out to a trusted professional or leave a comment in the section below. Our team of experts is here to assist you in resolving the DNS issue as soon as possible.
Read: 🚩 How To Fix the DNS_PROBE_FINISHED_NO_INTERNET Error?
Frequently Asked Questions
How to fix the DNS server might be unavailable?
Check out the following Best methods given below:
1. Restart your System and Router
2. Disable Any Security program and Firewall
3. Try using Windows Internet Troubleshooter
4. Update your Network Adaptors
5. Clear the DNS
6. Try Google’s DNS Server
7. Enable Automatically Obtain DNS detail
8. Provide your Desired IP address
9. Refresh your DNS service
10. Check for Windows Update
What is the “DNS server might be unavailable” error?
Your DNS Server Might be unavailable or DNS server might be unavailable error means, that your device cannot connect to the DNS server to translate domain names into IP addresses. This can occur for various reasons, such as a misconfigured network setting, a problem with your internet service provider (ISP), or an issue with the DNS server itself.
What causes a DNS failure?
There can be multiple reasons for DNS failure, but some of the most common are:
1. Poor Internet connectivity
2. Incorrect DNS configuration
3. Outdated browser
4. Outdated DNS
5. Firewall and Antivirus interference

Rahul Kumar is a web enthusiast, and content strategist specializing in WordPress & web hosting. With years of experience and a commitment to staying up-to-date with industry trends, he creates effective online strategies that drive traffic, boosts engagement, and increase conversions. Rahul’s attention to detail and ability to craft compelling content makes him a valuable asset to any brand looking to improve its online presence.



![How to Fix Error 523 "Origin Is Unreachable"? [Solved] Error code 523](https://www.wpoven.com/blog/wp-content/uploads/2023/12/Error_523.png.webp)


