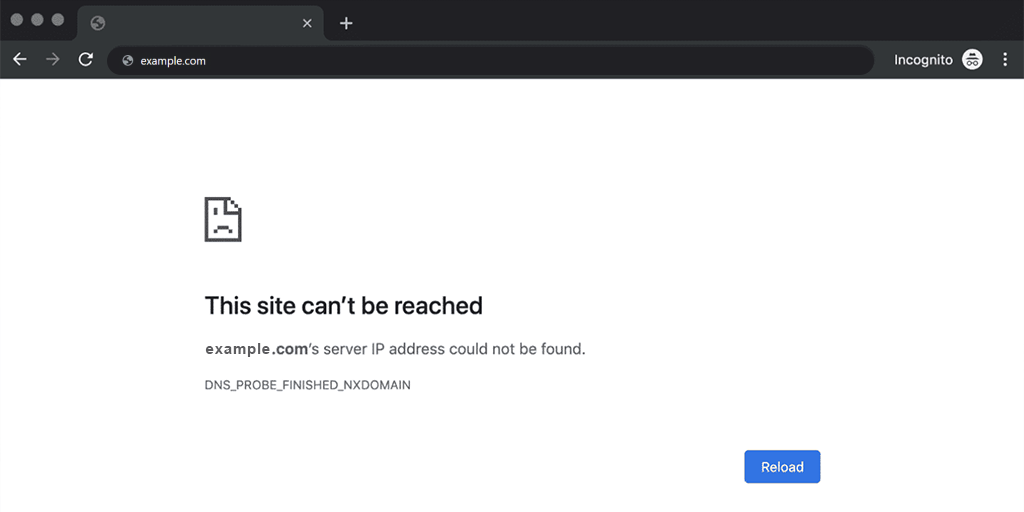
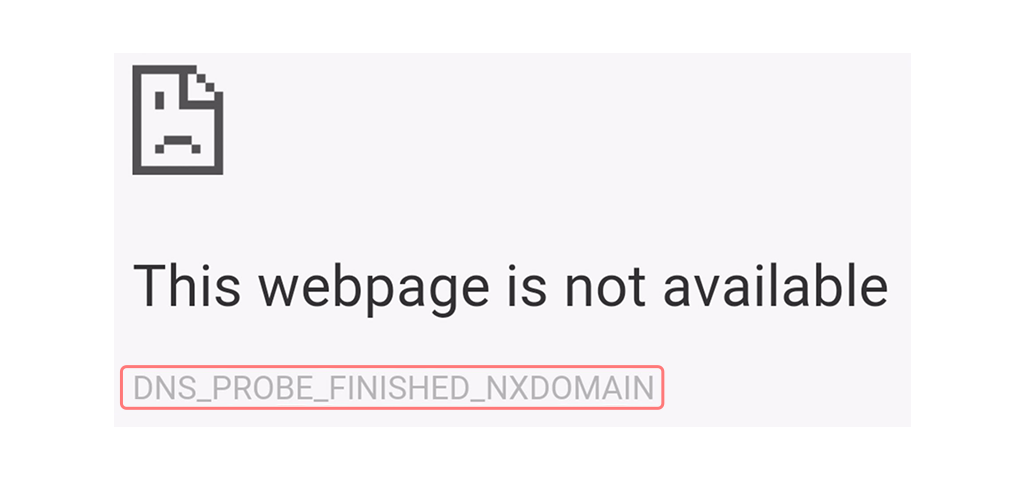
DNS probe errors are extremely frequent and imminent in the setup. You will often come across errors like the White screen of death or Error 404 not found error. One of the most commonly seen errors featuring the concept is DNS_PROBE_FINISHED_NXDOMAIN. This is one of the common issues seen by almost all regular computer users once in their usage cycle. The message comes in common web browsers, leaving the users to not be redirected to the target website.
Talking about computer networks, one of the main concepts of operation is DNS (Domain Name Server) A DNS server works mainly to translate complex IP domains with the collaboration of the IP addresses. While the aspect having is important.
How to fix DNS_PROBE_FINISHED_NXDOMAIN Error: 10 Best Methods
- Flush DNS Cache
- By Restarting the DNS Client Service
- DNS Server Change
- Checking Local Hosts
- Checking the DNS of the User’s Domain
- Release and Renewing of IP Address
- By Resetting Chrome Flags
- Temporarily Disable CDN
- Stopping Firewall/ Anti-Virus and VPN
- Other Methods
DNS errors are usually flexible from the users themselves. All they require is to follow a few generic steps, which will troubleshoot these prolonged errors in no time. Thus, some of the tested methods that assure DNS_PROBE_FINISHED_NXDOMAIN error gets resolved.
1. Purge or Flush DNS Cache
One of the first and highly recommended methods you can try to fix the DNS_PROBE_FINISHED _NXDOMAIN error is to flush your DNS cache.
The DNS cache stores the IP addresses of websites that a client has previously visited on their computer. But sometimes, some of these IP addresses may no longer be accurate or corrupted, which can prevent the computer from finding the correct website.
So, All Windows, MacOS, and Chrome users can follow these given simple methods to flush the DNS cache.
So, If you’re using Windows, MacOS, or Chrome, you can easily flush your DNS cache by following these simple steps.
For Windows Users
Step 1: Go to your Start menu > Search “Command Prompt” > Right-click on it and select “Run as Administrator“.
Step 2: When the Command prompt window appears, type the given command below and press Enter.
ipconfig /flushdns
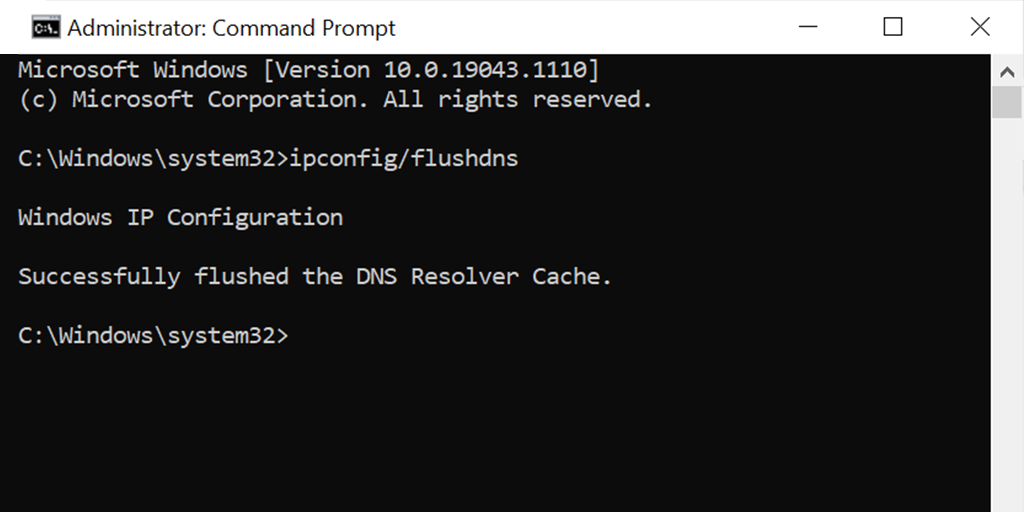
Step 3: Now open your browser and attempt to access the website again. This will allow you to check whether or not the DNS_PROBE_FINISHED_NXDOMAIN error has been resolved.
For MacOS Users
Step 1: In your Mac open the Terminal application.
Step 2: Now type the given command below and hit the Return Key.
sudo dscacheutil -flushcache; sudo killall -HUP mDNSResponder
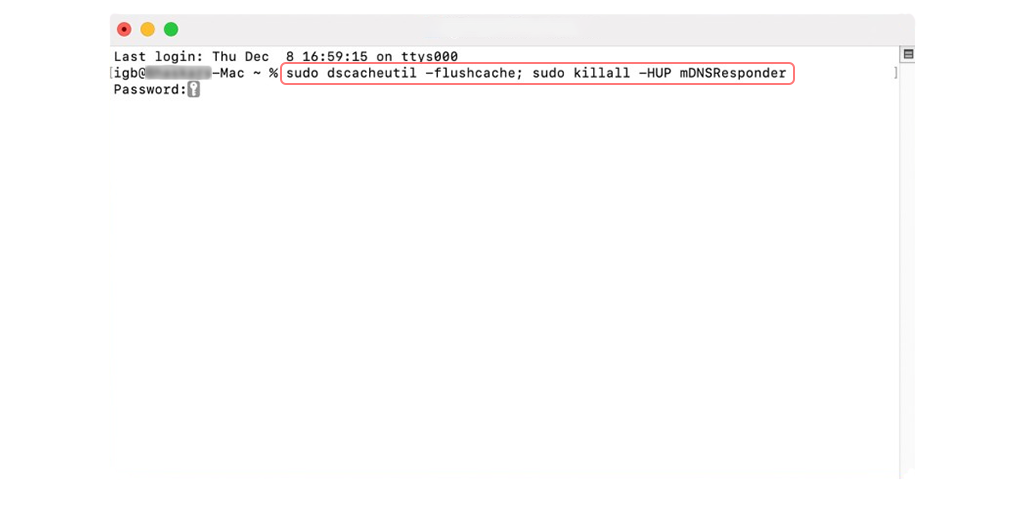
Step 3: Now enter your password and hit the Return Key.
Step 4: Now open your browser and attempt to access the website again. This will allow you to check whether or not the error has been resolved.
For Chrome Users
You might be surprised to know that Google Chrome has a dedicated DNS cache from the Operating System. Hence flushing it might fix the error. Let us see how you can do that:
Step 1: Copy this link “chrome://net-internals/#dns” and enter it into your Chrome browser’s address bar. Also, you can read our detailed article on chrome://net-internals/#dns.
Step 2: Now Click on the “Clear cache host” button as shown below:
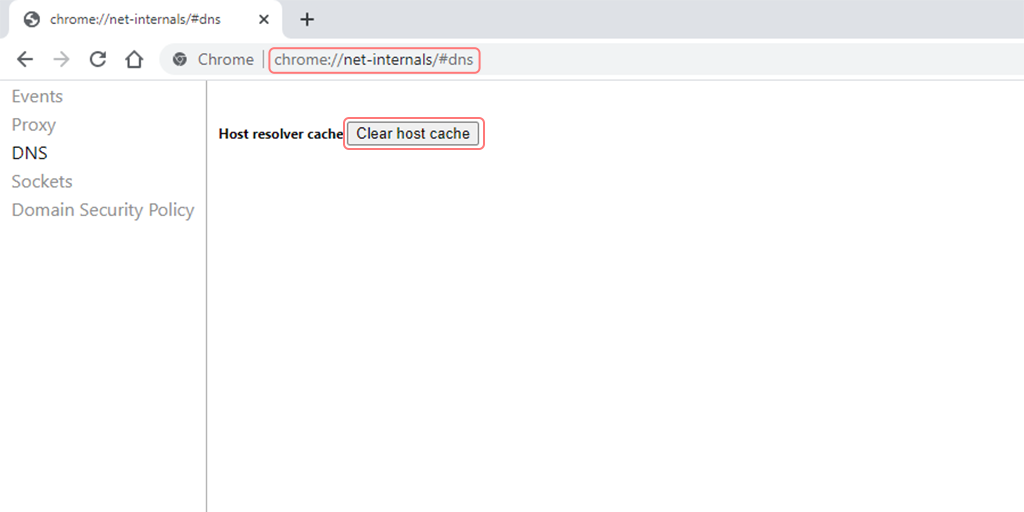
Step 3: Now check if the error has been fixed or not.
2. By Restarting DNS Client Service:
DNS errors are addressed in various ways. The most common way to fix the Dns_Probe_Finished_Nxdomain error in Windows 10 or any other Windows version is via resolving cached DNS server files.
Option 1: Open up the Command Prompt window using key combinations of Windows Key+R
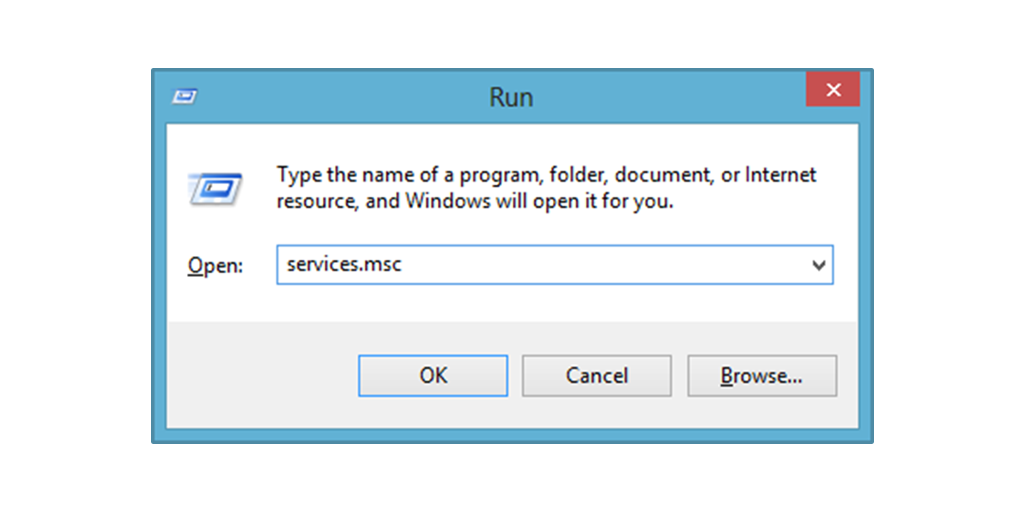
As soon as the terminal opens up, type services.MSC will immediately lead to the local Services Page. Once on the page, the user will search the ‘DNS client’ option, where on a right-click, there will be an option to restart, which is to be exercised. By performing the function, the cache files in DNS names will be refreshed and the errors might be removed.
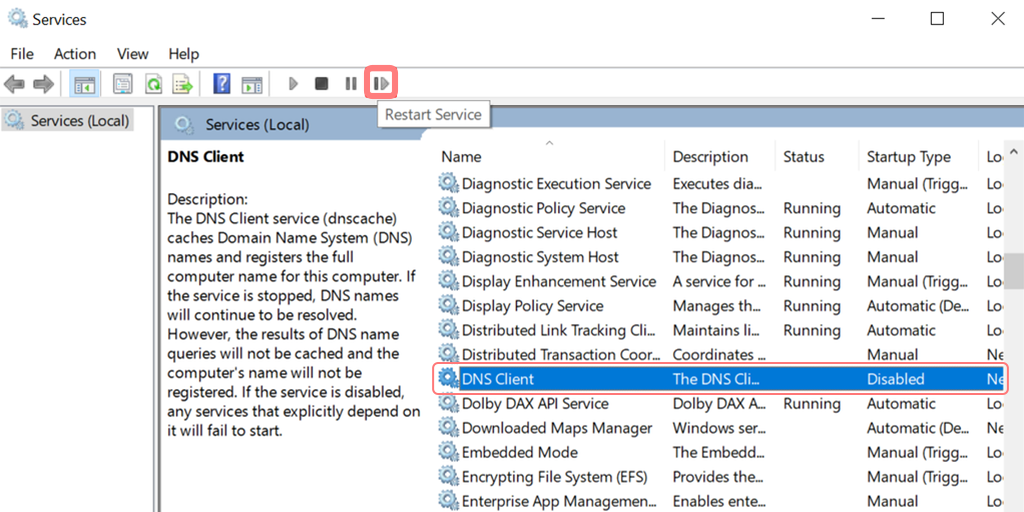
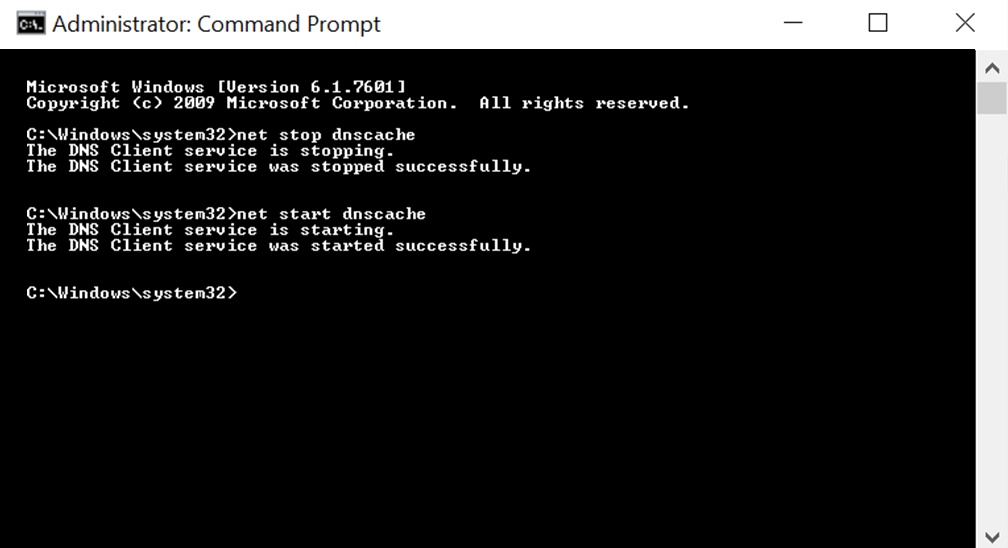
Option 2: Alternatively, depending on the Windows O/S versions, the other way involves using the command prompt to resolve the issue. All a person requires is to search cmd or command in the run tab, which will open up the DOS layout. In this interface, typing net stop dnscache and net start dnscache a will do the refreshing of DNS files.
You can have all these features and much more in a single plan with unlimited Free migrations, unlimited staging, and a 14-day risk-free guarantee. Check out our plans or Contact our support team which assist you in choosing the right plan.
3. DNS Server Change:
The ISP usually supplies DNS Server addresses, and the users can change this temporarily while facing issues. There are two popular public domains today, which are known to be secure and have a large user database. One is Google’s Public DNS, and the other one is Cloudflare. Some use-free DNS servers, where the case of DNS_PROBE_FINISHED_NXDOMAIN is imminent. During this instance, simply switching to Google and Cloudflare servers easily resolves the issues as well. For changing the same, here are steps for different O/S as follows,
For Windows
Opening Up the Control Panel, by typing the same in the run command box
Clicking on the Network and Internet option will open up loads of other options.
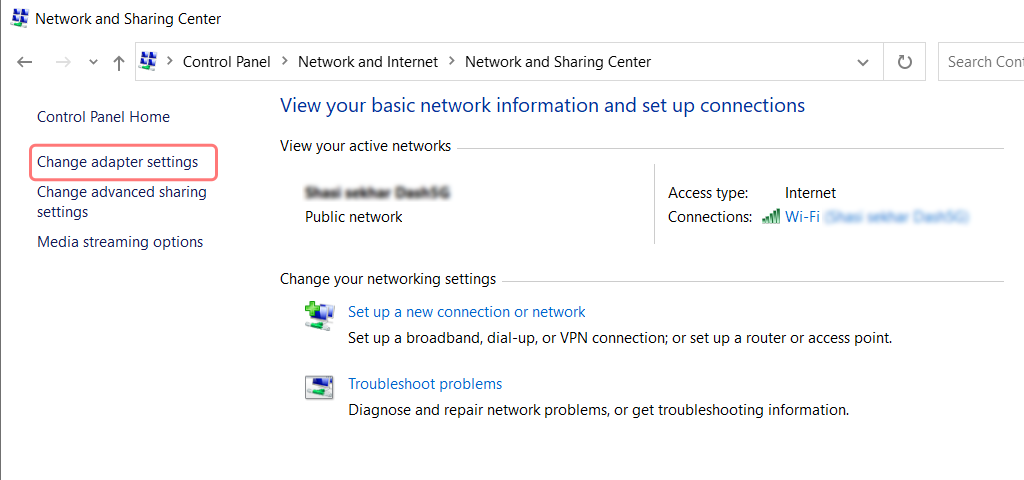
Next, click on the “Change Adapter Settings” option, this will show the current network connections.
Following the process, click on the properties option, under the Local Area Connection options, which comes for wired connections. For a wireless connection, click on the Wireless Network Connection options.
The next option involves displaying the IP version box. On clicking the same, a box will open to change the preferred DNS server and alternate DNS servers as well. For users with IPv4, Google DNS is 8.8.8.8 and 8.8.4.4 respectively.
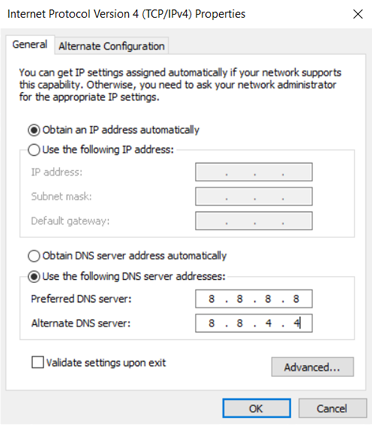
In the end, restart the browser to see the change.
For MAC Users
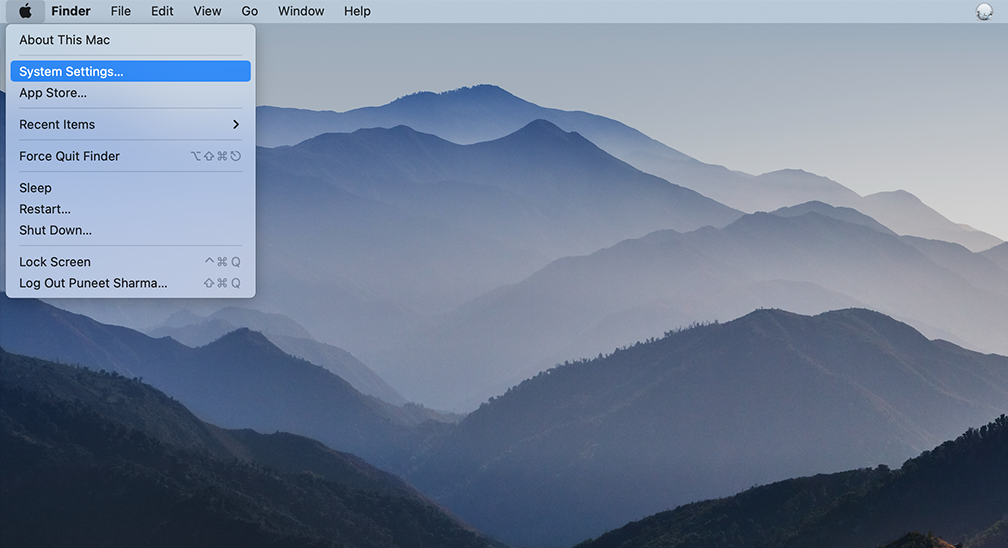
Step 1: Open the System Preference bar, situated on the left-hand top of the screen.
Step 2: In the following step, click on the advanced options to open up the page containing DNS server addresses
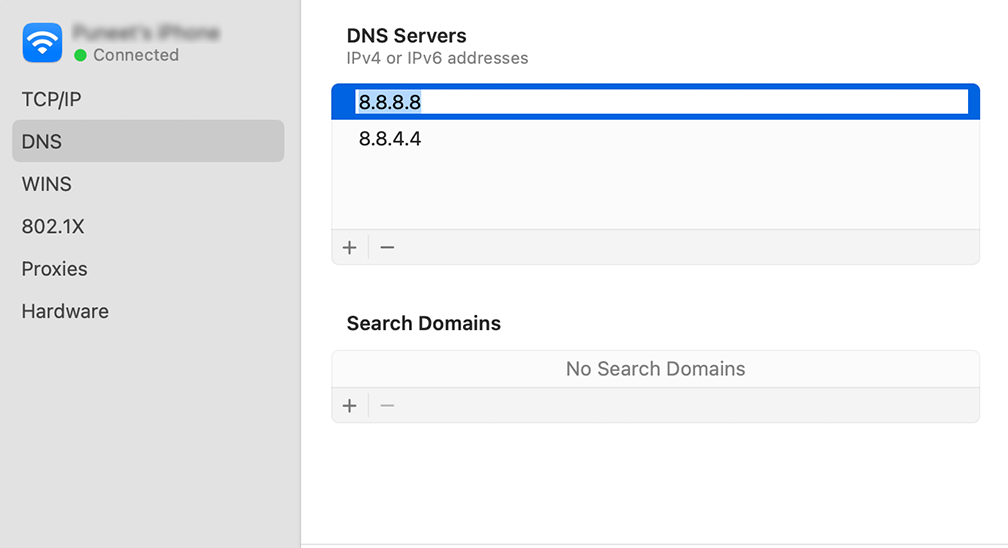
Step 3: In the final step, adding the IPv4 DNS address from Cloudflare, 1.1.1.1, and 1.0.0.1 will complete the setup.
4. Checking Local Hosts:
Local host files are present across all computing in this file, and the manual DNS records are present, which are mapped with a particular IP Address. The only way to amend the same is while previewing the DNS before changing domains. This is an effective measure to combat DNS_PROBE_FINISHED_NXDOMAIN Mac. However, approaching the same process is different for various O/S today.
For Windows
Step 1: Unlike any other previous resolving strategies, this requires a little understanding of using other applications. For instance, the first step requires running a notepad, which can manually be searched in the start menu.
Step 2: Instead of opening up the file, the process requires the file to run as administrator. Not just Notepad can be alternatively performed with any other text editor-powered applications. Some text editors such as Atom, Sublime, and Notepad ++ can be used.
Step 3: The next step involves opening up the address of the file location, which is usually C:\Windows\System32\drivers\etc\
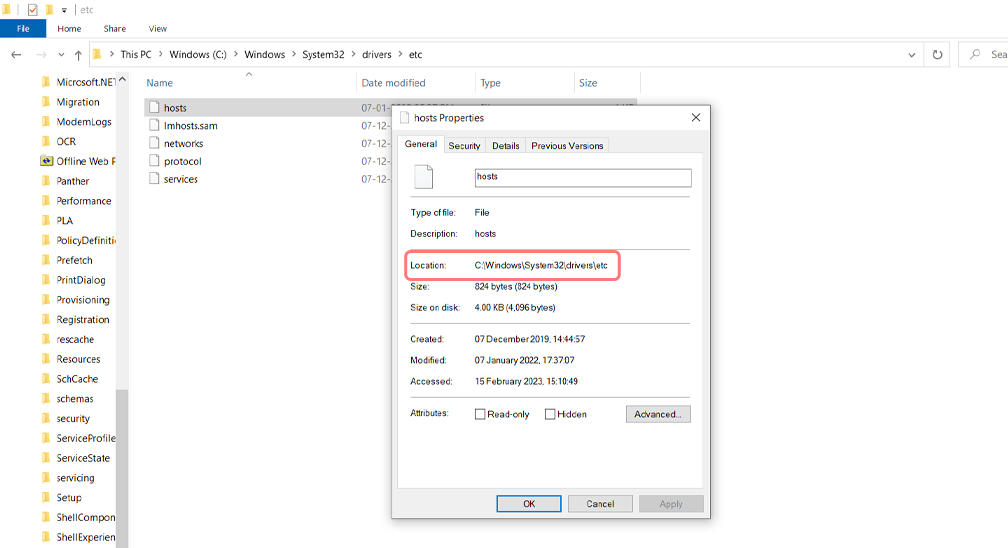
Step 4: With the operation completed, the next step involves choosing the host file, which will contain the details of the sites visited.
Step 5: Finally, remove if any site to be visited is mentioned. These are responsible for triggering errors on the site’s main page.
For Mac Users
Step 1: MAC users have the cushion of using a dedicated app called Gas Mask, which performs all the tasks related to filing management. More importantly, the app is free of cost and easy to install. Gas Mask also works to modify host files as well as a triggered task between these files.
Step 2: However, for regular users, there is a simple solution as well. The process requires opening up the Utility option under the View tab.
Step 3: Under the Utility option, a new page opens up with various options. Choose the terminal option. However, it is to be noted that, most probably you will be required to enter your admin password.
Step 4: Once the terminal page is opened, search Sudo nano / private/ etc/ hosts
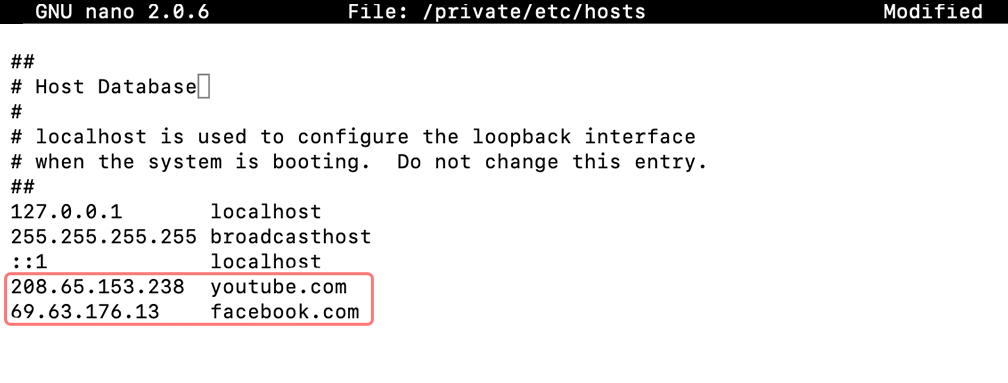
Step 5: This page will show the host file with the details of the sites visited.
Step 6: Finally, as for windows, remove if the site intended to be visited is present on the page. This will complete the proceedings immediately.
5. Checking the DNS of the User Domain:
DNS issues are a common occurrence that can affect multiple domains. However, there might be a specific issue for a single-out domain as well. Suppose the user tries to browse through a particular site and ends up getting the DNS_PROBE_FINISHED_NXDOMAIN This might be because of the domain name itself, whose DNS settings were cached incorrectly in the PC.
Thus, if the user has shifted the webpage under a new host provider, the previous caching was mapped incorrectly to the PC. If you are using the WPOven server we have an in-depth tutorial on how to point your DNS to WPOven.
To resolve the issue, restarting the DNS client service is the solution. With the revoking DNS, the mapping and newer cached files take up the place against the old files.
6. Release and renewing of IP Address:
This is one of the tried and tested solutions in networking topics. With the concept, it takes up to flush the old cache and reset it with a newer IP address. This is extremely handy in situations where you see outdated or corrupt cache file storage. For troubleshooting, both Windows and Mac devices have individual rules to speak.
For Windows:
Step 1: Open up the run command by clicking the Windows key and R. In modern versions, they can also be searched at the search bar present at the start menu option.
Step 2: Write cmd and press enter.
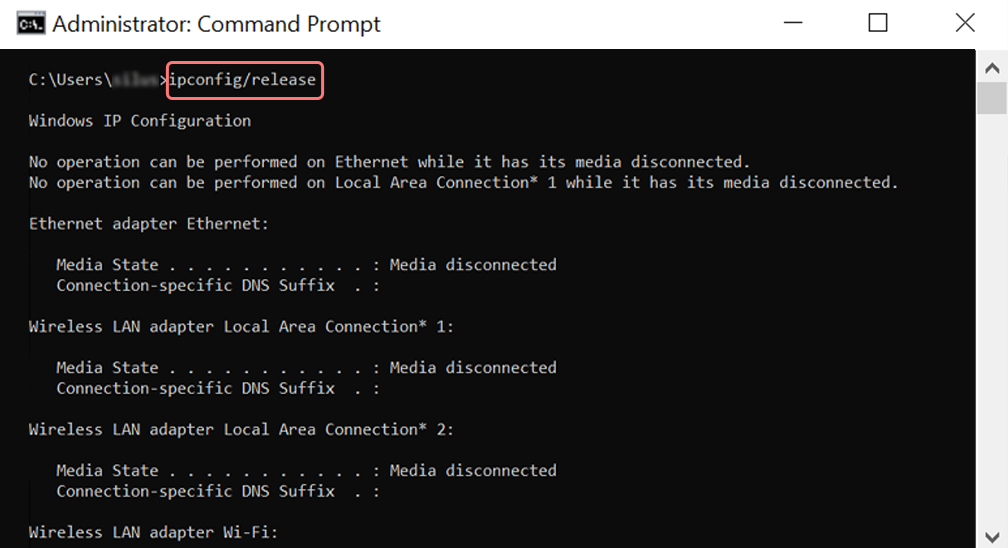
Step 3: Following the admin-based command prompt page opening up, the next step features typing ipconfig/release on the command page. This process triggers the release of the existing IP address.
Step 4: Once the IP address is released from the system, follow the next step to release the DNS cache. Thus, type ipconfig/flushdns to release the DNS cache.
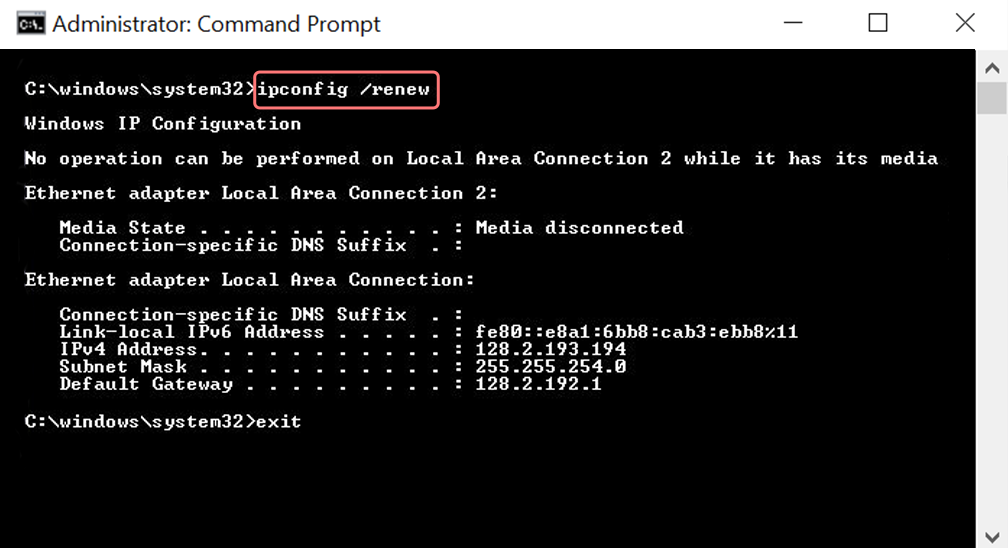
Step 5: In the next step, type ipconfig /renew, which will renew the new IP address to the system.
Step 6: Type netsh int ip set dns and click enter. This will reset the entire IP settings of the previous IP stored.
Step 7: Type the netsh winsock reset command. It will reinstate the Winsock Catalog.

Step 8: Finally, after the process is complete, restarting the PC will ensure the problem gets resolved.
For MAC users:
Step 1: As mentioned previously, using a Gas Mask is an easy way out for searching all system-related works. For the regular case users, the first step involves opening up the system preference options in the main window.
Step 2: Following this, under the Ethernet tab, click on the advanced options.
Step 3: For starters, with commands, it is required to click on the TCP/IP tab, which has the option to release a DHCP option. Thus, the process allows MAC users to clear out the local DNS.
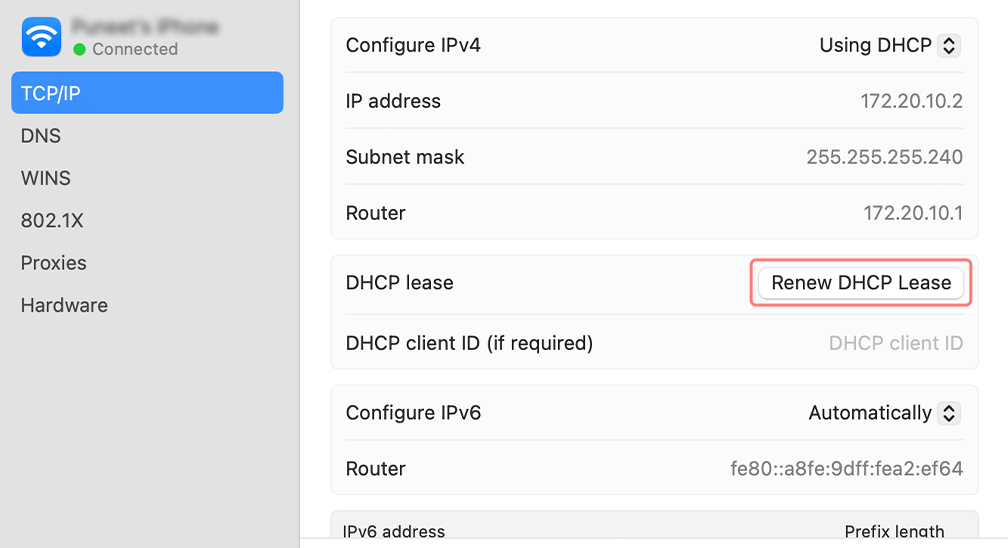
Step 4: MAC users can also clear the local DNS cache. This involves visiting the Utilities>Terminal page, where they will be required to present the command.
Step 5: The command for flushing the same is dscacheutil -flushcache
Step 6: Though, there will be no separate success or failure message popping up. However, in major cases, all these get removed without any major fuss.
7. By Resetting Chrome Flags
Chrome Flags are experimental settings or features in the Google Chrome browser that are not enabled by default but can be accessed and enabled by users for testing purposes. Enabling certain Chrome Flags may lead to the DNS_PROBE_FINISHED_NXDOMAIN error.
To reset Chrome Flags to their default settings, follow these steps:
- Open the Chrome browser on your device.
- In the address bar, type
chrome://flagsand press Enter. - Locate the “Reset all to default” button at the top of the page and click on it.
- A prompt will appear asking you to confirm the reset. Click on “Reset all” to confirm.
- Once the reset is complete, you will be prompted to relaunch Chrome to apply the changes.
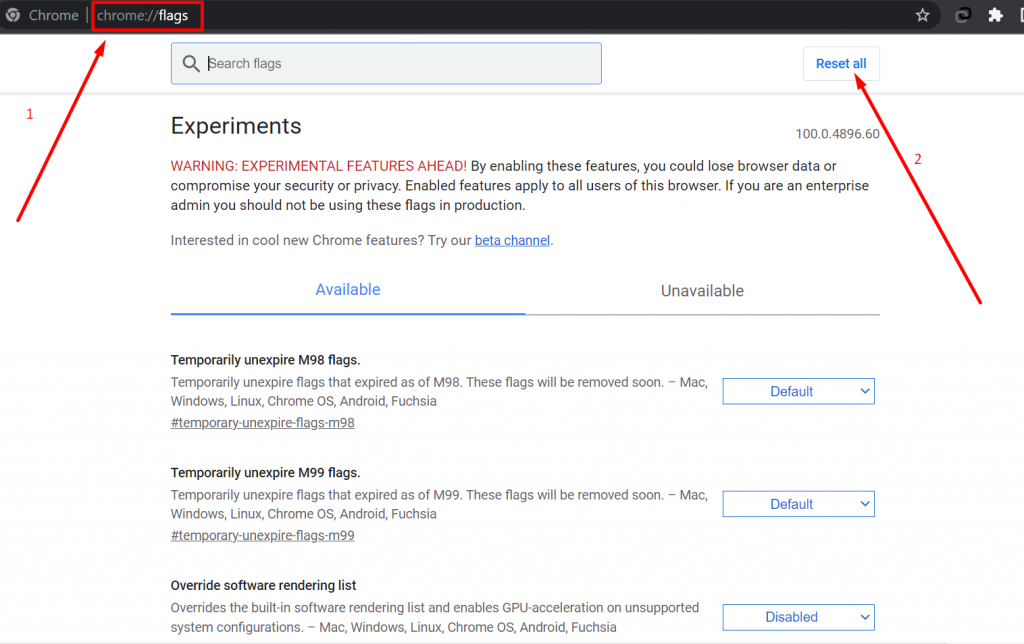
Note: Resetting Chrome Flags will revert any customizations you have made to these experimental settings back to their default values.
8. Temporarily Disable CDN
Web admins can temporarily disable the CDN as another way to determine if the error is originating from the website or not.
It is a system of distributed servers that are used to deliver web content, such as images, videos, scripts, and other files, to end-users based on their geographic location.
When a user requests content from a website that is using a CDN, the server closest to the user’s location is used to deliver the content, rather than the website’s origin server. This helps to reduce the latency and page load times, which can result in a better user.
If the CDN is temporarily disabled, the content will no longer be delivered from the server closest to the user’s location. Instead, the user’s web browser will need to retrieve the content directly from the website’s origin server.
To disable CDN in Cloudflare, you can follow these steps:
- Log in to your Cloudflare account.
- From the dashboard, select the domain for which you want to disable CDN.
- Scroll Down to click “Pause Cloudflare on Site“.

9. Stopping Firewall/ Anti-Virus and VPN:
A DNS_PROBE_FINISHED_NXDOMAIN error in web browsers occurs because of firewall actions. Even some antivirus embedded to track web browsers and VPN add-ons act to prevent browsing through certain sites. Temporarily, disabling the authority of any of the 3 mentioned software would allow a change.
For Windows
To deactivate a VPN in Windows, you can follow these steps:
- Click on the “Start” menu > “Settings” > “Network & Internet“.
- Click on the “VPN” tab > VPN connection > Disconnect button.
- Now restart or reboot your computer and check if the error has been fixed.
For macOS
To disable a VPN on macOS, you can follow these steps:
- Click on the Apple menu in the top left corner of your screen.
- Select “System Preferences” > “Network”.
- In the left-hand column, select the VPN connection that you want to disable.
- Click on “Disconnect” > “Apply“.
10. Other Methods
Besides all the options mentioned, there are other fruitful ways to ensure the error does not arise. One of the more common methods involves,
- Update Network Driver: Usually, all computer motherboard has their vendors, which come on CD or can be downloaded online. Since the LAN, port, and network drivers vary among motherboards, they require being unique. The driver installation barely takes minutes and promises to remove the issues.
- Restart Internet Connection: If the above methods don’t work, the last thing you can do is restart your Internet modem or router. Here is how you can do it by yourself.
- Unplug the power cable from your modem or router.
- Wait for at least 30 seconds to 1 minute. This allows the device to fully power down and reset.
- Plug the power cable back into your modem or router.
- Wait for the device to fully power up and establish a connection to your internet service provider. This may take a few minutes.
- Once the device has reconnected to the internet, check if your internet connection is working properly by trying to access a website or other online service.
If you are still having issues with your internet connection after rebooting the modem or router, you may need to contact your internet service provider for further assistance.
Read: 🚩 chrome://net-internals/#dns – How to Clear DNS Cache Chrome
How to fix DNS_PROBE_FINISHED_NXDOMAIN on Android and iOS?
Android and iOS both are the most popular and widely used OS in smartphones. Therefore users are also not untouched to face a DNS_PROBE_FINISHED_NXDOMAIN error on mobile screens. The majority of users use Google Chrome to browse content on their Android as well as iOS devices.
But the main point is, unlike Google Chrome the solution to fix DNS_probe_finished_nxdomain in Android and iOS devices is trickier.
However, we have compiled some of the best working methods that anyone can use to fix this error in their Android and iOS devices. Let us check out what they are!
There are three best working methods that you can try on your Android and iOS devices:
- Clear your Chrome app data
- Update your Chrome app on Android or iOS devices
- Modify your DNS settings
Clean your Chrome app data on Android
Clearing all your Chrome browsing data or App data can potentially fix your Dns_probe_finished_nxdomain issue. To begin with the process, just follow these simple steps given below:
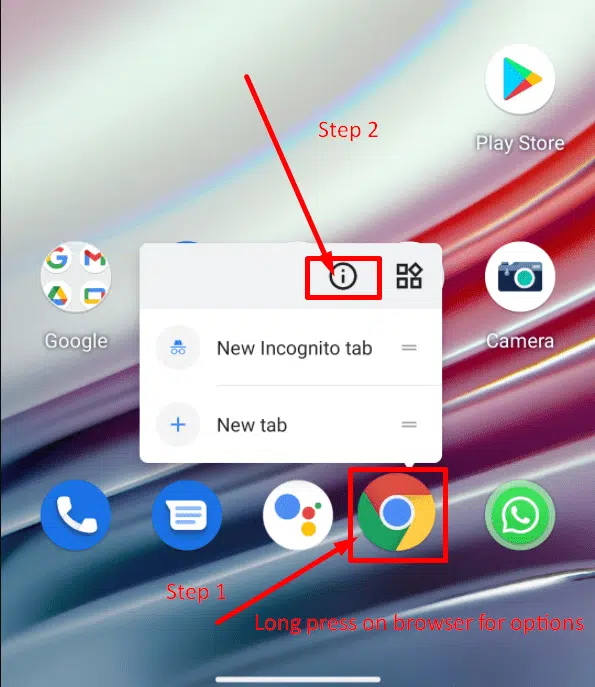
Step 1: Go to your Android device, and long-press on the browser for options.
Step 2: Select and click on the App info option as shown in the picture.
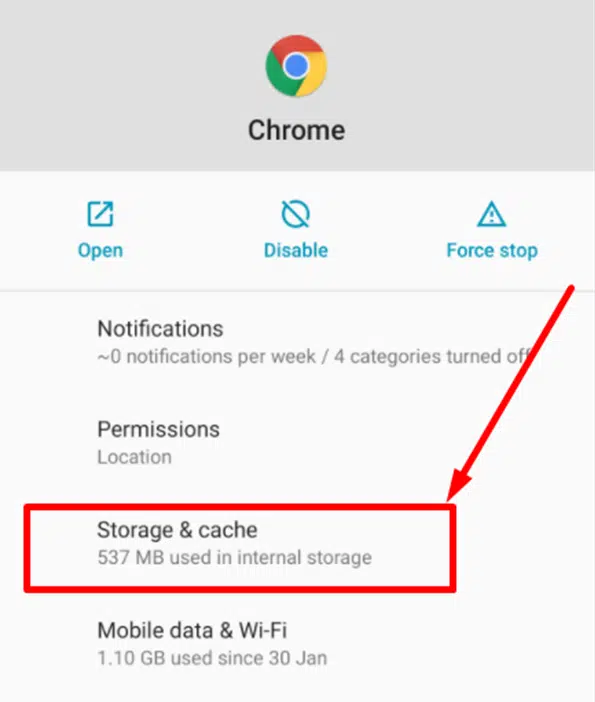
Step3: After that, you can see complete App information on your mobile screen, in which you need to select the Storage and cache option as shown in the picture below:
Step 4: Now click on the Clear cache button and you are done.
Clear Chrome browser’s app data on iOS
Since both the operating systems Android and iOS are quite different, clearing Chrome’s app data on iOS is quite different. In ioS devices, there is no option provided to directly clear all the app data like you have seen in Android before.
Alternatively, you can clear the browser’s cache data instead. Caches are very helpful in boosting website speed and enhancing the user experience. But sometimes it can also create problems by triggering errors such as DNS_PROBE_FINISHED_NXDOMAIN errors.
Fortunately, it is not essential to have cache data stored in your browser and you can get rid of this error by simply clearing it.
You can easily clear your Chrome app data and cache memory by following these simple steps:
Step 1: Open the Chrome app on your iOS device.
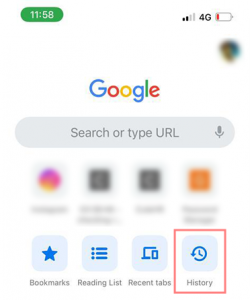
Step 2: Tap or click on the three dots “⋮” or “⋯” the hamburger menu icon is located at the top or bottom of the screen.
Step 3: Now click on History > Clear browsing data.
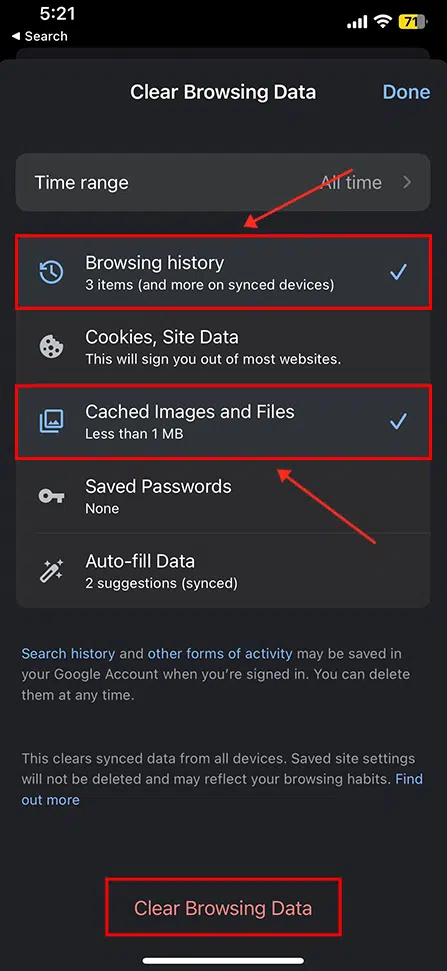
Step 4: Mark the box of Browsing history and Cached Images and files and click on the Clear Browsing data button. You can leave other options unchecked.
Setp5: You may get a prompt message confirming, whether you want to edit your browsing history or proceed. Click on the “OK got it” button and you are done.
Now, restart your device and see if things have been fixed or not.
Update your Chrome App
Sometimes, an older version of the Chrome app may contain performance-related issues and bugs that trigger such errors. Therefore, you need to keep your Apps updated with the latest version available.
Update your Chrome app on Android
Step 1: Open the Play Store app on your Android device.
Step 2: Click on the “manage your account” link which is located beside the Search bar as shown in the picture below. A pop-up window will appear and you need to click on the manage apps & device option as shown below:
Step 3: Now on the Manage Apps and Device page, you can check out all the updates available for your Android apps, in which if there is any update available for the Chrome app, it will reflect there with an option with an update button.
Update your Chrome app on iOS or iPhone
You can check availability or pending app updates on your iOS devices such as iPhone by following these simple steps:
Step 1: Go to your Apple Play store.
Step2: Tap on your accounts and check all pending updates,
Step 3: If you find any updates available for Chrome, update it immediately.
Modify your DNS settings
The last thing you can try on your Android or iOS device to fix this error is by modifying the DNS settings. It is not as tough or requires any technical knowledge as it may seem, all you need to do is to,
For Android devices
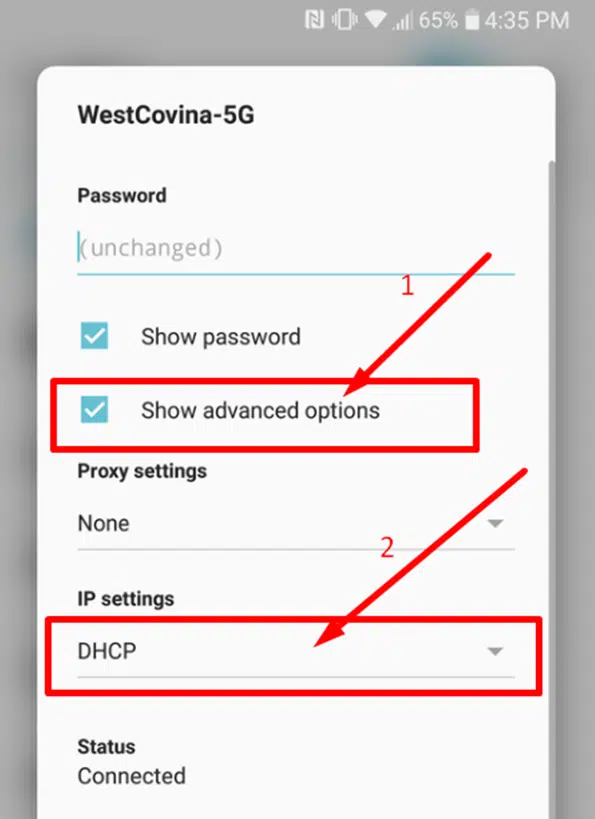
Go to Settings and look out for the Wi-Fi network you are connected to. Long press on the network name you are connected to and click on the Modify network option. The interface may vary from one Android version to another and even some customizations can be there. But the whole process would be the same.
Now a new pop-up window will appear, in which you will be required to click on “Show Advanced options” which brings up IP settings in which you need to select “Static” rather than DHCP.
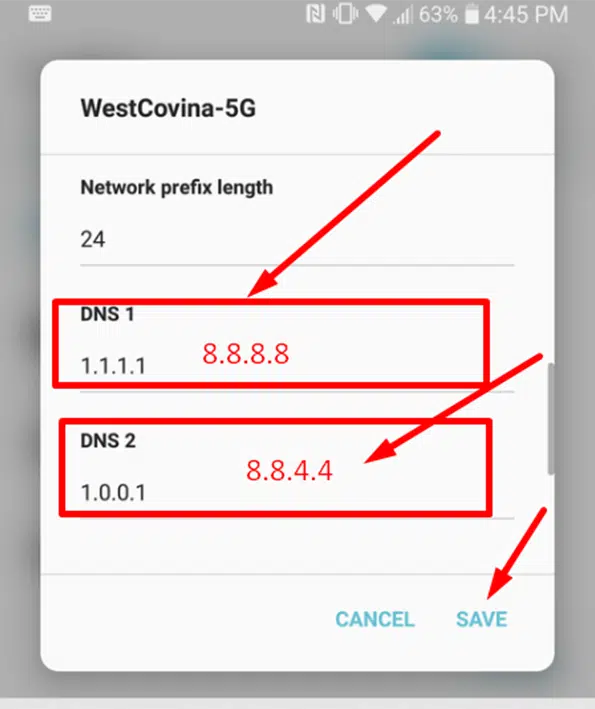
Now you will be able to modify network settings as per your requirement. You need to change DNS 1 with 8.8.8.8 and DNS 2 with 8.8.4.4
Once done with modifying all the DNS settings, click on the Save link and restart your Android device.
For iOS or iPhone
You can even change or modify DNS settings in your iOS or iPhone by following these simple steps:
Step 1: Go to your iPhone’s Settings which is indicated as a gear icon and click on Wifi.
Step 2: Tap on your connected network.
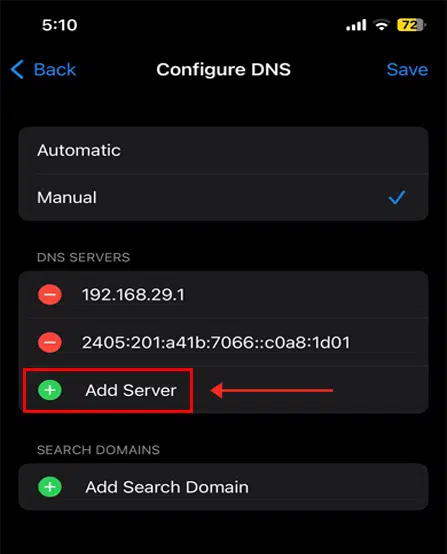
Step3: Now, Tap on Configure DNS option > Manual
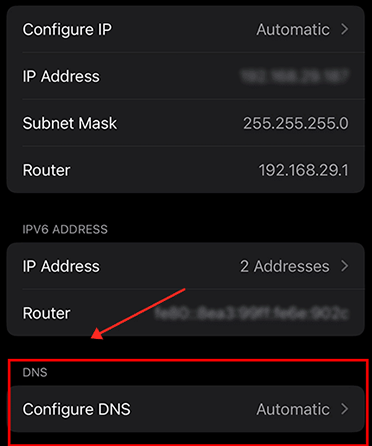
Delete the current DNS listing and click on Add Server to add the following listings:
8.8.8.88.8.4.42001:4860:4860::88882001:4860:4860::8844
Once done, restart your device and check if the error has been fixed or not.
What does the DNS_PROBE_FINISHED_NXDOMAIN error mean?
DNS_PROBE_FINISHED_NXDOMAIN issue starts due to mismatching of the IP address with the DNS of the computer. To be more technical, DNS converts the entire message from the domain end into the form of an IP address. Read more about what is DNS.
The real problem arises when a person feeds in the URL in their browsers; it is up to DNS to search the server with the appropriate IP address of the server. In a general case, the searching process redirects to the target site, but if DNS fails, this will result in errors. This is when a browser flashes up the message “DNS_PROBE_FINISHED_NXDOMAIN” error.
Breaking up the message, NXDOMAIN is the acronym for Non-Existent Domain. The error is very frequent in occurrence and there are working solutions for the same. Usually, different browsers offer various solutions, which work according to the server connection. For instance, in Google Chrome a message reading, “The Site can’t be reached” is flashed. In the case of Firefox, the message reads “Hmm. We’re having trouble finding that site.
Read: 🚩 How to fix your connection is not a private error in Chrome?
What are the Reasons that cause DNS_PROBE_FINISHED_NXDOMAIN Error?
The DNS_PROBE_FINISHED_NXDOMAIN Error can happen due to several reasons, but some of the most common reasons are as follows:
- The domain name does not exist or is not registered yet.
- The domain has not been properly pointed to any IP address.
- VPN, antivirus program, or any Firewall is interfering with the internet settings.
- Misconfigured DNS settings on the user side
- Isse raised from the ISP (Internet Service Provider)
1. The destination website doesn’t exist
It might be possible that the website you are trying to access might have a non-existent domain or its domain name has not been registered yet.
It might also be possible that in a hurry you have typed the incorrect URL on the browser’s address bar. which leads to the browser being unable to connect a correct IP address in DNS.
If you have typed the correct URL but still encounter the error again, there might be an issue with the domain that you are trying to access.
Here is some initiative that you can take to resolve this error from your end.
- Check your Domain registration date and verify its validity, if it has expired re-register it immediately, or may you lose ownership of the domain.
- Check whether your nameservers that have been provided by your WebHost are correctly pointing to the domain or not.
- If you are using A recorded rather than the nameservers, verify the DNS records and see if the Domain name pointing to the correct IP address or not.
2. Problem with your Browser or Internet configuration
To check whether your browser or internet configuration is the main culprit or whether the error occurs to all users. Test the website using a VPN and change the server location. Try to browse the website from different locations.
If the website is easily accessible from all the different server locations, it means the error likely to happen due to an issue either with your Browser or the internet configuration.
However, you can follow the given below different solutions to fix your DNS_PROBE_FINISHED_NXDOMAIN Error.
Conclusion
DNS_PROBE_FINISHED_NXDOMAIN errors are perhaps the most frequently occurring network issues, faced by users. The solutions mentioned are tried and tested, which has a minimal impact on the system while resolving the issue quickly. On a generic note, it is always recommended that all users clean up the network cache memories regularly. Failing might cause problems concerning DNS components. So, the next time, in case the issue arises, try the different methods mentioned.
Save your time, money, and resources, plus Maximize your ROI with WPOven’s WordPress Agency hosting. Seamless Integrations and Premium Addons are included in every Managed WordPress plan. This includes,
- Free high-performing CDN powered by Cloudflare
- DDoS Protection with Anti-hacking Support
- Upto 100% server uptime
- Edge Caching
- Hardened Servers with Enterprise level security
- 24X7 WordPress Expert support
Get all these features and many more benefits such as unlimited Free migrations, unlimited staging, and a 14-day risk-free guarantee. Check out our plans or Contact our support team which assist you in choosing the right plan.
General FAQ – Dns_probe_finished_nxdomain:
What is DNS_PROBE_FINISHED_NXDOMAIN?
DNS probe error finished domain is an issue that takes place when mismatching of IP address takes place with the DNS of your computer. In a technical sense, the entire message is converted by DNS from the IP address. When a person puts a feed URL in their browsers, it is on the DNS to search the server with an appropriate IP address.
How to fix DNS_PROBE_FINISHED_NXDOMAIN?
There are many ways to resolve the DNS probe finished domain error. Some of them are as follows –
By restarting your client service | Changing your DNS server | Checking your local host | Releasing your IP Address | Resetting your web browser | Stopping the Firewall | Renewing your IP Address
How to fix the dns_probe_finished_nxdomain error in Google Chrome?
DNS_probe_finished_nxdomain error in Chrome can easily be resolved by changing your DNS servers | Restarting your computer | Checking the DNS of your Domain | Checking your local host’s file | By disabling VPN and Anti-Virus Temporarily
What does dns_probe_finished_nxdomain mean?
It is an error that occurs when a user’s computer fails to resolve or translate the address of the target website. It is a DNS-related error that can be resolved easily.
How to remove dns_probe_finished_nxdomain?
It can easily be resolved using one of the following methods –
By restarting the DNS Client | By trying to connect in safe mode | Clearing DNS cache in Google Chrome | By changing protocol DNS Settings | Flushing out Outdated DNS | By resetting IP & TCP | Updating Drivers
How do I fix the DNS probe finished Nxdomain Android?
You can fix the DNS probe finished Nxdomain on Android devices by following these three methods:
1. Update the Chrome app on your Android device
2. Clear App data and browsing history on the Chrome app
3. Change DNS settings on your Android device

I am a Co-Founder at WPOven INC currently living in Vancouver, Canada. My interests range from Web Development to Product development and Client projects. I am also interested in web development, WordPress, and entrepreneurship.



Thanks, It helped me fix the DNS_PROBE_FINISHED_NXDOMAIN Error issue.
Thanks, Daniel for your kind words!
Thanks for this detailed article. It was very helpful. Looking forward to reading more useful articles from your website.
Looking forward to seeing you as our avid reader! 🙂
Great Article!!
Very Informative!!
This article helps me a lot to resolve the issue of DNS_PROBE_FINISHED_NXDOMAIN error.
Thanks Jack! I am glad we could help!
Amazing content. Really learned a lot.
Nice information provided
Thanks Ashu
Thanks for this detailed article. Was facing DNS_PROBE_FINISHED_NXDOMAIN Error. This helped in resolving it.
Glad we could help 🙂
The steps you mentioned were quite helpful. Thanks 🙂
You Guys did an amazing job, I was quite frustrated about this error , tried all basic methods , but with the help of your complete and detailed solution , I am able to fix this, thanks.
Thanks, please also post some more Detailed articles about such type of errors.
Thanks for this informative article…..I was also this issue….
Thanks for Sharing this Informative Article. Keep up the Good Work.
Nice information share….. keep sharing
After reading this post……I will definitely fix the DNS probe issue.
Thanks!
Hi There, I was searching for a solution for this and tried all of your sugestions above. Thanks for very useful information. I found that resetting Winsock resolved the issue for me. Makes sense. Winsock manages input and output requests for Internet applications on Windows. Therefore, resetting it helped me to get rid of DNS_PROBE_FINISHED_NXDOMAIN.
Hi I read your article on DNS_PROBE_FINISHED_NO_INTERNET Error This is very useful and Helpful information for all users. Thanks to create this great content for Us. I also a tech Blog and posted some information regarding this.
thanks for this helpful article i was unable to access my Mera Up Bihar but now i can access it. thank you so much is was tensed
Thank you so much for this article. Other similar search hit suggested solutions didn’t work but yours did. Solved the DNS_PROBE_FINISHED_NXDOMAIN problem in a few minutes.
the ultimate solution —
1. open router setting in chrome
2. DHCP setting
3. look for Start IP address and End IP address and write down the any IP address within the range. for an example if Start IP address is 192.160.0.100 and End IP address is 192.160.0.199 than you can choose 192.160.0.158, 192 , 192.160.0.198 , etc.( note that the IP address of two connected devices must not be the same)
4. open windows Network and Sharing Center
5. click on connection name(your wifi router name)
6. click on property
7. click on Internet Protocol v4
8. again click on property
9. now select the radio buttion to ‘use the following IP address’
10. write the already noted IP address in IP windows IP address box.
11. subnet mask should be 255.255.255.0 and default gateway can be blank or obtain it from router’s DHCP settings.
12. for DNS server address use 8.8.0.0 as preferred and 8.8.4.4 as alternate.
13. now click on ‘ok’ and close it.
14. cool…wifi connection successful(even you dont need to reboot your PC).
Hey, After update Win 10 h20. I have faced same problem. Now I resolved. Control Panel\All Control Panel Items\Network and Sharing Center. And then Click WifiName in front of connection. It open WiFi Status, click diagnosis button, they repair automatically. Enjoy it.
I actually signed up with this program to fix my issue but I dont exactly know whut do,I though maybe they would fix for me.
Im having this issue with my mobile
I’m kinda stuck now