If you have landed on this post, then you must be looking for the correct Outlook SMTP settings. Do not worry, we have got you covered.
With Microsoft’s Outlook SMTP server settings, you can configure your preferred email client (Gmail, Yahoo, etc.) to send emails using your Outlook email address. Or if you like to send emails directly from your WordPress site, you can also configure WordPress settings to use your Outlook email address.
In this ultimate post, you will get to know almost everything about Microsoft’s Outlook SMTP settings. From defining Outlook, and its history, and walking you through the complete process of configuring Outlook SMTP settings correctly.
So, keep reading this post till the end and become a pro in setting up your Outlook SMTP without any issues. Let us dive in!
What is Microsoft Outlook?
In its early days, Microsoft had its email application popularly known as Hotmail but in 2016, its name was changed to Outlook and the rest is history. Earlier it was quite popular among its users for just sending and receiving emails but now things have become different and multiple other features such as Calendar, task manager, contact manager, web browsing, etc. have been added.
Till now Microsoft Outlook has gone through 4 iterations of updates and all the features have been added accordingly. In 2015, to increase usability and attain more users, outlook released its services for Android and well as IOs devices.
Read: 🚩 How To Resolve WordPress Not Sending Emails Issue? [2023]
Outlook SMTP Settings or Outlook 365 SMTP Settings
Here are the Outlook SMTP settings that will help you to configure your preferred email client or to use your WordPress site.
- Server Address: smtp.office365.com
- Username: Your Outlook Email Address (Same email address you use for your Outlook account)
- Password: Your Outlook account Password
- Port Number: 587 (Learn more about SMTP Ports)
- Alternative Port Number: 25 (Without TLS/SSL)
- Required SSL: Yes
- Required TLS: Yes
Note: One thing you must be aware of is that your Outlook SMTP server has a total of 300 emails per day or 100 recipients per day limitation.
Outlook POP Settings
While with Outlook SMTP settings you can send emails to anyone via your Outlook account, Outlook, as well as IMAP settings, will let you retrieve or import incoming emails. We will cover Outlook IMAP settings in the next section.
To receive emails from Outlook in your email client, you will be required to do either POP3 or IMAP settings in your email client. But to be honest, IMAP is way better to use than POP3, it is because IMAP lets you do two-way syncing which it possible to access email from multiple devices such as desktop PCs or smartphones.
But, if you are going to use only a single device, POP3 would be better.
One thing, you must also note is that by default the POP3 will be disabled in Outlook and you have to enable it manually.
To do so, open your Outlook App and click on the gear icon located at the top right corner as shown in the picture below:
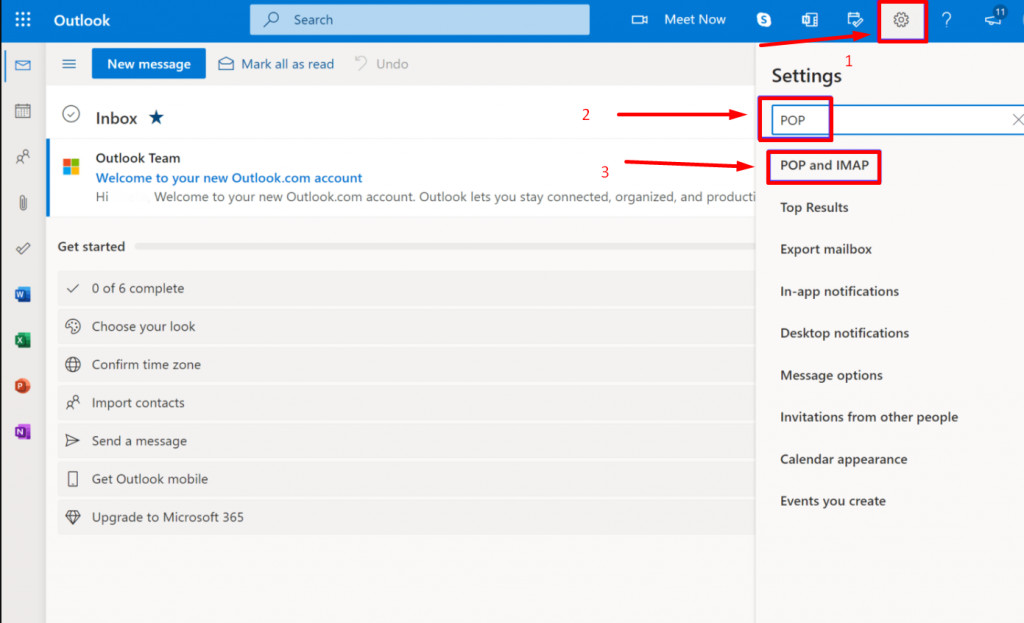
Now search “POP” in the search box, and you will get a list of the search results in which you have to click on “POP and IMAP“. A separate window will pop- up in which you have to select the “Yes” option under the pop option as shown in the picture below:
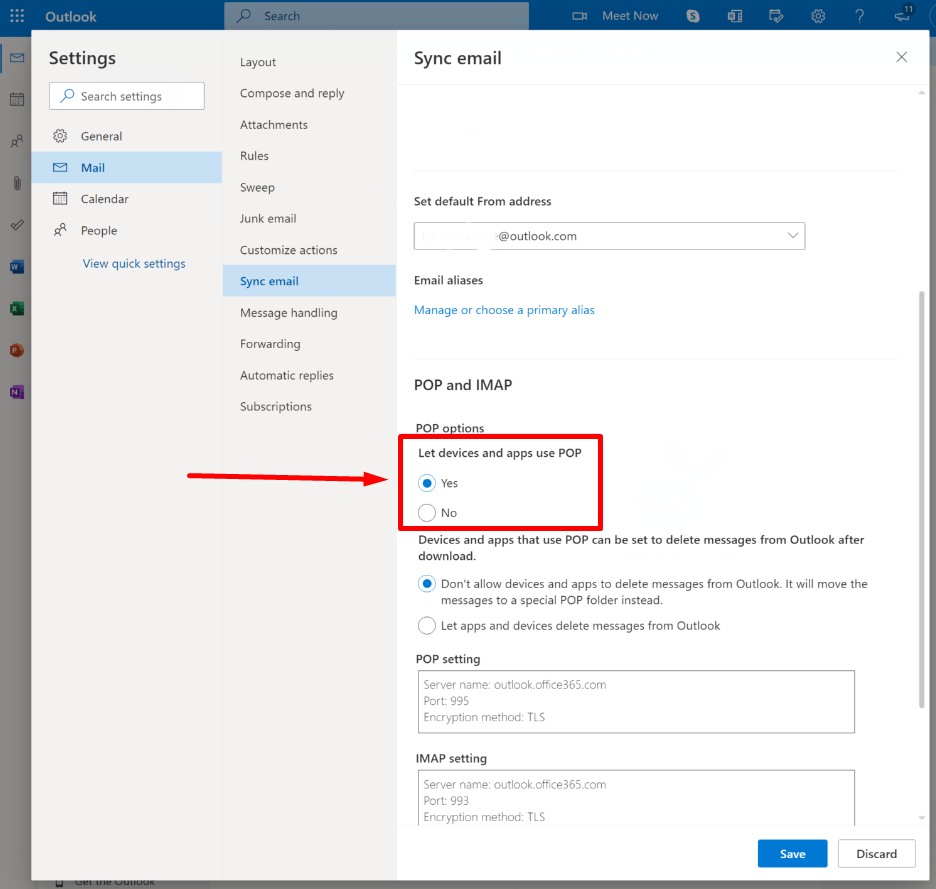
After that, you will have the option to choose whether or not to let apps or devices delete messages from Outlook. And after everything is done click on the Save button.
Now, after successfully enabling the POP3 access, you can use the POP settings as follows:
- POP server: outlook.office365.com
- Port: 995
- Encryption method: TLS
Let us see what the Outlook IMAP settings are:
Outlook IMAP Settings
As we have already mentioned in the above section, IMAP has an edge over POP in terms of syncing messages with multiple devices. Therefore, even Outlook enables it in their system by default. So, the only thing you need to do is to use the following Outlook IMAP settings.
- IMAP server: outlook.office365.com
- Port: 993
- Encryption method: TLS
How to find an SMTP Server in Outlook 365?
If you find any trouble or issues while sending emails, you need to check out your SMTP server settings for outgoing mail servers and update them immediately. But here comes the main problem, many beginners or users do not know how to find an SMTP server in their Outlook 365.
But you do not need to worry, we have provided you with a step-by-step method to find your SMTP server settings in Outlook 365.
Step 1: Open your Outlook365 app, which you can easily find on your Windows PC. All you need to do is just click on the start menu button and search “outlook”. For Mac users, open the finder and search.
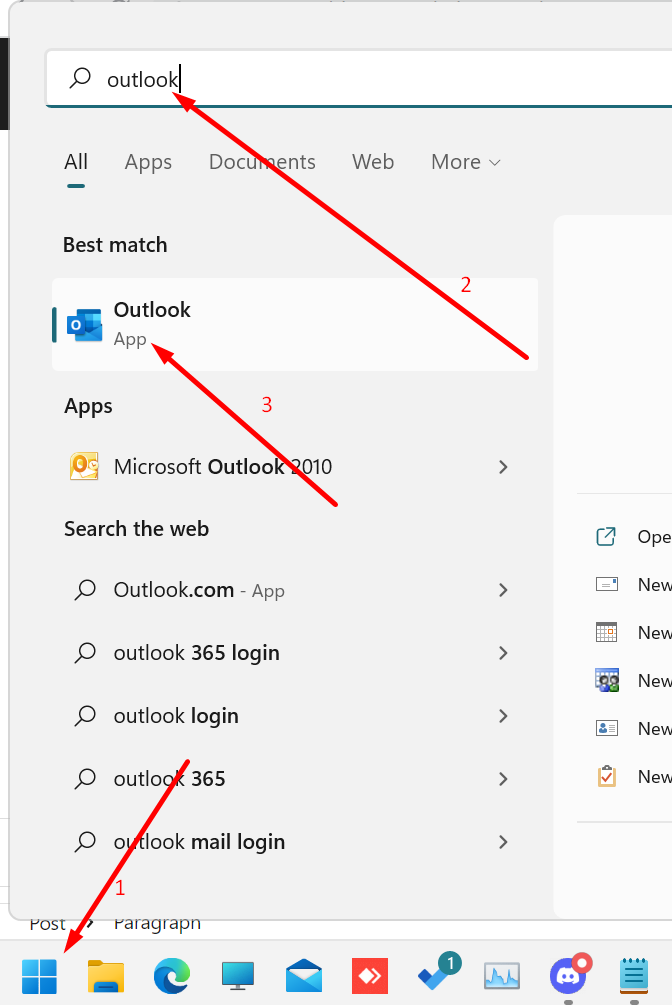
Step 2: Now click on the file tab as shown in the picture.
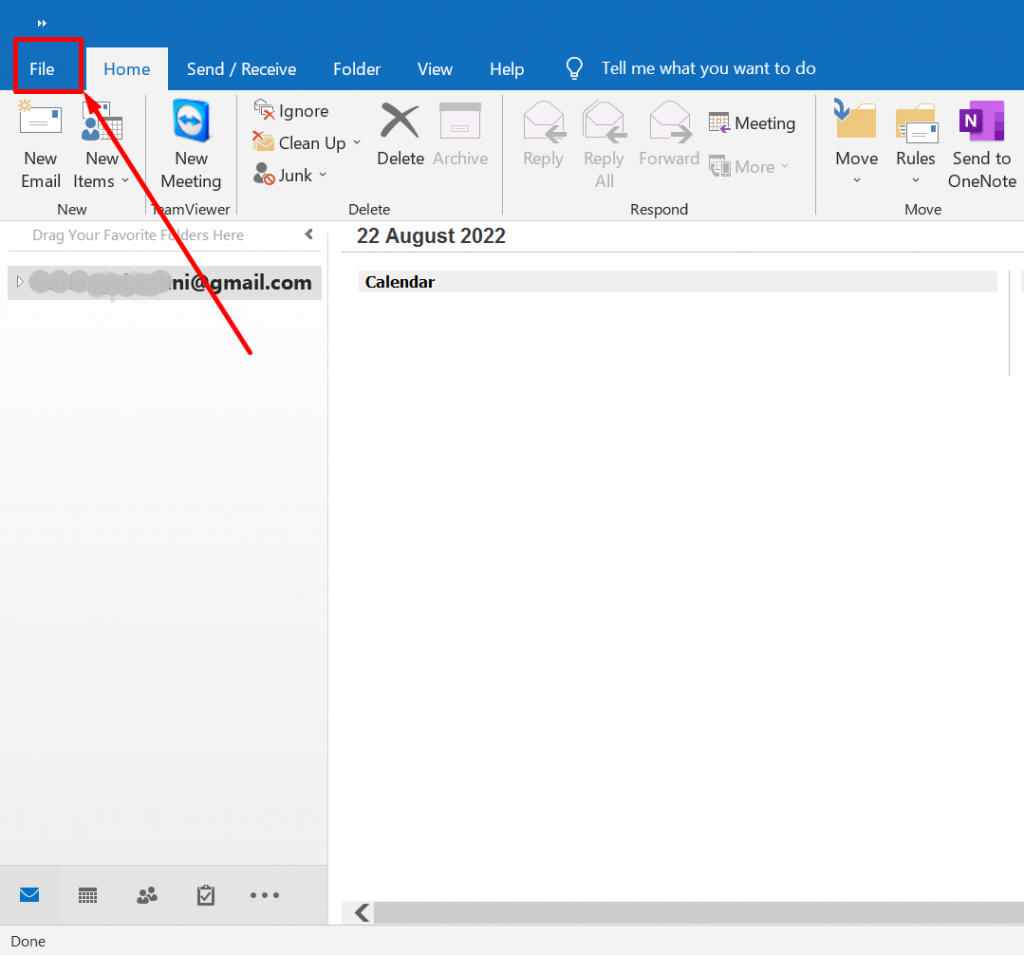
and then click on “info” located at the left corner of the application window.
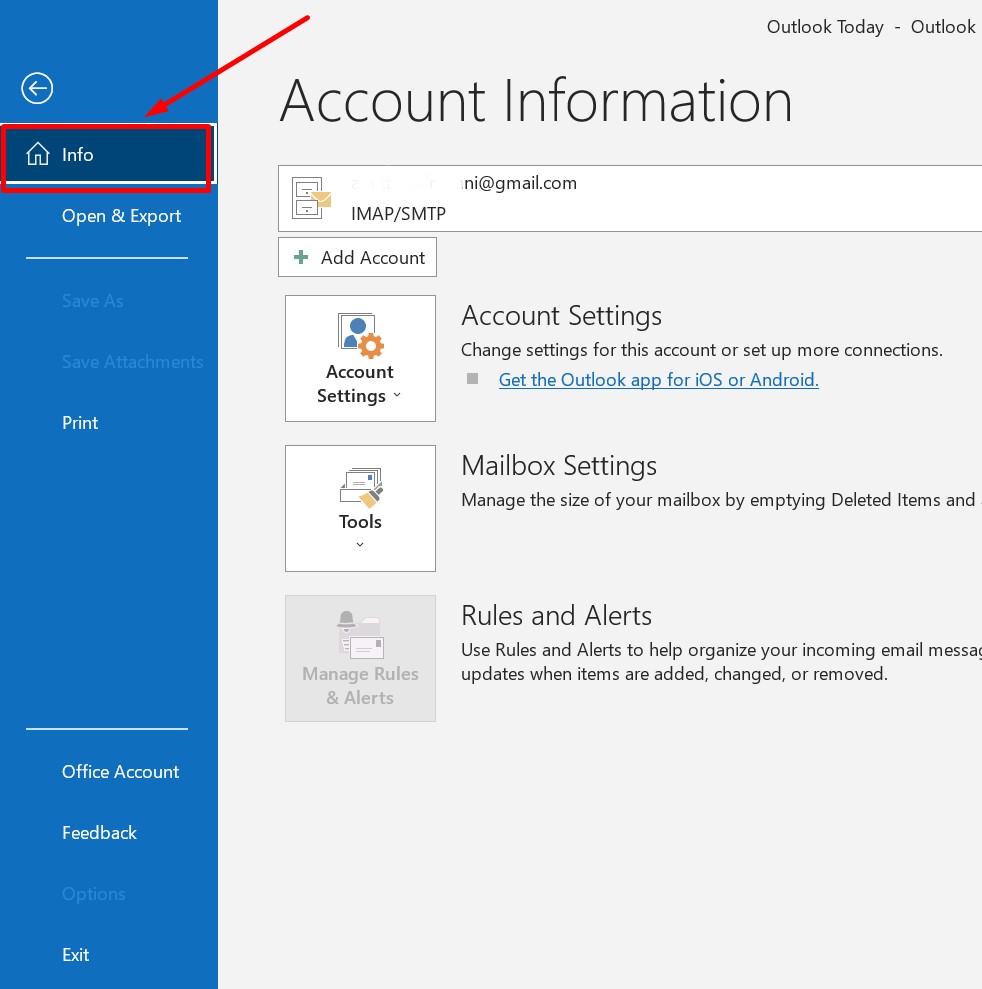
For Mac users, you have to click on Preferences > Accounts.
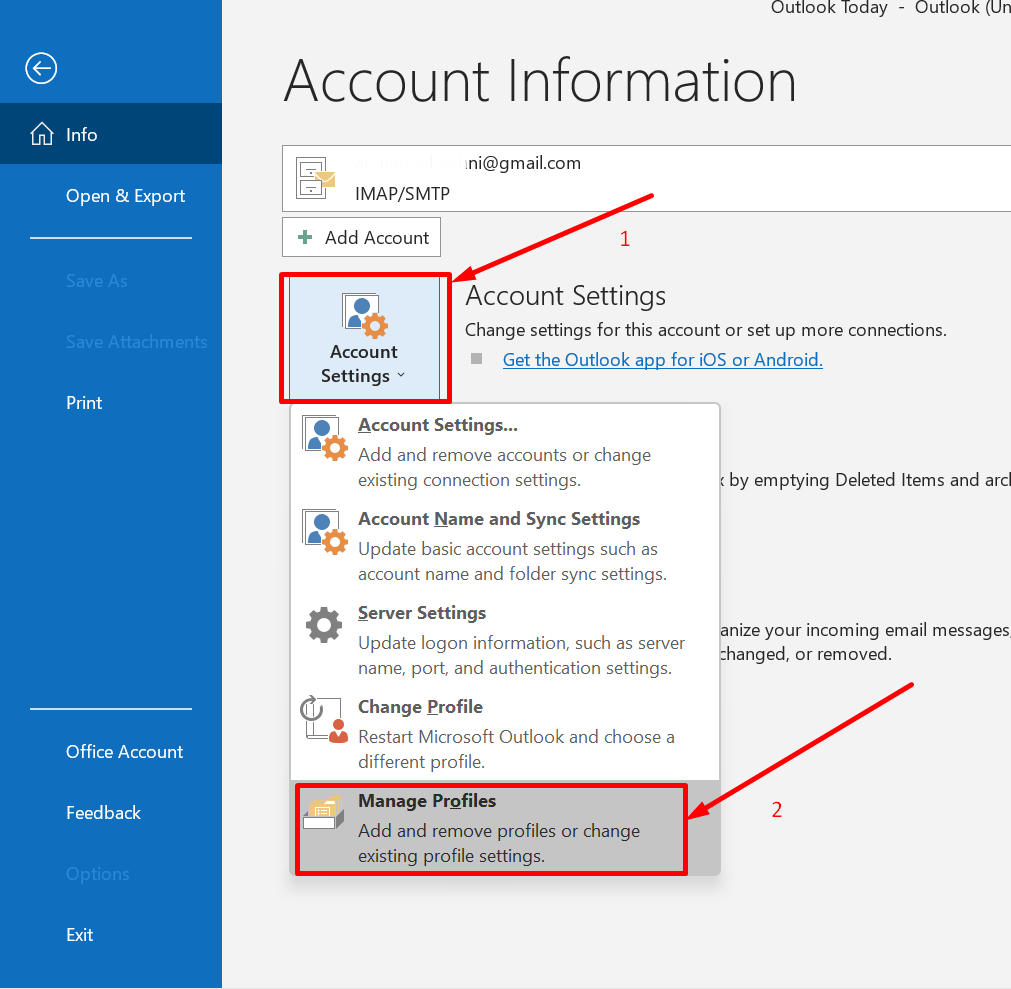
Step 3: Now click on the account settings, followed by clicking on Manage Profiles as shown.
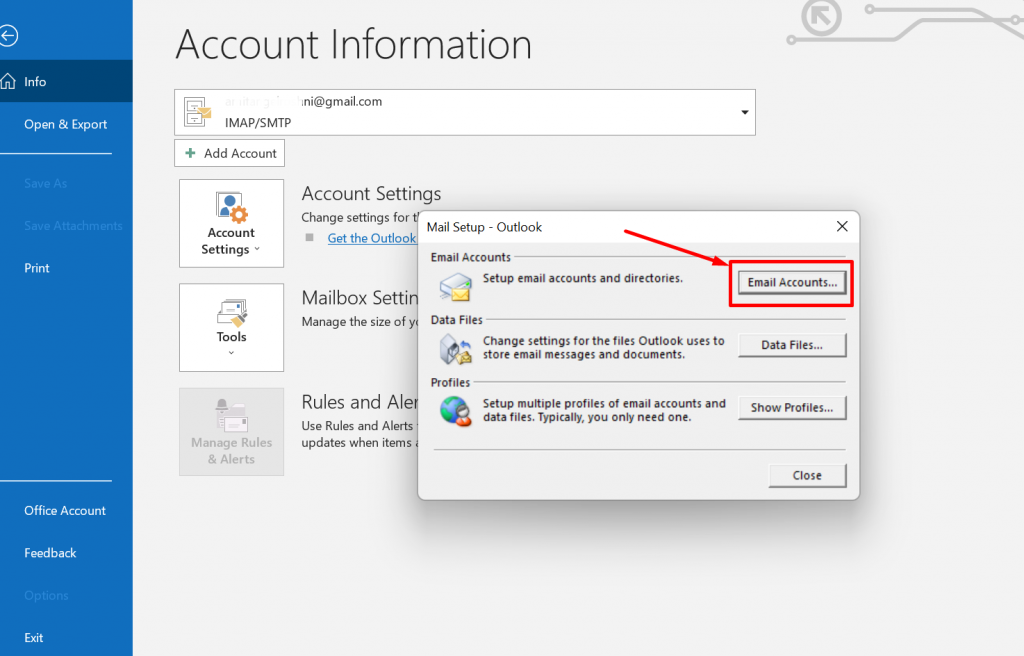
Step 4: When you click on the Manage Profiles option, a dialogue box will pop up in which you have to select “Email accounts”.
Step 5: This will open an account settings window, with tabs like data files, RSS Feeds, Email, etc. Click on the email tab and select the email address you want to find the SMTP.
- Now you can see POP and IMAP account settings in the new Change account window.
- For further information, you can click on “More Settings” followed by clicking on the “Advanced” tab as shown.
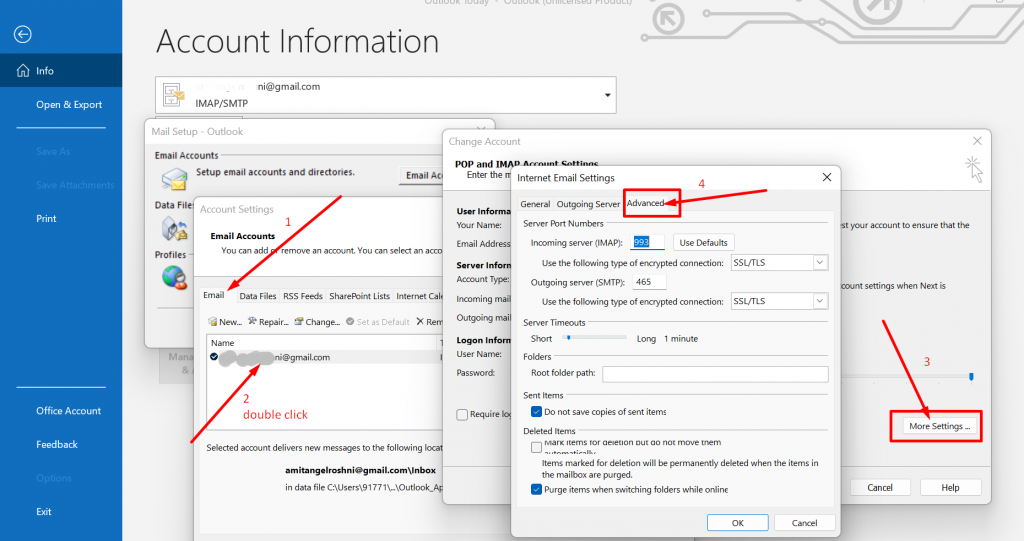
Now, if you want to make a custom setup in Outlook SMTP settings, check out the below section.
Read: 🚩 7 Best WordPress SMTP Plugins for Better Email Delivery
How to Set Up the SMTP Server in Outlook for Sending Emails from a Non-Outlook Account Through Outlook?
Now to set up the SMTP server in Outlook, all the steps will be the same as in the previous section.
- Click on Account Settings > 2. Select manage profiles >3. Click on email accounts and follow further steps as mentioned below.
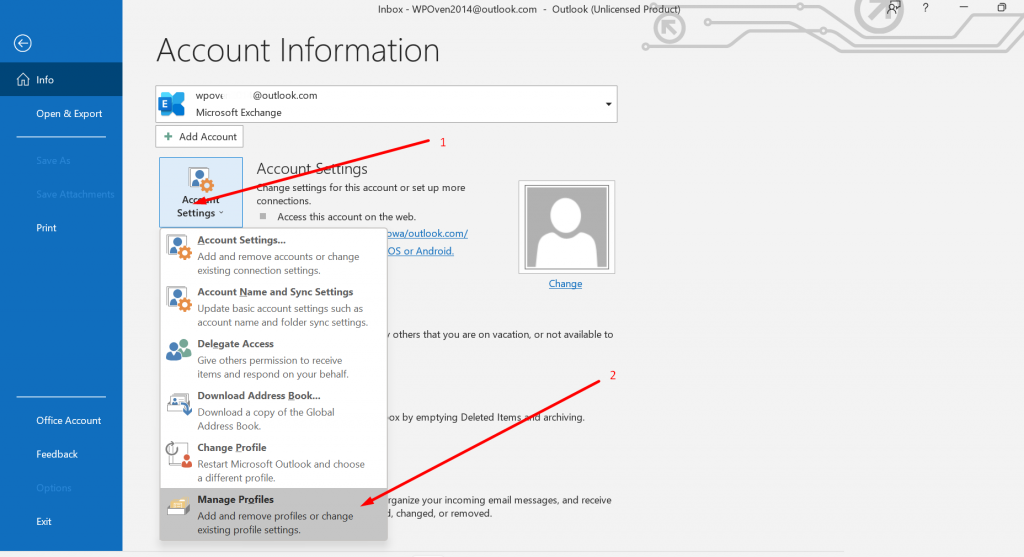
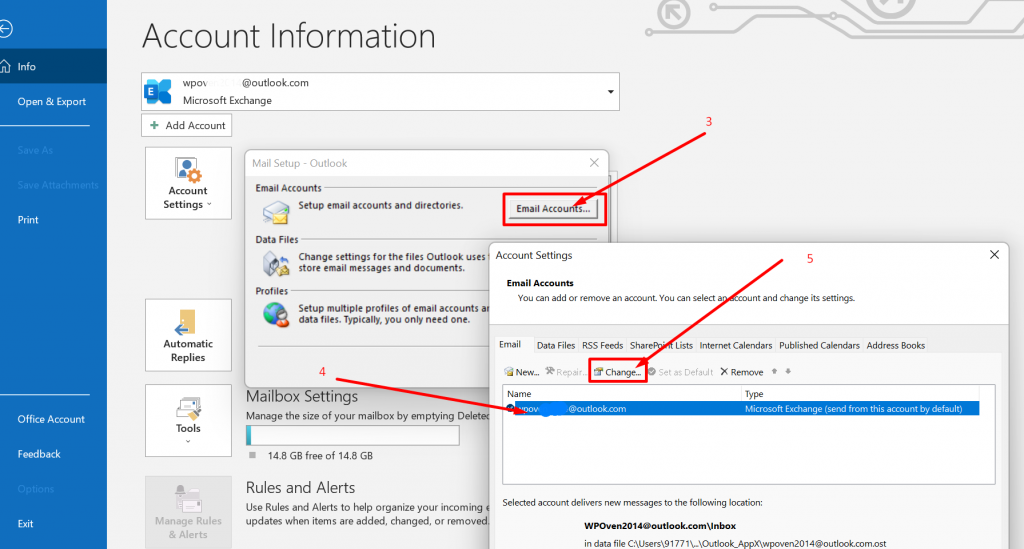
After Step 3, an accounts settings window will pop up, in which you have to click on the email tab and select the email account for which you want to set up.
Now a change account pop-up window will appear in which you have to click on “More settings” as shown in the picture.
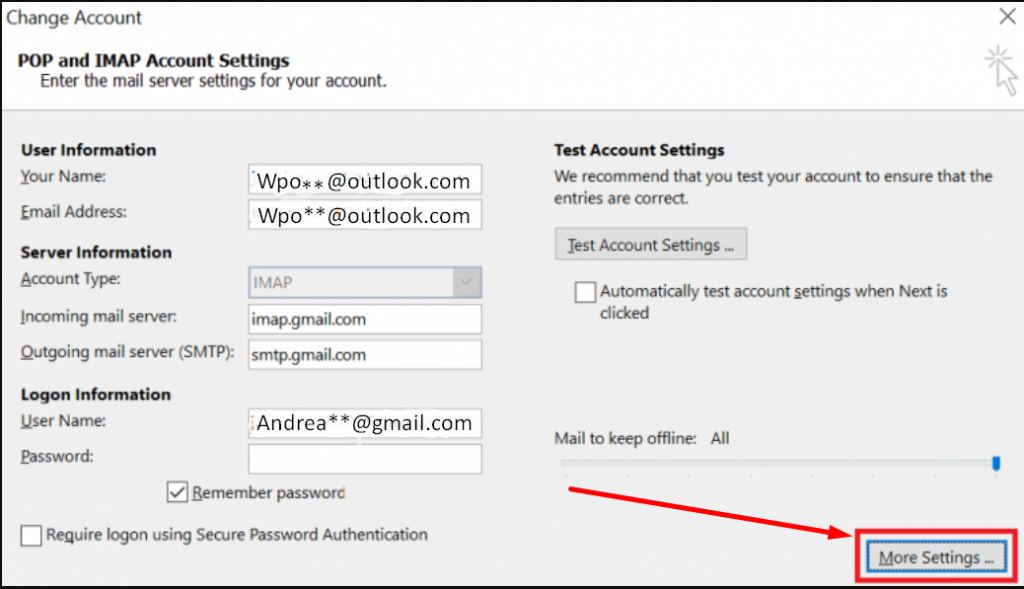
Note: For your reference, I am using a Gmail account here, due to which the incoming mail server is showing “imap.gmail.com” and the Outgoing mail server is showing “smtp.gmail.com“.
Now when you click on the More Settings button, a popup window will appear named “Internet Email settings”.
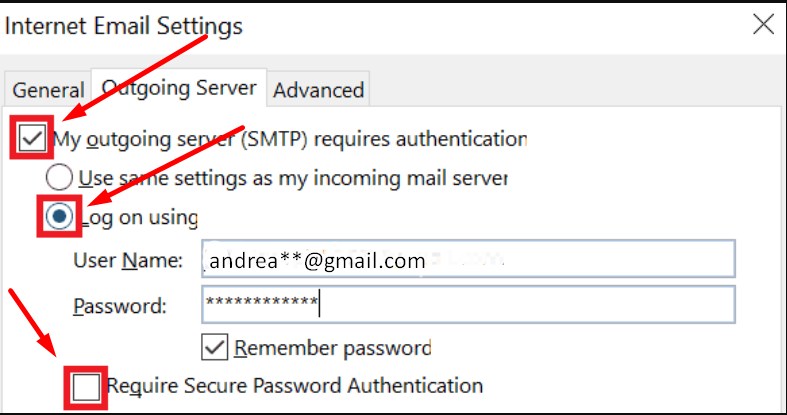
Now Mark checks the “My outgoing server” and “log on using” fields and leaves the “Require secure password Authentication” box unchecked (Outlook doesn’t require Secure password Authentication especially if you are using Outlook).
Do not forget to insert the username which is the email address from which you are going to send the email and the password in their respective fields.
After that click on the Advanced tab select the SSL or TSL encrypted connection for both the Incoming server (IMAP) as well as the outgoing server (SMTP) and click on the OK button as shown in the picture below.
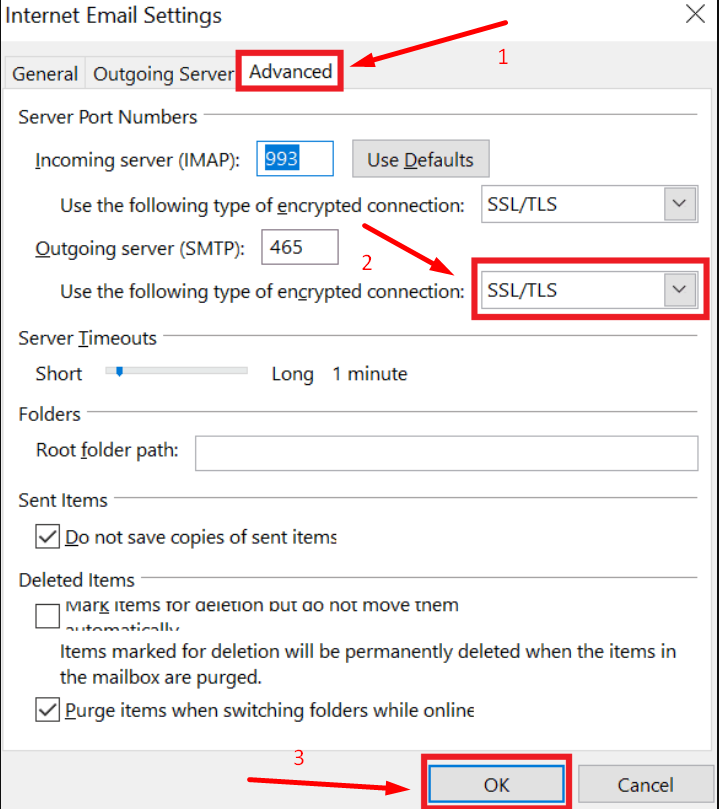
Now you are done.
How to Configure Outlook SMTP Settings in WordPress Sites?
For WordPress admins who would like to improve the email reliability that is being sent from their WordPress sites. They can also configure SMTP Outlook and use its advantage on their WordPress sites as well.
Note: Outlook SMTP server has an email sending limit of up to 100 recipients and 300 emails per day.
The major steps involved will be inserting the Outlook SMTP settings into a WordPress SMTP plugin, which you will be going to see below. In case you find any issues with that, there are plenty of other free WordPress plugins available, that you can choose from.
For this particular setup demo, we are using the Post SMTP plugin, which is available free to use and download from the WordPress repository.
Step 1: To begin with the setup process, the first thing you need to do is to Install > activate the plugin directly from your WordPress site, just exactly you install any WordPress plugin.
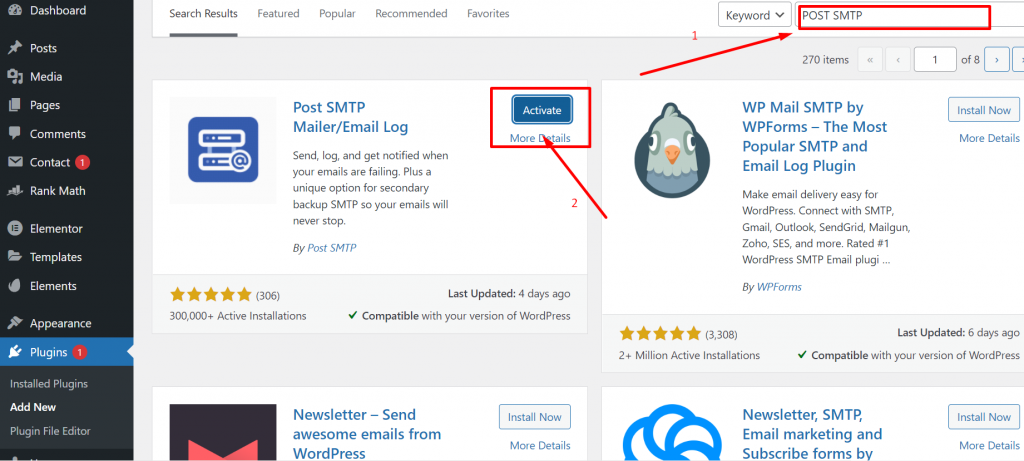
It is not necessary to show you the whole plugin installation process, because if you are using WordPress then you must be familiar with that.
Anyways, after successful installation and activation of the Post SMTP plugin, go to your WordPress dashboard and Click on the Post SMTP tab as shown in the picture.
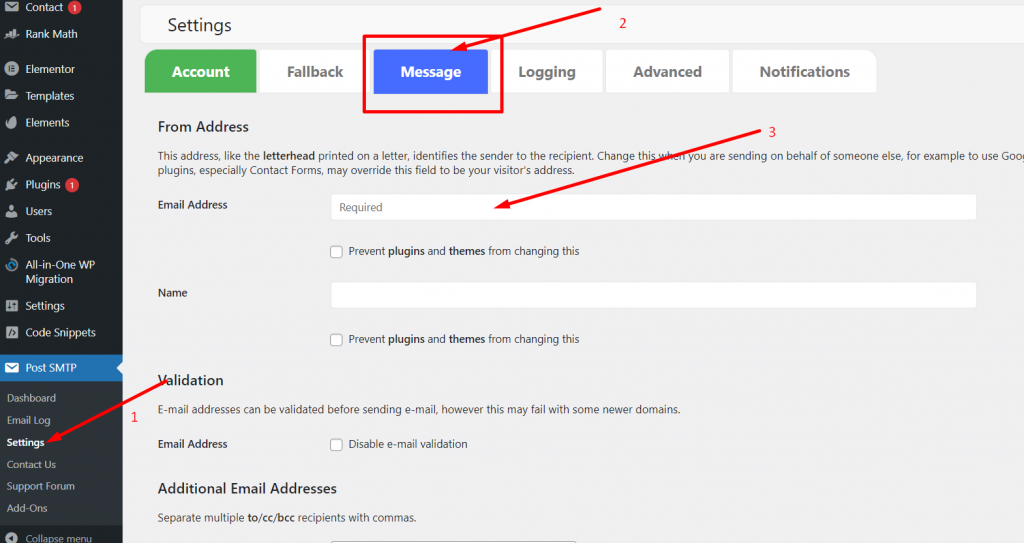
Now click on the Message tab and enter your email address as well as your Name in the required fields. But here, the email address you should enter will be your Outlook account email and the name can be anything of your choice.
Click on the “save changes” button and when done.
Step 2: Now in the second step, you have to add Outlook SMTP server credentials in the Post SMTP Plugin’s settings. For that, you have to again open the Post SMTP dashboard and click on the “Show All Settings” Link.
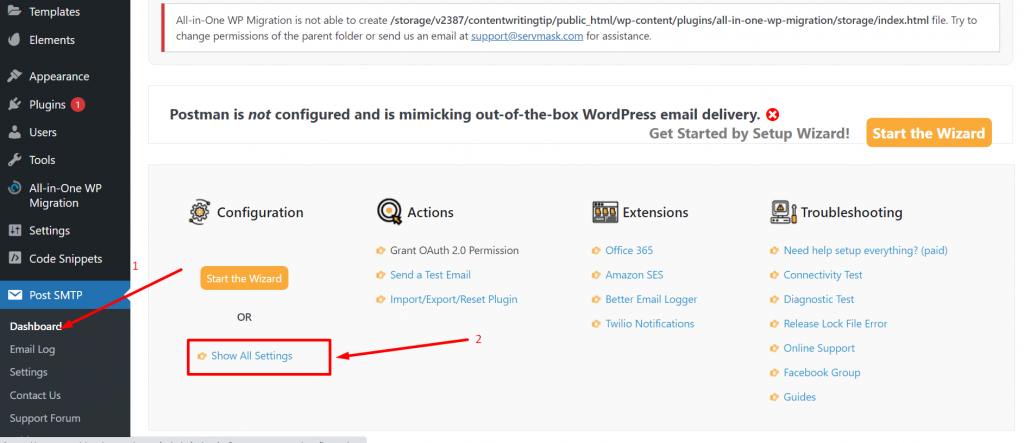
After that, click on the Account tab and select “SMTP” from the “TYPE” drop-down menu as well as select Post SMTP in the Mailer Type section.
You will see, furthermore, options have been expanded in which you have to carefully enter all the Outlook SMTP server details:
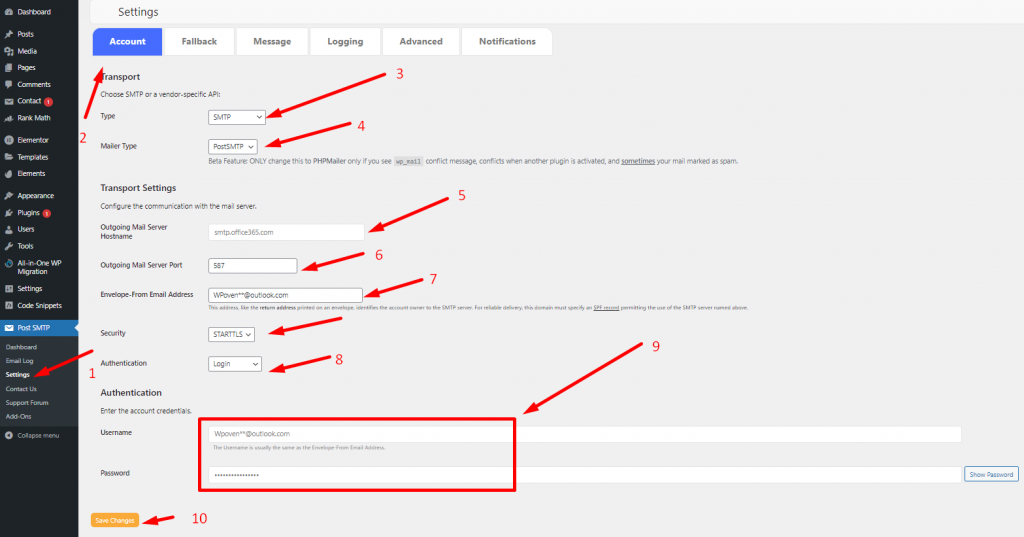
Transport Settings:
- Outgoing Mail Server Hostname: smtp.office365.com
- Outgoing Mail Server Port: 587
- Envelope-From Email Address: Insert your Outlook email address. (Do not insert other email addresses or you may encounter errors)
- Security: STARTTLS
- Authentication: Login
Authentication:
- Username: Your complete Outlook email
- Password: Your Outlook email password
After filling in all the details make sure to click on the “save changes” button.
Step 3: Now you have completed the configuration and setup part, it is time to make sure that everything is working fine or not. For this, the plugin itself provided a feature to send a test email.
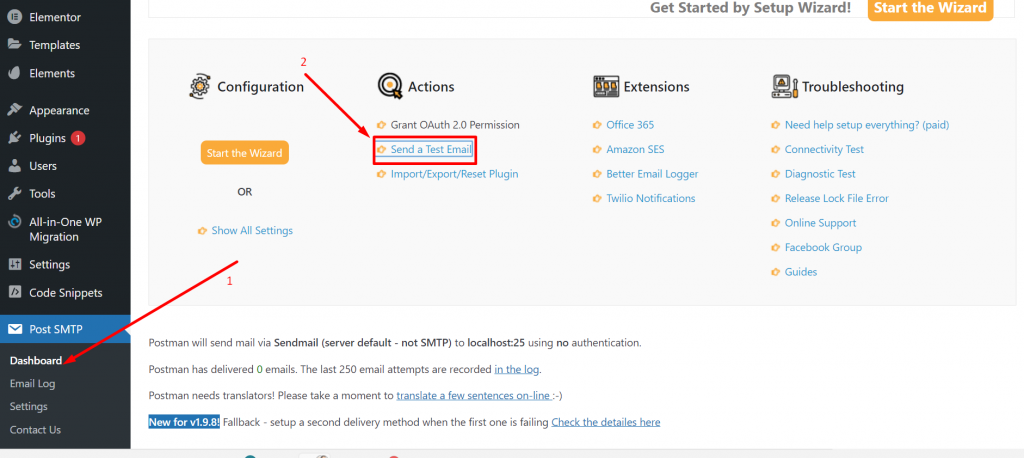
To do the testing, go to your Post SMTP dashboard and click on the Send a test email link.
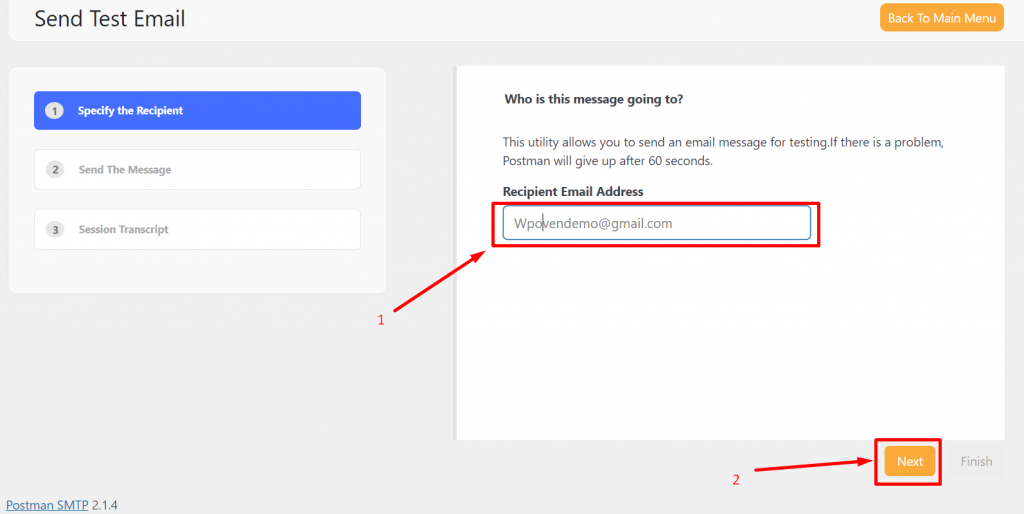
Now, enter the recipient’s email address to which you would like to send a test email and click on the next button:
If all the details you entered are correct, you will see a successful message as shown:

Apart from that, you can also check your inbox and see if the message has been received or not. If you find everything is working fine and great, it means you have done the complete setup successfully.
Wrapping it up
In this post, you have learned how the Outlook SMTP server lets you configure any email client or your WordPress site to send emails using your Outlook account.
Especially, this setup is especially beneficial for WordPress users and provides a reliable option to send emails directly from your WordPress site. It is because the SMTP servers are well-optimized and have a good reputation.
As well as their daily limit of 300 will be sufficient for most WordPress sites.
When talking about your favorite email clients, the SMTP server will allow you to send emails using your client’s interface. In addition to that, if you enable POP3 or IMAP settings, you can also get all your Outlook emails in your email client’s inbox.
If you have any doubts regarding Outlook SMTP settings, please do let us know in the comment section below. Our dedicated WPOven expert team is available 24/7 around the clock to assist you.
Save your time, money, and resources, and give your website mammoth growth with WPOven’s Best VPS hosting for WordPress.
- 24X7 WordPress Expert support
- Cloudflare integration
- High-end Security
- Datacentres around the world, etc.
You can have all these features and much more in a single plan with unlimited Free migrations, unlimited staging, and a 14-day risk-free guarantee. Check out our plans or contact our support team which assist you in choosing the right plan.
Frequently Asked Question
What is the SMTP server for Outlook?
The outlook SMTP server is ” smtp.office365.com “.
Username: Your Outlook Email Address (Same email address you use for your Outlook account)
Password: Your Outlook account Password
Port Number: 587 (Learn more about SMTP Ports)
Alternative Port Number: 25 (Without TLS/SSL)
Required SSL: Yes
Required TLS: Yes
Why is my SMTP server not sending emails?
1. Check all the SMTP settings configuration is done correctly.
2. Check whether authentication is done properly or not.
2. Check your firewalls
3. Check whether the ports are blocked.
4. Check network access from CSO to the SMTP server
How do I find my SMTP server for Office 365?
1. Open your Outlook365 app > File > info.
2. Click on the email address you want to find SMTP for.
3. A pop-up window appears, click on email accounts.
4. Double-click on the email address > click on more settings
5. and you will see your SMTP server information, if not then click on the advanced settings button.

Rahul Kumar is a web enthusiast, and content strategist specializing in WordPress & web hosting. With years of experience and a commitment to staying up-to-date with industry trends, he creates effective online strategies that drive traffic, boosts engagement, and increase conversions. Rahul’s attention to detail and ability to craft compelling content makes him a valuable asset to any brand looking to improve its online presence.


![How to Fix "SMTP Error: Could not Authenticate"? [6 Methods] SMTP error Could not authenticate](https://www.wpoven.com/blog/wp-content/uploads/2023/05/SMTP-error-Could-not-authenticate.png.webp)
