Are you looking for SMTP Server Setup? Then you have landed on the right post, but before we directly start with the main topic first let me ask you a simple question, ever wondered how Emails work? When you send an email and within a few seconds they are in your recipient’s Inbox, the technology behind how this happens is Simple Mail Transfer Protocol (SMTP).
How emails are stored on the server once received using the IMAP/POP3 Server is a story for a different time, for now, we will cover SMTP and by the end of the article, we hope you have a complete understanding of the SMTP Server setup, STMP Protocol, SMTP Servers, SMTP server best practices, usage, Common options and how to ensure your emails have done land up in SPAM.
Then what are you waiting for? Let us get started!
What is SMTP?
Simple Mail Transfer Protocol (SMTP) is the protocol used to Send Emails, it defines a common standard so that any SMTP server can communicate with any other SMTP Server or POP3/IMAP server on the internet and they understand each other. You can say it ensures that different entities involved in the transfer of emails speak a common language.
Read: 🚩 How To Resolve WordPress Not Sending Emails Issue? [2024]
What does SMTP Server Mean?
The SMTP protocol needs to be made available by an application, this application that responds to the SMTP requests for those who wish to send an Email or relay Email is called an SMTP Serve/SMTP Relay. You can break it into two types as given below, both are mostly the same other than the minor difference.
- SMTP Server: It is the same thing as an SMTP relay but is mainly used when the receiver domain is the same as the server domain. These are usually used with free email services like gmail.com and yahoo.com.
- SMTP Relay Server: This is also a Server, but this term is used when the source email and destination email domains are different from the SMTP server domains. An example can be SendGrid or Brevo which offer these. These servers are mainly routers for mail.
Fake SMTP Servers: – These Servers are mainly used for testing by developers, they are catch-all servers that allow users to see how the Email will look on the recipient end without actually sending any Email. You can either install a local application like MailHog or MailCatcher or use a cloud provided like Mailtrap or Our local tool.
How SMTP Work?
Below is a common guide to how the process of Sending Emails works with SMTP.
- A user wanting to send an email from [email protected] to [email protected] uses his Email client to draft an Email with a Subject and Body and press Send.
- Once the user presses send the Email client will connect to the configured SMTP server for now let’s assume it to be smtp.source.com. The client and SMTP server do a handshake; if authorization is required, the client will provide credentials for the same.
- After a handshake, the Email Client sends the receiver address which in our case is [email protected], the subject, and the body.
- If it had been our user who had been sending it to someone in the same domain then our server will simply forward it internally to the local recipient server.
- Next, the SMTP server using a DNS request for MX records finds out the recipient’s IP or domain address where his SMTP server is running.
- Next, it connects to the receiver’s SMTP address and tries to deliver the email.
- The Recipient’s Email Server verifies if it can handle the Email being forwarded to it. And if all is well then it forwards this to the incoming IMAP or POP3 Server.
Common SMTP Port and Address
In most cases, the SMTP address will be a prefix of mail or SMTP in front of the domain to which you are trying to connect to. Also, these are specified by the Mail Exchange (MX) records in the DNS which direct a client to the mail server which is supposed the handle how Email messages are to be routed.
To find the address of the SMTP server you can use the dig command
root@mailtest:~# dig +short freesmtpservers.com MX
20 smtp.freesmtpservers.com.
10 smtp.freesmtpservers.com.
Then you can use the dig command to find the IP address if required
root@mailtest:~# dig +short smtp.freesmtpservers.com
104.237.130.88
Things are not so simple with the port to which to connect, Servers and relays usually have a set of different ports to which you can connect, and each has come into being over time to fulfill specific requirements.
SMTP Port
| Port Number | Description | Information |
|---|---|---|
| 25 | Standard SMTP Port | It should mainly be used for Email Relay |
| 465 | Deprectared SMTP Port | Was for secure SMTP, Used SSL for encryption. Avoid usage. |
| 587 | Modern Secure SMTP Port | Most moden Email Clients will use this , it uses TLS Encryption. |
| 2525 | Alternative Non Standard SMTP Port | This is used as an alternative to 587 incase its blocked. |
In most cases, you will be using Port 587 for your needs.
For more details, you can also read our dedicated post on SMTP ports and get a complete insight into it in a very comprehensive way.
Common SMTP Server Names
Common addresses for SMTP servers start with SMTP. or mail. with the domain name, some might have an IP address also. We have listed a few common ones with their details below –
| Service Name | SMTP Server | Port |
|---|---|---|
| Googlemail | smtp.gmail.com | 587 |
| Outlook.com | smtp.live.com | 587 |
| Office365.com | smtp.office365.com | 587 |
| Yahoo Mail | smtp.mail.yahoo.com | 465 |
| Yahoo Mail Plus | plus.smtp.mail.yahoo.com | 465 |
| Yahoo UK | smtp.mail.yahoo.co.uk | 465 |
| Yahoo Deutschland | smtp.mail.yahoo.com | 465 |
| Yahoo AU/NZ | smtp.mail.yahoo.com.au | 465 |
| O2 | smtp.o2.ie | 25 |
| O2.uk | smtp.o2.co.uk | 25 |
| AOL.com | smtp.aol.com | 587 |
| AT&T | smtp.att.yahoo.com | 465 |
| NTL @ntlworld.com | smtp.ntlworld.com | 465 |
| BT Connect | pop3.btconnect.com | 25 |
| BT Openworld | mail.btopenworld.com | 25 |
| BT Internet | mail.btinternet.com | 25 |
| Orange | smtp.orange.net | 25 |
| Orange.uk | smtp.orange.co.uk | 25 |
| Wanadoo UK | smtp.wanadoo.co.uk | 25 |
| Hotmail | smtp.live.com | 465 |
| O2 Online Deutschland | mail.o2online.de | 25 |
| T-Online Deutschland | securesmtp.t-online.de | 587 |
| 1&1 (1and1) | smtp.1and1.com | 587 |
| 1&1 Deutschland | smtp.1und1.de | 587 |
| Comcast | smtp.comcast.net | 587 |
| Verizon | outgoing.verizon.net | 465 |
| Verizon (Yahoo hosted) | outgoing.yahoo.verizon.net | 587 |
| Zoho Mail | smtp.zoho.com | 465 |
| Mail.com | smtp.mail.com | 587 |
| GMX.com | smtp.gmx.com | 465 |
| Net@ddress by USA.NET | smtp.postoffice.net | 465 |
Bulk SMTP Server Provider Settings
What happens if you want to send more than a few Emails, say 10000 K emails then you will need something like a Bulk SMTP relay, they will also provide you API and other features like Delivery tracking, Open rates, etc. Also helps you send Emails quite fast as SMTP as a protocol is a bit slow.
If the number is not very large then you can use our listing for Free SMTP Servers providers to make a choice.
If you want to send an email to your large user base or maybe for email marketing, we have given pricing below with various providers listed.
| Vendor | Free / Month | Daily Limit | Paid plans | Comments |
|---|---|---|---|---|
| Brevo | 9000 | 300 | $25 for 10k to $499 for 1 Million | Best Free |
| TurboSMTP | 6000 | 200 | 14.95 for 50k to 979.95 for 2 Million. | 6000 / month for 12 months |
| Alibaba Direct Mail | 6000 | 200 | .00029 per 1000 Emails | |
| SendGrid | 3000 | 100 | $14.95 for 50K emails to $749 for 150K | |
| SparPost | 3000 | 100 | $20 for 50K to $525 for 1M | |
| Elastic Email | 3000 | 100 | Costing like Amazon SES | Low cost paid option |
| Amazon SES | 62000 | .0001 for 1000 Emails | One of the Cheapest , Free if sent from AWS EC2 server |
How to Setup Local SMTP Server?
If you are looking to set up an SMTP server on your PC or computer, you need to figure out on which operating system your PC is working. Typically, we have three major operating systems in use, Windows, macOS, and Linux.
Therefore, we shall provide you with a complete SMTP setup guide for the following popular PC operating systems.
1. macOS SMTP Setup
Nowadays, you will find the latest versions of macOS come preinstalled with a default email server, Postfix. It is one of the most popular mail servers. You will also find it the best email server for Linux, which we will also consider in the later section of this post.
Since the mail server by default comes with the OS, the only thing left for you to do is to make minor changes to it, and you are done. This is how it’s done:
1.1. Configuring Postfix
Step 1: The first thing you need to configure Postfix’s main configuration file. Run the following command:
sudo vim /etc/postfix/main.cf
Step 2: Now command the postfix to use the name, so that it can easily identify by other email servers. To do this simply add the command lines as given below:
myhostname = name.domain.com
myorigin = domain.com
Now if your local hostname is “name” the email received by other email servers will be identified as “[email protected]“.
Step 3: Now you have to configure the relay host, which is responsible for allowing emails to receive after proper authentication and relay them to the SMTP server.
relayhost=mail.domain.com:25
Step 4: Now in the next step, you have to enable SASL with an extra config file, where your password has been stored.
smtp_sasl_auth_enable = yes
smtp_sasl_password_maps = hash:/etc/postfix/saslpasswd
Step 5: Now allow Postfix to use a secured connection.
smtp_tls_security_level = encrypt
This is how the main configuration or main.cf file looks like this:
myhostname = name.domain.com
myorigin = domain.com
relayhost=mail.domain.com:25
smtp_sasl_auth_enable = yes
smtp_sasl_password_maps = hash:/etc/postfix/saslpasswd
smtp_tls_security_level = encrypt
Step6: Now in the next step, you have to save the main configuration file by using the following command line:
sudo postmap /etc/postfix/main.cf
1.2. Configuring the SASL Password File
To create a SASL password, the first thing you need to do is to create a sasl_psswd file. For this run the following command:
sudo vim /etc/postfix/sasl_passwd
and the following line:
mail.example.com:25 [email protected]:<your password>
After that you have to save the sasl_psswd file by following the command:
sudo postmap /etc/postfix/sasl_passwd
and restart the email server postfix by using the command:
sudo postfix reload
Now you have successfully been able to set up your local SMTP server. You can even check if it is working or not by simply sending out a test email:
date | mail -s "Test email" [email protected]
2. Linux SMTP Server Setup
Quick MTA Comparison, we will choose Postfix as we will be working with Linux –
| if you are... | qmail | Exim | Sendmail | Postfix | Notes |
|---|---|---|---|---|---|
| Inexperienced | 0 | 3 | 1 | 3 | Exim and Postfix have good docs and clear examples |
| Worried about security | 3 | 2 | 0 | 3 | Postfix is secure and modern; qmail is secure but very old and cranky; Exim is secure to different criteria (read above.) |
| Relying on Sendmail milters | 0 | 1 | 3 | 2 | Postfix can run milters; can use equivalent Exim routers/filter script |
| Wanting minimum hassle | 0 | 3 | 0 | 3 | Sendmail has some easy front-ends, but the deeper you go the worse it gets. Postfix and Exim are more predictable. |
| Resource-constrained | 3 | 2 | 1 | 2 | See Embedded Application below for other comments |
| On Windows | 0 | 2 | 3 | 0 | Sendmail has a native Windows port; Exim is in the Cygwin distro |
| Needing commercial support | 1 | 3 | 3 | 3 | There are competent companies for all MTAs; qmail is inherently less supportable being so old |
Postfix is a Mail Transfer Agent (MTA) that can act as an SMTP server or client to send or receive email. It is one of the best Linux mail servers which is easy to set up and configure and we ourselves use it for most of our needs, it can also be set up to act as an intermediary to forward emails through third-party email services. We will only cover the basic setup and send your first email.
However, most of the Linux distros generally come up with the two best email servers for Linux: Sendmail and Postfix. But you might find it difficult to use Sendmail and configure it because it has a complex design and is even less secure. That is why postfix is predominantly used and even we are also using it in this guide.
The simplest setup consists of installing postfix and you should be good to go.
Such a bare-bones setup will work technically but your Emails might land in SPAM, to cater to this and ensure better email deliverability, we have another guide where we add the other requirements like DKIM or SPF which are needed to make sure your Emails go through. But still, unless there is a very good reason, we do not recommend running your own Email Server.
This process assumes that you have a newly installed Ubuntu 20.04 and that you can work with command-line Linux, if not we recommend using one of the existing SMTP Providers. We will set up postfix on the Ubuntu 20.04 server and send an Email using it to our very own dummy service for testing to see if it works.
To begin we will issue the update cache command for the apt package manager
sudo apt update
Next, we will install postfix using the following command –
sudo apt install postfix
The installation will open up a bunch of prompts please make the following selections –
- General type of mail configuration? : For this, we will choose an Internet Site since this matches our infrastructure needs.
- System mail name: This is the base domain that will be used to send an email if no sender domain is specified by the user. So, if you send an email from say user1 and no domain is specified this will be postfixed to the email. So, if example.com is given, it will send an email from [email protected].
Now you have to configure your mail server i.e. postfix so that it can process requests to send mail from the local host. To make this happen, you have to make certain changes in the main.cf file by using the following commands:
sudo nano /etc/postfix/main.cf
Now, search for the line “inet_interfaces = all” and change it with another line,
inet_interfaces = loopback-only
In addition to that, you also have to make changes to the “mydestination”, which shows the list of all the domains, which will look something like this:
mydestination = $myhostname, localhost.$example.com, $example.com
Now save the file and restart the postfix to make all the changes that you have made work:
sudo systemctl restart postfix
Now port 25 should be available, you can check if it’s open by using any of the commands –
sudo lsof -i -P -n | grep LISTEN
sudo netstat -tulpn | grep LISTEN
sudo ss -tulpn | grep LISTEN
sudo lsof -i:22 ##
see a specific port such as 22 ## sudo nmap -sTU -O IP-address-Here
What we are looking for is something like this
master 2575 root 13u IPv4 30244 0t0 TCP *:25 (LISTEN)
master 2575 root 14u IPv6 30245 0t0 TCP *:25 (LISTEN)
If you even need to reconfigure the setup simply run the command –
sudo dpkg-reconfigure postfix
We are all set and our SMTP server should be up and running. Next, we can send an Email to some users on the internet or maybe catch all emails to test things.
You can even try to send a test mail by using the following command:
echo "Email testing 123" | mail -s "Subject line for test email" receipient’s_email_address

3. Windows SMTP Server Setup
Although you will find multiple software available that can help you to set up a Windows SMTP server, here we are using hMailserver for your reference.
Step 1: The first step in Windows SMTP server setup is to download the latest version of hMailServer software available.
Step 2: Choose the full installation option in the Select Components Window as well as check Server and Administrative components.
Step 3: Now check the built-in database engine option in the Select database type window.
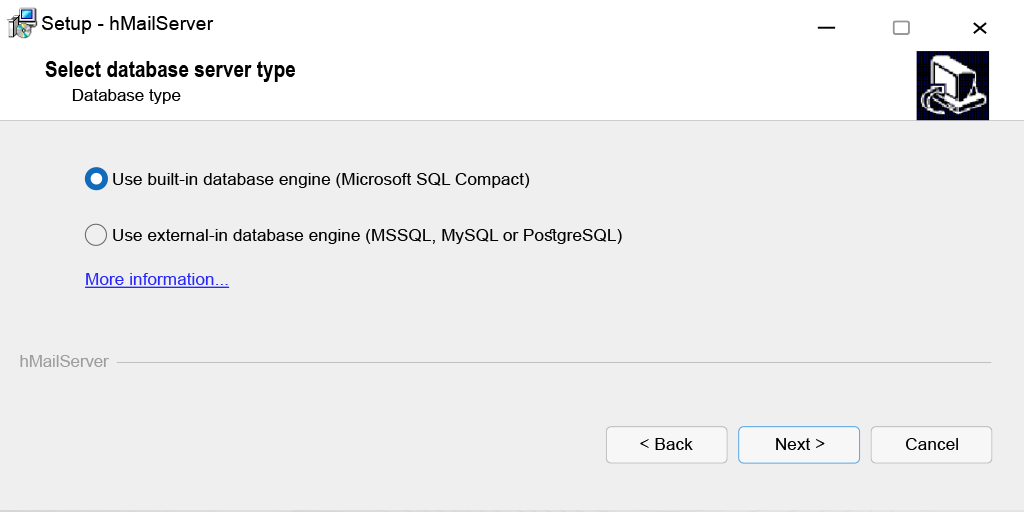
Step 4: After that create a password for the user, which you will ask for in the hMailserver security window.
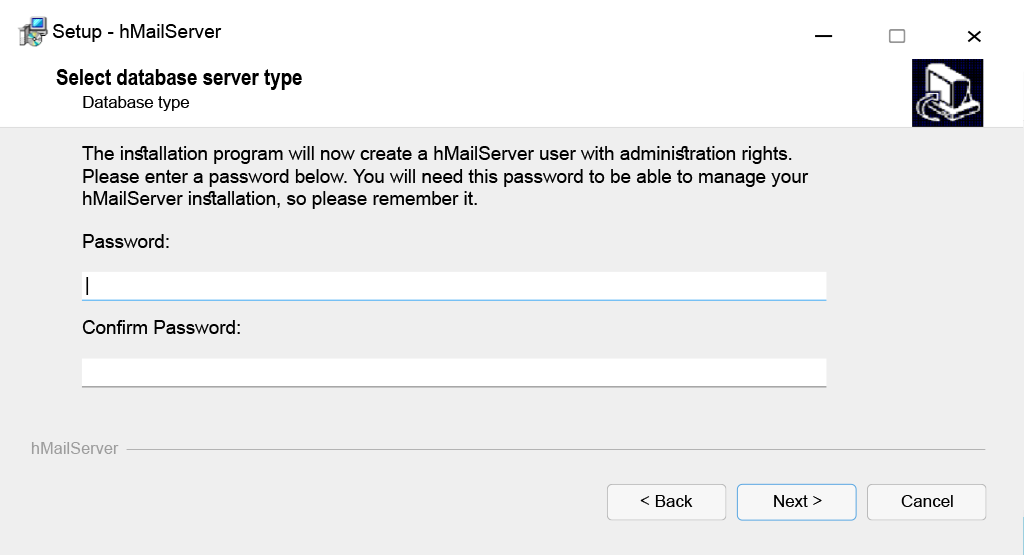
Upon successful installation, open to run the hMailserver software and get started to configure it properly.
3.1. Configuring hMAilServer
Step 1: Click on the connect button as soon as the starting window appears shown in the picture below.

Step 2: Enter the password that you have already set during the installation process.

Step 3: Now click on the “Add domain” button and enter your domain name in the corresponding field.
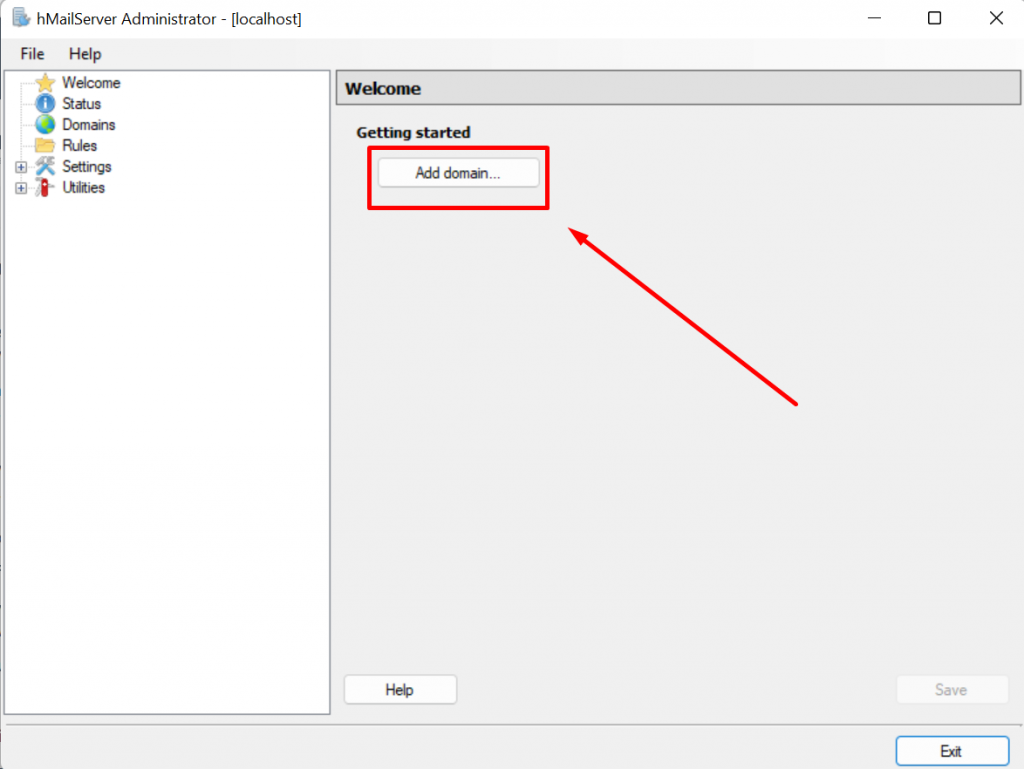
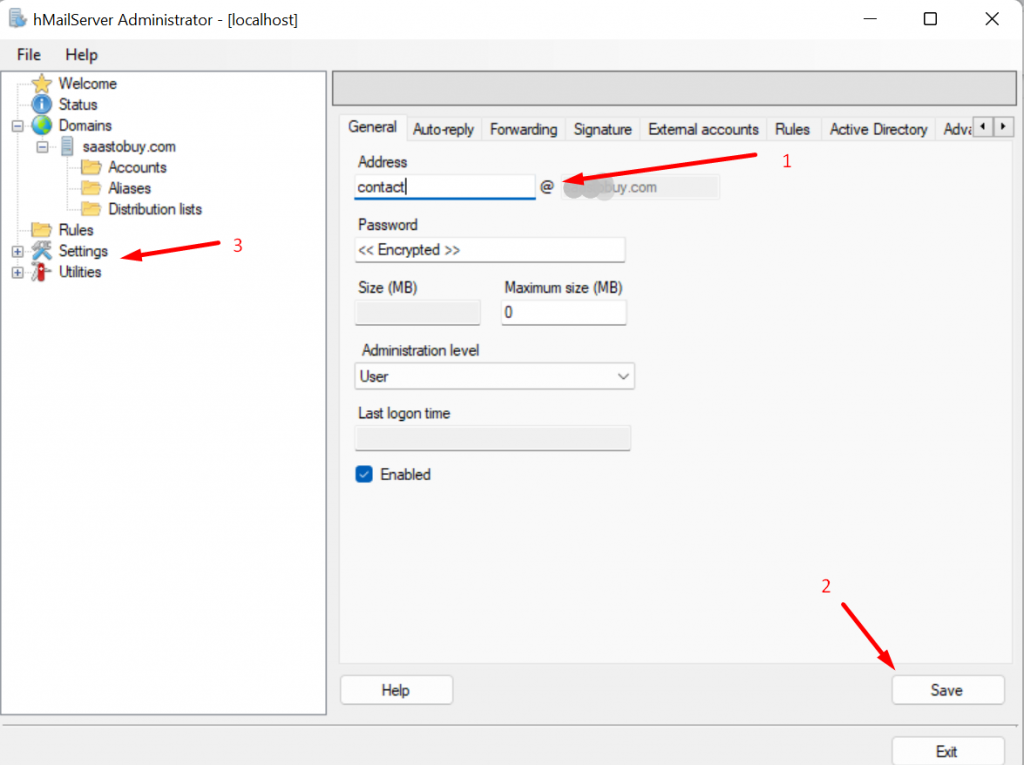
Step 4: Select the Accounts folder located at the left tab as shown below and click on Add button to configure.
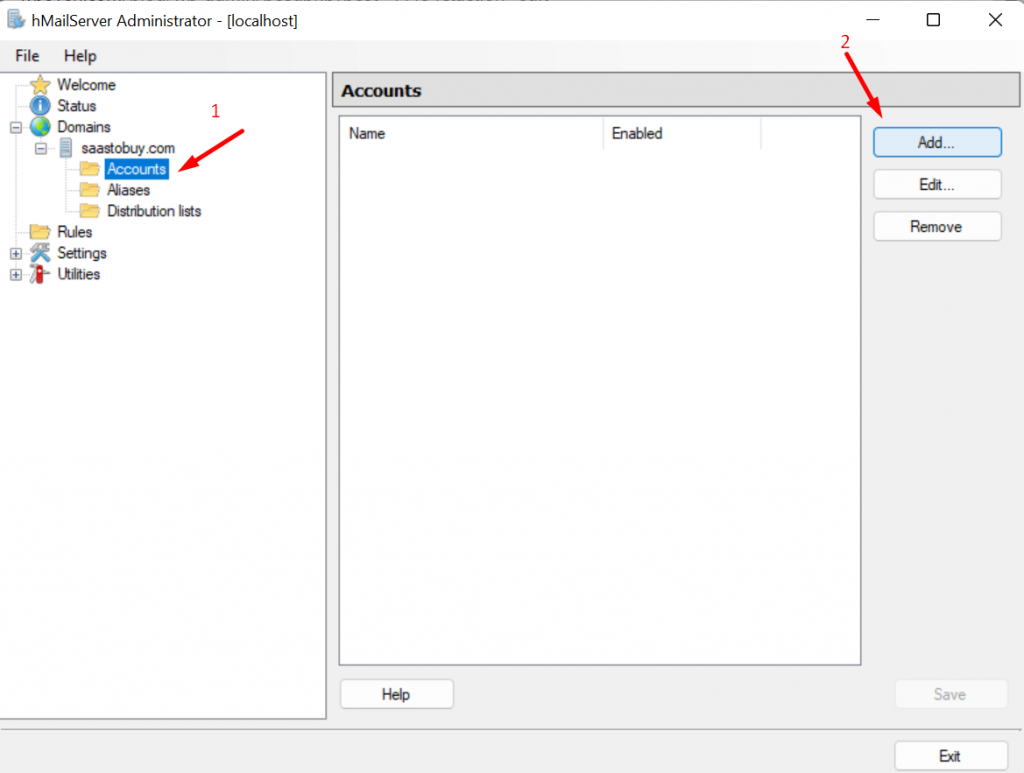
Now enter a name in the address field and this will set up your email address. If you want, you can also specify a password. Now click on the Save button and navigate to the settings in the left tab as shown below.
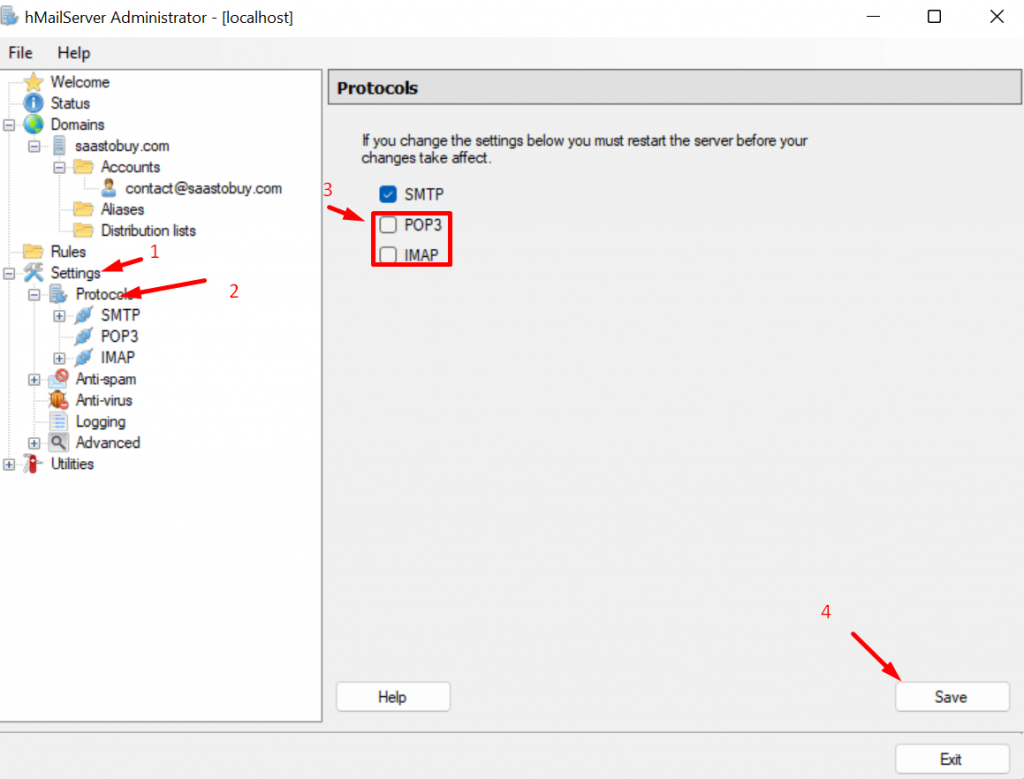
Step 5: Now in the settings thread select the protocols option and uncheck the POP3 and IMAP boxes Followed by clicking on the Save button.
Step 6: Now click on the Advanced tab in the settings thread at the left side of the window and enter your local host in the Default domain field located in the right tab as shown below.
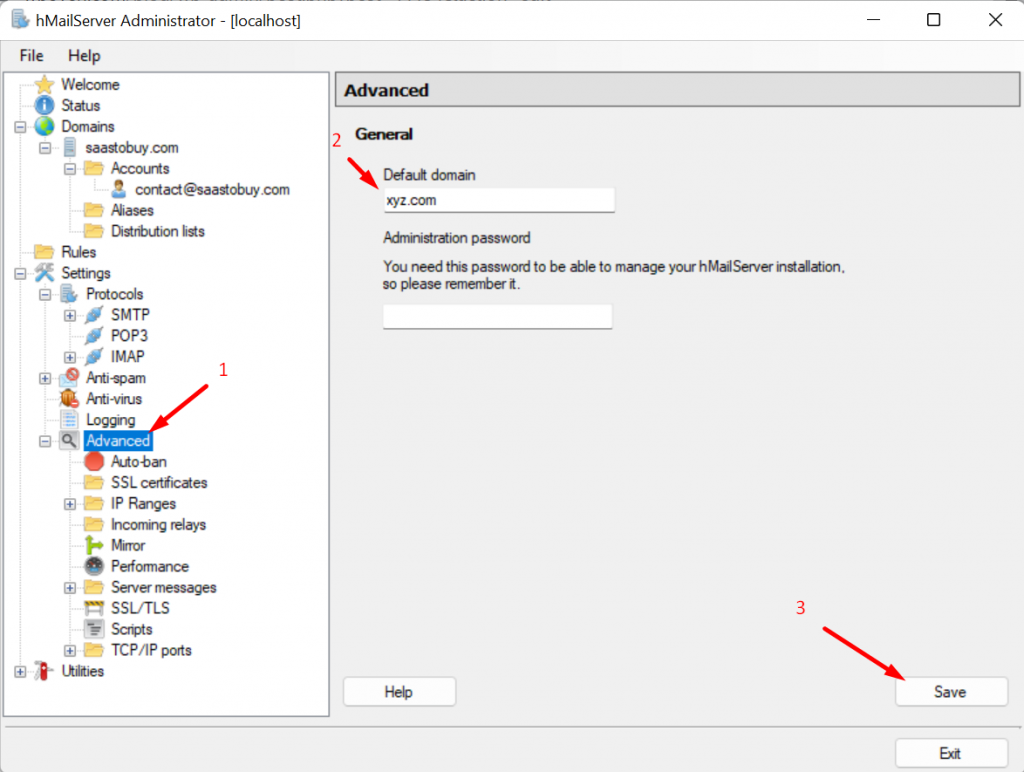
Now to finish up the Advanced settings, you need to select the Auto-ban option under the Advanced settings thread and uncheck the Enabled box > Click on the save button.
Step 7: Now, at last, click on the utility thread located at the left side of the window as shown below, select diagnostics > Select the domain you want to run tests on > Click on the start button.
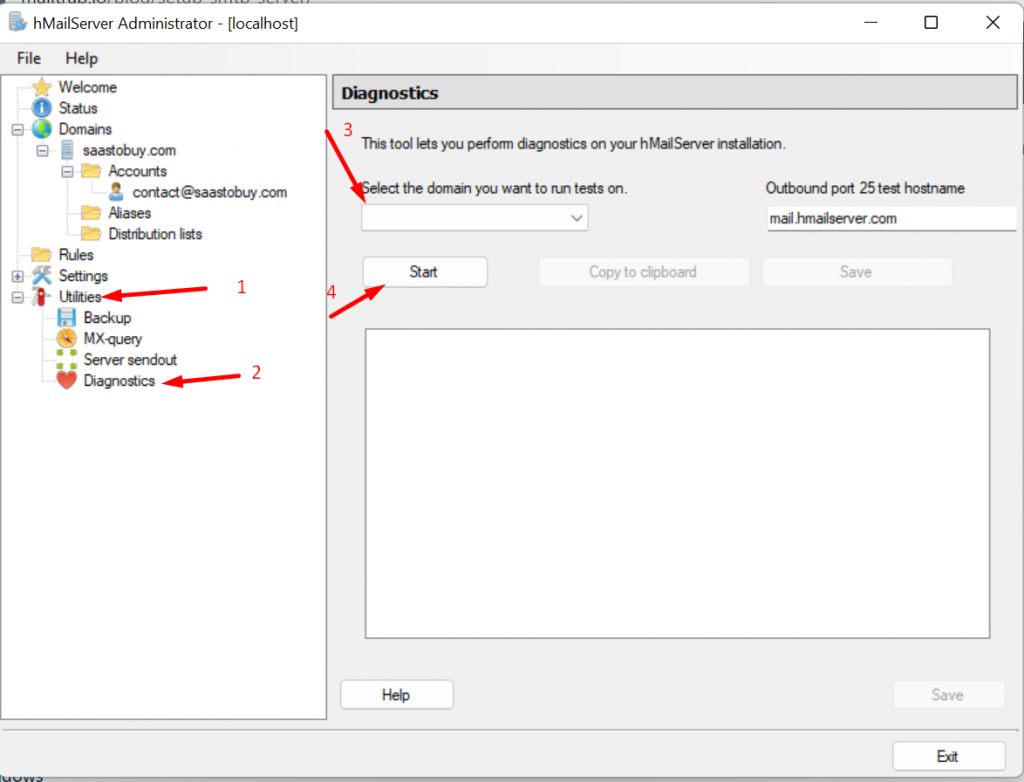
If everything works well, the collect server details and Test outbound report must be marked green.
Read: 🚩 6 Best Bulk Email Services for Email Marketing [Free & Paid]
4. Setting SMTP Server with WordPress
WordPress powers almost 40% of the sites on the internet, by default it uses PHP Mail to send transactional emails which in turn if not configured uses Sendmail, this can be a hit or miss in the case when delivery is concerned, so we recommend using a WordPress plugin which can use SMTP Settings or use SMTP API for the same.
By default, WordPress uses PHP mail to send an email, if configured correctly it is sufficient, but in most cases, it’s easier to use third-party Service as most shared hosts do not allow direct console access to check what is going on and your Host IP might have been blacklisted due to SPAM as there may also be other users on the Server (In case of Common Shared Hosting) who might not behave and cause your IP to be blacklisted. By being blacklisted we mean that your server’s IP is put on a global list of known spammers, which makes it even harder for your Mails to get through, you can check your status here.
For WordPress we recommend the Post SMTP mailer Plugin, it’s easy to configure, and set up and supports a lot of different vendors including Gmail, and there is also an option to log all sent emails. The free plan should be sufficient for most users.
You can easily install it from inside WordPress or even download it from WordPress’s website. It has a premium plan, but free should be good enough for most users.
For complete details on How to set up an SMTP server with WordPress, you can check out our dedicated and comprehensive guide on ” What is a Gmail SMTP Server and How to Use It for Sending Emails for Free?“ and “How to Configure Right Outlook SMTP Settings to Send Emails?“
Using an SMTP Server
Usually, an Email client is the most common way most of us will interface with an SMTP server, but you can also directly interact with it using telnet. We will start with this method as it is just plain cool.
1. Send Mail using Telnet on Linux
Connect to your local SMTP Server by entering the following line –
telnet localhost 25
You will see something like this –
root@mailtest:~# telnet localhost 25
Trying ::1...
Connected to localhost.
Escape character is '^]'.
If you are not able to connect, make sure postfix is running and check port 25 is open.
Now let’s send an email to [email protected] ( catch-all email ).
root@mailtest:~# telnet localhost 25
Trying ::1...
Connected to localhost.
Escape character is '^]'.
220 mailtest ESMTP Postfix (Ubuntu)
ehlo localhost
250-li292-146.members.linode.com
250-PIPELINING
250-SIZE 10240000
250-VRFY
250-ETRN
250-STARTTLS
250-ENHANCEDSTATUSCODES
250-8BITMIME
250-DSN
250-SMTPUTF8
250 CHUNKING
mail from:[email protected]
250 2.1.0 Ok
rcpt to:[email protected]
250 2.1.5 Ok
data
354 End data with .
Subject:Testing Email service

This is a test email.
.
250 2.0.0 Ok: queued as A6ADC402D4
quit
221 2.0.0 Bye
Connection closed by foreign host.
Go check if the Email is received in the inbox for [email protected], or if you used a different recipient can check it in its inbox.
2. Send an Email from the Linux Command Line
On Linux, we can use the SendMail command to send Emails quickly.
echo "Subject: hello" | sendmail -v [email protected]
SMTP Best practices
SMTP is an Internet standard protocol for sending and receiving emails but much of the email deliverability depends upon the reputation of the sender also. Hence it becomes essential for anyone to follow SMTP best practices to operate a mail server.
So let us see what SMTP Best practices one should follow before setting up an email server.
1. Avoiding Misuse of Open SMTP Relays
You might notice that SMTP port 25 is generally either blocked or disabled by your ISP or cloud providers to avoid spam. In addition to that, it is also done to prevent the misuse or illegal activities of open SMTP relays.
Therefore, while setting up or configuring your email server, you must be careful and take preventive measures to avoid any security negligence. This is because even a slight mistake during the setup can lead to overall security ineffectiveness.
Hence, you must make sure that your server does not become an open relay at any cost.
2. Prefer Only encrypted SMTP Connections
To carry out successful secure email submissions, the connection established should be TLS encrypted to port 587 of a server. Both clients, as well as the server, have to support this to make a secure connection.
The best part is, that the majority of the popular email clients by default support TLS, hence the only thing left to establish a secure connection depends on a mail server.
It is also important to note that while configuring SMTP clients, enable TLS for outgoing connections to prevent any MITM (man-in-the-middle) attacks. These attacks can show your TLS connection as unavailable and they can only be prevented by making TLS mandatory.
3. Using Reputed and Professional Email Services
Since SMTP port 25 is by default blocked by many ISPs and cloud services, you have other better and more secure SMTP ports available i.e. ports 465 and 587. You can utilize these ports to send emails through SMTP relay.
For instance, you can configure the settings of your MTA (mail transfer agent) to use any mailing services such as Brevo or Mailchimp over a secured port i.e. 587 to relay encrypted emails.
Is your SMTP Server working as it should be?
Run a quick Free SMTP Server test
And find Is your SMTP server settings are working or not.
Summary
Configuring and setting up SMTP servers can be a daunting task, especially for beginners who do not have any knowledge about SMTP servers. Therefore, we tried to explain all the settings and terms related to SMTP servers in the easiest language so that it can be easily grasped by the majority of the readers.
However, in case you find anything confusing or have any doubts regarding this article, feel free to share your opinion in the comment section below.
Save your time, money, and resources, and give your website mammoth growth with WPOven’s Enterprise wordpress hosting for agencies.
- 24X7 WordPress Expert support
- Cloudflare integration
- High-end Security
- Datacentres around the world, etc.
You can have all these features and much more in a single plan with unlimited Free migrations, unlimited staging, and a 14-day risk-free guarantee, Signup Now!
Frequently Asked Questions
How do I Set up a Free SMTP server?
There are plenty of Free options available from where you can easily set up a free SMTP server, the most popular ones are:
1. Brevo
2. Mailchimp
3. Mailgun
4. Mailjet
Can I use Gmail as SMTP Server?
Yes, you can easily use Gmail as an SMTP server, but for that, you have to configure its settings. If you have an encrypted or secure connection, you can easily send mail to anyone inside or outside of your organization simply using smtp.gmail.com as your server.
Is there any Free SMTP Server?
Yes, Brevo and Mailchimp are two of the best free SMTP servers that allow users to send emails free (Up to a certain limit) with other benefits such as good deliverability, great ISP reputation, unlimited contacts, Bulk campaigns, and many more.


![How to Fix "SMTP Error: Could not Authenticate"? [6 Methods] SMTP error Could not authenticate](https://www.wpoven.com/blog/wp-content/uploads/2023/05/SMTP-error-Could-not-authenticate.png.webp)

![How To Resolve WordPress Not Sending Emails Issue? [2023] wordpress not sending emails](https://www.wpoven.com/blog/wp-content/uploads/2022/04/How-To-Resolve-WordPress-Not-Sending-Emails-Issue.png)