There are billions of people who use Gmail as a free, easy, and efficient way to send emails to anyone. However, it is true to a greater extent. But it is also true that most of them are unaware of its other feature called Gmail SMTP server.
Google has provided a free SMTP server i.e. Gmail SMTP server, through which a user can easily send emails from their Gmail address or domain using any other email client such as Yahoo or Outlook. But to take advantage of this feature, you must first have a free Gmail account. In addition to that, you can also send emails to anyone directly from your WordPress site for free.
Isn’t it fascinating! After all, you do not need to rely on any dedicated email-sending service which is quite expensive.
Therefore, in this post, we try to cover almost every aspect of the Gmail SMTP server that you must know. But first, let us know what exactly a Gmail SMTP server means.
What is a Gmail SMTP Server?
Before defining the Gmail SMTP server, first, you must understand what SMTP means.
SMTP or Simple Mail Transfer Protocol is an email protocol that is used by mail servers to send emails on the web. Where Email protocols are termed as a set of instructions or rules that help to execute the email transmissions between email clients and accounts efficiently.
This email protocol is generally used to manage and send emails through an SMTP server.
Similarly, a Gmail SMTP server is like any other free SMTP server that can be used by anyone around the world. With the help of the Gmail SMTP server, you can easily perform all your email transactions from your Gmail account using any email service or web application.
You can set or configure any web application to send messages by using the default Gmail SMTP server name “smtp.gmail.com“. The external web application will connect to the SMTP server through specific ports and transmit the email throughout the web.
Read: 🚩 7 Best WordPress SMTP Plugins for Better Email Delivery
What are the SMTP Server Settings for Gmail?
To use the Gmail SMTP server properly, there is a list of details you need to consider. The Gmail SMTP settings must be as given below:
- Gmail SMTP server address (outgoing): smtp.gmail.com
- Gmail SMTP name: Your name
- Username: Your Gmail Address
- Password: Your Gmail Password
- Gmail SMTP server ports: 587(TLS) and 465(SSL)
- Use Authentication: Yes
- Use secured connection: Yes
What Are the Advantages of Using Gmail SMTP for Sending Emails?
Although, there are plenty of players available out there, that provide Free SMTP services for sending emails or messages. But the following are some of the advantages of Gmail SMTP that give it a little edge over others. Let us see what they are.
1. Easy to Manage Emails from Other Platforms
You can manage and send emails or messages through other web applications or platforms such as Outlook or Mac Mail with your Gmail account. But for that, you have to manually configure their settings and use Gmail SMTP details, which we will discuss in a later section of this post.
2. A Significant Amount of Storage Space
Whenever you sign up for a free account in Gmail, google allocates you up to 15GB of storage space. Which is quite a significant amount of storage space to store your emails. But one thing you must not forget is that this storage space is being shared with your other Google applications such as Google Photos, Google Docs, and Google Drive.
3. Top-Notch Google Security
Google is a tech giant and has a dedicated team of the best minds around the world that continuously work on its sophisticated security system. This means that all the services provided by Google are also quite secure and protected even for their Free email services i.e. Gmail.
You can use their SMTP service over two standard ports 465(SSL) and 578(TLS).
4. Some Other Advantages of Using Gmail SMTP
- Google platform is one of the most reliable in the market and has by default blog the usage of SMTP port 25 to avoid spamming and prevent you from getting blocked by ISPs.
- It is secured by two-factor authentication.
- Google also provides an option to save the emails that you have sent via Gmail SMTP and backed up on the Google server.
- If you have a Paid Google Workspace account, you will have more premium features and services. This premium/paid plan will let you send 2000 emails per day. Whereas, if you are sending emails via Google’s free portable SMTP server, it will be limited to up to 100 emails per day. Which is about a total of 3000 emails per month.
Read: 🚩 How to Create A Free Business Email Address in 5 Minutes?
How to Enable SMTP in Gmail?
If you want to enable SMTP in Gmail, the first thing you need to do is to make sure the following details in the setup are correct.
1. Custom Setup in Your Gmail Account
- The first step is to log in to your Gmail account.
- Go to settings as shown in the picture below:
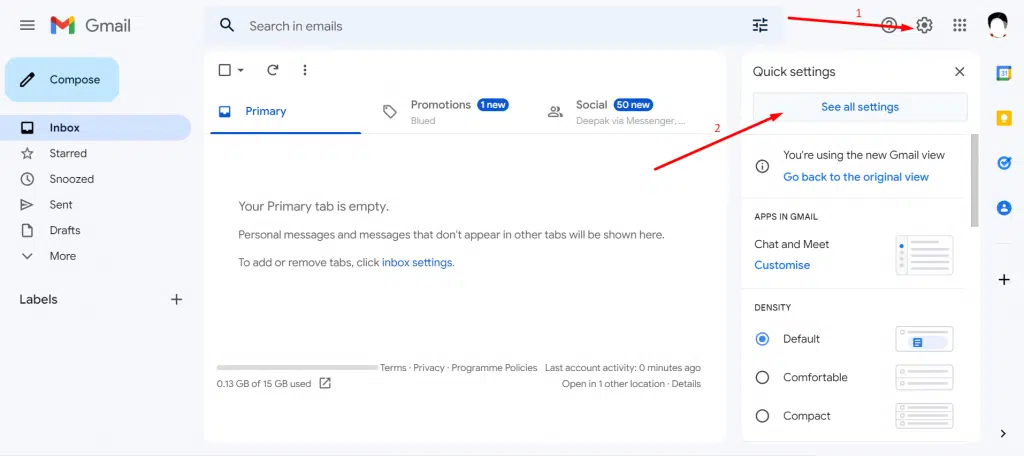
- Now on the Gmail Settings page select the” Forwarding and POP/IMAP” settings and also toggle on the option under IMAP access to enable IMAP, click on the Save changes button as shown in the image below:
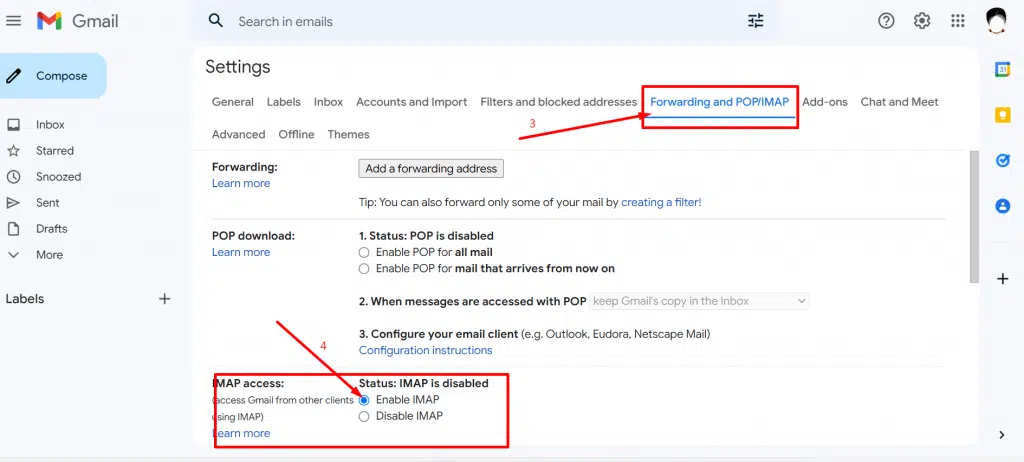
- Now after that, go back to your Gmail and click on my account as shown:
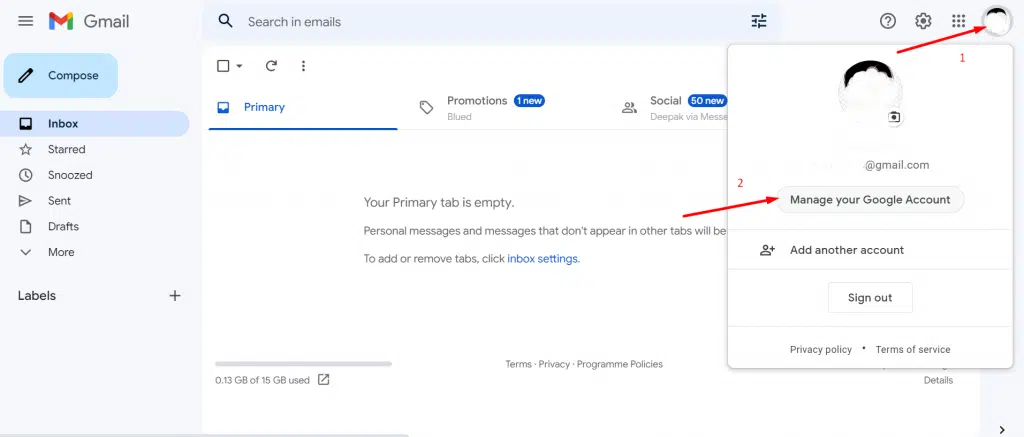
- Click on security to set up two-step verification:
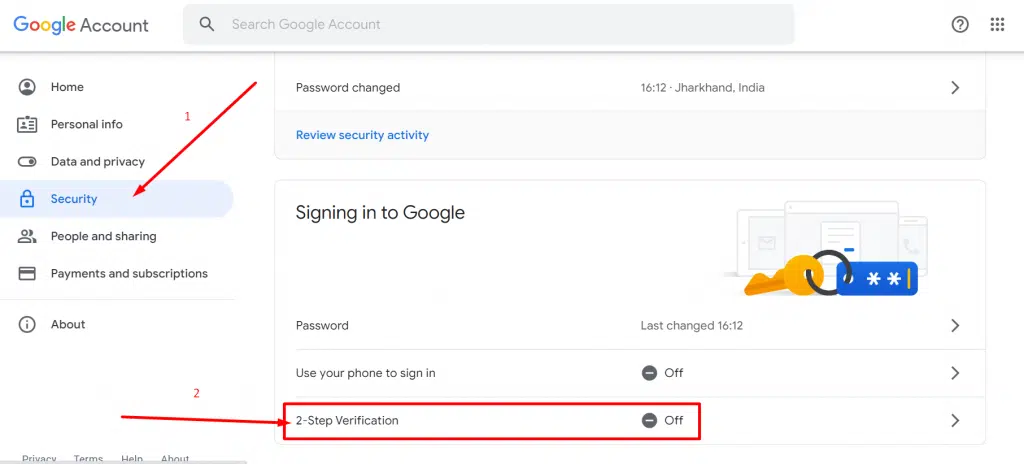
and follow the instructions as displayed on your screen.
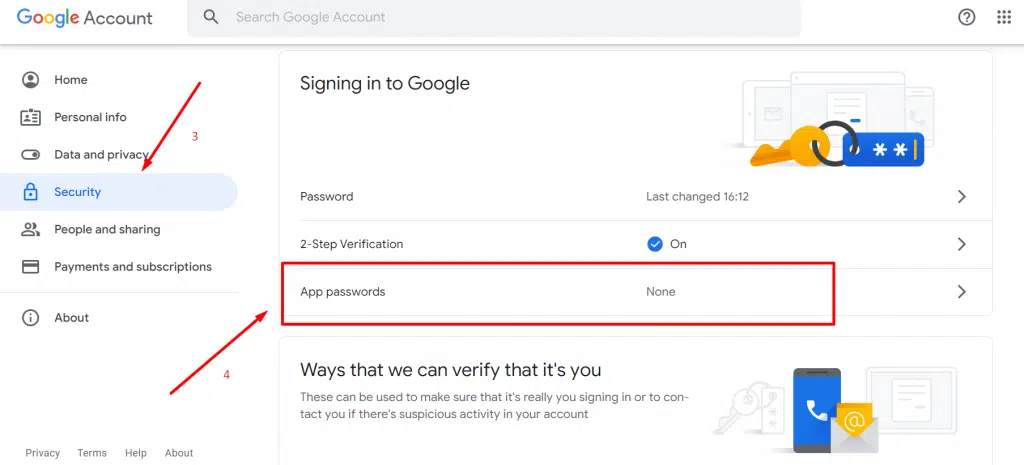
- After successfully enabling two-step verification, go back to your Google account> Security > Click on App Password as shown:
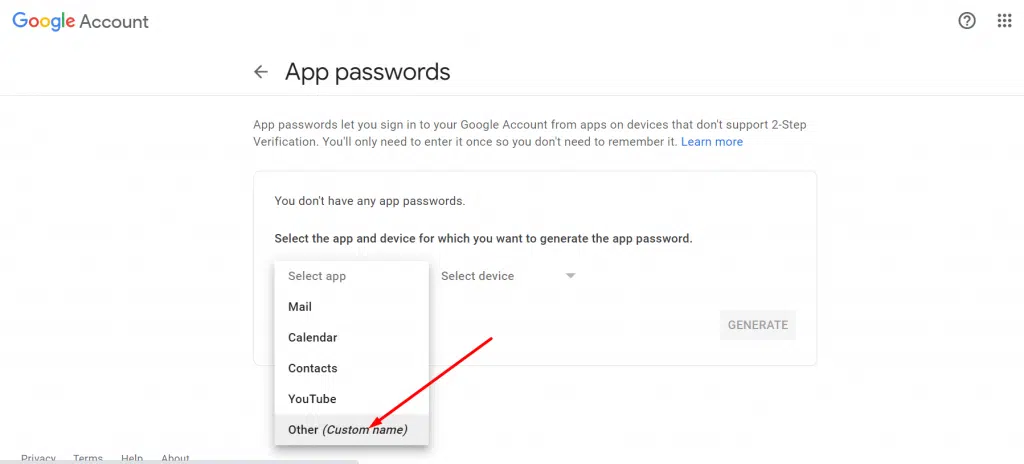
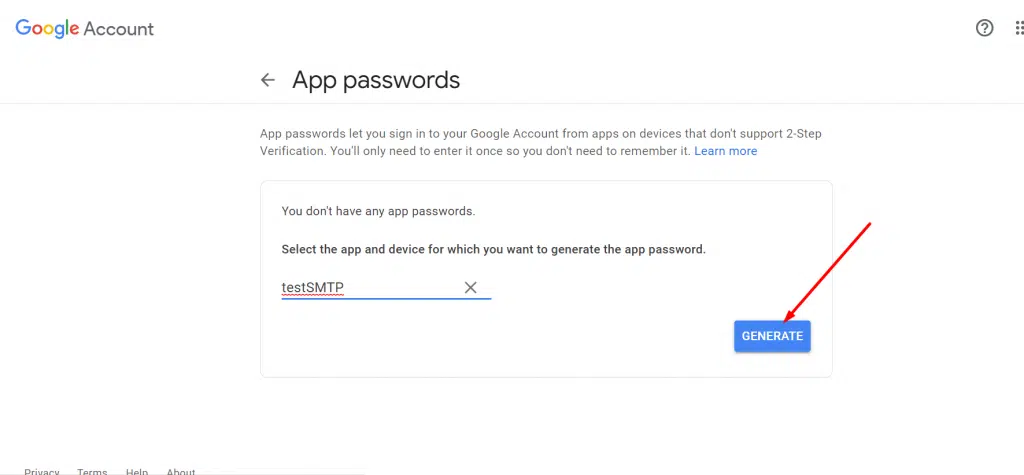
- In the next step, you will be asked to enter the Gmail password again. Select app as Other or Custom name and type any name of your app “test SMTP” followed by clicking on Generate button.
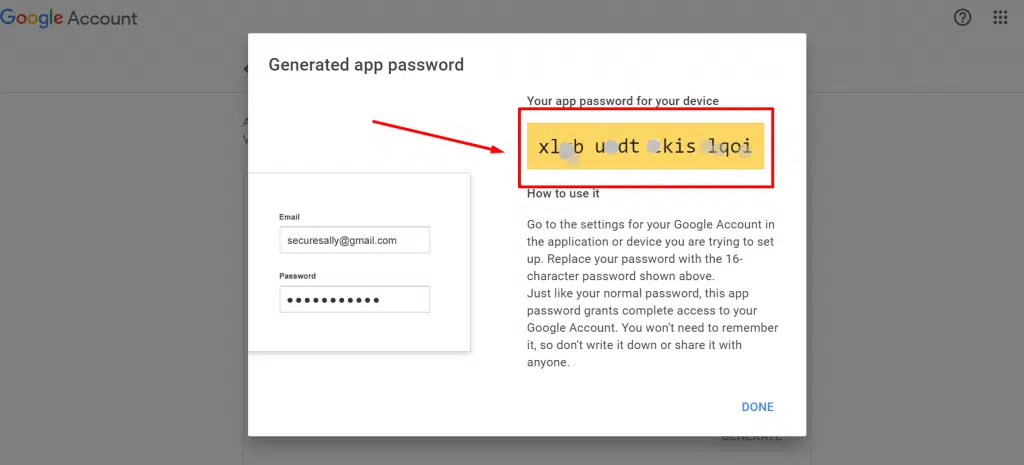
- When you click on Generate button a pop-up window will appear showing your app password for your device. Immediately copy that password and save it in your notepad.
Note: If by any chance you were not able to copy the app password and close the window, you won’t get it back again.
- Now after successfully configuring all the SMTP settings in Gmail, it is time to check whether it is working or not.
For this, you can try WPOven’s free SMTP server testing tool.
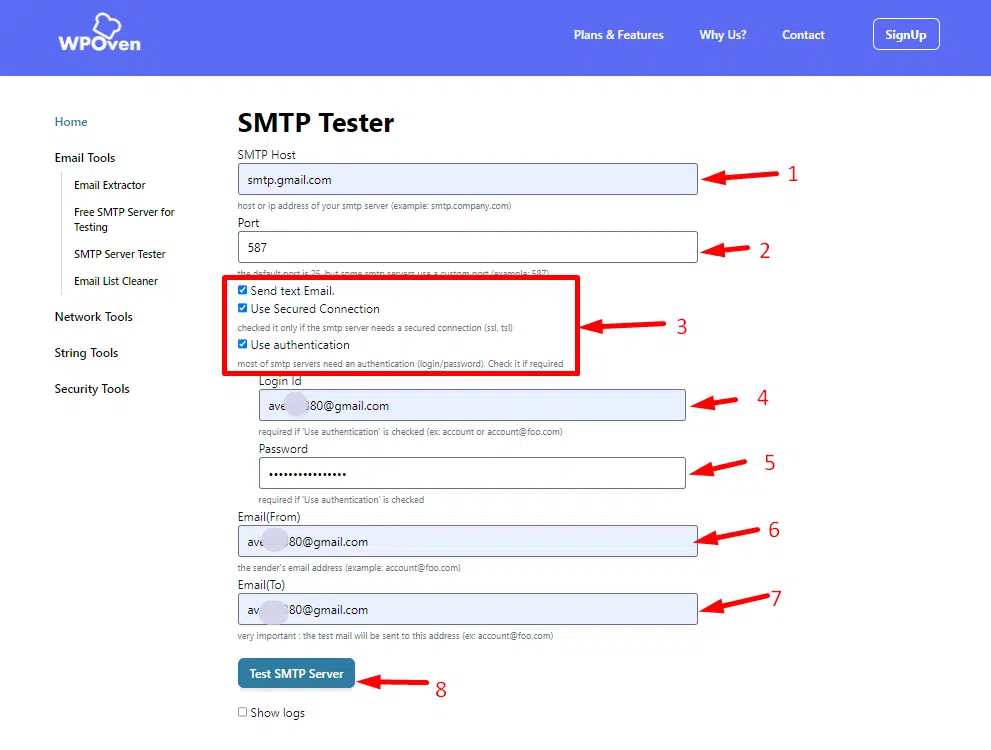
Now to run the SMTP server test, follow the instructions given below:
- Provide the name of your SMTP host i.e. smtp.gmail.com
- Enter port 587
- Check the boxes as shown in the picture above.
- Enter your login ID, i.e. your email address
- Enter the app password that you have generated.
- Enter the sender’s email address, i.e. your email address
- Enter the receiver’s email address
- Hit the Test SMTP Server button and a successful message will appear.
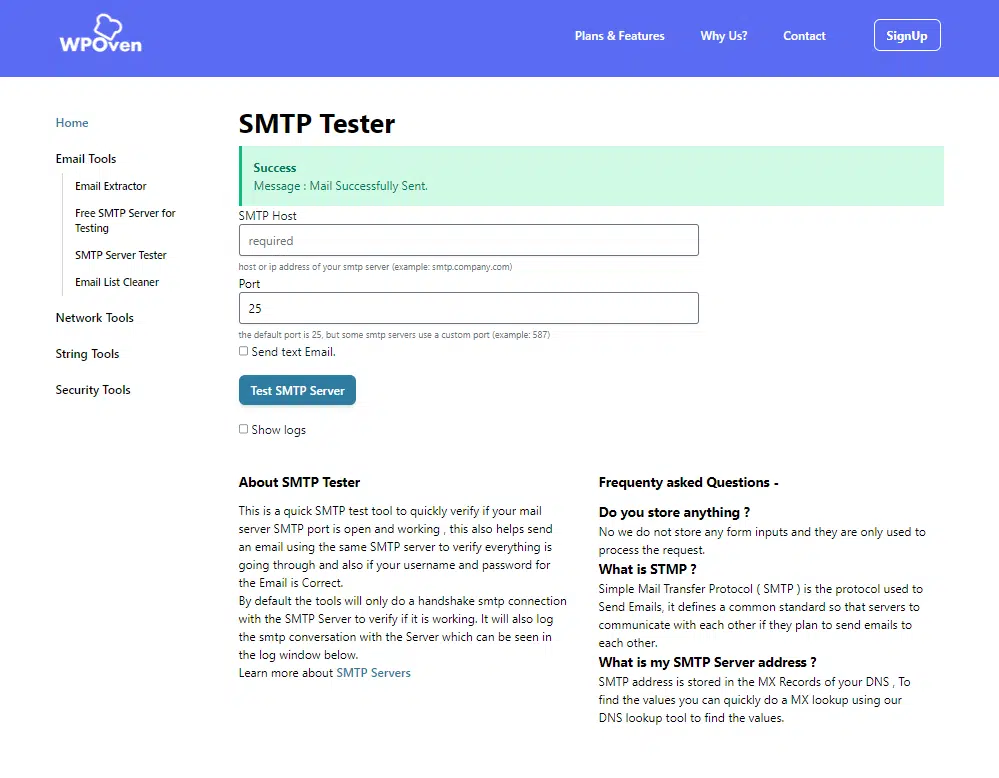
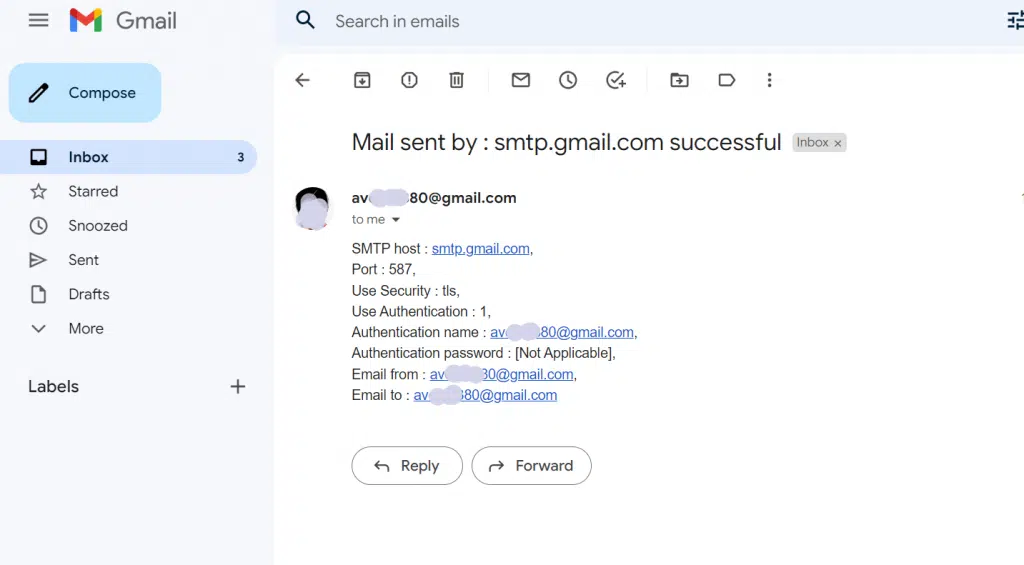
When you check back your email, you will find a message has been received by smtp.gmail.com successfully.
How Can You Use Gmail with Your Domain?
So far, you have seen how you can take advantage of the Gmail SMTP server to send messages for free with your Gmail address. This method can be most suitable for small websites or your personal use.
But if you are doing self-branding or running an online business, you should go for more professional email addresses, that represent your brand or domain.
Most web hosting companies provide email services along with their web hosting plans in which you can create a custom email for your domain name. At WPOven, you will have one free Email account with each dedicated server wordpress hosting plan and each Email account has a storage space of 5 GB.
To set up an Email account on your WPOven account:
Step 1: Log in to your WPOven dashboard click on the ‘Emails‘tab and click on the ‘Add Email’ button.
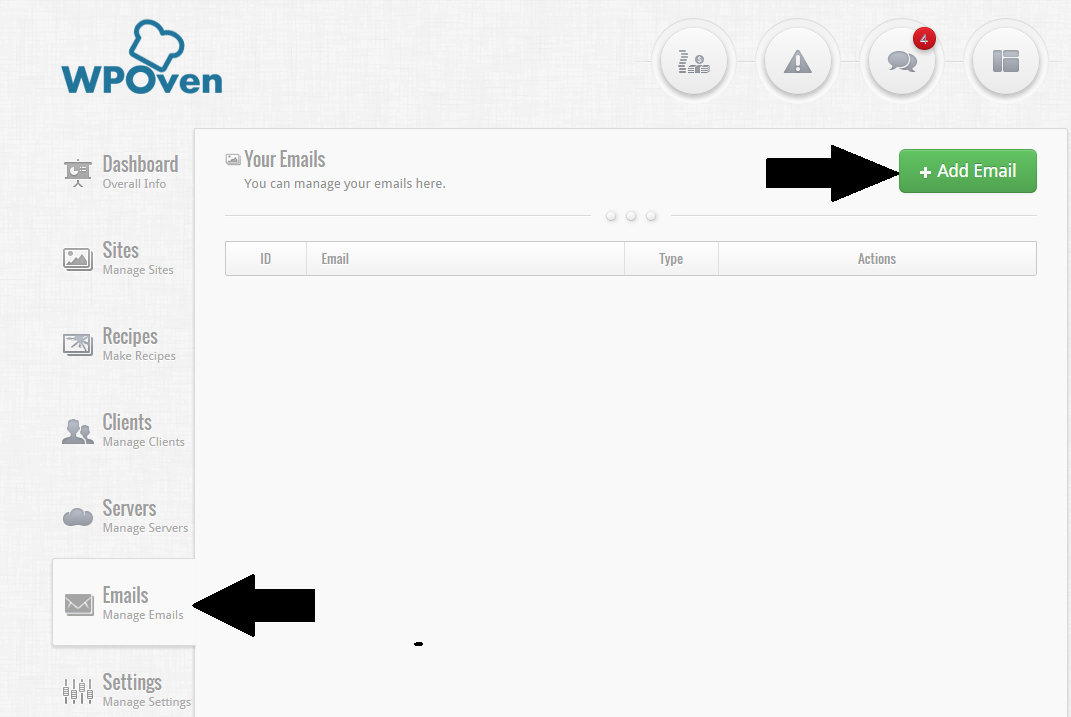
Step 2: Fill out the form and press the “Add Email” button when done.
‘Email Type ‘: This is the type of email account you wish to create. You can create either ‘Normal‘or ‘Forwarding‘ type accounts.
‘Email Account ‘: This field takes the Email account name that you wish to create with the domain name on which you require it.
‘Name ‘: Name of the Email account holder.
‘Email Password ‘: Password for the Email account.
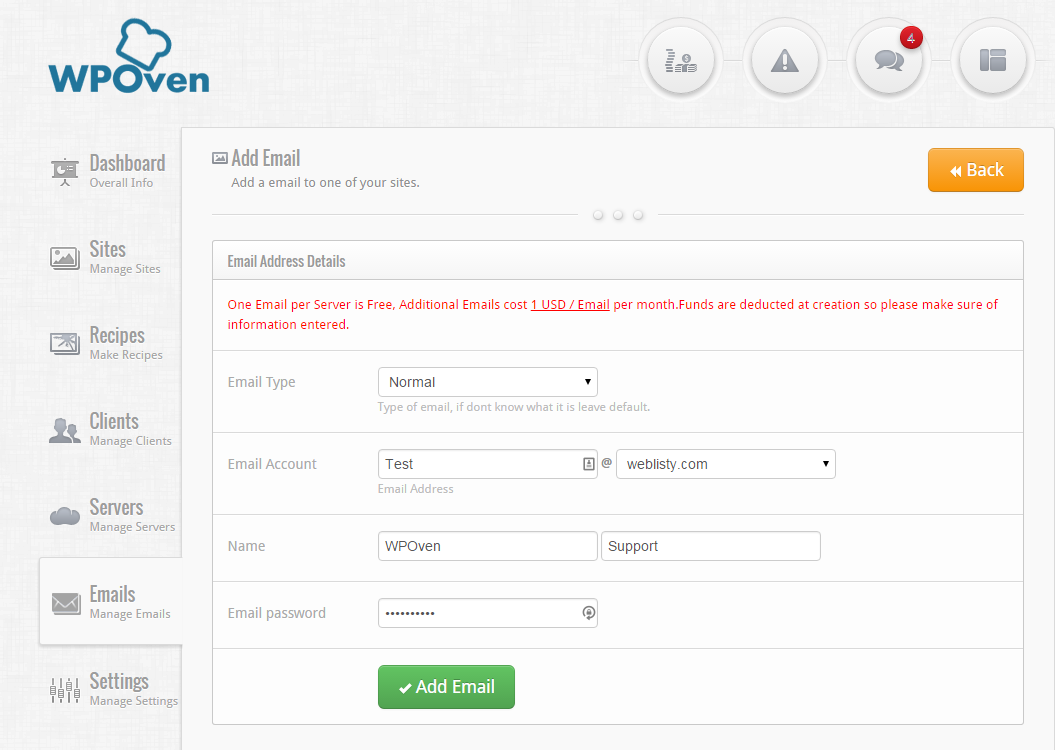
Step 3: Your Email account is now created.
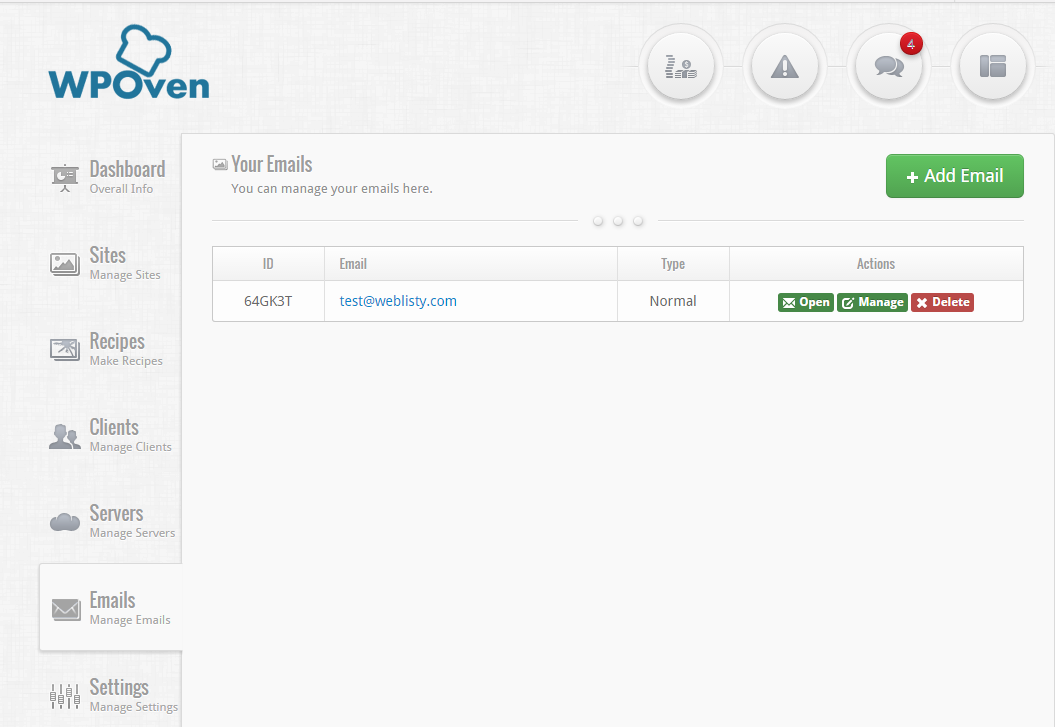
To make changes or see the DNS Details and Email Client Details of the Email account, click on the ‘Manage‘ button. These Email client details will help you with Gmail configuration.
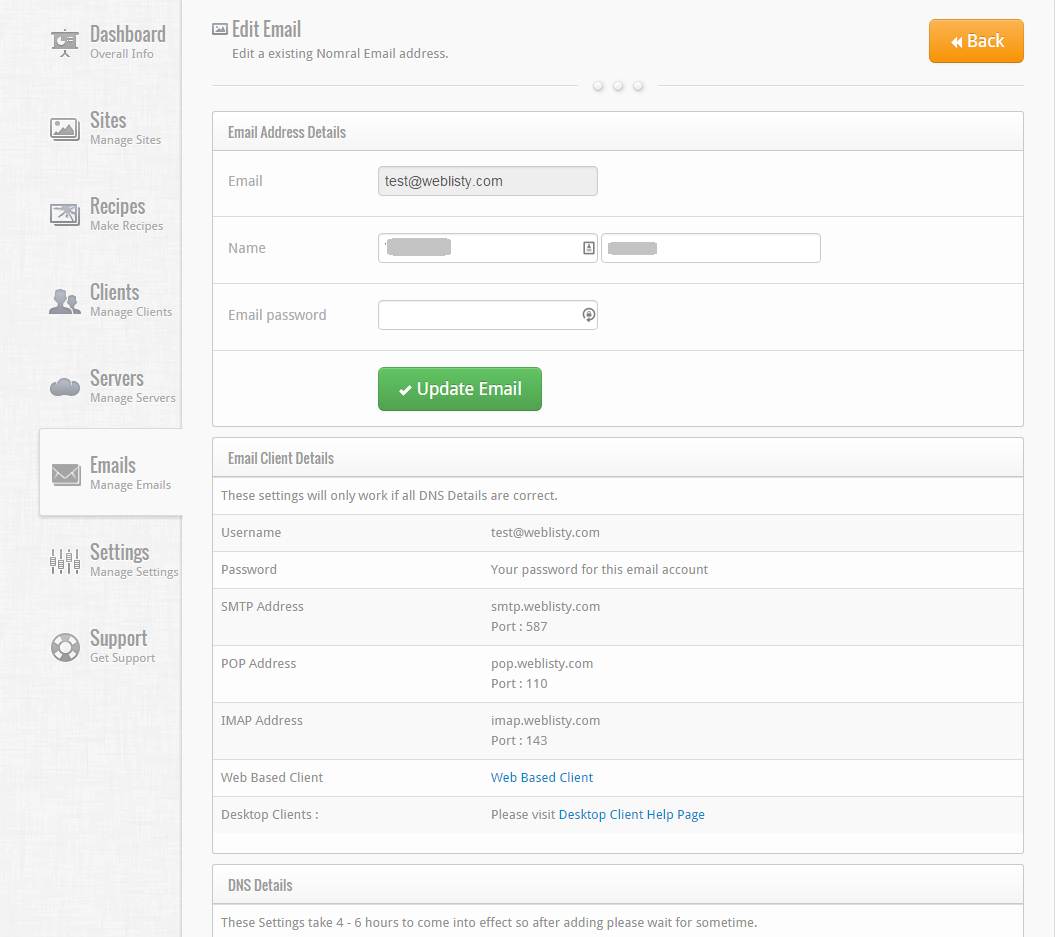
Step 4: Now you have to enable POP3 or Post Office Protocol version 3 for your mail account in Gmail. This protocol will be responsible for receiving all your emails or messages. When you do POP3 settings in your domain’s mail configuration, it commands Gmail to download all the emails from the host server.
This way, you will get all your business emails in your Gmail inbox. In addition to that, you will be free from email account storage limitations by your web host.
Go to your email account in your browser, click on the settings or gear button located in the upper right corner, and select “See all settings” as shown in the picture below:
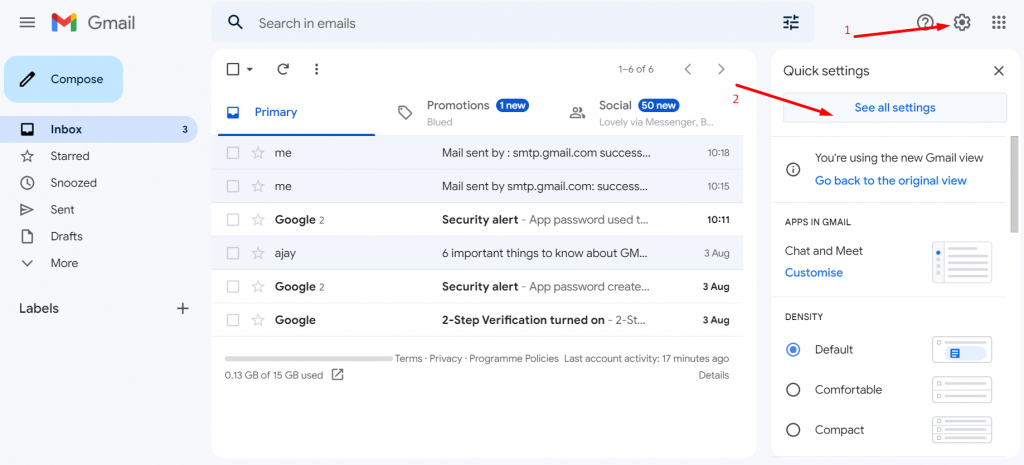
Now on the Gmail settings page, click on the accounts and import tab as shown in the picture below, and look out for “Check mail from other accounts“.

Click on the “Add an email account button” next to Check email from other accounts. A pop-up window will appear in which you will have to enter all the configuration details.
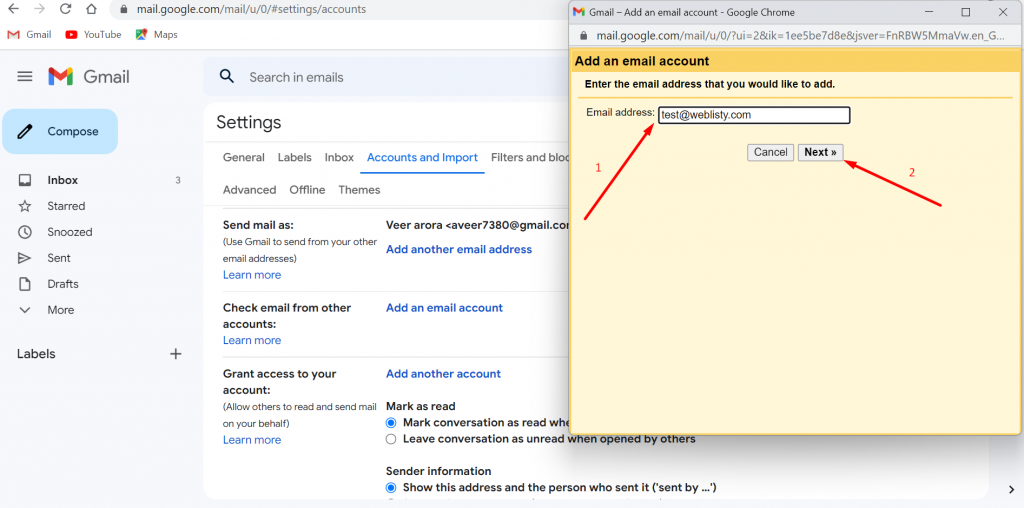
In the next step check the “Import emails from my other account” that enables Gmail to import all the messages and emails from your other accounts using POP3.
The next step is to allow Gmail to “Import emails from your other account” using POP3.

Now Gmail will ask you to provide all your POP configuration settings for your domain email address. For WPOven users,
- Username: [email protected] (Here you will have to enter the email that you have created in the web host)
- Password: email account password that you have chosen for this email address
- Incoming server: pop.weblisty.com
- POP3 port: 110

Note: Replace [email protected] with your email address. Here we took test@weblisty as a demo to show the whole process.
Check the boxes ” Leave a copy of the retrieved message on the server“, “Always use a secure connection when retrieving mail” as well as “Label incoming message“. When everything is done, click on the “Add Account” button and Google will ask for confirmation whether it has been added to your email account or not.
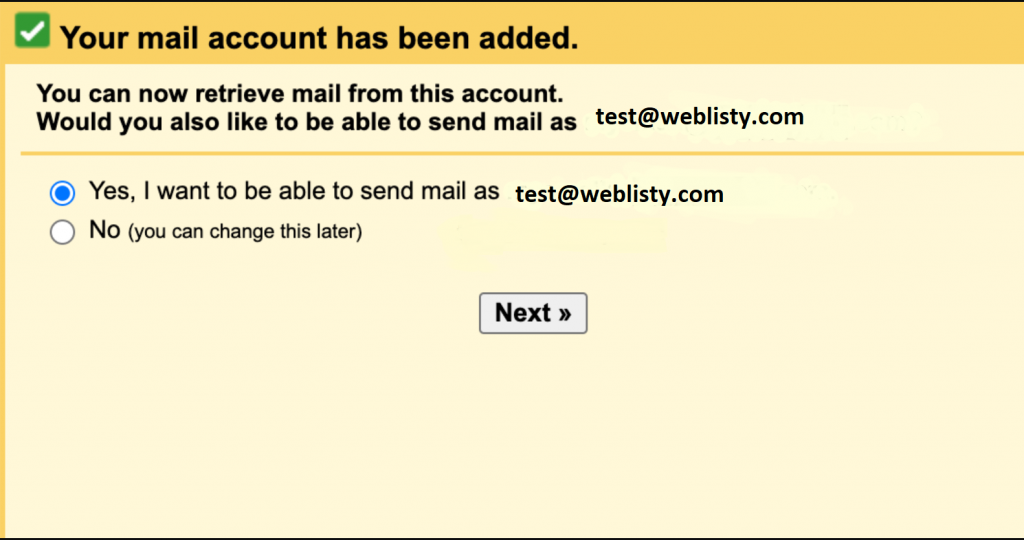
After successful confirmation, Gmail will download all the emails from your email hosting and start reflecting them in your Gmail inbox and a copy of these messages will remain on the server. Now, you will be able to access them and read the content. But you won’t be able to reply to these messages or emails just yet.
How to Enable Replying to Emails?
Step 1: To enable replying to emails and messages, you have to enable SMTP service. As you can see in the image above, Even Gmail will ask you if you want to be able to send mail from your same email address. If you check the box, Gmail will treat other email addresses as a sobriquet.
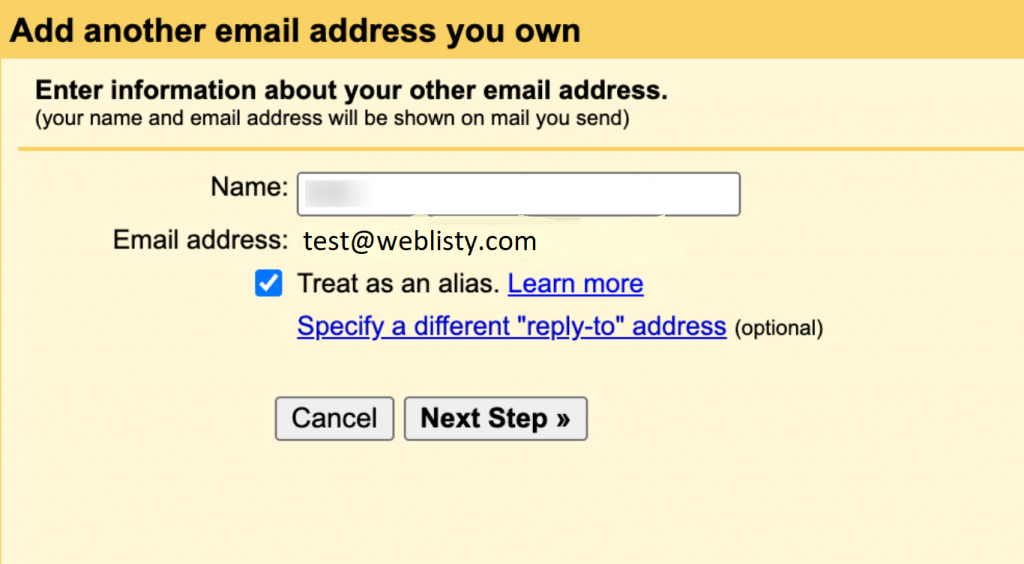
Step 2: After you confirm this, you have to check the box “Treat as an alias” and click on the “Next Step” button. Gmail will ask you for your server’s SMTP settings, such as:
- SMTP server: smtp.weblisty.com
- SMTP port: 587
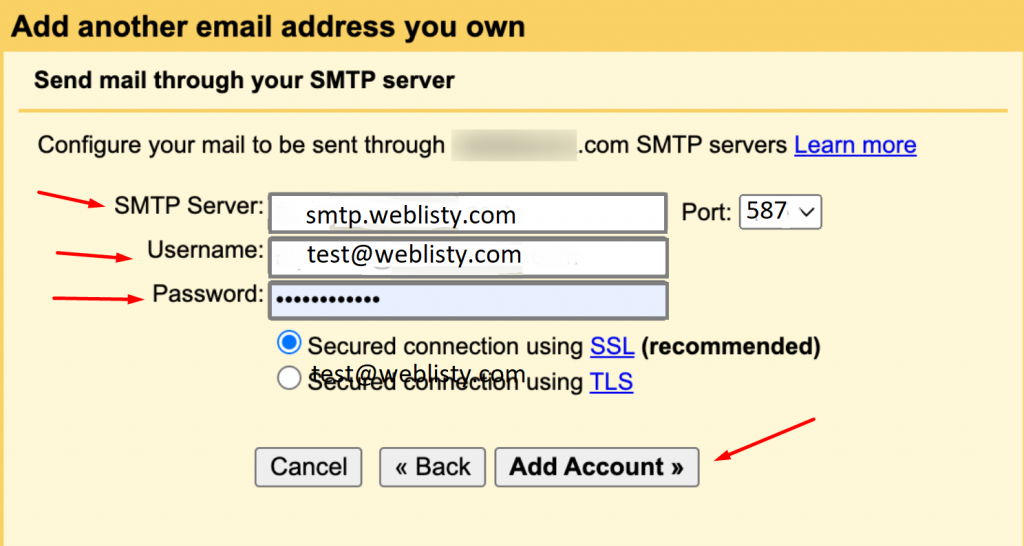
Step 3: Now this is the last step and, in this step, you have to verify your domain name with Gmail. To do so, you have to click on the link you will receive in the inbox of your Gmail.
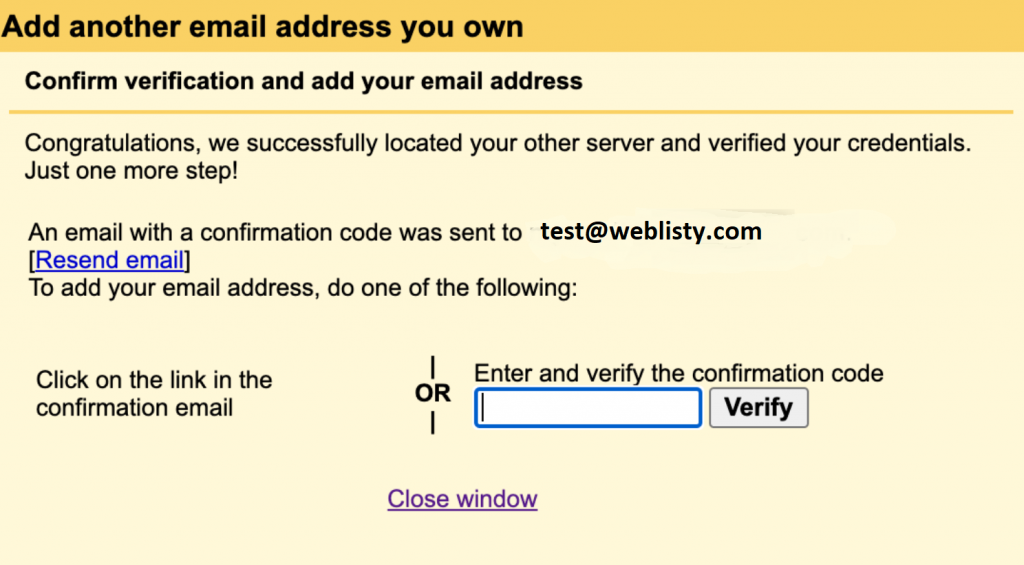
When you click on the link, it will open in your browser tab and ask you to confirm.
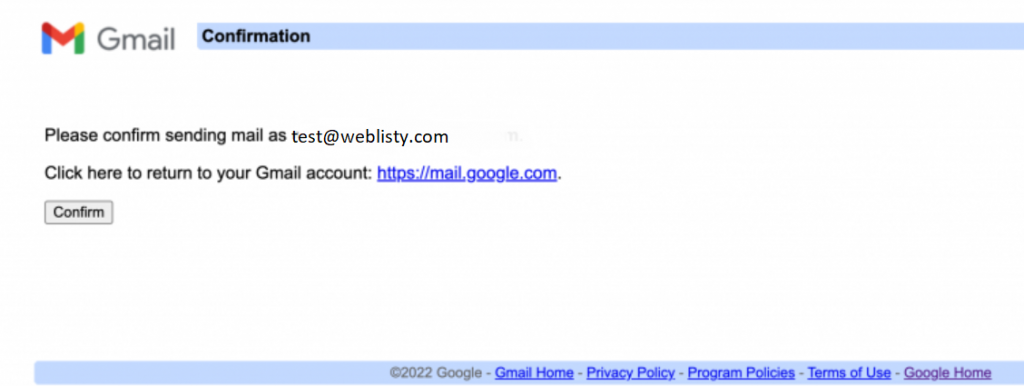
After confirming, you will be ready to manage and access all your website emails directly through your Gmail account.
How to Set Up Your WordPress for Sending Email Via Gmail SMTP Server?
Now, if you want to send emails directly from your WordPress install Free, then this method will definitely work like a charm for you and it also enhances your website’s reliability.
To do so, the first thing you will require is to create a Google app that helps you to establish a connection with the Gmail SMTP server using API rather than using SMTP credentials.
The whole setup process is quite lengthy and you will find there are a lot of steps involved. So, be ready to spend almost 1 hr. in the complete setup process.
Apart from creating a Google App, you will be also required to use a WordPress SMTP plugin along with it. There are plenty of Free SMTP plugins available in the WordPress repository. But in this guide, we will use the Post SMTP Mailer log plugin that supports Gmail API.
Step 1: Download and Install the Post SMTP Mailer Log Plugin
Login to the WordPress site > Go to plugins > Add new > search “Post SMTP Mailer” in the search box and install the plugin as shown in the screenshot below:
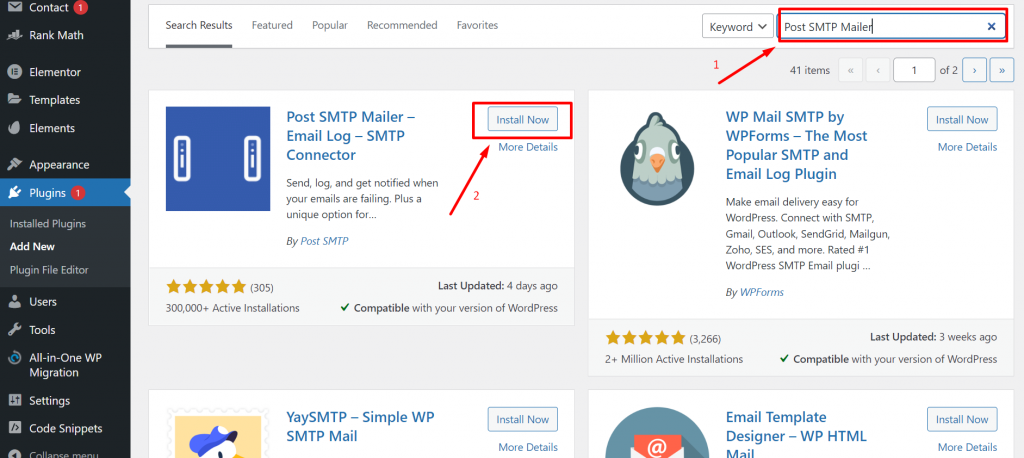
After successfully installing and activation, go to the SMTP tab, which will start reflecting in your WordPress dashboard, and click on the ” Show All settings” link as shown below:
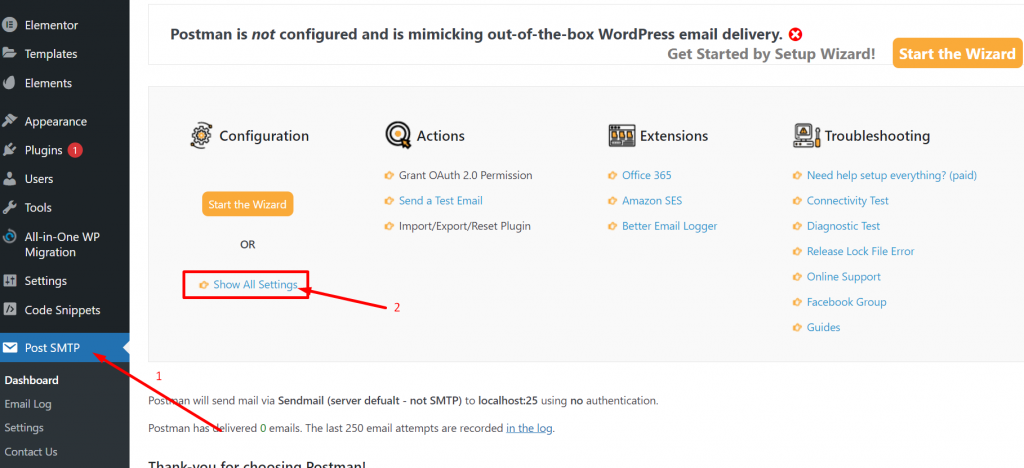
After that click on the message tab and enter your name and email address or any different email address you prefer, followed by clicking on the “Save changes” button.
Now, click on the Account tab and select Gmail API in the “Type”. Below it, you will see an Authentication section in which you have to keep the page open for a while. Because you will require Authorized JavaScript origins and Authorized redirect URL credentials in the upcoming steps.
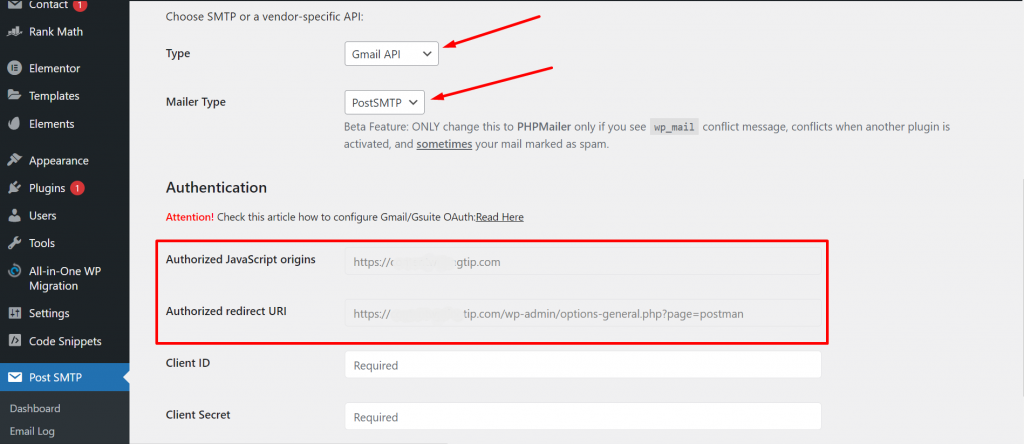
Step 2: Creating A Google App
In the second step, you will need to create a Google App, which lets you send emails from your WordPress site securely using the Gmail API. This step can be a little tricky and sophisticated but you do not need to worry. Just follow the steps and see the screenshots, you will easily get through it.
First, you have to go to the Google Developers console. To create a new project, click on the “Google Review embedding” as marked by “1” in the screenshot below. However, if you are the first-time logging into the Google Developers Console, a prompt message will ask you to create a new project directly :
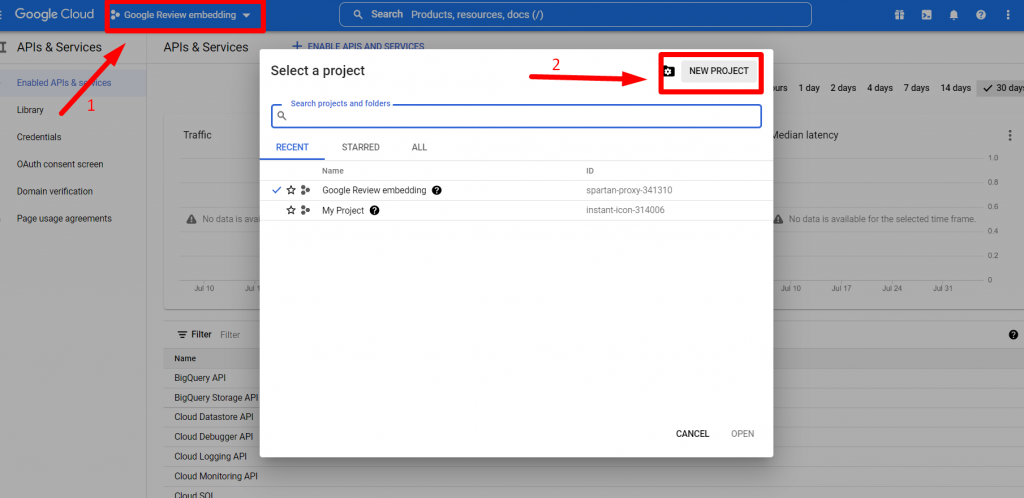
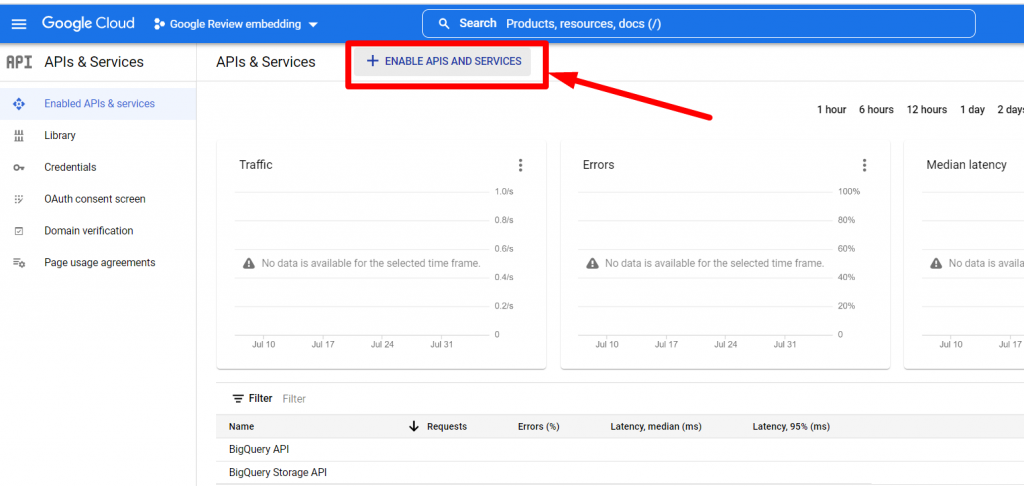
After creating a new project click on “Enable APIS and services”. which will prompt you on an API library.
In the API library search for “Gmail API” in the search box.
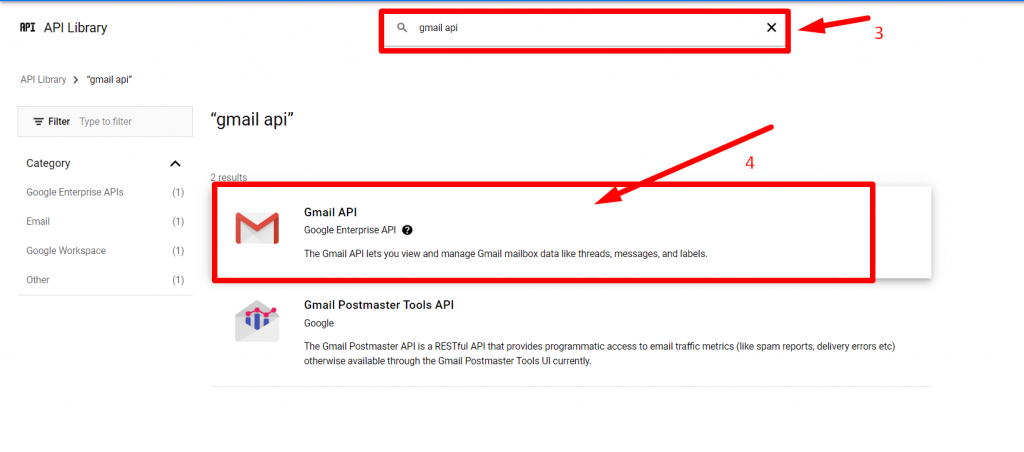
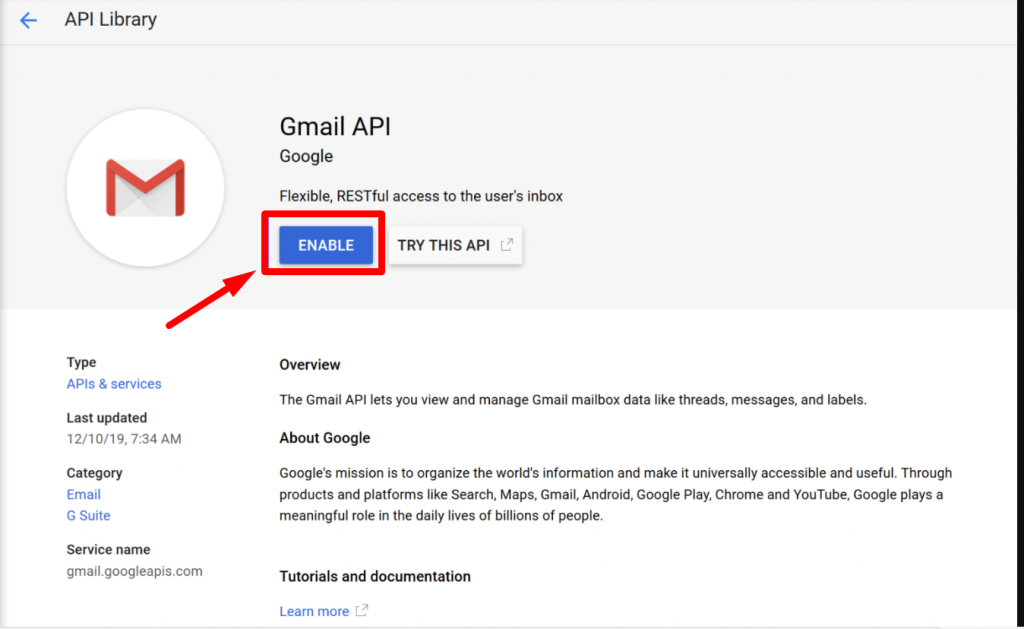
The Gmail API result will show on your screen and then click on the “Enable” button.
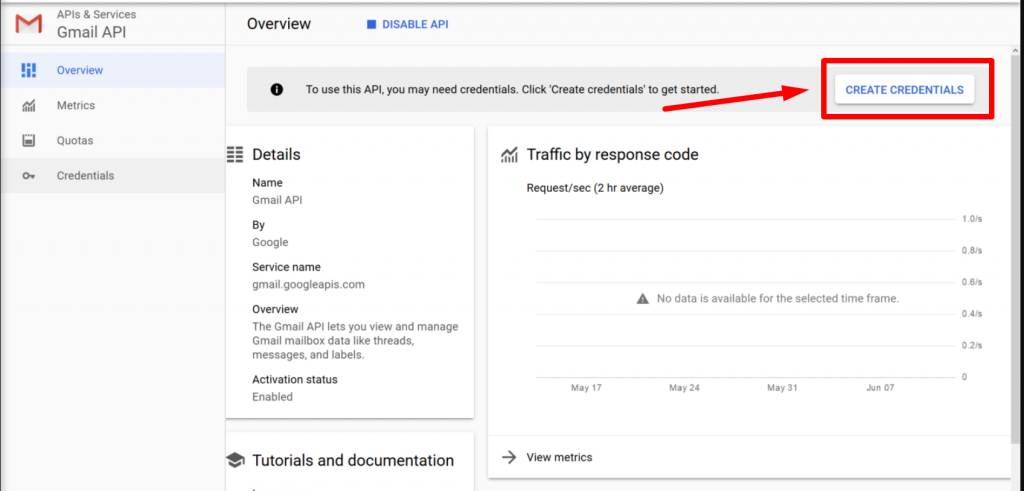
After that, you will find a dedicated interface for the Gmail API, on which you have to click on the “Create credentials” button.
On the Credentials page you will, different questions that you have to answer accordingly:
- Select Gmail API for the question “Which API are you using?“
- Select Web Browser (javascript) for the question “Where will you be calling the API from?”
- Check the “User data” for the question “What data will you be accessing?“
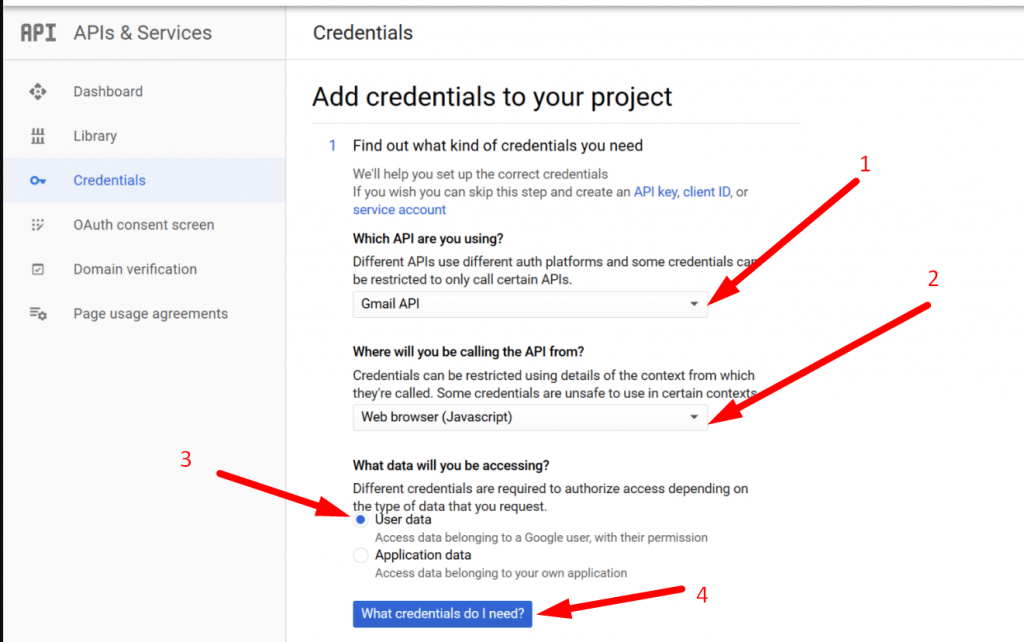
After answering the above three questions, click on the What credentials do I need? button. A prompt-up window will appear on which you have to select the “set up consent screen” option.
Note: All the information entered by you will be used only for your WordPress site.
This will open a new tab where you have to configure the OAuth consent screen. Keep all the previous tabs open, because you have to go back to them immediately.
In the User type section, check the “External” option as shown and click on the “Create” button.
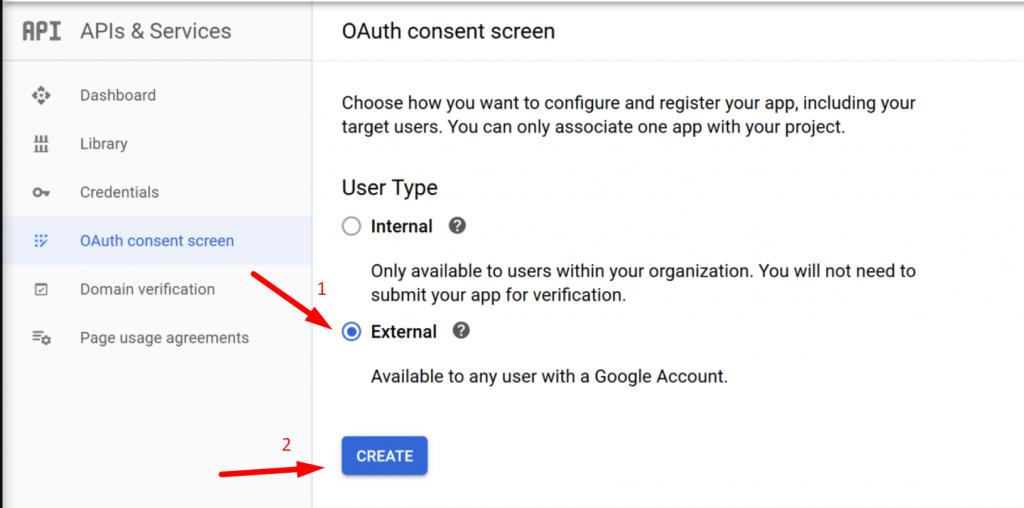
After that, you have to enter some basic information for your site on the next screen. On the other note, do not hesitate while entering your basic information on this page because you are the only person who can see this.
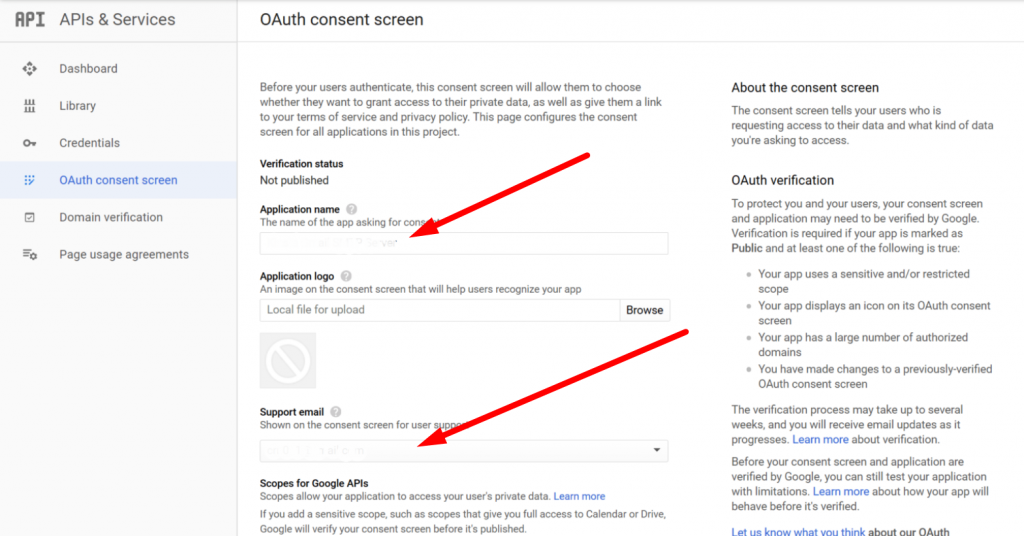
Enter your application name and Support email, after that click on the “Save” button at the bottom.
Now, move back to the previous ” Add Credentials to your project” tab and enter the following information into it such as:
- Name: The name of your website or anything else which is easier to remember
- Authorize JavaScript Origins: You will find these details in step 1, i.e. in the Post SMTP mailer plugin settings.
- Authorize redirect URLs- You will find this information in step 1. i.e. in the Post SMTP mailer plugin.
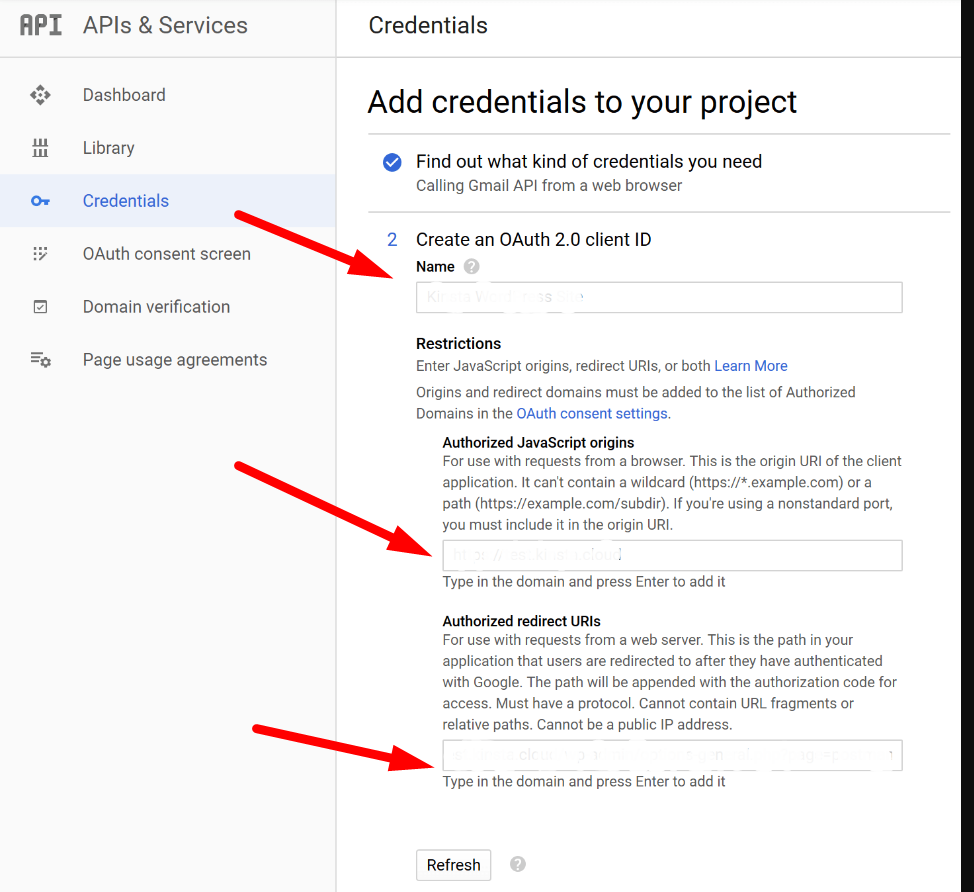
After entering all the details, click on the “Refresh” button located at the bottom of the page. The Refresh button will immediately change to “Create OAuth client ID”, click on that and click on the “Done” button to finish the process.
Once you click on the Done button you will find OAuth 2.0 client IDs section on your Credentials tab. Click on the name of the project that you have just created as shown below.
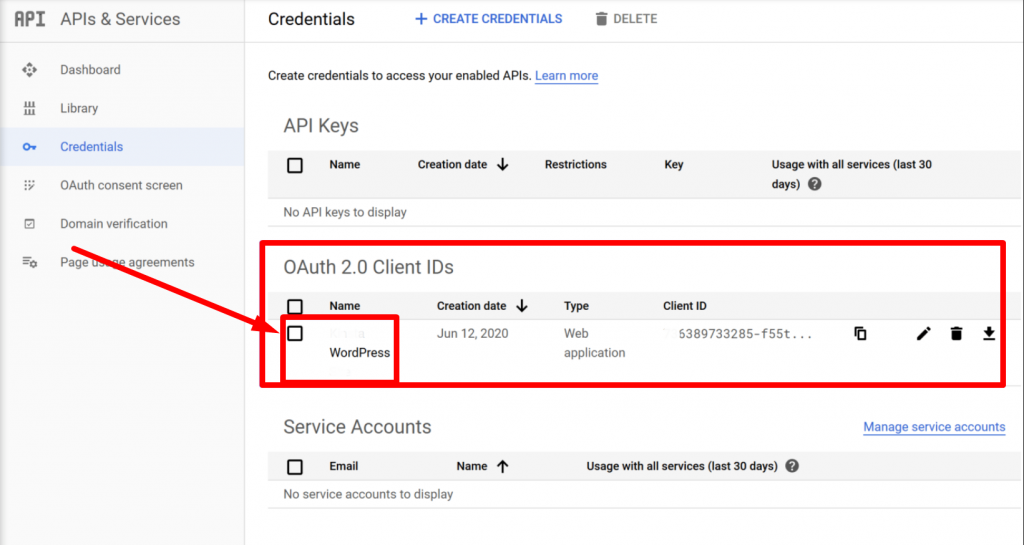
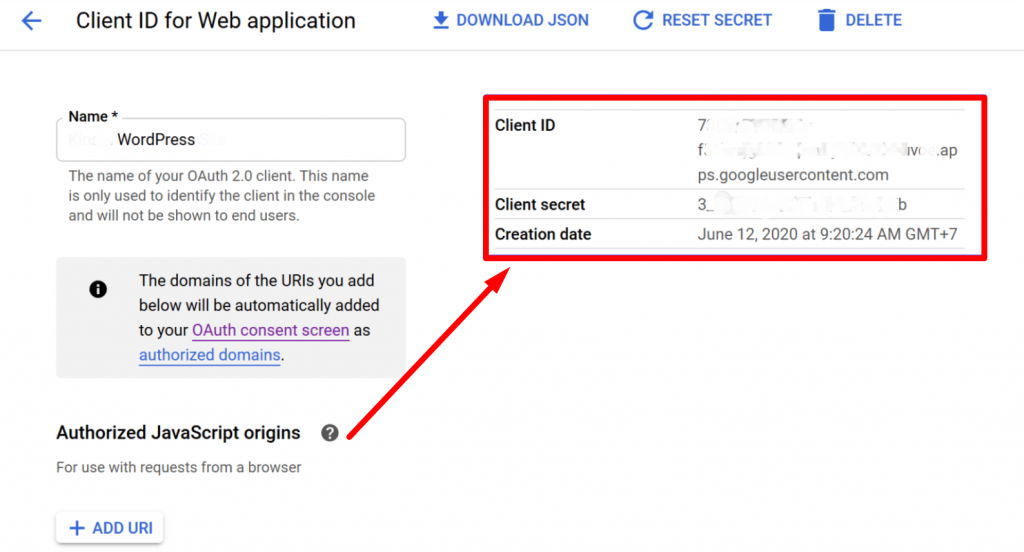
And note down or Copy the client ID and Client secret on a notepad, which you will be required later on.
Step 3: Adding the Created Gmail App Client ID to the Post SMTP Mail Plugin Credentials
Now here comes the final step, go back to your post-SMTP mail plugin settings in your WordPress dashboard paste the client ID and client secret that you have copied in the above step, and click on the “Save changes” button.
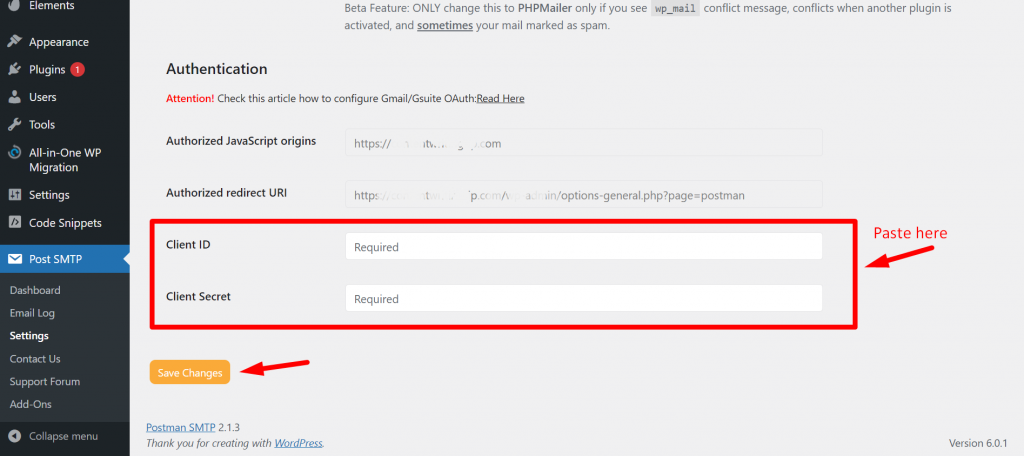
When you click on the “Save changes” button, the plugin will ask you to grant permission to Google.
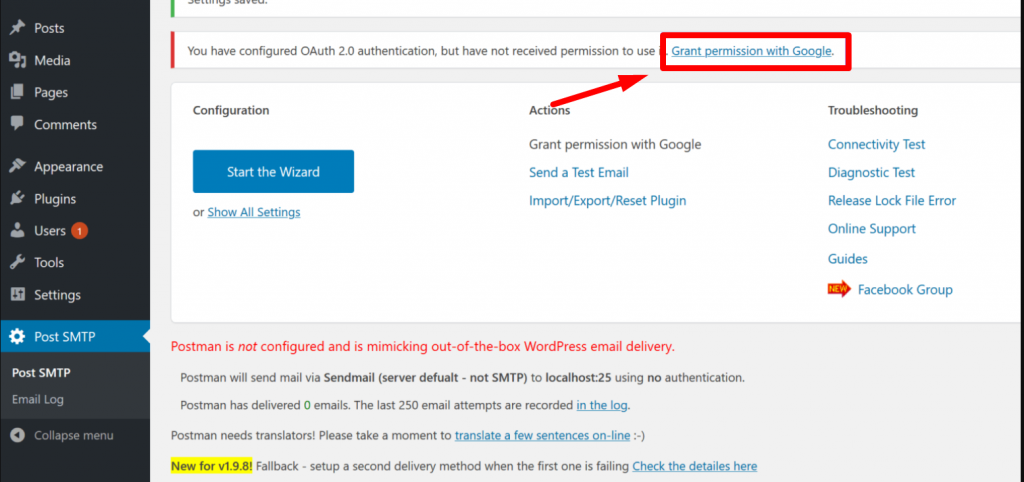
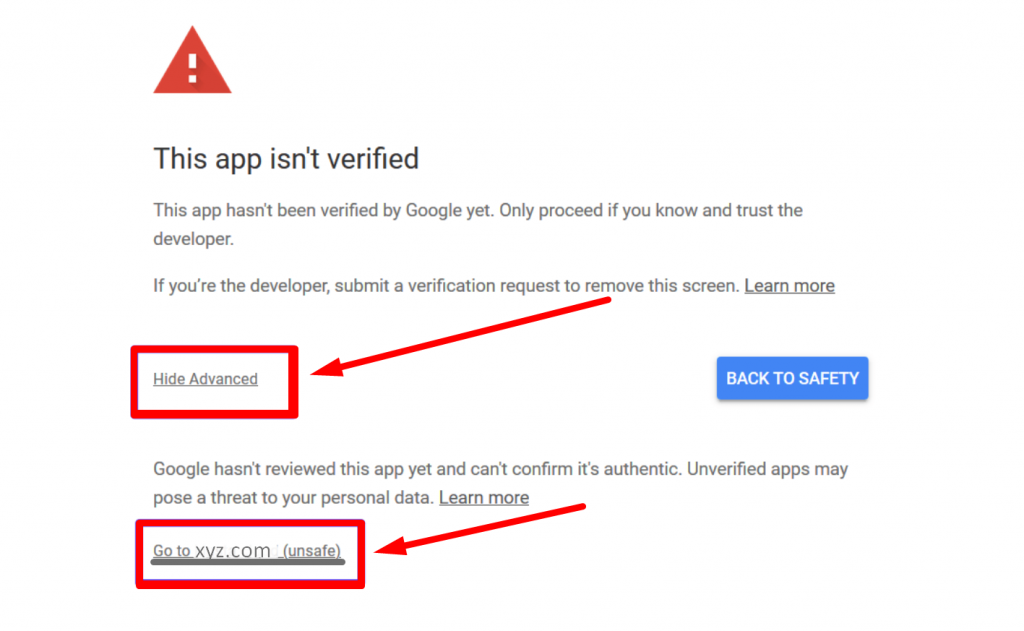
When you click on the grand permission link, Google will initiate a typical authorization process. During the process, it may show you a warning message, but you do not need to worry about it. It is because you have not submitted your app to Google for review, hence it will show you a warning message stating ” This app isn’t Verified“.
Since the app is for your website use only and not for the public domain, you can ignore that warning message by clicking on the “Advanced settings option and again clicking on the “xyz.com(unsafe)” link which completes the authorization process.
After that, everything will be regular but you have to ensure that you must select the Allow option that enables your WordPress site to have access to your Gmail account. This permission will let you send emails through the Gmail SMTP server.
Now you are done, the only thing left is the testing part.
Step 4: Check Whether the Gmail SMTP Server Configuration Is Working
Once the setup is done, it is time to check whether the Gmail SMTP server configuration is working or not. Even the Post mailer plugin has the option to send a test mail. The only thing you have to do is to go to the WordPress dashboard and click on the Post SMTP tab.
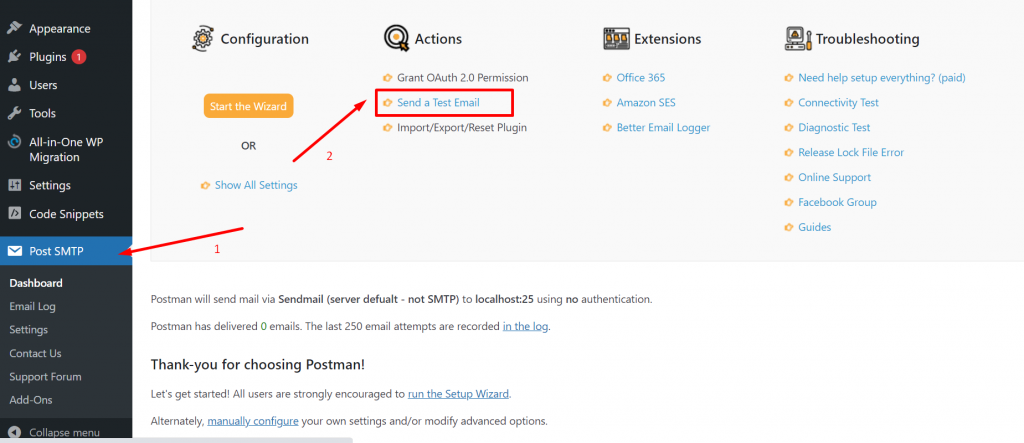
Enter the Recipient’s email address and click on the “Next” button. Then you should see a success message on the same plugin interface as shown in the picture below:
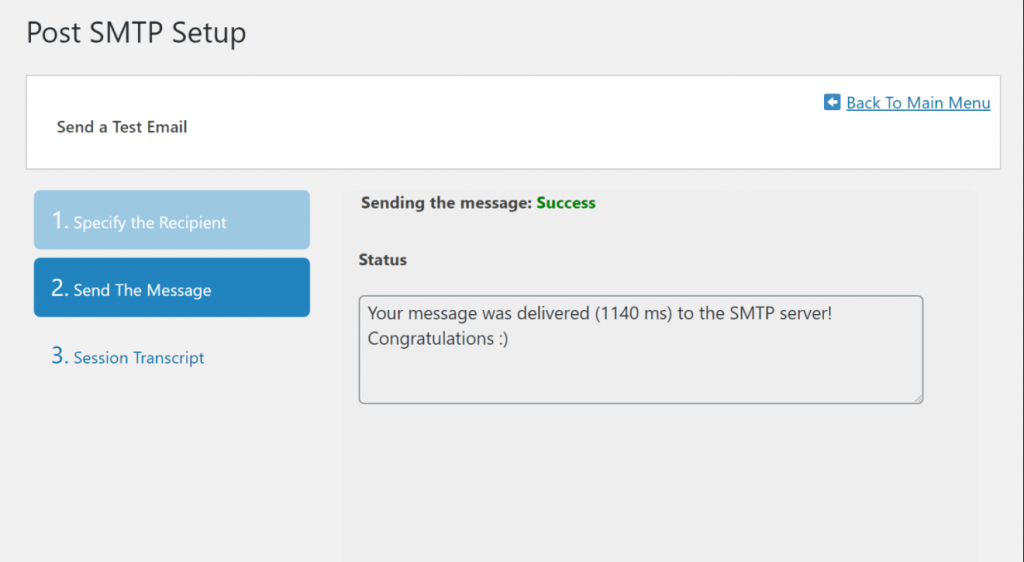
You can even cross-verify by checking your email inbox and there should be a test email received. If everything goes well, it means you have set up things correctly and you are done with Gmail SMTP server configuration.
Summary
Now from the above post, you have seen the Gmail SMTP server lets you send emails directly via your Google account and secured Google servers. On top of that, you can also enable SMTP in Gmail, use the Gmail SMTP server with your domain, and even send emails through the WordPress site.
Although the setup and configuration part can be overwhelming, after going through this ultimate guide, I hope things become a lot easier and simpler for you to understand.
Even if you have any queries about the Gmail SMTP server or Gmail SMTP not working, please do let us know in the comment section below:
Frequently Asked Questions
How do I find my Gmail SMTP server?
To use the Gmail SMTP server properly, here is a list of details you need to consider:
1. Gmail SMTP server address (outgoing): smtp.gmail.com
2. Gmail SMTP name: Your name
3. Username: Your Gmail Address
4. Password: Your Gmail Password
5. Gmail SMTP server ports: 587(TLS) and 465(SSL)
6. Use Authentication: Yes
7. Use a secured connection: Yes
What is SMTP Server for Gmail example?
The SMTP server for Gmail is as follows:
1. Gmail SMTP server address: smtp.gmail.com
2. Gmail SMTP name: Your name
3. Username: Your Gmail Address
4. Password: Your Gmail password
What is Gmail Host name?
The Gmail hostname is pop.gmail.com, the username is your complete email address and the password would be the password of your email account.

Rahul Kumar is a web enthusiast, and content strategist specializing in WordPress & web hosting. With years of experience and a commitment to staying up-to-date with industry trends, he creates effective online strategies that drive traffic, boosts engagement, and increase conversions. Rahul’s attention to detail and ability to craft compelling content makes him a valuable asset to any brand looking to improve its online presence.

![How to Fix "SMTP Error: Could not Authenticate"? [6 Methods] SMTP error Could not authenticate](https://www.wpoven.com/blog/wp-content/uploads/2023/05/SMTP-error-Could-not-authenticate.png.webp)
![How To Resolve WordPress Not Sending Emails Issue? [2023] wordpress not sending emails](https://www.wpoven.com/blog/wp-content/uploads/2022/04/How-To-Resolve-WordPress-Not-Sending-Emails-Issue.png)

