Implementing Google AdSense on WordPress is the ultimate solution to generate passive income from your WordPress Website. It allows Web admins to put their website space on rent for advertisers to show their ads on your website. Therefore, Google Adsense has become one of the easiest ways to start generating income online.
Similarly, if you want to make more than just blogging, pushing content, and increasing your follower base from your website. Google Adsense on the WordPress website would be a great choice for you to generate easy income. You just need to learn the basics of Google Adsense on WordPress and How it works. In this article, we try to cover all the aspects of Google AdSense and try to provide you with a detailed comprehensive solution on How you can implement it on your Website and many more.
Just keep reading this article and find many more about Google AdSense.
What is the meaning of Google AdSense?
Google AdSense is a program run by Google through which Advertisers or various publishers try to implement display marketing on Websites that are available in Google networks through videos, texts, GIFs, ad banners, or other interactive media, that are especially targeted for audiences or particular type of content.
The whole process is being monitored, filtered, and administered by Google itself, hence it is a hassle-free process without intervening with advertisers or asking for the money. The Google admins deal with the various advertisers or publishers and receive payment deduct processing fees and send it to the Website owner.
The whole monetary works on the CPC value. A CPC or Cost per click is a parameter for ads to determine the value of a single click that visitors click on the ads. It means an amount of money you earn whenever a visitor clicks on the ads or the links provided with ads on your website. However, the value of CPC varies from time to time depending upon a lot of other factors.
Some Pros and Cons of Using Google AdSense on WordPress
Pros
- Free to implement
- The whole process is completely Administered by Google.
- You can put ads on multiple websites from a single account.
- You can even customize and choose how the ads will appear on your website.
- Good source of Passive income, Hence no need to put extra effort into it.
Cons
- You can only get paid once it has reached a threshold minimum amount of $100.
- You are completely abiding by the policies of Google and cannot use other Ads services along with Google.
- Your Google Adsense account can be terminated or suspended if found in any violation of Google policies or any misconduct.
- You can only earn a good amount if your website receives high traffic and ranks higher in SERPs.
- Visitors found ads irritating as well as annoying.
Hence, if your website receives a higher number of visitors, then you must not let this opportunity earn extra money from it.
How you can create a Google Adsense account?
- The first and foremost step to implement Google AdSense on WordPress is to create a Google AdSense account first. Go to https://www.google.com/adsense/start/, and click on the Get started button as shown in the picture below.

- When you click on the ” Get started” button, the page will start loading to a new page asking for some information about Your Website name and your email address click on the check box to select whether you want to receive any customized help and suggestions from Google or not.
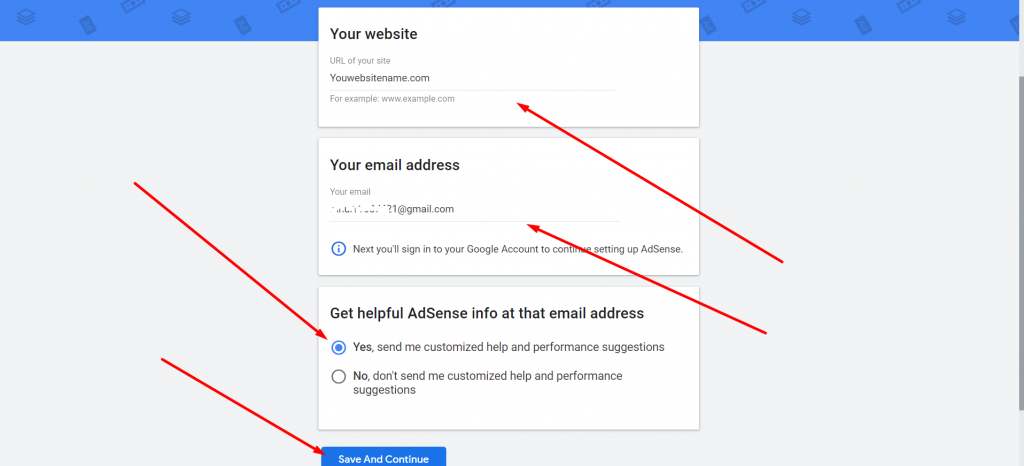
After filling up all the required information click on the save and continue button.
- Select your country and territory on the next page, Read Google Adsense terms and conditions, and mark the checkbox to agree. After that click on the Create Account button to proceed further.
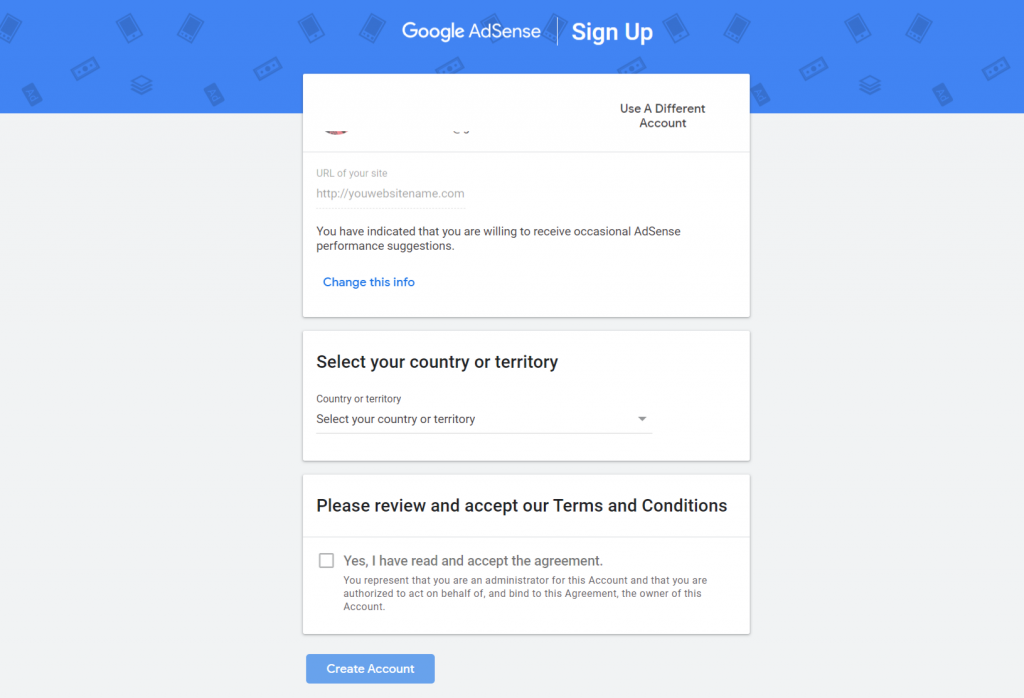
- Depending on country to country, Google may try to verify your Google Adsense account via SMS or call your registered mobile number.
After completing all the above steps, the page will be directed to the Google AdSense panel. Which will take you through the process of setting up your account. Click the Get Started button.
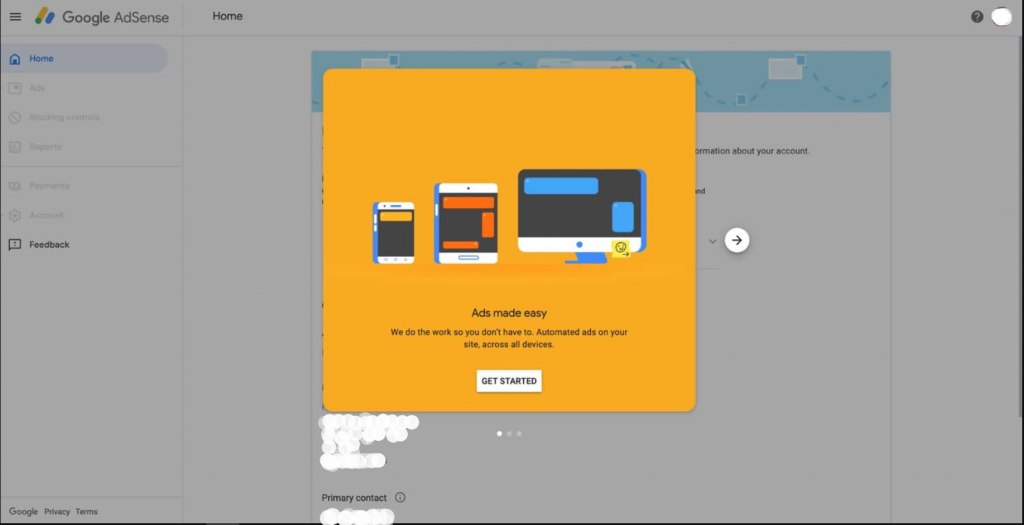
After completing your contract, a code will be flashed on your computer screen, asking you to copy and paste it to your website header and footer. Which we will cover in the coming sections.
How to insert a Google Adsense verification code in your WordPress website?
There are mainly two methods by which you can insert Google AdSense Verification code in your WordPress website,
- By manual
- By using a plugin
1. Insert Manually the Google AdSense Verification Code
First of all, you need to log in to your Website dashboard. Look out for the Appearance menu section on the left-hand side of the dashboard. Hover, over the appearance menu to reveal options, and click on Theme Editor.
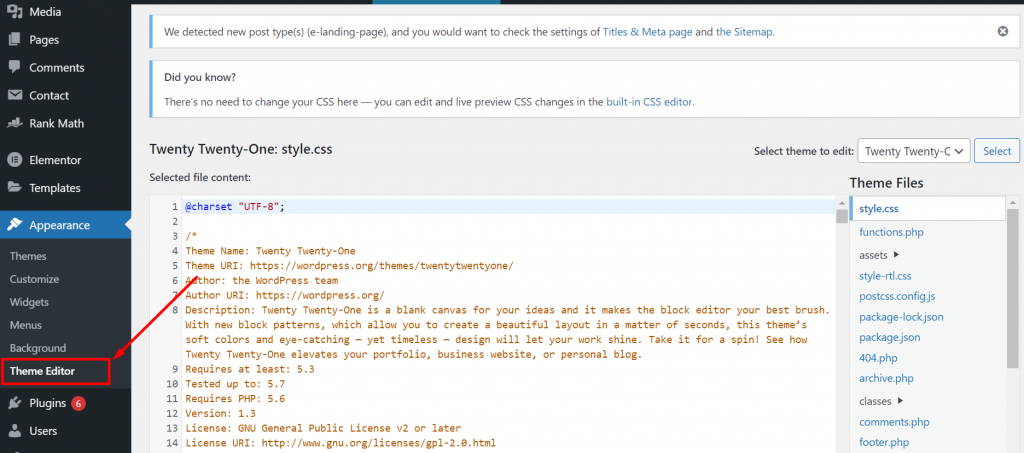
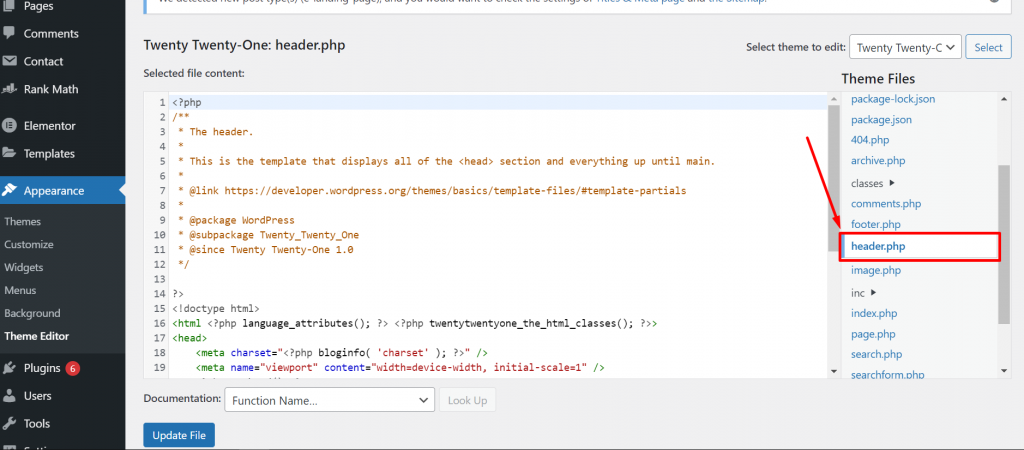
In the top right corner, choose the theme that you running currently on your website from the drop-down menu. Then scroll down the theme files to select the header.php file.
After opening the theme header.php file, the next step is to find the verification code that Google Adsense has provided you, Copy it and paste that verification code into your header.php file as shown in the picture below:
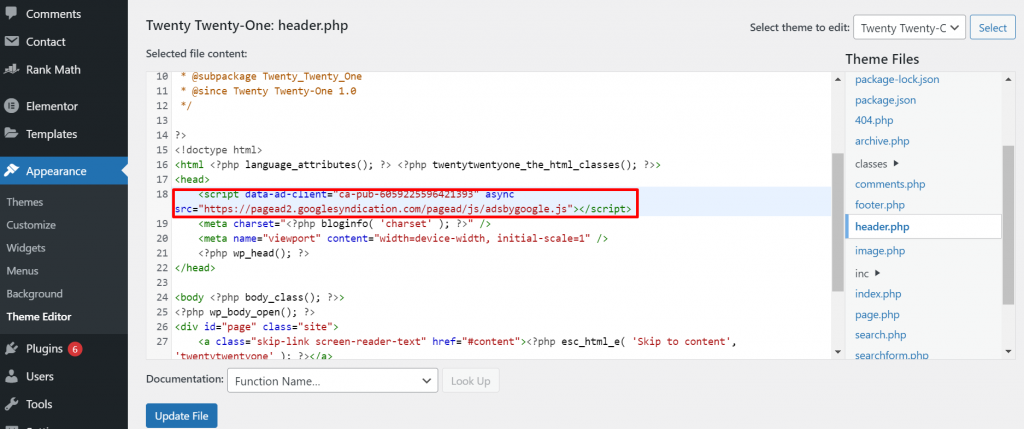
After inserting the verification code, click on the Update File to save the changes and you are done!
Note: Although adding Google Adsense code directly to the WordPress theme file seems an easy and lightweight approach we do not recommend you to do so. Especially if you are not familiar with the files and confident about editing them.
If your website uses a third-party theme, then it is highly recommended that you do not try to edit or mess with the codes in theme files anyhow. It is because, whenever you update your theme, all the edits or changes that you have made will be completely wiped off or overwritten. Hence, to avoid such you need to create a theme file first, copy all the content of the header from the parent theme file to the child theme, and make changes to it only.
By doing this, the edits or changes will not be wiped off or omitted whenever you update your WordPress theme to the latest version available.
However, the above process might seem hectic for beginners, hence it will be easy to use plugins as an alternate solution to the above methods, which we will discuss in the coming section.
2. Inserting a Google AdSense verification code using a Plugin
This is one of the simplest methods by which you can add a Google AdSense verification code to the WordPress website. You just need to install a plugin ” Insert Header and Footers” from the WordPress directory, which is available free.
To begin with, first of all, Open your WordPress Dashboard > Plugins > Add new > Search “Insert Headers and Footers” > Install > Activate.
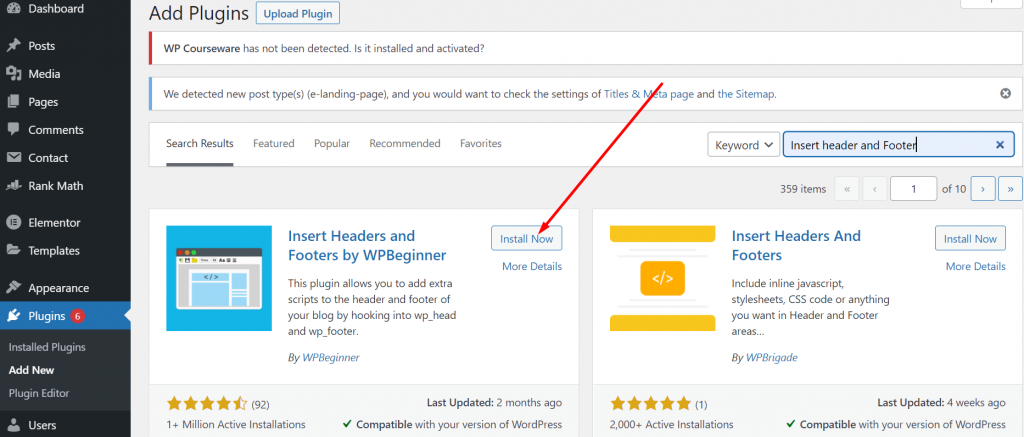
After Installing and activating the Plugin, Go to the settings option of the Dashboard and click on the “Insert Headers and Footers” link. A page will appear showing two empty boxes one for the header and the other for the footer. You need to paste the Google Adsense verification code in the Scripts in the Header box and click on the Save button.
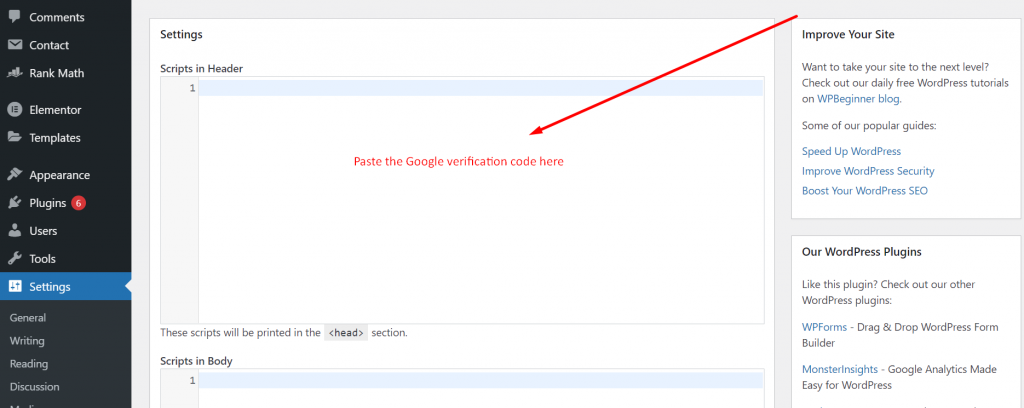
Now, One thing you must note is that whichever method you follow to insert the code. You need to verify with Google Adsense. To do this, go back to your Google Adsense Account and mark the checkbox to confirm that you have successfully pasted the code.
After that, Google will try to verify by checking out the code on your website. If found, a popup message will appear stating “The Code was Found”.
Now, the only thing is left for you to just wait until the Google team reviews your whole website and activates your Adsense account. The activation process can be quick or it may take days, it all differs from website to website. Hence, you do not worry about it, just have a little patience and wait.
One more thing worth mentioning about that to overcome all the AdSense integration processes, Google has recently launched its own WordPress plugin “Site Kit”.
Site Kit is a free, open-source plugin for WordPress that helps you access unified metrics and insights from Google AdSense, Google Analytics, Google Search Console, and PageSpeed Insights directly from your WordPress account.
For more details, you can read the complete article here.
Note: Do not remove the verification code even after approval of your Google AdSense Account.
How to create a Google AdSense Unit?
Google AdSense unit is a complete set of ads that will be displayed on your website from a single Google AdSense code. It is a placeholder for an ad in the layout of a website. A web admin can create many ad units on a web page, each ad unit will serve a specific type of ad ranging from different sizes and formats.
Each Ad unit contains a specific ad code that calls ads from the ads server and finally serves the users. After approval of your Google Adsense Account, you can head over to create a new ad unit by following the steps given below:
Step 1: First, you need to log in to your Google AdSense account and Click the On Ads menu button showing the left side of the Dashboard. Ads > Overview, and select the “By Add unit” Tab.
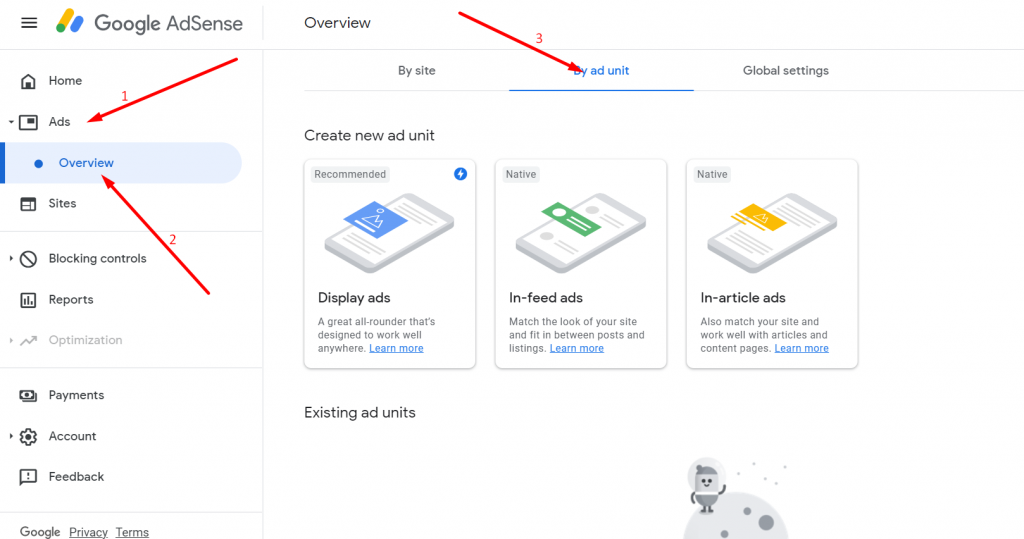
When you click on the “By ad unit” tab, google will provide you with three different types of Google ads.
- Display ads- Widely used and most common type of advertisement you mainly see on the maximum of the websites. It is seen that these ads work perfectly while putting at the header, footer, or side of the webpage rather than in between the body of the content. However, the only drawback is most of the users ignore or are unable to get attention because they are located outside of the content.
- In-feed ads – These types of ads are usually put in between the content and listings.
- In-article ads– These Ads are placed in between the flow of content, However, these types of ads can easily be viewed by audiences but most of them find it irritating and irrelevant.
Step 2: For your convenience, we took the Display ad as an example, First of all, give a name to your ad that can be easy to remember or accessible. Do not worry the name won’t appear to the audience.
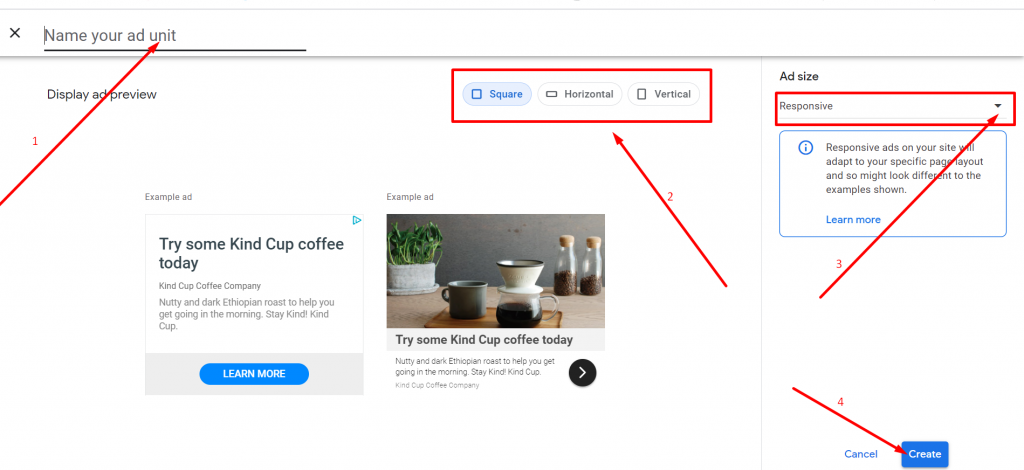
Step 3: Now, select the size of the ad from the given three options square, Horizontal, and Vertical. After that choose the ad size from the drop-down menu option. In our example, we have used Responsive size, through which the size of the ad will be automatically adjusted on different screen sizes. After selecting the best-given options for your website, you can hit the Create button just the bottom of the web page.
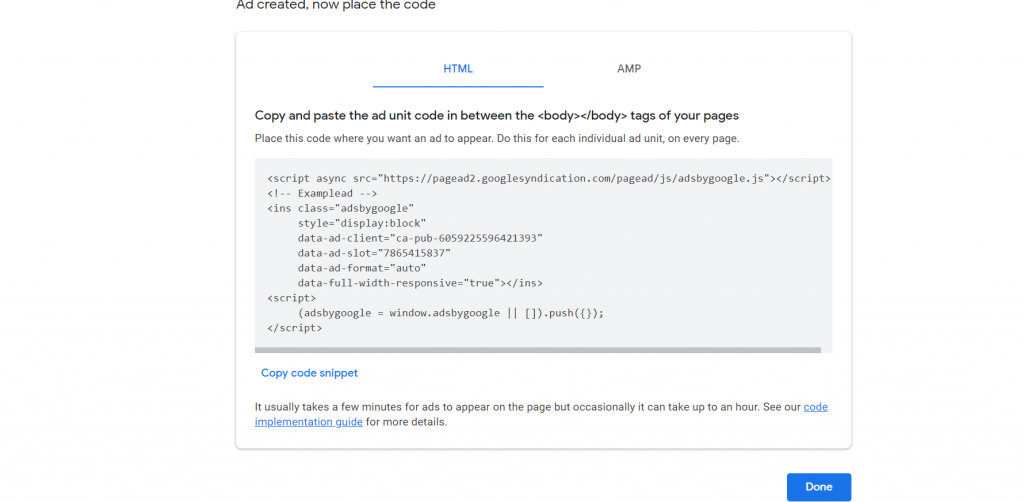
8 Once you click on the Create button, the page will load to Code generator, asking you to copy the HTML code and paste it wherever you want to display ads on your website pages.
How to Put Codes of Google Adsense on WordPress?
After creating AdSense units and generating codes, now you need to put them into your WordPress website. But the main question is how you can do it. But before that, one thing you must note is that You are putting an ad unit code not inserting an ad directly. You are just providing a space for Google to display ads that are most relevant to your website.
1. The best strategy to follow while inserting Adunit codes.
You cannot simply insert ads anywhere on your website, you need to do a proper analysis of your website space and plan it. First, take your time, and think of the most suitable ad placements possible. It can be different from website to website depending on, the theme, design, and layout of the website. And also at which part/page of your website you receive the highest amount of traffic.
Do remember, the traffic you are receiving on your website is not there for watching your ads, but to consume valuable content that you push from time to time. If your content page is showing ads more than the content, the visitors will get irritated and find it irrelevant. This can lead to poor user retention and can also affect your SEO too.
Hence, try to put ads and content in healthy proportion, so that the audience can enjoy your content as well as the ads won’t get ignored. Try to create appealing content that compels audiences to visit your website again and again.
The best strategy to consider while inserting an Ad on your WordPress website:
- Ad positioning: It plays an important role in acquiring more ad clicks. The ads must be positioned or located at a place where they can grab visitor’s attention without consuming the content space and irritating the audience.
- Ad Size: The size of the Ads should be not too large so that they cannot cover the majority of the web page and not too small so audiences cannot notice them.
It is always recommended that you do ad testing before making it live, the best option is to use a staging platform and see how the ads will appear and perform. Play with different ad configurations and find out the most suitable one that works best for your website and your audiences. Similarly, WPOven is one of the leading Managed Web hosting service providers that provide their users with a Staging platform to run tests of their website without making them live.
To implement Google Adsense on WordPress, there are some methods available, which solely depend upon the way you are approaching, either manually or using a plugin.
2. Insert Ads in the WordPress website using a plugin
If you do not want to play with codes and mess around with theme files, using a WordPress plugin is the best alternative for inserting the ads in your WordPress website. There is a collection of Plugins available in the WordPress directory that can help you insert ad codes into your website easily. Let us check out how you can implement it.
2.1. How to insert Ad codes using a WordPress plugin?
Using WordPress plugins can be very helpful and one of the best alternative solutions rather than using manual methods, hence Head, Footer, and Post injections are other useful WordPress plugins, that let you insert Ad codes easily in the header or footer section of your WordPress website, without accessing theme files.
First of all, you need to install the plugin by going to your WordPress Dashboard > Plugins > Add new > Search ” Head, Footer and post injections“> Click on Install > Activate.
After successfully installing and activating the plugin, Go to the Settings menu, and click on the Header and Footer link. Now open the Posts tab as shown in the picture below:
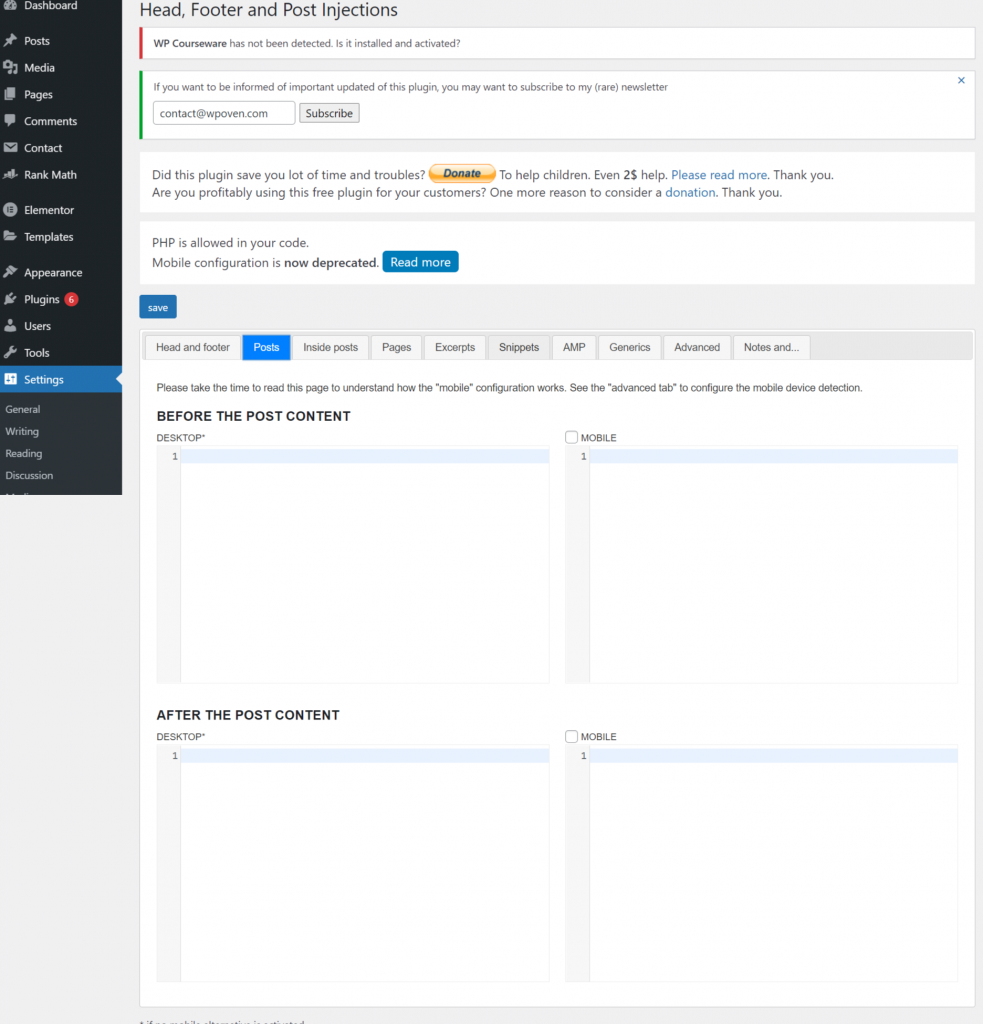
Now the next thing you need to do is copy the ad unit code from your Google Adsense Account and paste that code in the respective areas of your Posts page.
The plugin also provides you with an option to paste Ad unit codes for different dimensions such as desktops and mobile phones in their respective fields. Once, you are done with pasting the ad units that you have created earlier in Google Adsense, Click on the Save button at the bottom of the page and you are done.
3. How to Manually inject Google Adsense on a WordPress Website?
If you are not comfortable and do not like to load your website with an extra plugin. You can choose the manual method instead. You can carry out this process either by pasting the ad unit codes directly to the theme files or into the widget.
3.1. Inserting the Ad Code in a Text Widget
Instead of accessing WordPress theme files, one of the simplest ways to add ad unit codes to a website is by inserting the code into a text widget. But, it is only possible, if your theme provides an option to add widgets and flexibility to add anywhere on the website.
You need to go to your WordPress Dashboard > Appearance > Customize. The page will be loaded to the customization page where you will see a Wiget menu button. Click on it and add a Custom HTML. Open it and Paste your Ad unit code. But before that make sure the dimensions which you have earlier specified for an ad must be compatible with the widget you are using.

3.2. How to inject codes of Google Adsense into WordPress theme files?
We highly caution you to make sure you are confident enough to add to a theme file. and also make sure you have all the permissions to access your theme files. It is because you need to paste the ad unit code to every theme template file to display your ads.
However, if you have already installed a third-party WordPress theme, we highly recommend you first create a child theme before making any changes or edits to the parent theme file. Or else all the changes and the codes that you had added will be wiped off completely when you do the next update. Hence in this scenario, you need to edit your theme’s function.php file of your child theme.
The best way to edit or make changes to the codes of a theme file manually is to access the files via the FTP client. Filezilla is one of the most popular and widely used FTP client tools, with the help of which you can access and edit WordPress files easily.
First, connect your FTP client with a WordPress web server, and try to access your WordPress core files, go to the wp-content/themes folder. Search for your child’s theme folder. If it is not available, create a new one and open it. When you open it, you will able to easily find a filed name as functions.php inside it. Right-click on it and select the open its option. The file will open in a text editor.
Now, if you want to add your Google Ad unit code within the header or the website, Add the following code mentioned below in your functions.php file:
add_action('wp_head', 'adunit1_code');
function adunit1_code() {
?>
//Paste your Google Adsense code here//
<?php
}
You can change the function’s name from adunit1_code() to whatever you prefer.
In case, if you didn’t want to show Google ads on your website. Either you can delete the code from the theme file or simply disable the child theme.
Customize Your Ad design and appearance
As far as now, whichever method you use to implement Google Adsense on your WordPress Website, the outcome will be the same as shown in the picture below.
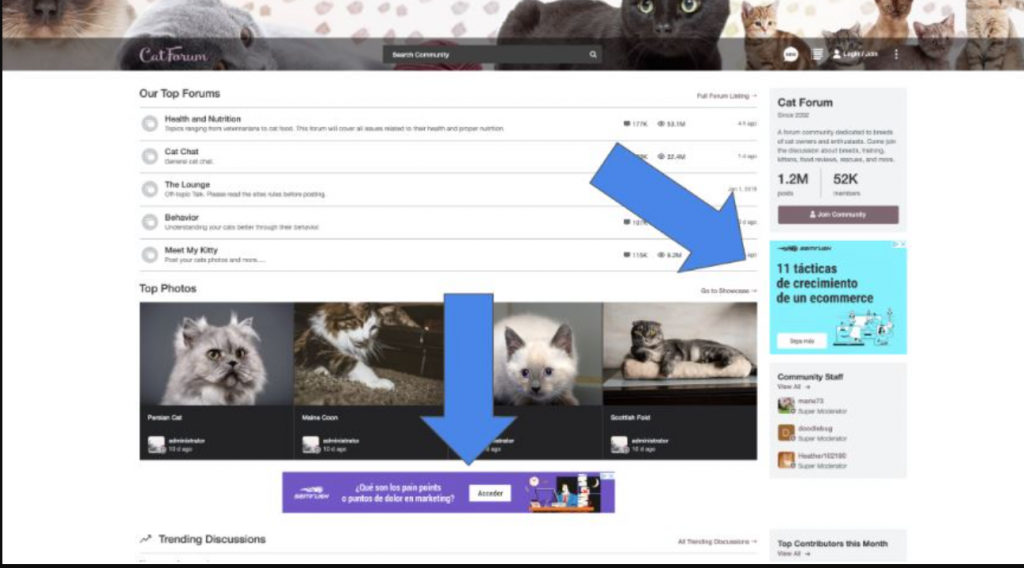
However, sometimes the default Ad design doesn’t look appealing and matches with the theme of a website. But you have the option to change its position, change the ad colors, or even you can try different ad units in that particular ad space/area.
Let us check out how you customize your Ads on your website.
Customizing the layouts of your Ads
No matter, what method you have chosen to insert your Google ad unit into your WordPress website. The Ads will appear only at the places you have already fixed on your website. But what if you have changed your mind and want to make some changes to it? Let us figure it out.
Fixing the layouts with the Advanced ads plugin
The Advanced ads plugin is not just limited to helping you out by inserting the ads codes into the heater and footer section only. But with the help, you can adjust or fix the position and layouts of an ad too. For example, what if the ad blocks or hinders the content of your website?
This can be easily fixed by the Advanced Ads plugin, Go to your WordPress Dashboard > Advanced ads > Ads, and choose the ad unit you want to fix. Look for the Layout/ Output option and select the position of the ad that looks better for your post, even you can set the Margins too.
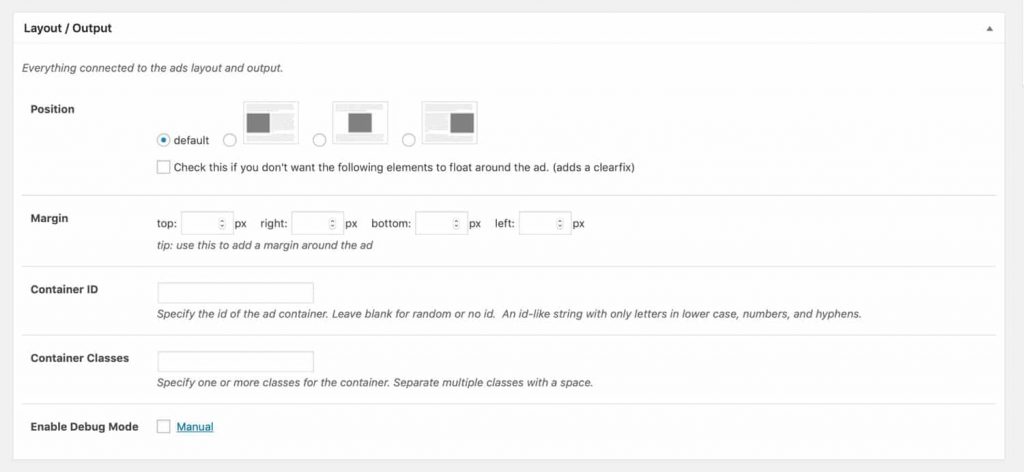
Adjusting the Layout of Your Ads with the Manual Method
You can even adjust or fix the layout of your ad with this manual method by setting up a function. It can be easily achieved by adding a containing element.
For example, if you want to adjust the layout of an ad, you need to follow the code shown below:
function WPOeven_add_adsense_after_content() {
if( is_singular( ‘post’ ) { ?>
<aside class=“ad-wrapper”>
// Paste the adsense unit code over here
</aside> <?php }
}
add_action( ‘WPOven_after_content’, ‘WPOven_Add_adsense_after_content’ );
The above code can only work if your theme contains action hooks in the content. We have taken the WPOven_after_content hook as an example here. We have used aside elements here because the content has nothing to do with the main content, but it is something extra that you need as extra.
How to adjust your Ads position on your Website?
As we have discussed earlier, how plugins can help you with high-intensive tasks and reduce time. Similarly, you do not need to play with codes or do high-level editing to just fix the position of an Ad on your website at the desired location.
All this can be easily done with a simple click by installing a WordPress plugin named Ad Inserter from the WordPress directory free. Whether you want to place ads at the header, footer, sidebar, or even at other default desired locations on the Website.
For example, if you want to choose a very popular and the right spot for audiences to see your ads. You might locate ads either at the center of the content, where it becomes easy for visitors to see, or maybe floating ads that move along while scrolling with the content.
The Ad Inserter plugin provides you with a set of different locations to put your ads on a website, some of them are:
- Before or after the content.
- Before or after images.
- Before or after a random paragraph
- Before or after multiple paragraphs.
- Before or after the comments or the excerpt.
To begin with this plugin, first, you need to select a block (Do remember, each Ad unit needs one block) and mention where you want it and on which page, as provided with a lot of options shown in the picture below:
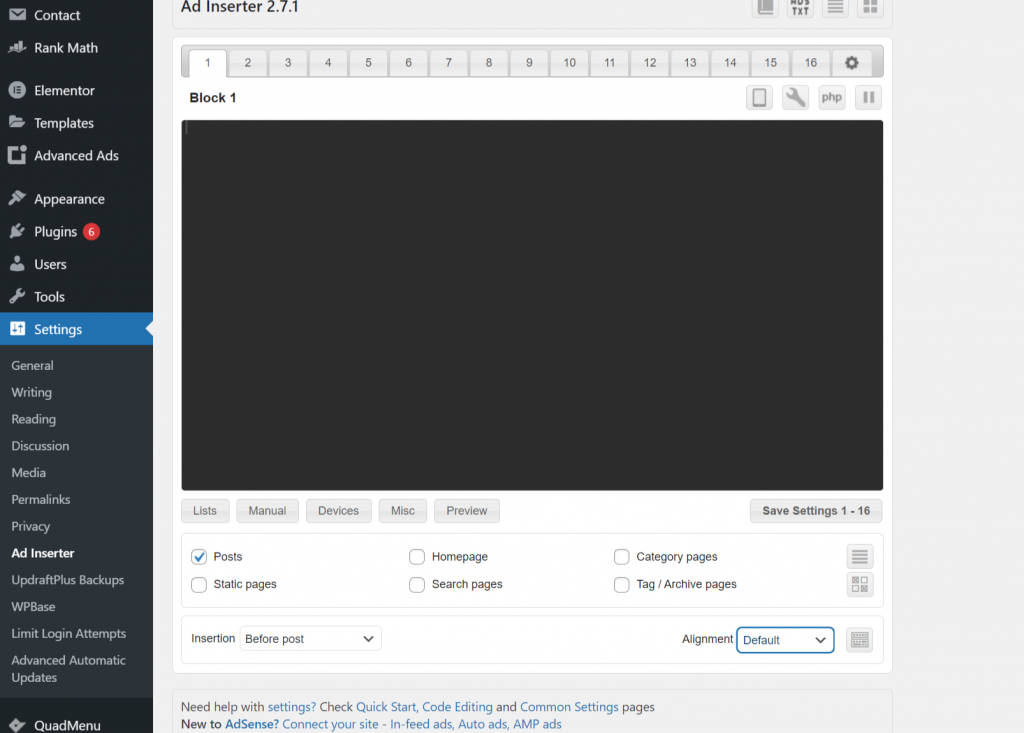
If you want to position your ad at the desired location, there is a CSS option is also available in the Alignment. There are a hell of a lot of options that you can try and figure out yourself.
Summary
No doubt, Adding Google AdSense on WordPress can be a better option for anyone as a side source of income. Especially since you are working on a low competitive and high traffic volume niche and your website is not intended to sell anything and is completely based on content.
However, adding Google AdSense on WordPress can feel a bit tricky for most beginners or those who do not sound technically good. But there always have been methods for all types of users out there, some of them are:
- Using a plugin to add Google AdSense code to the WordPress website.
- Adding to the theme file.
- Adding codes in function.php file
- Creating a function to add codes.
After reading the above post, it will be easy for you to add Google Adsense to the WordPress website. Or if you have already added to your website, you can even share your experience with us in the comment section below. We would love to hear your valuable opinions.
Frequently asked questions
Can I use Google AdSense on WordPress?
In short, yes you can use Google Adsense on the WordPress website. For new users or beginners who have just started to add Google AdSense on WordPress, it is highly recommended that they use Sitekit. Especially, developed by the Google team to overcome the issue of adding Google AdSense on the WordPress website easily.
You need to connect your website with the site kit and the tool site kit will add code to every page automatically. So that it will be easy to display ads on your website automatically.
How do I add Google AdSense to WordPress?
There are some methods that with the help of them you can easily add Google Adsense on WordPress.
1. By using a plugin
2. By adding codes to the theme files
3. By doing it manually, adding codes to function.php
4. Add custom HTML codes in widgets
How do I monetize my WordPress site?
Some of the methods that you can implement on your WordPress site to earn income are:
1. Use Google Adsense on the WordPress site to display ads.
2. Affiliate Marketing
3. Guest Posts or sponsored posts
4. Selling personal products and services
5. Ask for donations
6. Sell exclusive and membership content

Rahul Kumar is a web enthusiast, and content strategist specializing in WordPress & web hosting. With years of experience and a commitment to staying up-to-date with industry trends, he creates effective online strategies that drive traffic, boosts engagement, and increase conversions. Rahul’s attention to detail and ability to craft compelling content makes him a valuable asset to any brand looking to improve its online presence.



![How to Start a Fashion Blog In 2022 [Guided Steps] how to start a fashion blog](https://www.wpoven.com/blog/wp-content/uploads/2021/06/How_to_Start_a_Fashion_Blog.png)
![How To Start A Food Blog In 2023? [Complete Guide] How To Start A Food Blog](https://www.wpoven.com/blog/wp-content/uploads/2023/02/How-To-Start-A-Food-Blog.png.webp)
