Building a WordPress Multilingual website is one of the best practices for SEO as well as international traffic perspective. Your website traffic will be not just restricted to a particular region and language. It can get easily reach a vast area and the organic search results will be a boost. The new audience will be able to browse content on your WordPress Multilingual website, in whatever language they choose.
It all sounds pretty great and productive, but implementing a WordPress multilingual website can be an effective and strong step for your website. You have all the options to translate the whole content, URLs, and Every text from the Plugins and themes that you are using.
But the main question arises, How can you do it? Well, you do not need to worry much about it. We all know WordPress has always a plugin for every problem. This is what WordPress is popularly known for. With the help of the right and best WordPress Multilingual Plugin, it becomes easy for you to translate the whole WordPress website into multiple languages.
And at the end of this article, you will have all the comprehensive information available on how to create a WordPress multilingual website in easy steps What can a WordPress multilingual Website can be a boon for your website’s organic traffic?
But before that let us hop into the facts about implementing WordPress multilingual feature in detail:
Let’s get started…
Advantages of implementing WordPress Multilingual feature in your WordPress Website
If you want to know all the advantages of using the WordPress multilingual feature on your website, then you must check out the major points mentioned down below:
1. Boosts your WordPress website SEO
Creating your website Multilingual or adding a Translating feature into different languages can help your website to expand its reach. And it increases the higher chances of getting indexed in various search engines for multiple languages.
In addition to it, there is no need to create any new content for every new language, with just a single click the content in the default language can convert instantly into the languages you chose. But how can you avail or implement this feature in your WordPress website?
Well, WordPress multilingual plugin can do that easily. All you need to just look out for certain key functionalities before installing them, such as:
- WordPress Multilingual sitemap support
- Hrefland tags support
- Easy to translate SEO metadata
- Multiple languages Indexing in search engines
These key features will let your website get indexed in search engines for multiple languages easily and also helps to boost your website SEO.
2. Enhances User Experience
It is a fact that majority of the internet users prefer to browse their favorite websites in their own language. Hence, giving them the option to translate the webpage into their own language is a plus point for enhancing the user experience as well as attracting international traffic.
But, it can be only possible if you give provide an easy option to choose their preferred language. Hence, it is better to always search for only those plugins or tools that can provide an option to switch language on the front end of the website.
Even there are certain tools available that let redirects your webpage to a different IP address that is based on your preferred language.
3. Complete Translation solution
Translating text on web pages is an easy task but translating the dynamic content on your website can be challenging. These contents can be your form, WordPress themes, widgets, plugins, and WordPress editors, Widgets. And the most challenging part is to look out for the tools or plugins that can do such tasks.
However, there are always slight chances that the tool might not be able to or miss some dynamic content to be translated. That can be floating on your website and appear weird. Hence, it is highly recommended that whatever plugin or tool you use, make sure it covers the whole website.
Note: Creating WordPress Multilingual Website, can boost your website SEO if done properly and There is no need to write content in multiple languages, all of them can be easily translated without any fear of plagiarism problems.
What things do you need to keep translated into your WordPress website?
Now, you have the basic idea of how creating a WordPress multilingual website can help you to drive international traffic and boost your SEO. Although translating the whole is highly recommended, still some things you need to make sure are not left untranslated.
1. Easy to tranlate Website URL
From the SEO point of view, it is one of the best practices to include your keyword in the URL. Hence, it is highly recommended that you must translate your website’s URL into Multilangues.
When it comes to SEO, it is recommended by many SEOs to try and have your keyword in your URL. This is why if you can, it is better to translate your URLs into their native language. For example, a website in the English language: https://mydomain.com/about-us/ can look like after translation in Spanish as https://mydomain.com/es/sobre-nosotros.
From the above example, you can see, how exactly a translated URL will look in Spanish. And due to this, there will be high traffic on the website will be experienced by native Spanish speakers. It is because this will become easy for them to understand and easy to get results in SERPs.
However, it is not always the case, not all languages are supported for URLs. For example, Japanese and Chinese these two languages have special characters in them. Even both the platforms Google and WordPress has full support, but the only concern is with third-party plugins that won’t work with it and it can get your website into trouble.
The only solution to this exception case is to use English as a default language for all those languages which does not support other platforms.
2. SEO Metadata should be available in different languages
Along with Multilingual Website URL, you must also not forget to let your SEO metadata be available in different languages. Even the Meta description, as well as the Title of the content, should also be able to translate in multi-languages.
To make this whole process a lot easier for you, there are SEO WordPress plugins available such as RankMath that are compatible with almost every WordPress multilingual configuration and tool available.
3. The image file names must be translated
For many users, image file names won’t be a matter of concern, but they are unaware of the fact that it plays a massive role in SEO for any Website. After Google web search, Google image search is another best image search engines available and also helps to drive maximum web traffic from it.
Hence, it is highly recommended that you must have your image file name SEO optimized in addition to it make it available for multilanguage.
4. The Content of the website must be easy to translate completely
Content is the major part of a website and the majority of the website traffic only depends on it. Hence, it is the most important thing for anyone to have WordPress multilingual content available for their multinational users. Not just the content but it also incles all the menu items, header, footer, tags, etc.
How to shortlist a WordPress Multilingual Plugin that has all the essential features?
We know that WordPress has plenty of plugins available in its repository. Similarly, there are also several WordPress multilingual WordPress plugins available in them. But the main problem is, which one to shortlist the best one, that can complete your requirements most comprehensively.
Hence, to make things a lot easier for you, we try to bring you some of the top WordPress Multilingual plugins that will definitely help you to build or create your own WordPress Multilingual website easily. Let us check out them one by one and learn the complete process step by step.
1. Translatepress Multilingual Plugin
One of the best WordPress multilingual plugins to create a WordPress multilingual websites available in the market is Translatepress. It has some unique features that make it a bit different from other WordPress multilingual plugins.
Generally, most WordPress multilingual plugins let you create several copies of the same content in different languages to translate it. But in the case of Translatepress, it let you translate your whole content in an instant.
Translatepress has a live editor tool that translates all the visual content available on your website. In addition to it, it uses a combination of two powerful translation tools Google Translate and Artificial Intelligence to complete the whole translation and if anything is missed or unable to get translated by Google Translate then the AI comes into play.
To start using this plugin, first of all, you need to download it directly from the WordPress repository, WordPress dashboard > Plugins > Add new > Search “TranslatePress”> Install > Activate.
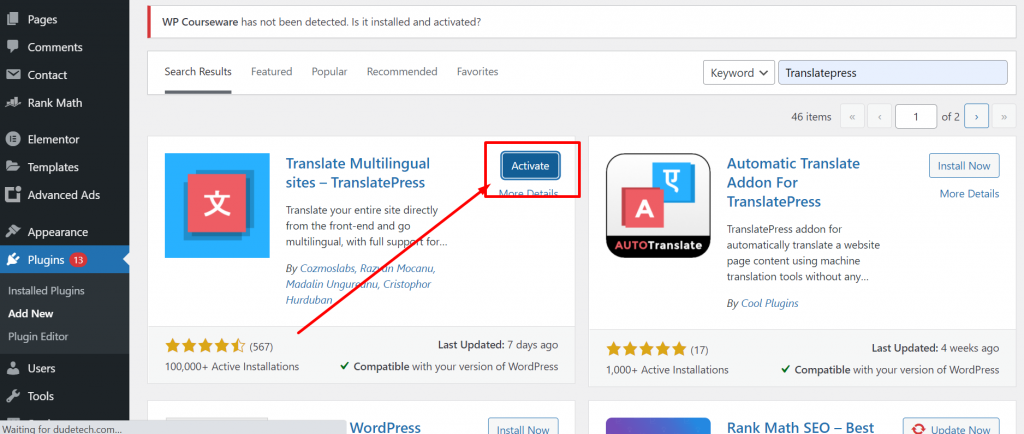
Once, activate the plugin, you need to configure its settings by clicking on Settings > Translatepress.
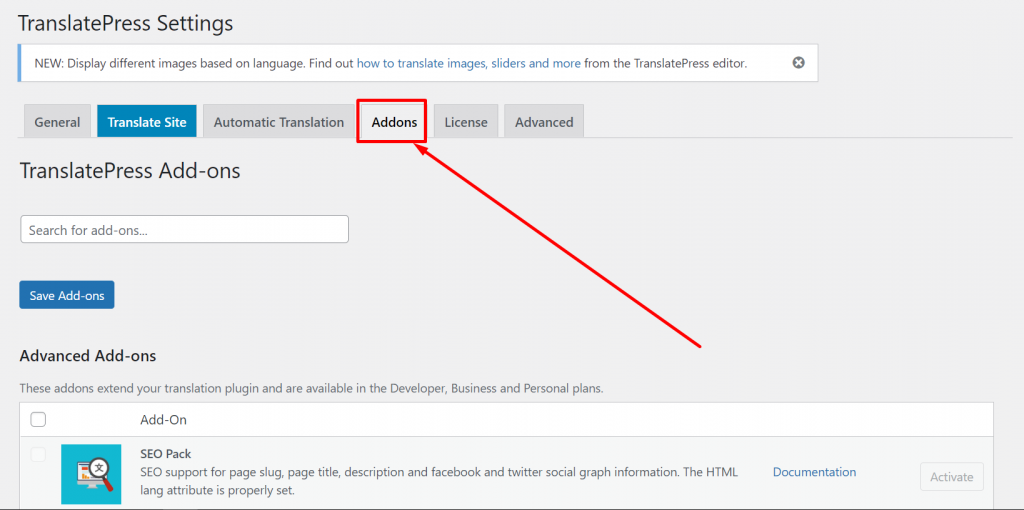
If you like to add more languages to your website to translate into, then you have the option to download and install an extra language add-on. The downloading and installing process of the add-on will be similar to the WordPress plugin.
Just click on the Addons option as shown in the picture below and add as many languages as you want.
If you are a premium user or bought a license from Translatepress, you need to click on the license tab and enter your license key.
After it, go back to the “General” tab for more options to set up.
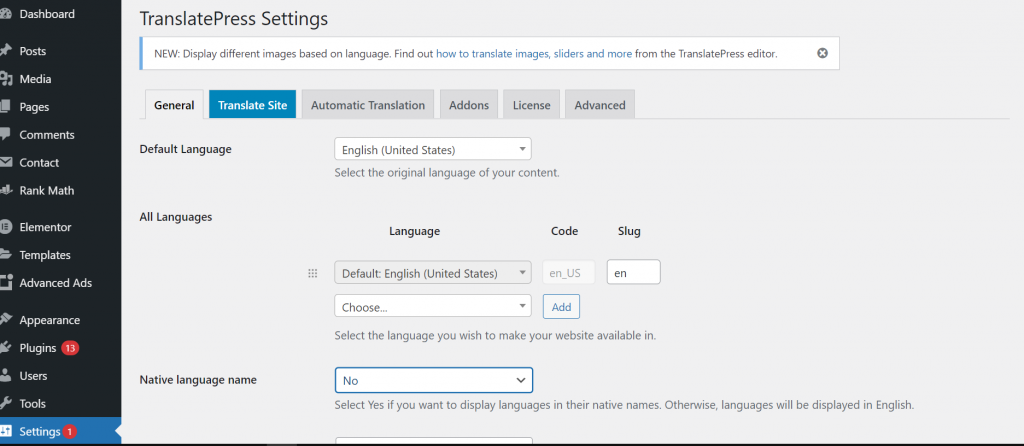
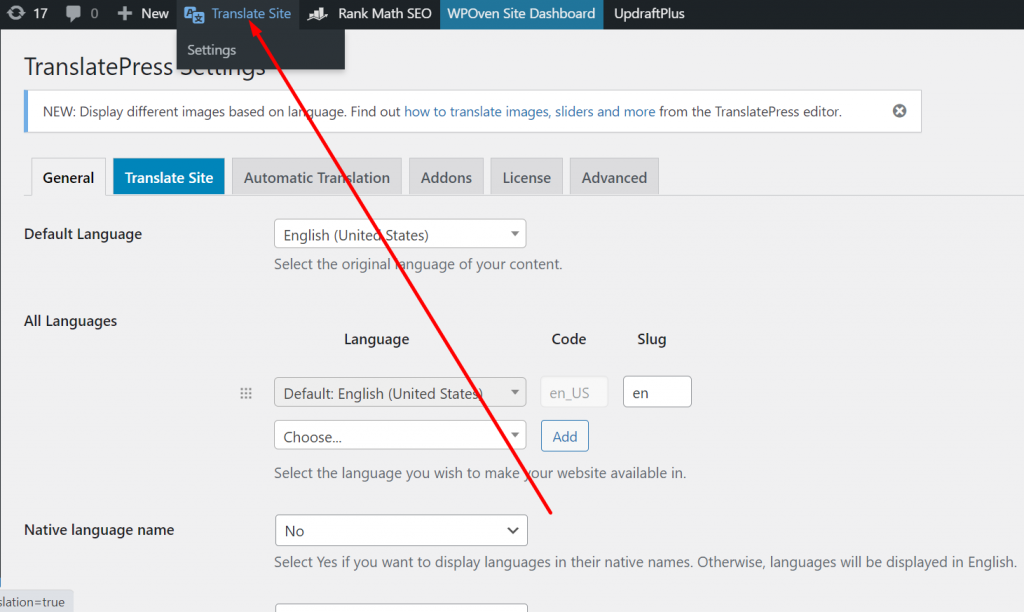
From the above General settings page, you can see the first option is asking you to choose the default language of your website. And below are multiple languages that you would like to translate your default website language into.

Native language name: Further proceeded, with an option to choose whether you like to show or display your Language name in the native names, or else languages will be displayed in English.
Use a subdirectory for the default language: Choose yes only if you want to display your default language name in the URL of the website as a subdirectory. i.e HTTP://www.mydomain.com/en/. But by default, it is set to NO, because it is the best option anyone can recommend for the best SEO efforts.
Force language in custom links: This section has the default option set to Yes. This means it will change custom links for translated languages that help to make URLs SEO optimized.
Language Switcher: Now the last option is Language Switcher. It helps you with how you would like to display the language switcher option on your website. You are provided with these three options.
You have been provided with three options, either to use shortcodes, in your navigation menu or show them at the floating menu.
Once done with your settings, click on the “save changes” buttons to save the settings and complete the whole setup.
How to Translate your website using Translatepress?
After completing the whole setup, now it is time to check out how it works. To translate your web content, you need to simply click on the “Translate Site” tab as shown in the picture below.
A new tab will open showing the translation editor page with vivid options as shown below:
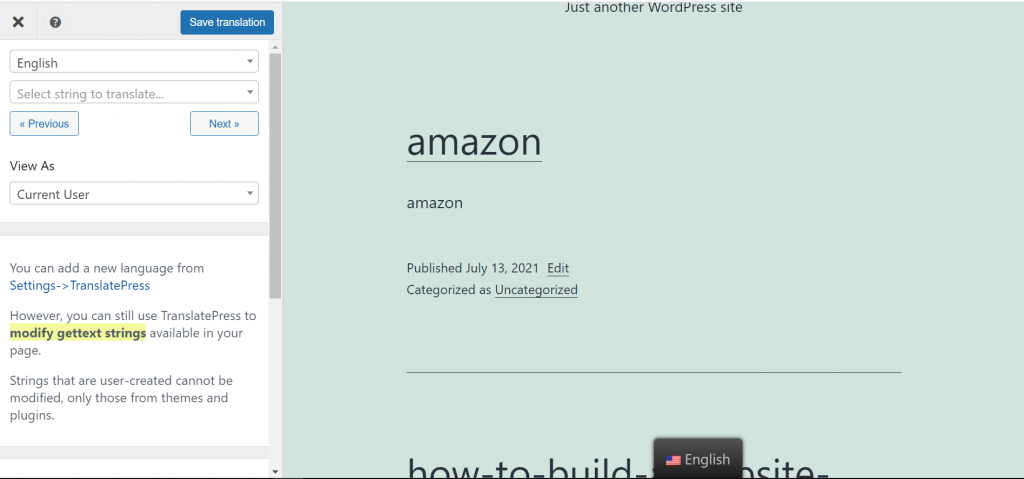
The advantage of having a live editor tab is, that whatever the changes you will make, you can see the effects directly in the right panel.
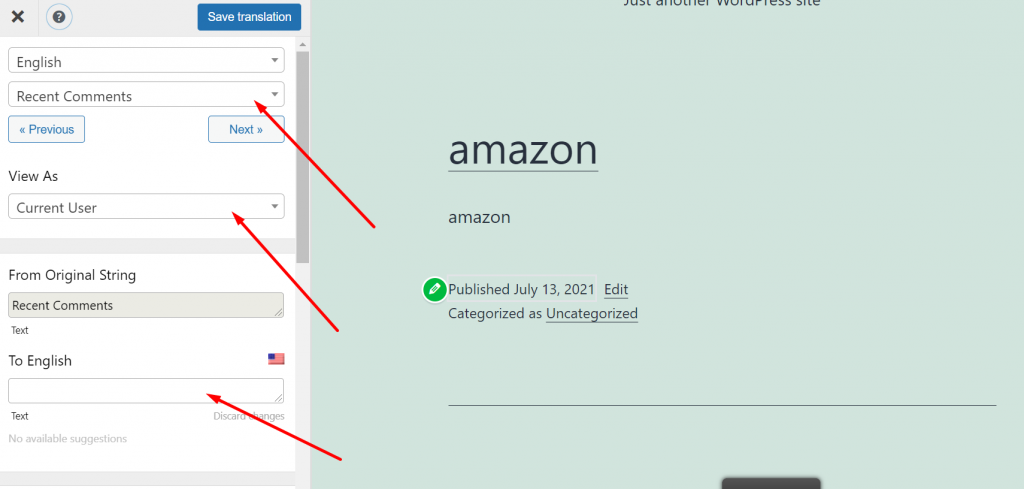
Select the string that you want to translate into another language and see how it will look. Similarly, enter all the strings as per your choice and translate them according to your website. After completion, click on the “Save Translation” on the top to make the changes effective, and then click on the Next button.
Similarly, you can translate all the web page content including, Skip to menu, widgets, buttons, etc. In addition to it, the WordPress plugin Translatepress lets you immediately translate any web page or content on your website. All you need to do is to click on the “Translate Page” button and a live editor tab will open.
After making certain changes i.e. translating a particular string, the plugin will automatically translate that string in other places on your website as well.
How to Add Language Switcher Option to Your Website?
Language switcher is an option you usually find at top of the many websites. It allows a visitor to choose their native language whenever they visit your website. Generally, these Language switchers display on the website with a Flag icon of the respective country or a drop-down menu to choose a particular language that s available on your website.
The WordPress multilingual plugin Translatepress, lets users add a language switcher either using a Shortcode, as a floating banner, or the navigational menu button.
Using Shortcode to Add WordPress Multilingual Option
All you need to just add the “language-switcher” shortcode wherever you want on your website to display the option and you are done.
Adding a language switcher to your WordPress navigation menu
Now to add a language switcher to your WordPress navigation menu, you need to go to your WordPress dashboard > Appearance > Menu > Language witcher and select the language that you have already added and want to display. Now click on menu settings and add it to your menu button.
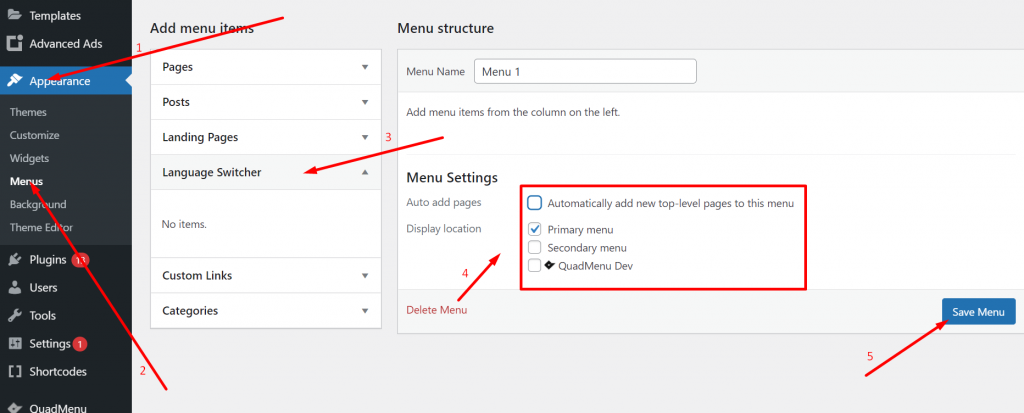
Now after setting up the language switcher in the WordPress Navigation menu, the next and final step is to save the settings by clicking on the “Save Menu” button as shown in the picture above.
Adding a Language Switcher that Floats on the Website
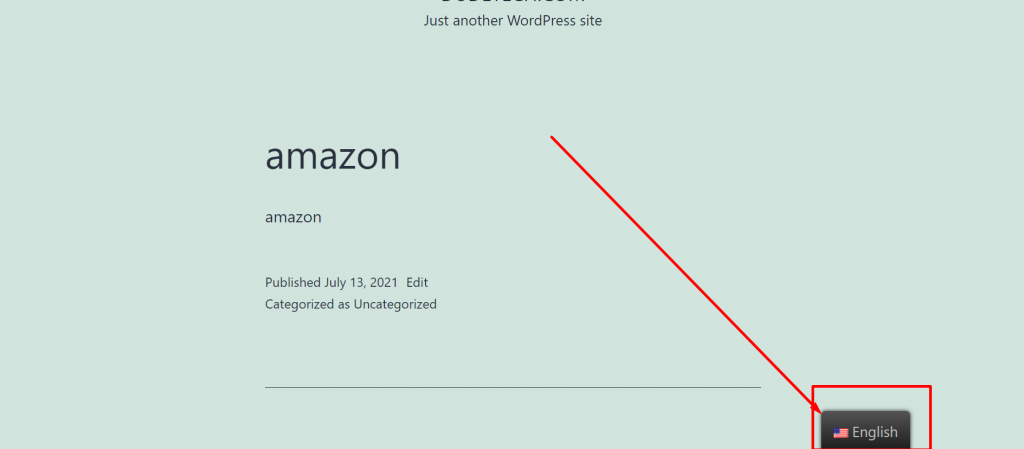
It looks quite unusual when you provide a feature that floats on your webpage, similarly, you can also implement it with the language switcher option. You need to go to the Translatepress plugin’s settings page > Translate Site > Language switcher and check the Floating language selection check box.
After it, click on the save changes button to make your settings effective. And finally, you can check out on your website how it appears on every page of your website.
2. Polylang Multilingual Plugin
Polylang is an open-source free WordPress multilingual plugin, with the help of which you can easily create a WordPress multilingual website. With more than 600000 active installations, it has become one of the worthy WordPress plugins one should try.
However, the Free and open-source version is efficient to do its job but with certain websites such as e-commerce, you might need to upgrade it to its premium version to avoid any issues and add extra features to a website.
To use this plugin on your website, you need to download it from the WordPress repository and activate it like any other WordPress plugin.
After successfully installing and activating you need to hover over the language option of your WordPress dashboard as shown in the picture below and click on it.
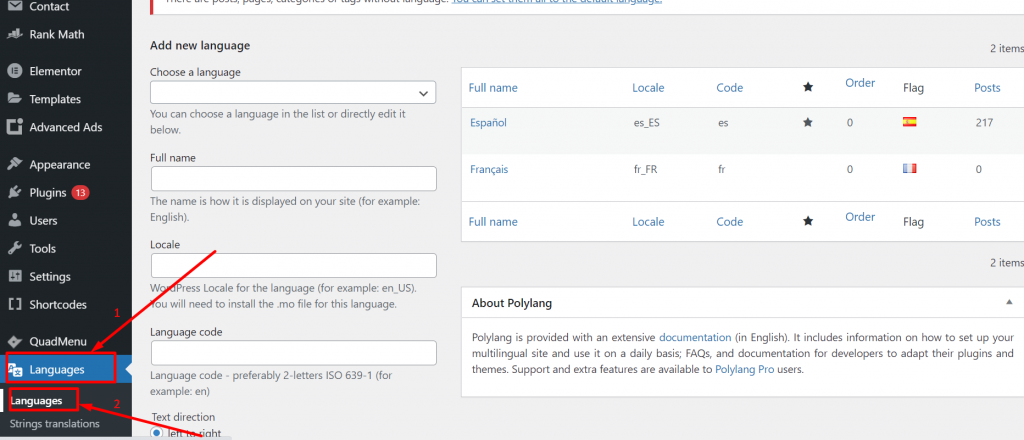
On the Language settings page, you can see there are three further options, 1. Languages, 2. Strings translations and 3. Settings.
The first Language page is let you add multiple languages that a visitor chooses to translate into your website as well as a default language.
After setting up the languages the next thing you need to do is to open the Strings translation settings tab to set up the website title, description, and date-time format.
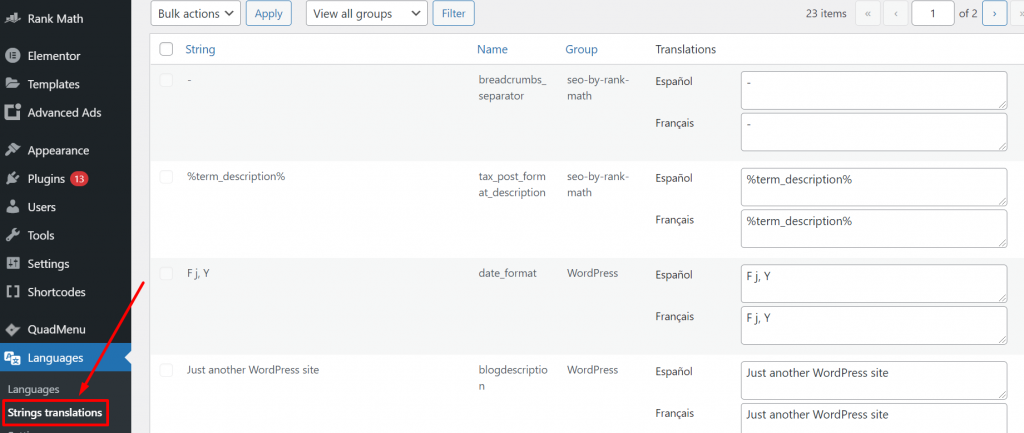
After the Strings translations setup page now you need to click on the Settings tab to set SEO-friendly URLs for different languages.
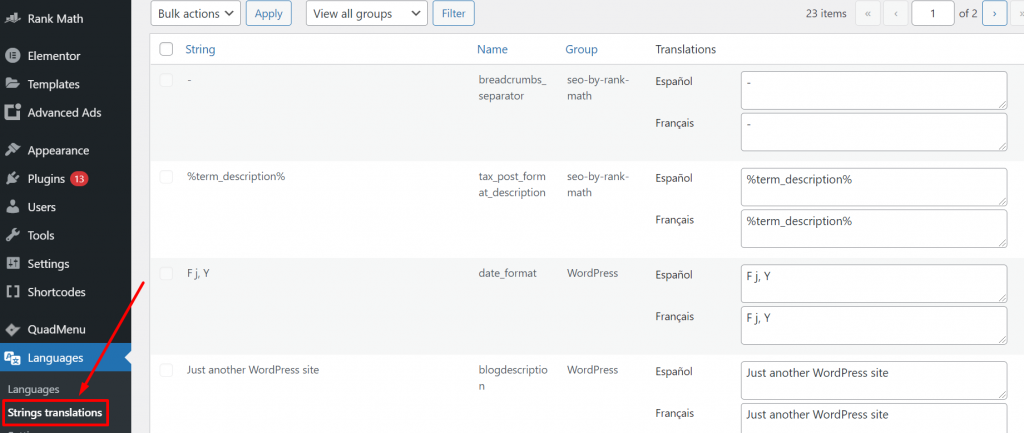
After setting up all the settings part, the final step is to click on the save settings option to make the changes effective.
How to translate Web content using Polylang plugin?
With polylang, it becomes easy for you to add content in different languages. Hence, to do this create or edit a post/page and in the edit option you will find the language section as shown in the picture below:
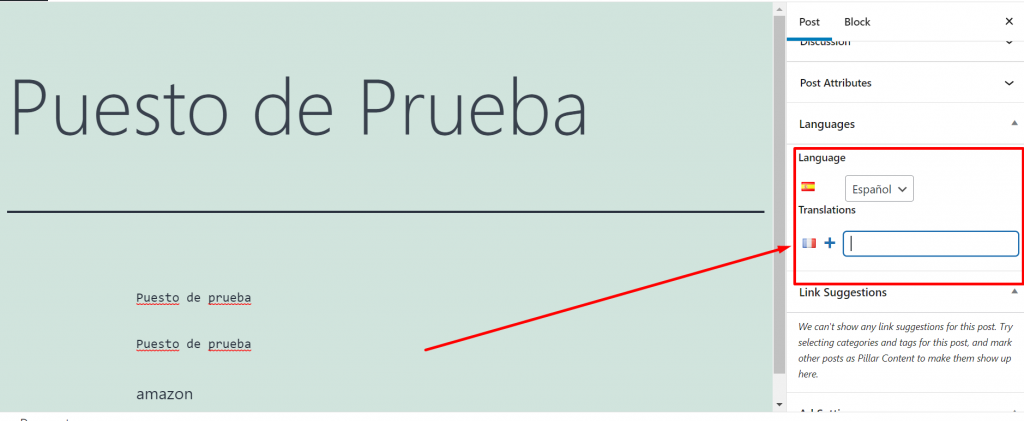
You can see, the default language that you have selected already and you need to add content in that language only. After then you will be able to translate it into other languages.
To add different languages to translate into, click on the “+” icon to add whatever language you want it to convert into.
To translate, you need to click on the + button next to a language and then add content for that language. For multiple languages, repeat the process again and again. Save the changes and you are ready to publish content in multiple languages.
How to Display Language Switched on WordPress Website using Polylang?
Language switcher is an option, you usually find at top of the many websites. It allows a visitor to choose their native language whenever they visit your website. Polylang WordPress multilingual plugin makes it a lot cleaner and easier. You need to go to your WordPress Dashboard > Appearance > Widgets, after that look out for language switcher widgets as shown in the picture below, and chose the option where you would like to display a language switcher.
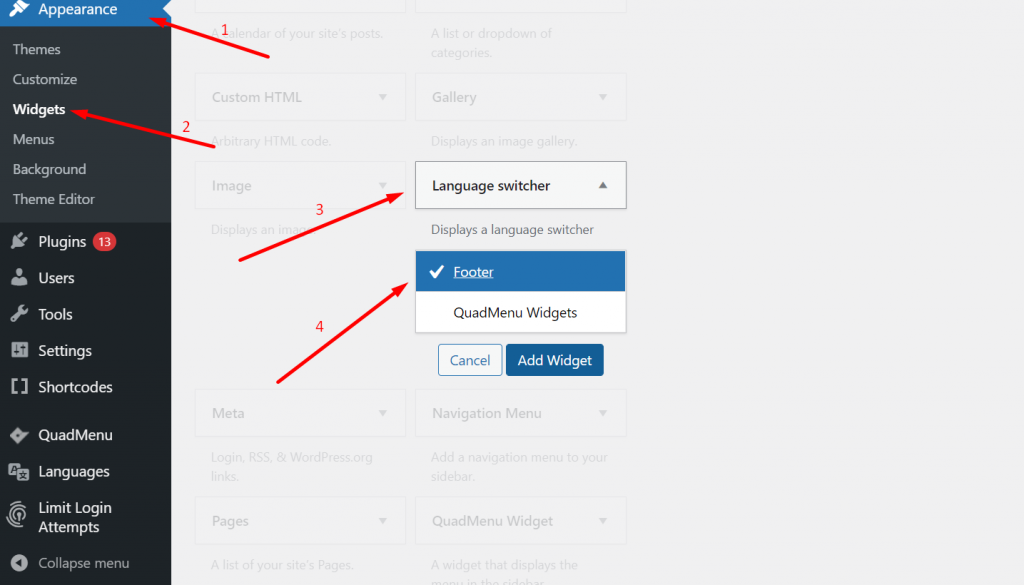
When you click on Add Widget button, you will have the option to choose a drop-down menu or use language names with flags. After completing the whole setup, click on the “Save” button and you are done.
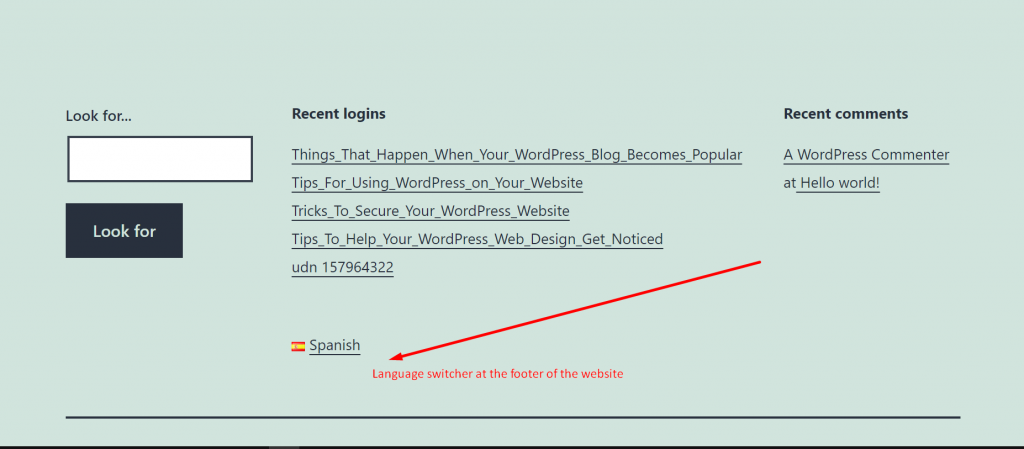
This is how it will appear on your website.
3. WPML Multilingual Plugin
WordPress Multilingual plugin or abbreviated as WPML is one of the earliest and most popular WordPress multilingual plugins available. To get into its settings and how to use it, first of all, you need to install and activate it in your WordPress dashboard.
This WordPress multilingual plugin is not available in the WordPress repository and there is no free version is available. Hence, the first thing you need to do is to, go to the WPML homepage, buy the plugin license and download it. The plans are starting from $29 to $159, with one year of complete updates and 30 days, money-back guarantee.
After buying and downloading the plugin, you need to add it to your WordPress dashboard, and to do this first go to your Dashboard > Plugins > Upload plugin > choose file > Install.
Once installed and activated, the WordPress multilingual plugin will be listed as WPML in your WordPress menu. When you click on it, you will see the WPML settings page.
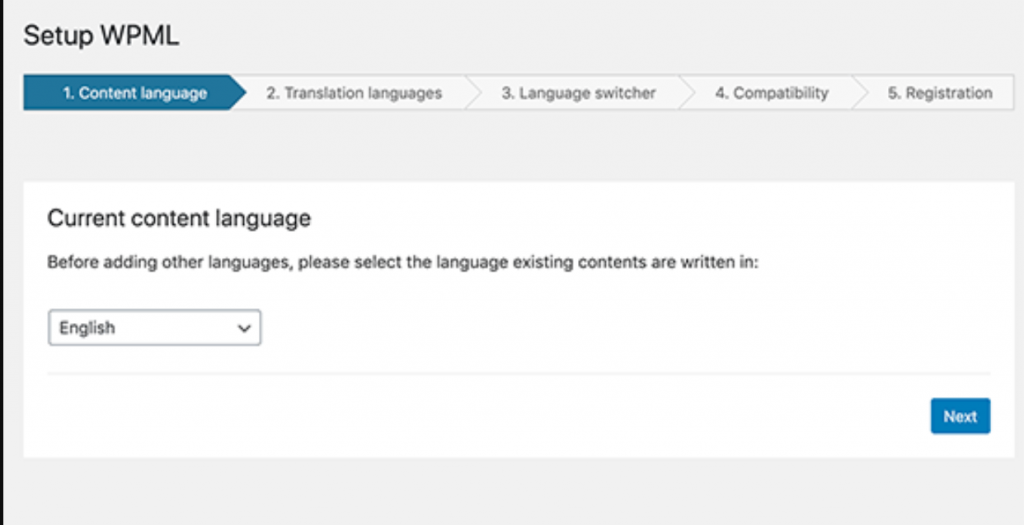
By default, the plugin will detect your WordPress default language and if you want it to change you can change it by selecting the drop-down menu. Click on the “Next” button to continue to the second step.
Now in the Second step, You will have a list of more than 40 languages from which you can select to enable on your website. Just click on the check box and it will be added to your website.
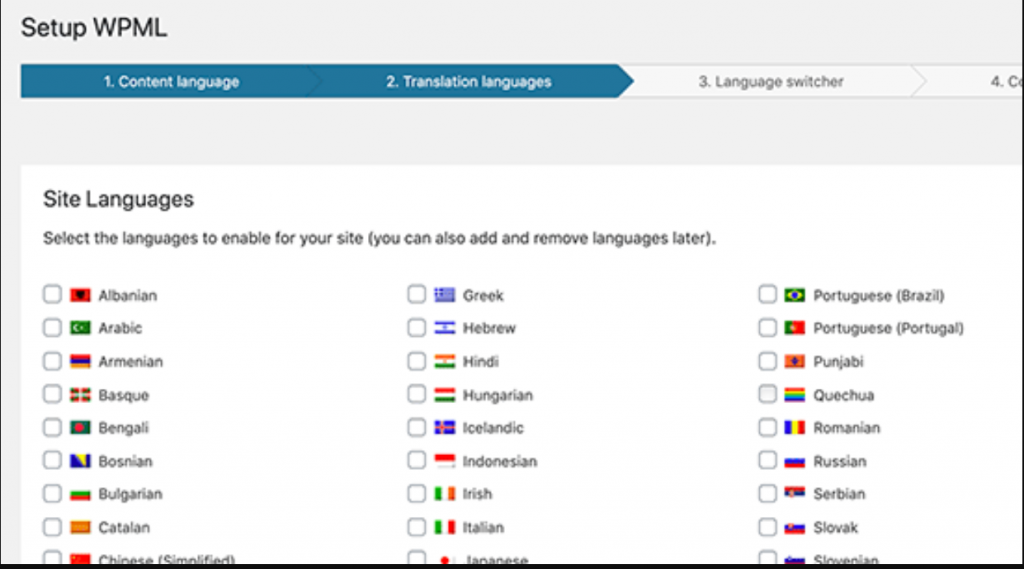
If you want to add more languages or remove some of them from the list, you can do it later after the completion of the setup. When you are done choosing the languages, proceed to the next step by clicking on the “Next” button.
The third step of the WPML setup process is to add a language switcher to your website. In this step, you will be asked to choose whichever language, you would like to provide your visitors to choose from.
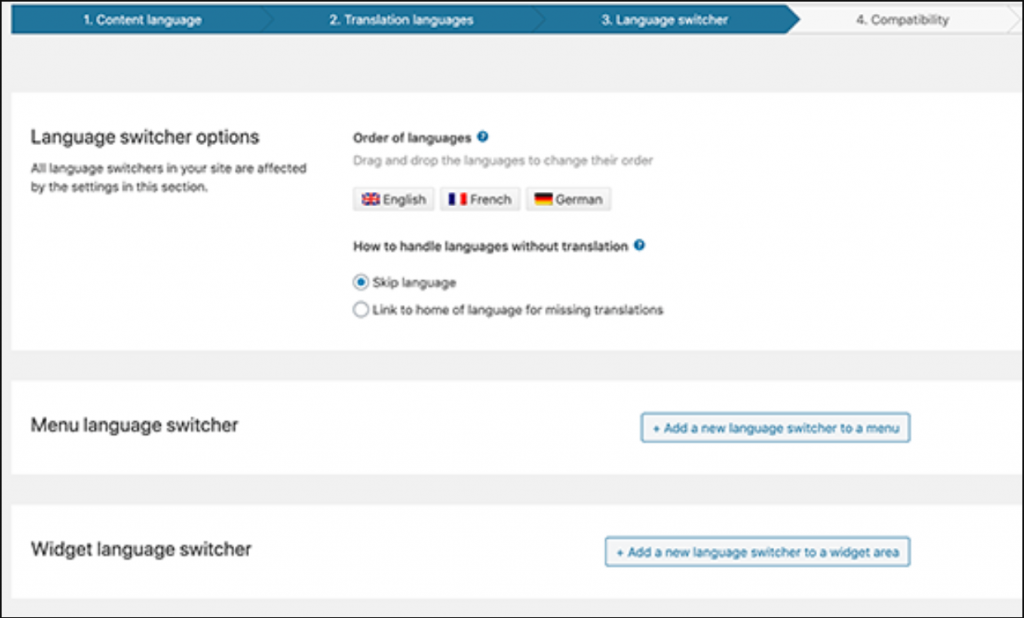
By default, the WPML plugin will set the Language switcher at the sidebar, Menu, or in the Footer. After completing the third step and coming to the 4th.
You will be provided with an option to choose whether you like to send a compatibility report to WPML such as theme and plugin information, to get faster support and compatibility alerts or not.
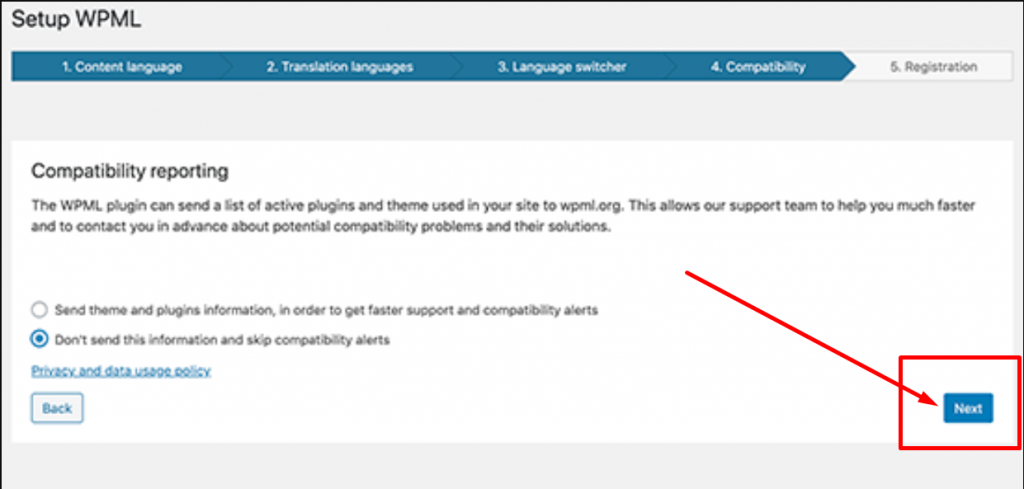
Now in the 5th and final step, a Site key will be asked to provide in the Site key box. But if you don’t have any or have not generated yet. You can click on the “Generate a key for this site” button.
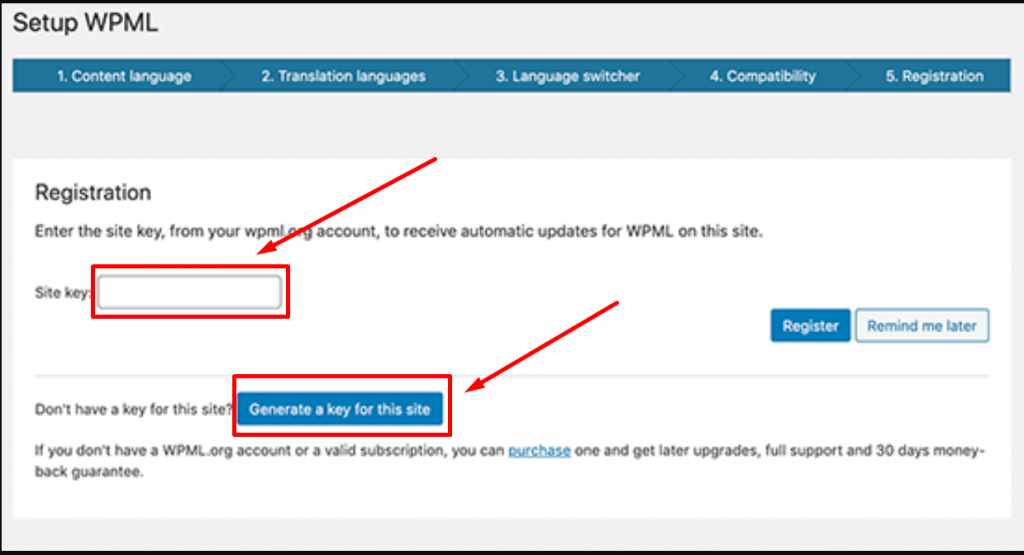
When you click on the “Generate a key for this site” button, you will be taken to the WPML site, where you will find that you need to add your website to your WPML account.
After adding and completing this step, you will be provided with your generated site key. Just copy that and paste it to the Site key box as shown in the picture above and click on the register button.
Voila! now you are done, you have successfully able to complete the whole setup process. Now the next thing is left to know how you can add multilingual content to your WordPress website with the help of the WPML plugin.
How can you add multilingual content to your website?
The best part of using WPML is, it can translate your complete WordPress website into any language that you choose. Whether it is your content, pages, Menus, themes, or tags.
Translate your posts and pages with WPML
To translate pages and posts of your WordPress website with WPML, you need to click on posts to check out your all posts. Just beside your posts titles, you will notice Flags of countries, as shown in the picture below:
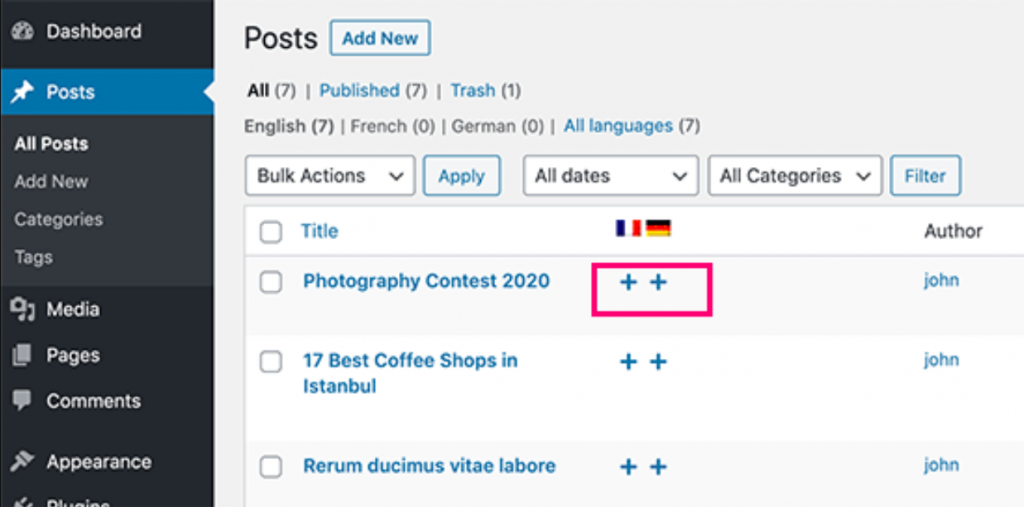
By default, WPML sets your post or pages in the WordPress language. However, you will have the option to add languages with the add button to translate them to whichever language you want.
Translate your Categories and Tags using WPML
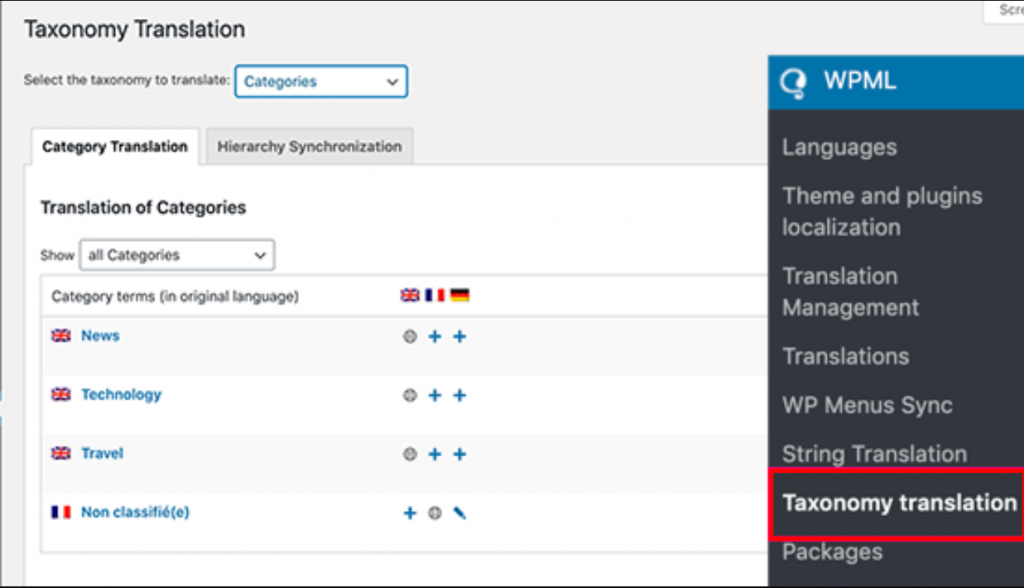
With WPML, it becomes easy for you to translate Categories and Tags. All you need to just go to WPML settings > Taxonomy Translation and select all the taxonomies whether it is available by default or custom to translate.
Translate Menu buttons using WPML
With WPML, it becomes easy for you to translate your navigational menu buttons just like you do with pages, posts, or categories. Just go to your WordPress dashboard > Appearance > Menus. Select the menu that you would like to translate.
On the right side of the Menu, you will find the languages link that you have already added to your WordPress website.
When you click on a certain language, a new menu will be created in that particular language. And all you need to do is to add those menu items to your primary language menu. Save the menu and all the settings to make changes effective.
Translating texts from plugins and themes with WPML
The WPML WordPress multilingual plugin provides you with an option to choose either the inbuilt translation of plugins and themes or use their own translation. Just go to WPML > Themes and plugin localization.
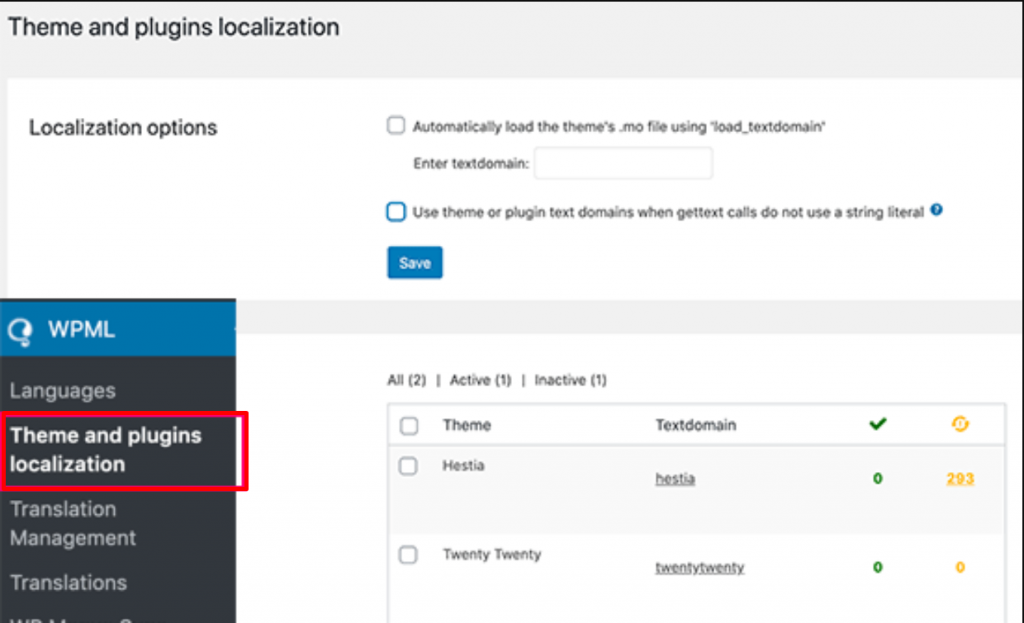
WPML always gives priority to your inbuild plugin or theme translation file to use instead of its own files. And if your plugins and themes are not translated into your desired languages, you have the option to translate them using the WPML string translation option.
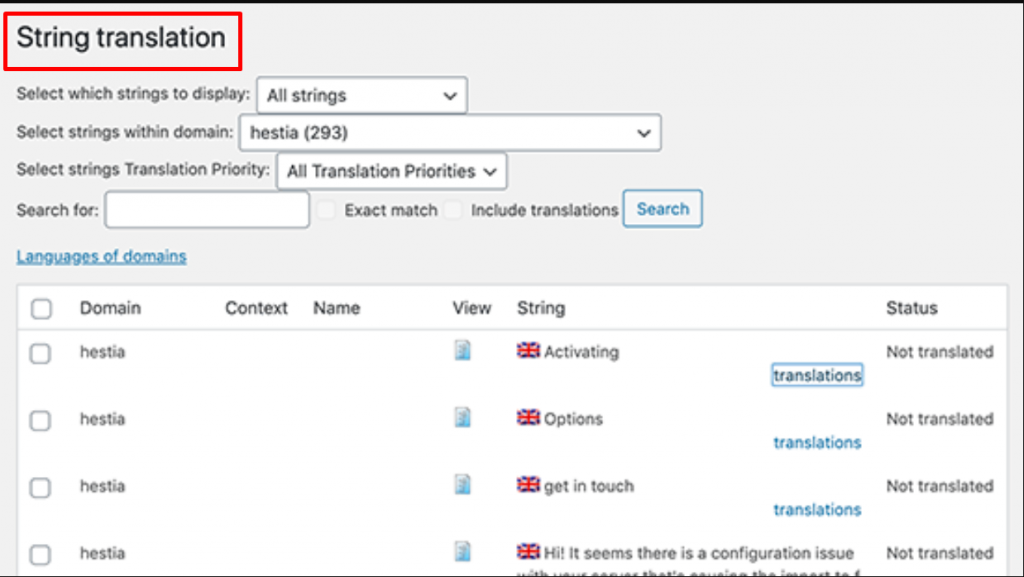
This WPML feature will let you translate almost everything whether it is Plugins, themes custom fields, or widgets.
Summary
A WordPress multilingual is one of the best tools to convert website content into any language and helps it make it ready for international audiences. However, a beginner might find it a little difficult and confusing. It is because there are certain settings and features present that might need some prerequisite knowledge.
But you should not need to worry about it at all, the above guide will let you easily set up three different WordPress multilingual plugins. In addition to it, you can also follow certain best SEO practices and follow hreflang tags, it will become easy for you to drive international traffic on your website.
Hope in this article, it becomes easy for you to understand how important to create a WordPress multilingual website, The advantages of using a multilingual website, and how can you convert an existing WordPress website into WordPress multilingual website easily.
If you find anything that we have missed to cover or any more valuable points to add. And if have already a WordPress multilingual website, kindly share it with us in the comment section below. We love to hear from you.
Frequently Asked Questions
Does WordPress support multilingual?
In short answer yes, when you create a WordPress multilingual website, it serves its content in different languages. It redirects the users or visitors to content based on their native language or region, or with the help of a language switcher, they can convert the content into any language.
What is the best WordPress multilingual plugin?
There are a wide collection of WordPress plugins available in the WordPress directory but below are the best and most popular WordPress multilingual plugins for you.
1. Translatepress
2. Polylang
3. WPML
4. Google Website Translator
How can I make my website multilingual?
There are certain things or points you must consider to make a website multilingual.
1. SEO-optimized multilingual plugins
2. hreflang tags
3. Translate URLs
4. Translate meta descriptions
5. Image files must be translated
6. Complete website content must be translated.

Rahul Kumar is a web enthusiast, and content strategist specializing in WordPress & web hosting. With years of experience and a commitment to staying up-to-date with industry trends, he creates effective online strategies that drive traffic, boosts engagement, and increase conversions. Rahul’s attention to detail and ability to craft compelling content makes him a valuable asset to any brand looking to improve its online presence.

