If you’re a frequent internet user, chances are you’ve encountered the DNS_PROBE_FINISHED_BAD_CONFIG error message. This error can prevent you from accessing websites and can be quite frustrating.
You also might get confused especially if you’re not familiar with DNS (Domain Name System). Which, is a critical component of internet browsing that translates website domain names into IP addresses, allowing you to access the internet.
When you encounter the “DNS_PROBE_FINISHED_BAD_CONFIG” error, there’s no need to worry or panic. This error simply indicates a problem with your DNS configuration, and your DNS is unable to resolve the IP address due to various possible reasons.
But the best part is, like other DNS issues, this DNS_PROBE_FINISHED_BAD_CONFIG error can also be easily fixed with only some simple troubleshooting methods.
In this article, we’ll comprehensively discuss every point related to the “DNS_PROBE_FINISHED_BAD_CONFIG” error, including its meaning, causes, and solutions.
So stay tuned and keep reading this post.
How to Fix DNS_PROBE_FINISHED_BAD_CONFIG Error?
A DNS-related error can trigger due to a variety of reasons, and it would be difficult for you to figure out the exact cause. Hence, the best thing you can do is to try troubleshooting DNS issues directly which can help you to fix DNS_PROBE_FINISHED_BAD_CONFIG Error.
Here are the steps to troubleshoot and fix the “DNS_PROBE_FINISHED_BAD_CONFIG” error:
1. Restart your Internet device or Router
Although your internet device or router may be working fine, one of the quickest and easiest ways to check and fix the DNS_PROBE_FINISHED_BAD_CONFIG error is by restarting it and renewing the IP address.
To do this, simply turn off your router or internet access device for a few minutes, and then turn it back on. Meanwhile, you can also restart your system. Once both devices are turned on, connect your system or PC to the LAN or Wi-Fi and try to access the website. Check if the error has been resolved or not.
2. Purge your Browser’s DNS cache
Browsers are designed to cache DNS records in order to deliver faster response times. Therefore, over time, these DNS records may get corrupted and can be responsible for triggering the DNS_PROBE_FINISHED_BAD_CONFIG error.
Clearing your browser’s cache can resolve the DNS_PROBE_FINISHED_BAD_CONFIG error caused by corrupted DNS records, as browsers cache DNS records to deliver faster response times. However, before trying this troubleshooting method, try accessing the website on an alternate browser.
If you can access the website on an alternate browser, then you should proceed to clear the DNS cache of the faulty browser.
Note: Since Chrome has a major Browser market share, here
On various operating systems including Windows, macOS, and Linux, if you use Google Chrome as your web browser, you have the option to use the feature chrome://net-internals/#dns to clear the DNS cache within the Chrome browser.
Read: 🚩 How to fix the DNS_PROBE_STARTED Error? [8 Ways]
All you have to do is,
Step 1: Open your Chrome Browser
Step 2: Enter the chrome://net-internals/#dns to the chrome address bar and hit the “Enter” button to open the interface.
Step 3: Now click the Cler Host cache button as shown in the picture.

Step 4: After that restart Chrome and go to the link chrome://net-internals/#sockets to flush the socket pools.

You have successfully been able to flush the DNS cache in Chrome. The above method also works on various platforms and devices such as Windows, Linux, macOS, Android, and iPhone or iPad.
3. Check DNS Settings
To Check your DNS settings and ensure the settings are up to date and accurate. The following steps outline the process of reviewing DNS settings on a Windows system:
Step 1: Open the Command Prompt > Type “ipconfig /all” and hit enter.

Step 2: Now Locate the ” DNS servers ” entry to make sure your DNS settings are accurate.
Step 3: If the displayed DNS servers are incorrect, recheck your DNS settings in the “Network and Sharing Center”.

Step 4: Now Type “nslookup WPOven.com” and hit the enter button.

Step 5: Now confirm that the displayed IP addresses are correct.

If you receive an error message something like “Host not found,” it may indicate an issue with your DNS servers. Consider changing to a different DNS server and try again.
4. Change DNS servers
For Windows 10 and Windows 11 users:
Step 1: If you are a Windows 10 or 11 User, you have to open the control panel by simply typing “Control Panel” in the search bar.
Step 2: In the Control Panel select Network & Internet > Network and Sharing Center.
Step 3: From the menu on the left, select Change adapter settings.
Step 4: Right-click on your network and select Properties.
Step 5: In the window that opens, click on Internet Protocol Version 4 (TCP/IPv4) from the list, then select Properties again.

Step 6: Click on Use the following DNS server addresses.
Step 7: Enter “8.8.8.8” for the Preferred DNS server and “8.8.4.4” for the Alternate DNS server.

Step 8: Click on the OK button to save your changes.
Step 9: Close all the windows and try re-accessing the website to see if the error is still present.
If the problem persists, you may need to try other solutions. However, changing your DNS address can often resolve internet connection issues.
For MacOS users:
Step 1: First, navigate to the System Preferences on your Mac. You can find this by clicking on the Apple icon in the top-left corner of your screen, and then selecting “System Preferences“.
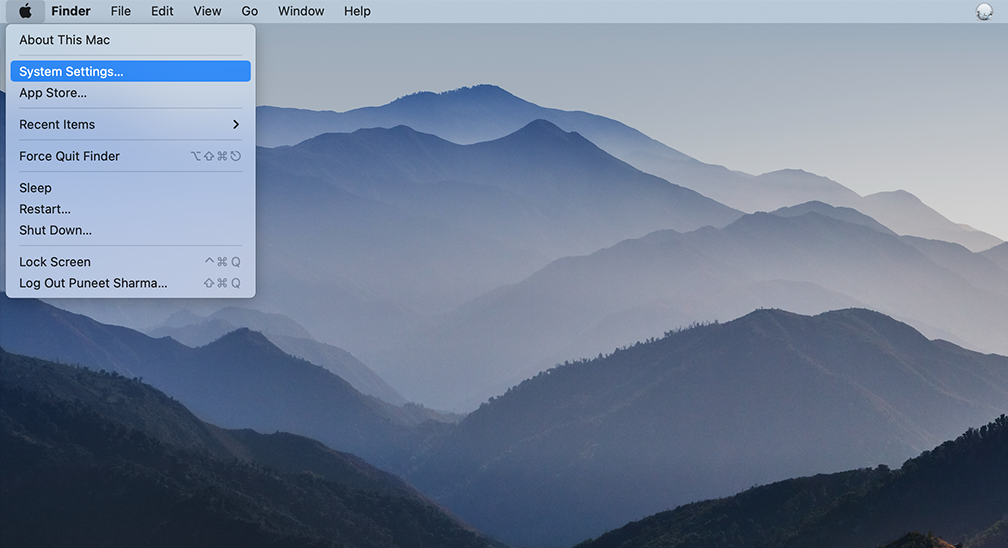
Step 2: Once you’re in System Preferences, locate the “Network” icon and click on it. From there, select the network connection that you want to modify (e.g., Wi-Fi or Ethernet).
Step 3: In the Network settings, you should see a button labeled “Advanced“. Click on that, and then navigate to the “DNS” tab.
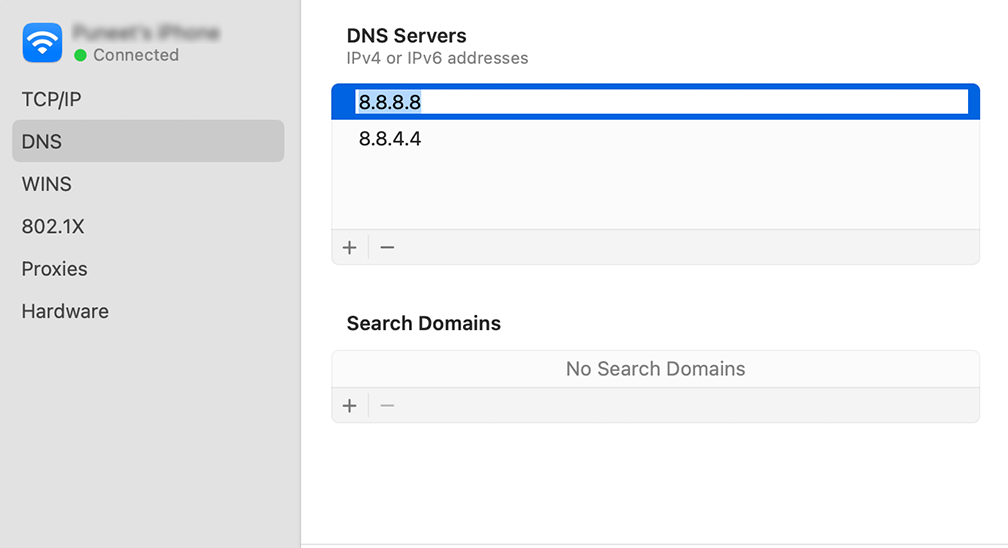
Step 4: Here’s where you’ll add the DNS server addresses. Click on the “+” button at the bottom-left of the DNS settings window, and then type in the IPv4 address for Cloudflare’s DNS servers: 1.1.1.1. Press enter, then repeat the process to add another address: 1.0.0.1.
Step 5: Finally, click “OK” to save the changes you’ve made. You should now be all set with your new DNS settings!
5. Reset IP and Flush DNS Cache
The DNS cache stores recent DNS lookup results on a computer or device. It improves the speed and efficiency of web browsing and other network-related tasks by avoiding the need to perform new DNS lookups.
The DNS cache is automatically updated over time, but it may get corrupted and need to be manually cleared to resolve issues with DNS lookups.
Refer to our detailed and comprehensive guide on ‘How to Easily Flush DNS Command Cache (Windows, Mac, Linux).‘ Once you have successfully cleared the system DNS cache, attempt to access the website again to determine if the issue has been resolved.
6. Update Network Drivers or Adaptors
Sometimes, an outdated network Adaptor can also be the culprit for triggering the DNS_PROBE_FINISHED_BAD_CONFIG Error. Hence, if you are still facing the error try uninstalling and reinstalling your network drivers through your Device Manager:
Step 1: Press the Windows key + R on your keyboard.
Step 2: Type “devmgmt.msc” into the Run box and hit Enter.
Step 3: In the Device Manager window, click to expand Network adapters.
Step 4: Right-click on your network adapter, and select Uninstall device.
Step 5: Confirm the action and wait for the process to complete.
Step 6: Close the Device Manager window and restart your computer.
Step 7: Once your computer has restarted, open the Device Manager again and select your network adapter.

Step 8: Click on Action > Scan for hardware changes from the menu bar. This will reinstall your network driver(s).

Step 9: Now try loading the website again. If the issue persists, you may need to update your drivers manually or seek further assistance.
7. Delete System Temporary Files
Most browsers and operating systems store some temporary data on the device for later use. However, if any of these temporary files get corrupted over time, it can conflict with the DNS information and trigger DNS_PROBE_FINISHED_BAD_CONFIG errors.
Therefore, you can resolve this issue, by simply deleting your system’s temporary files. To do this,
For Windows
Step 1: Type %temp% in your Windows search bar and hit Enter.

Step 2: This will open the “temp” folder, which contains all the temporary files listed.

Step 3: Select all, and Delete them.
For macOS
- Open the Finder by clicking on the Finder icon in the dock.
- Press the “Command+Shift+G” keys on your keyboard. This will open a search bar.
- In the search bar, type “/Library/Caches” and then press the Enter key.
- This will take you to the Caches folder. Here, you will see several folders with the names of different applications.
- Select the folders that you want to delete.
- Empty the trash bin by right-clicking on the icon and selecting “Empty Trash”.
For Linux
Ubuntu users do not need to follow these steps because all temporary files are automatically deleted with every reboot.
8. Disable Antivirus or Firewall
Antivirus and firewalls are undoubtedly essential tools for protecting your PC against malware and hacking threats. However, sometimes these security tools are configured too strictly and start interfering with your DNS servers, causing connectivity issues.
Therefore, you can try temporarily disabling them and check whether it fixes the DNS_PROBE_FINISHED_BAD_CONFIG error or not.
For Windows users:
Step 1: First, you need to open your computer’s control panel. To do this, click on the “start” menu on your desktop and type in “control” in the search field.
Step 2: Next, select “System and Security” from the control panel options. This will take you to a new page.
Step 3: On the new page, you’ll see an option for “Windows Defender Firewall.” Click on “Allow an app or feature through Windows Firewall.”

Step 4: In the next window, you’ll see a list of apps and features that are allowed to communicate through your firewall. To change these settings, click on “Change settings.”

Step 5: If you don’t see your DNS client on the list, you can add it by clicking on the plus (+) icon.
Step 6: To temporarily disable your firewall, uncheck the box next to “Windows Defender Firewall” and click on “OK” to save your changes.
Step 7: Alternatively, you can adjust your firewall settings by finding the DNS client or any other application you want to configure and checking or unchecking the boxes next to the desired settings.
Step 8: Once you’re done adjusting your settings, click on “OK” to save your changes.
Note: It’s important to disable your firewall temporarily if you need to troubleshoot a connectivity issue. Leaving your computer without a firewall can expose it to potential security threats.
For macOS
- Click on the Apple search bar and type “Firewall”.
- A firewall interface will open where you have to select the “Firewall” tab.
- If the firewall is turned on, you’ll see a message that says “Firewall is on.” Toggle to Turn it Off.

9. Scan your System for any Malware
Cached DNS records can be infected with by malware, viruses, and other threats. If you suspect that your device has been compromised by malicious software or files, it’s recommended that you run a complete malware scan of your System.
Attackers often target DNS in order to redirect users to fake websites. To protect your infrastructure from cyber attacks, it’s important to follow DNS security best practices.
Read: 🚩 DNS Poisoning aka DNS Spoofing: Meaning, Prevention, and Fix.
10. Check the Browser’s Extensions
A faulty Browser Extension can create connectivity issues. Try disabling all extensions to see if they are the case. In the Chrome menu, click on Advanced Tools — Extensions. To disable them just uncheck the toggle on each of them. Make sure you disable all the extensions, it is very important to identify the reason.
Then, try to access the website again. If the error does not appear anymore, all you have to do is to find the extension causing the error. Turn on the installed extensions one by one and check the availability of the problem site after each one.
How to Prevent DNS_PROBE_FINISHED_BAD_CONFIG Error?
Preventing the “DNS_PROBE_FINISHED_BAD_CONFIG” error can save you from the frustration of not being able to access the internet. Here are some tips to prevent the error:
- Maintain a Stable Internet Connection: Ensure your internet connection is stable and reliable. Unstable connections can cause DNS-related issues.
- Check DNS Settings Regularly: Check your DNS settings regularly to ensure they are up-to-date and correct.
- Update Software: Keep your software updated to ensure compatibility with the latest DNS settings.
- Secure Your System: Protect your system from malware and viruses that can interfere with your DNS settings.
Read Similar DNS errors: 🚩 How To Fix DNS_PROBE_FINISHED_NXDOMAIN Error?
What is DNS_PROBE_FINISHED_BAD_CONFIG Error?
To better understand what DNS_PROBE_FINISHED_BAD_CONFIG Error means? It is better you must understand the role of DNS first.
- DNS directs traffic on the internet and connects nameservers, URLs, and IP addresses with web servers.
- Websites have unique IP addresses, which can be difficult to remember for all the sites you want to visit. Fortunately, DNS comes to the rescue by making domain names user-friendly and easy to remember.
- When a user inputs a URL into their browser, the DNS begins the process of DNS name resolution to connect it with a web server.
- If the DNS is unable to complete this process successfully, it can return an error message.
DNS_PROBE_FINISHED_BAD_CONFIG is an error message that appears in web browsers when they are unable to access a website due to a problem with the DNS configuration.
It means that the browser was unable to resolve the IP address of the website you’re trying to access. This can happen due to a misconfiguration in your network settings, your router settings, or due to an issue with your ISP’s DNS server.
Note: The DNS_PROBE_FINISHED_BAD_CONFIG error can occur on various browsers and devices, including Google Chrome, Android, iOS, macOS, and Windows. It is not restricted to a particular platform.
What Are The Causes of DNS_PROBE_FINISHED_BAD_CONFIG Error:
The “DNS_PROBE_FINISHED_BAD_CONFIG” error can occur due to various reasons. Here are some common causes:
- Misconfigured DNS Settings: This is the most common cause of the error. If your DNS settings are not configured correctly, your device won’t be able to connect to the internet. This can happen due to incorrect settings or outdated information.
- Outdated Browser: An outdated browser may not be compatible with the latest DNS settings, leading to the error. Make sure to update your browser regularly to avoid this issue.
- Antivirus or Firewall Interference: Sometimes, antivirus or firewall software can interfere with your DNS settings and cause an error. Disable your antivirus or firewall temporarily and check if the issue persists.
- DNS Server Issues: The server you’re trying to connect to may be down or not responding. You can try changing your DNS server to a different one to see if it resolves the issue.
Read: 🚩 How To Fix “DNS Server Not Responding” Error? (12 Methods)
Conclusion
If you have encountered the DNS_PROBE_FINISHED_BAD_CONFIG error, it can be frustrating for anyone. However, there are several ways to fix it.
In this article, we have explored the causes of the error and provided various basic and advanced troubleshooting steps to resolve it, along with some preventive tips to avoid it in the future.
To summarize, the basic fixes include.
- Restart your Internet Device or Router
- Purge your Browser’s DNS cache
- Check DNS Settings
- Change DNS Server
- Reset IP and Flush DNS Cache
- Update Network Drivers
- Delete Temporary files
- Disable Antivirus or Firewall
- Scan your System for any malware
- Check Browser Extensions
If you have any queries or would like to add any valuable points to it, please do let us know in the comment section below.
Read: 🚩 chrome://net-internals/#dns – How to Clear DNS Cache Chrome
Frequently Asked Questions
How do I fix the error code dns_probe_finished_bad_config?
How to DNS_PROBE_FINISHED_BAD_CONFIG Error? (10 ways)
1. Restart your Internet Device or Router
2. Purge your Browser’s DNS cache
3. Check DNS Settings
4. Change DNS Server
5. Reset IP and Flush DNS Cache
6. Update Network Drivers
7. Delete Temporary files
8. Disable Antivirus or Firewall
9. Scan your System for any malware
10. Check Browser Extensions
How do I fix DNS probe problems?
1. Reset your Router
2. Flush the DNS cache of your browser, as well as your system.
3. Update your Network Drivers
4. Change the DNS server
5. Check DNS settings

Rahul Kumar is a web enthusiast, and content strategist specializing in WordPress & web hosting. With years of experience and a commitment to staying up-to-date with industry trends, he creates effective online strategies that drive traffic, boosts engagement, and increase conversions. Rahul’s attention to detail and ability to craft compelling content makes him a valuable asset to any brand looking to improve its online presence.

