Are you looking for Shifting from Webflow to WordPress? The reason for such actions can vary from user to user. Depending on whether you are not satisfied with the current web design, your budget, features, flexibility, or customization of the website.
Whatever the reason is, a website owner’s ultimate goal is to have a highly efficient website whose performance can easily boost, drive and sustain high traffic, is rich in features, and has more flexibility to keep working in website development.
In short, if you are not completely satisfied with the webflow, you are always welcome to Move your website to WordPress.
Needless to say, WordPress is one of the most popular CMS available that dominates the CMS market share. WordPress powers more than 40% of the websites on the internet which you cannot ignore.
Whatever the reason you have for moving from Webflow to WordPress, one thing you must note is that the process will not be that easy. It is because Webflow is a web builder and WordPress is CMS. This means there will be a lot of technical procedures you have to follow, without affecting SEO and the content of the website.
To find out How you can shift from Webflow to WordPress easily, take your time and keep reading this post till the end.
Let us get started!
Introducing Webflow
Launched in 2013, Webflow is a new website builder, that is trying to get fit in the CMS world. The company Provide SaaS (Software as a Service) to build websites, CMS, and hosting platform. Generally, with the help of these SaaS applications, users will be able to build responsive websites with website editing tools based on the browser.
But in Webflow, HTML, CSS, and JavaScript are generated automatically. All the websites developed on web flow are hosted on Fastly and powered by Amazon CloudFront. Webflow is an all-rounder website builder which has built-in CMS and does not require any external plugin.
Webflow vs WordPress- Comparison
Both the platforms Webflow and WordPress have the same objective, i.e. to make it possible for users to build websites that are rich in features and look attractive. Both the platforms possess some common features but still, they differ in terms of their usage and technicalities.
Webflow is a SaaS-based application that is used to build websites, whereas WordPress is an open-source CMS that requires some coding knowledge to be used for customizing websites.
Let us compare both platforms, side by side on various parameters which will help to determine which platform has more advantages over others.
Comparing Webflow vs WordPress
Webflow
- SaaS-based website Builder
- Built-in Drag- Drop page builder
- No external Plugins required
- Rich integrated functionality and design customization tools are available by default.
- Comes with a built-in e-commerce platform and Premium website editing tools
- A huge collection of Free, customizable, responsive templates is available.
- Easy to integrate
- Integrated Domain and hosting
- Provides complete Freedom to design
- Easily able to make edits on the page directly
- More expensive
- 0.3% market share
WordPress
- Open-Source Content Management System software
- Website builder plugin is required
- External plugins required to add features to the website
- Default themes and plugins are limited
- Hundreds of third-party templates, themes, and plugins are available on the web.
- Free to use any hosting service and domain registration
- You can easily turn any website into eCommerce using simple e-commerce plugins.
- Integration of Plugins or extensions may require coding skills.
- Website designing is limited to the use of templates or you have to code from scratch.
- You will require to use dashboard and page editors to edit web pages.
- Available Free to use but need to pay for web hosting
- A lot of flexibility and customization options are available
- 40% market share
The above-mentioned points are some of the huge differences between Webflow and WordPress, that you must be aware of before making your decision. Now let us see, apart from the main differences why would you consider Shifting from Webflow to WordPress.
Why you should consider Shifting from Webflow to WordPress?
Although there can be many reasons for moving from Webflow to WordPress, that varies from user to user. But there are some obvious points that you must check out.
Flexibility
When you talk about flexibility and customization, WordPress turns out to be a perfect choice. WordPress is one of the most flexible platforms that provide a complete area for flexibility and customization options. You will have thousands of third-party templates and themes available, from which you can easily build your website.
The official WordPress repository has more than 4000 themes, and ThemeForest( 3rd party) has more than 11000 themes available. All of these themes are customizable as per the user’s demand and their business needs.
When we talk about Webflow, it is also well equipped with great customization tools. It also provides plenty of Free and paid customizable templates, with the help of which you can edit and build a website with ease. However, if you would like to have a unique web design, you need to have little designing skills and you will be ready to create beautiful layouts from scratch.
But the main problem is, Webflow is a hosted platform where all the choices or features are limited by the vendor. But in WordPress, you will have all the control over hosting service, features, and choices for a website.
Integrations and Extensions
As we have already mentioned, In Webflow the users will be restricted to use only the premium addons or extensions provided by the vendor only. But in the case of WordPress, you can use a wide range of plugins available from the WordPress repository as well as third-party websites and integrate with your website to build a feature-rich website instantly.
Pricing
One of the best things about WordPress is it is open source and available free for users. The only price a user has to pay to build a website on WordPress is for Hosting services, Domain registration, Premium plugins, and premium themes. If you do not want to use premium themes and plugins, the cost of developing a website on WordPress can be reduced further. In addition to it, you have to only pay for the services or features you want on your website.
Whereas Webflow has both free as well as premium options available. But in Free plans, you will have certain restrictions and limited features. In addition to it, the website builder does not provide the freedom to choose a hosting provider because they have their own. This means a user will be restricted to use the features that the vendor provides.
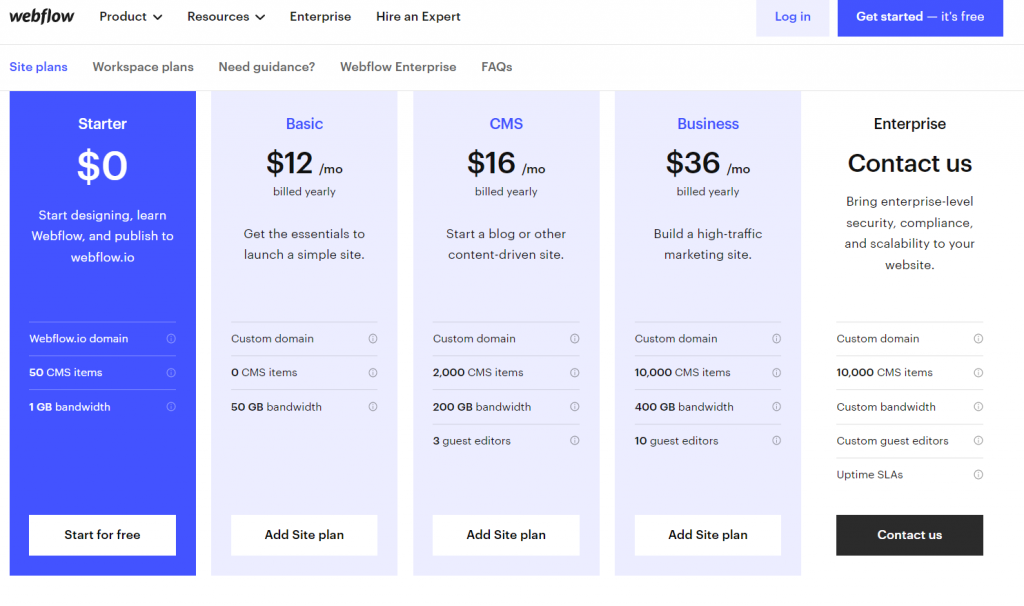
The prices of Webflow start at $12/month for the basic plan and go up to $36/month for the Business plan. That means if you want to build an eCommerce store and have the potential to get high traffic, Webflow’s business plan would be better. Which is quite an expensive plan when compared to WordPress.
Regardless of your reasons, which compels you to move from Webflow to WordPress, it is pretty sure that the result would turn out to be exceeding your expectations. The CMS WordPress possesses all the powerful features that help you to build and manage any website rich in features. The only thing that you need to do is ask yourself whether you have any coding knowledge or ability to handle the technical stuff while working with the platform. It so, then use to make it to your advantage and you won’t regret your decisions.
Pre-requisite points need to consider before Shifting from Webflow to WordPress
When you have finally decided to move from Webflow to WordPress, before starting the process, there are certain things you need to consider before shifting your website from Webflow to WordPress so that the process can be successful without any issues.
Let us check out some Pre-requisite points you need to consider for shifting from Webflow to WordPress:
Get web hosting service provider – WPOven make it easy!
In the above sections, we have already mentioned that the biggest advantage to using WordPress is the freedom to choose your web hosting services. And in this regard, WPOven can be the best deal in the market. It is because WPOven is one of the best-Managed WordPress hosting service providers in the US, that provides a dedicated WordPress optimized platform that has all the features for WordPress websites to grow.
We have servers and data centers with dedicated hotspots around the World that help to decrease website latency, boost performance and enhance speed.
Some of the key Features of WPOven are:
- 24/7 customer support
- You can choose a Data center from our 13 locations around the world.
- Can host unlimited websites
- Provides and Staging platform and easy to Sync
- We offer a Dedicated Cloud with SSD Storage.
- Complete Security
And Plans start at $16.61 per month. It is one of the lowest and best plans for anyone who likes to start their WordPress blog.
![How to Start A WordPress Blog in 2022? [8 Simple Steps] 3 WPoven pricing](https://www.wpoven.com/blog/wp-content/uploads/2021/06/image-1017x1024.png)
Create website Backup
Creating backups is one of the most essential steps that everyone should have to follow prior to shifting from Webflow to WordPress. It is because, if anything went wrong during the process, you are still able to regain your website data just like it was before.
It also has to be understood that making a website backup doesn’t mean that you are completely Shifting your website data from one platform to other. You will only be downloading your website data and uploading it to WordPress. And there would be no effect on your Webflow website.
The create backup, you need to press the Cntrl+shift+S key simultaneously on your windows PC. For macOS press the keys Command + Shift + S simultaneously, a pop-up window will appear asking you to enter a description of the backup, after that click on the Save button. For your reference you can check out the video given below:
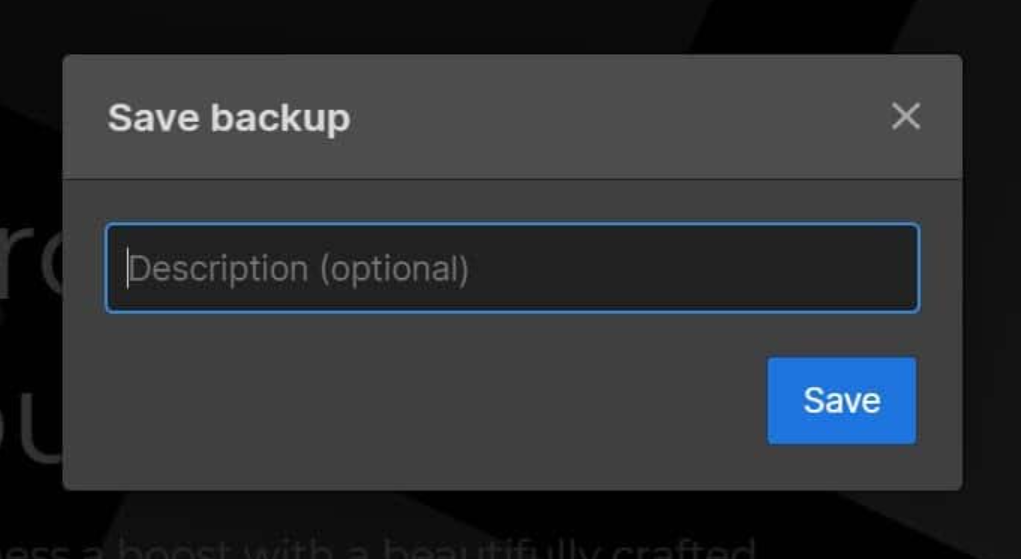
However, for your reference, you can also check out a complete tutorial video on creating critical backups in Webflow, given below:
How to shift from Webflow to WordPress easily? – Complete guide
When you have already made your mind to switch from Webflow to WordPress and taken all the pre-requisite steps, now you have to follow these must-have steps to make the whole process successful.
Step 1: Get your WordPress ready
The first step for Webflow to WordPress migration is, you need to follow is to get your WordPress ready. However, many Managed web hosting companies like WPOven provide you with preinstalled WPOven, when you add a site to the server, WordPress is automatically installed on that site.
But in case you want to do it manually, you can download the software from WordPress.org and upload the downloaded WordPress files to your server. using FTP client.
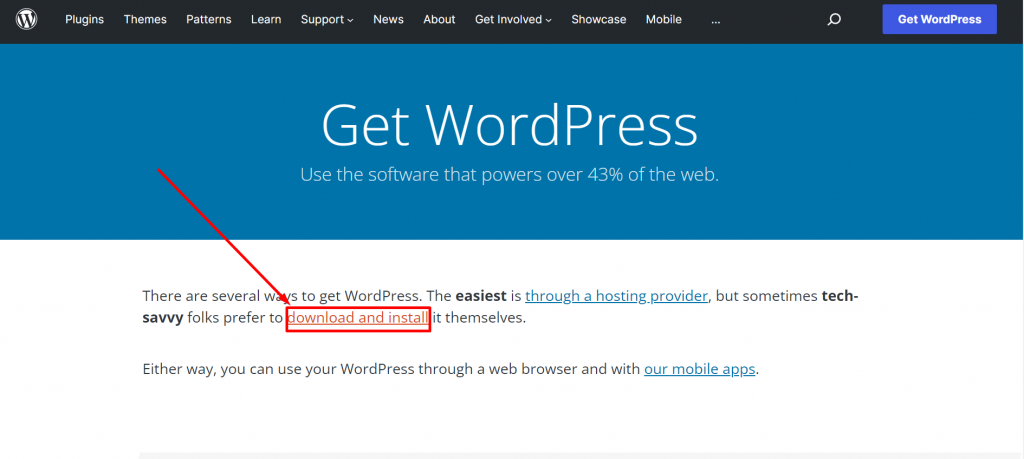
The whole process hardly takes a few minutes and WordPress will be ready to install. But why add more steps to install WordPress manually and make it more complex? Where WPOven can do it for you automatically.
Step 2: Export content from Webflow
Now that you have successfully installed and configured WordPress, it is time to get your website content ready to be uploaded. One of the best things about Webflow is that it provides you with an easy way to export all your website data. But not exactly you will be able to export all of it, such as your product pages, custom CSS, style elements, videos, audios, and index pages are not exportable.
While, blog posts, image galleries, texts, and all your website pages will be easy to transfer or export.
Now login to your Webflow Dashboard to export the content followed by Webflow Collections Panel where you will be able to see all the website files are stored. Now from the panel, you can select and export any collection by simply using the export/import feature as shown in the picture below:
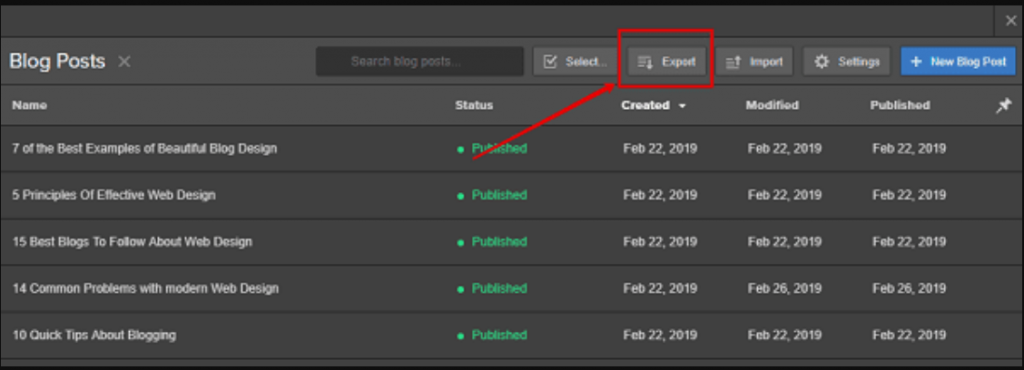
To export a particular collection, click on it to open and click on the “Export” button. Similarly, you can select and export as many collections as you want. All the exported files will either be in CSV files or standard files on your PC. In the case of an e-commerce website, if you want to export the products that were listed on your e-commerce website, you will need to download them into a CSV file and save a backup.
Step 3: Import content from Webflow to WordPress
The next and most important step is to upload or import all the downloaded files into your new WordPress site. To begin the importing process, first of all, go to WordPress dashboard > click on the tools > Import.
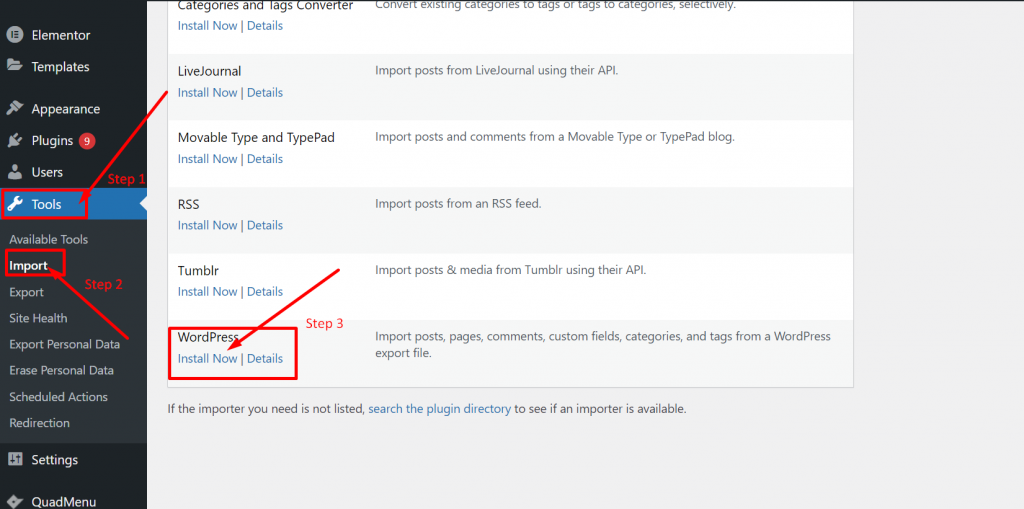
On the import page, you will find a list of services to choose from, as shown in the picture above. You have to select WordPress and click on Install Now link to install the importer plugin automatically. Now an Import WordPress page will open as shown in the picture below and you can click on the choose file button to select the files you want to import/upload followed by clicking on the “Upload file and import” button.
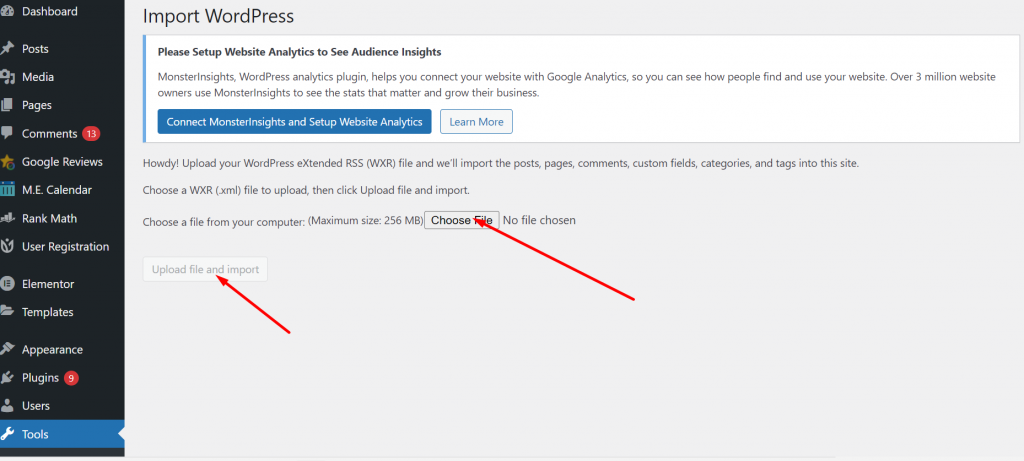
One thing you have noticed is that the importer only accepts XML files to be uploaded. But in case CSV files are to be uploaded, you need to install a migration plugin such as “WP All Import” that can help you to install CSV files as well.
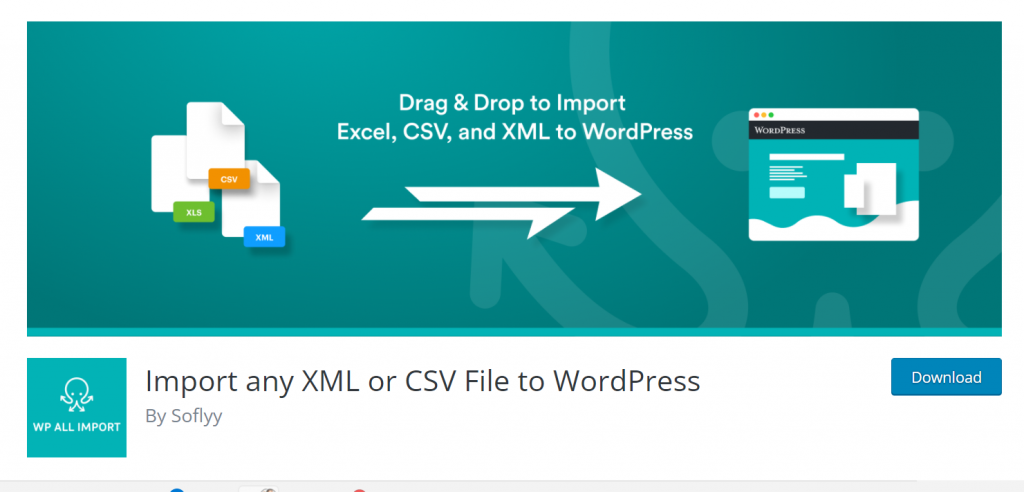
Install the plugin by searching out the Plugin section on your WordPress dashboard > plugins > Add new and search WP All import in the repository and install the plugin.
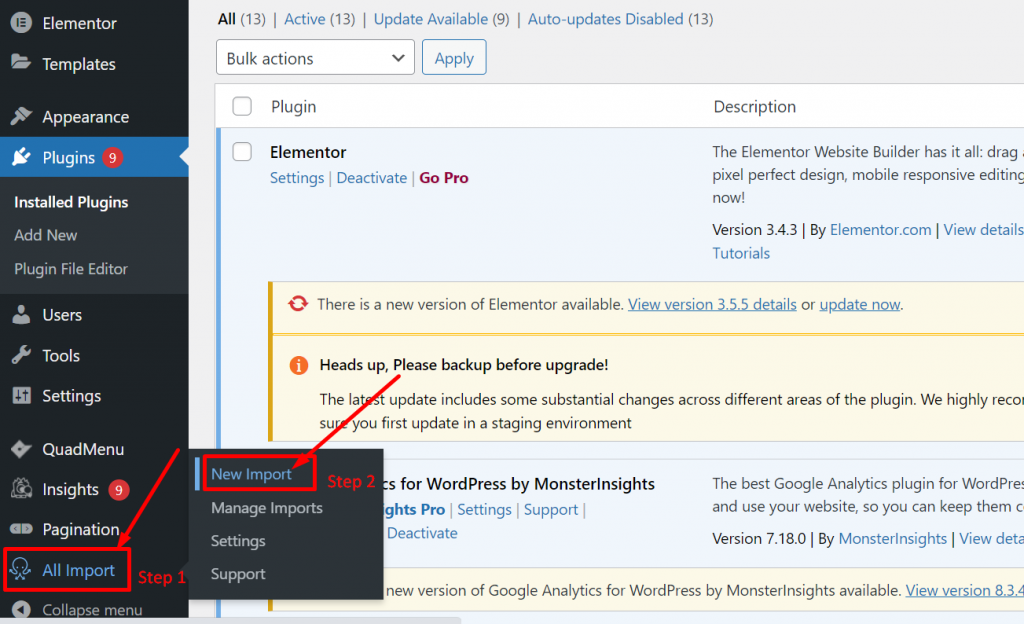
Once you have successfully able to install and activate the plugin, Navigate to All import > New Import as shown in the picture down below:
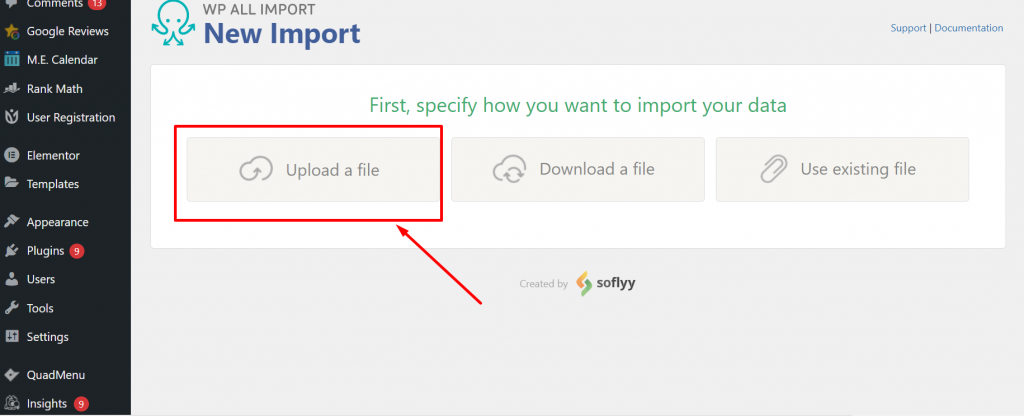
Now click on the Upload a file, and select whichever type of file (XML or CSV) you would like to import on your WordPress site.
For further assistance, you can also read the full documentation of the plugin available here.
For Uploading CSV files, you can use these plugins, however, XML files can be easily imported via Importer Plugin. You have to follow the same process for any Webflow file to be uploaded on WordPress.
Step 4: Importing images
One thing you must note is that photos or images cannot be uploaded automatically to WordPress. For this task, you will require to have a WordPress plugin or follow a manual method which can be tricky. So, it is better to use any WordPress free plugin such as “Auto Upload Images” which is free to install and use from the WordPress directory.
Step 5: Setting up your Permalinks
One of the major tasks that anyone has to follow is to set up your permalinks after Shifting from Webflow to WordPress. It is because you won’t like to lose the traffic which you have gained with your hard work. And to preserve the same glory and loyal visitors, you will have to customize or set up the newly generated WordPress URLs (if any).
The best thing about WordPress is it is one of the best platforms that provide a lot more customization and flexibility options than any other CMS. And it also provides users with a lot of areas to work on SEO in which editing URL is one of the best things.
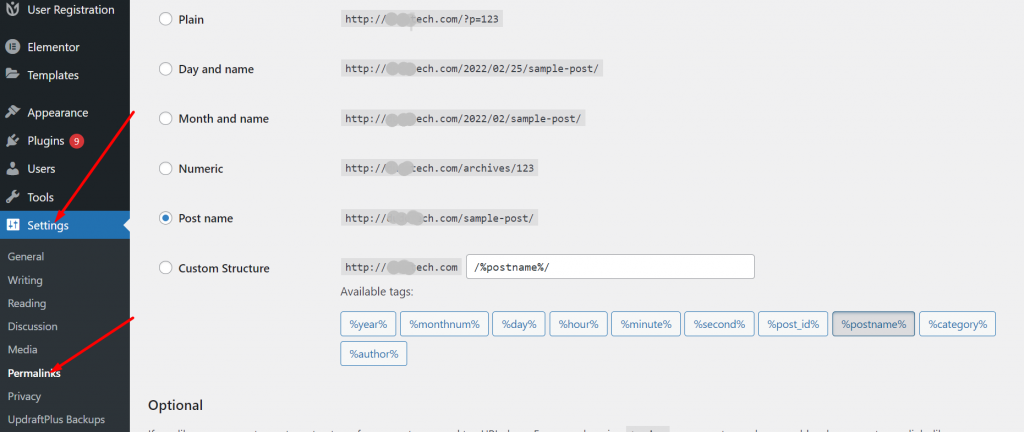
To access and edit your permalink, go to Settings > Permalinks in your WordPress dashboard:
Step 6: Checkout your contents
Since we have already mentioned that it is not possible for all the contents to migrate from Webflow to WordPress automatically, you have to follow the manual path to do so. At this point, there is also a possibility that some content might get missed. To avoid this scenario, it is highly recommended that you cross-check and review your website again. If you find any, move them manually.
Now webflow to WordPress conversion has been successfully done. But you are not done yet, there are some more steps you need to follow, in order to run the website completely.
Step 7: Move your Domain to the WordPress
Although you have successfully migrated Webflow to WordPress, your domain will still be direct to Webflow. And if you want to retain the same domain name, you need to make changes in your Domain name settings so that the domain name directs to the new web servers provided by your web hosts.
If you have WPOven as your hosting service provider, you will be able to set the DNS records for all your sites hosted with WPOven from the WPOven dashboard itself.
How Do I Point my Domain to WPOven?
As a Cloudflare Certified Partner, we’re providing you with the ability to easily enable the free plan from Cloudflare, for all your domains.
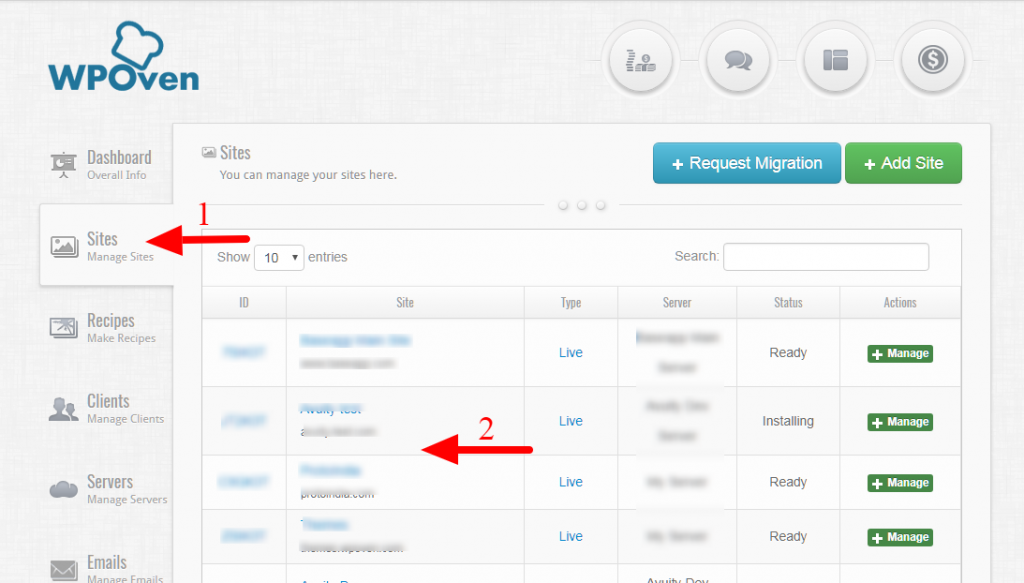
Step 1: Log in to your WPOven dashboard and navigate to the ‘Sites’ Section and select the site for which you wish to add the DNS through Cloudflare, from the list
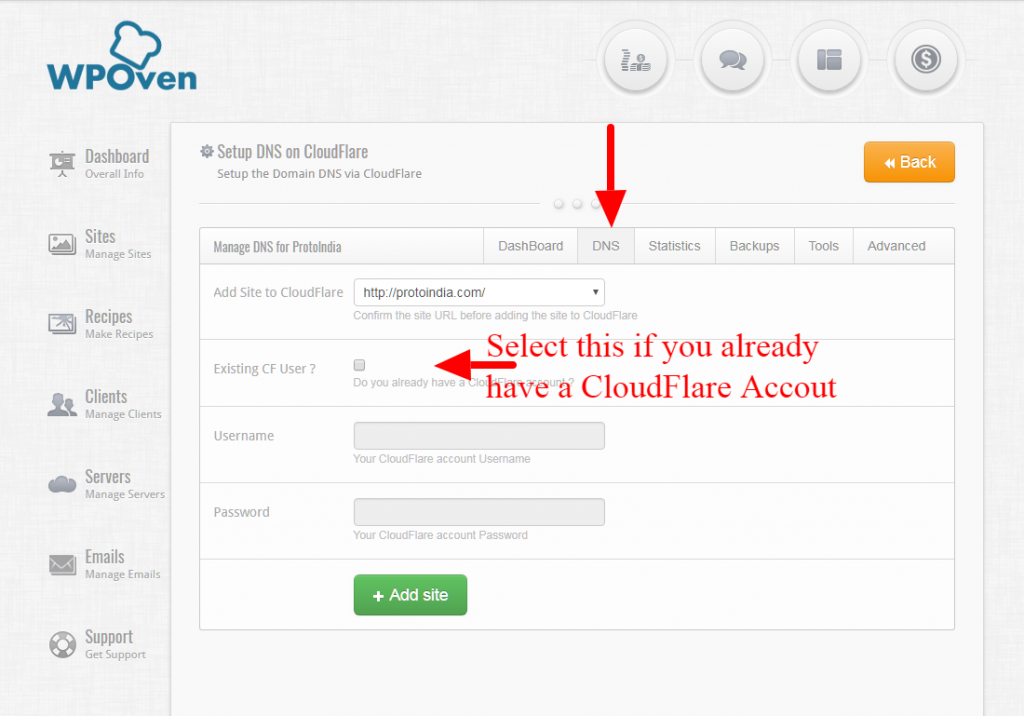
Step 2: Click on the ‘DNS‘ Tab to open the DNS creation page. In case you already have a Cloudflare account you can check the ‘Existing CF User’ Checkbox, if not, simply select the site and click on the ‘Add Site‘ button.
Step 3: Once you see the following form on your screen, it means that the site has been added to your Cloudflare account and you should also have received an Email regarding this from Cloudflare. You will be provided with 2 Nameserver records in the form. You need to simply log in to your Domain hosting account and change the nameservers for your domain to these values in the form.
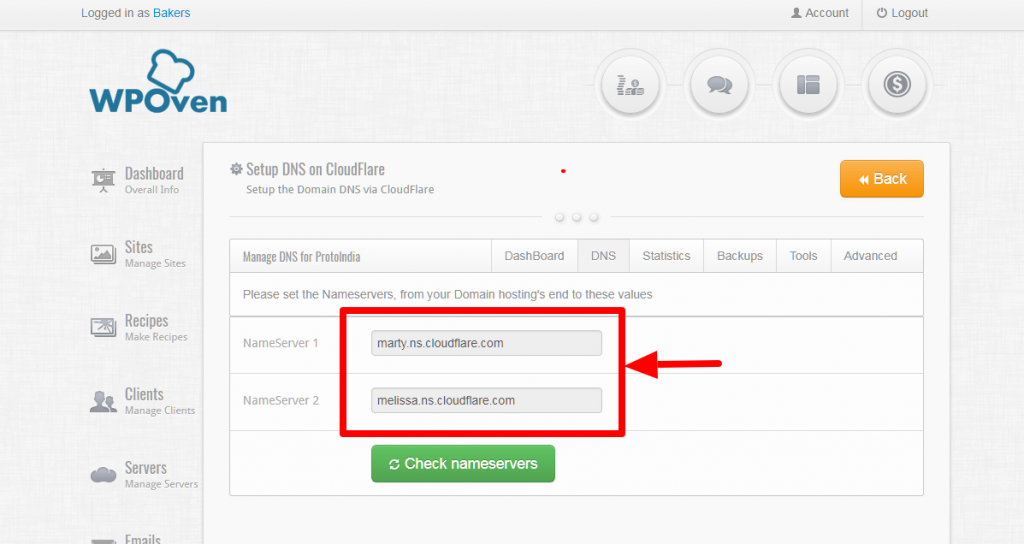
Note: The Nameserver changes can take up to 24 hours to reflect. In case the nameservers changes still do not reflect after 24 hours, please feel free to contact us
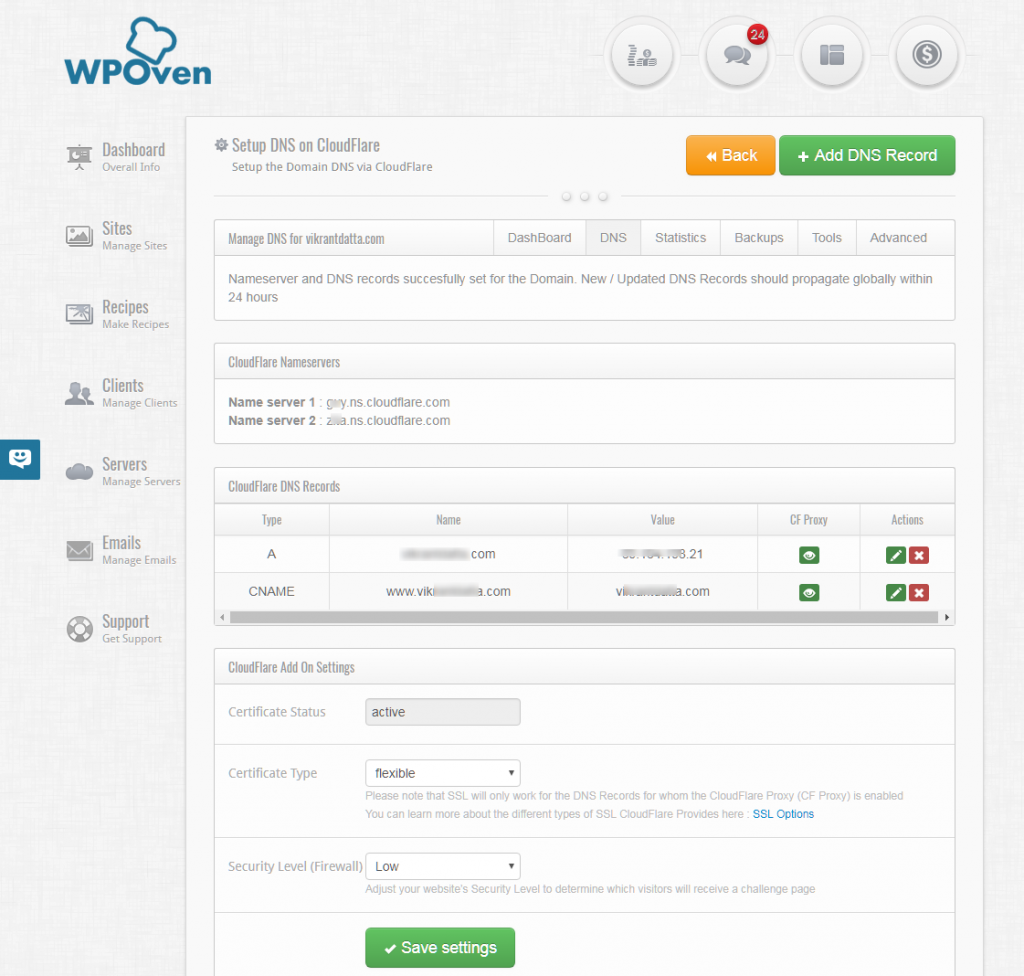
Step 4: Once the Nameserver changes take effect, you will see the following screen as confirmation and you will also receive an Email from Cloudflare regarding the same.
Two basic DNS records should be added automatically, i.e. the Aname record and the Cname record for ‘www’. In case you wish to add more records, you can simply use the ‘Add DNS Record‘ button placed on top of this page.
Step 8: Setup Your WordPress site
At last, when you are done with the whole process of Shifting your website from Webflow to WordPress, the last thing only left for you is to customize your WordPress site and make it visibly presentable. Take your time and explore more about WordPress and how you can use most of it for your website to grow and expand.
Install plugins, themes, and addons to increase the features and functionality of your website that help you to provide a unique user experience for your visitors. Try and test different designs and implement the best SEO practices to increase your organic traffic, which helps you to outshine your competitors.
Summary
Shifting or migrating from one CMS to another i.e (Webflow to WordPress) is not an easy task like it seems. It involves a lot of risk and steps, that if anything went wrong you probably lose your website. Although webflow is a complete solution for managing and building sites, things will become out of your hands when your website is starting to grow.
At this moment, WordPress comes to the rescue that is one of the most powerful platforms and has higher flexibility. In addition to it, if you combine WordPress with Managed WordPress hosting services you will never turn back.
On the other hand, after completing shifting website from Webflow to WordPress do not forget:
- Importing images
- Setting up Permalinks
- Checking your contents
- Pointing your domain to a new web host
- Setup your WordPress site
If you have any queries regarding the post shifting from Webflow to WordPress, please feel free to write your valuable opinions or suggestions in the comment section below.
Frequently Asked Questions
Can I transfer Webflow to WordPress?
You can easily transfer Webflow to WordPress by following these easy steps:
1. Get a web hosting service
2. Set up WordPress
3. Export content from Webflow collection panel
4. Import to the WordPress
5. Customize permalinks
6. Import images
7. customize your WordPress website
Is Webflow easier than WordPress?
Both the platform Webflow and WordPress help you to build stunning websites, there is a bit of a learning curve in WordPress but it is worth trying. However, it is quite easy to build a website on Webflow due to its drag and drop feature but not as flexible as WordPress.
Is Webflow good for beginners?
Webflow is quite a complex website builder, hence it is not recommended to beginners. But if you want to build a website, it is preferred to go for WIX or Squarespace as a beginner? Wix provides you with a free plan on which you can try and learn how website builders work and when things get easy for you try to move on other platforms.

Rahul Kumar is a web enthusiast, and content strategist specializing in WordPress & web hosting. With years of experience and a commitment to staying up-to-date with industry trends, he creates effective online strategies that drive traffic, boosts engagement, and increase conversions. Rahul’s attention to detail and ability to craft compelling content makes him a valuable asset to any brand looking to improve its online presence.

