WordPress Login URL is the only link through which a user can get easy access to WordPress Admin Dashboard by providing a login and password. But beginners, often find it difficult to get access through the admin page, and their work gets affected.
Even some users prefer to change or Hide their WordPress Login URLs due to the following two reasons:
- Security concerns
- To rebrand each and everything thing of your website to give a better user experience.
Hence, in this article, we will be stressing more on the above two points and also, other ways to find WordPress Login URLs. So stay tuned and keep reading this article completely, to clear all your doubts.
How to locate or Find Your WordPress URL?
By default, after installing WordPress, you will have two WordPress login URLs “mydomain.com/wp-admin” and “mydomain.com/login“
mydomain.com/wp-admin
mydomain.com/login
mydomain.com/admin
Or you can simply add “Wp-admin” or “login” at the end of your website URL provided by “/”.
However, there are at times when these login URLs do not work, then you can choose the fourth option given below:
mydomain.com/wp-login
Do not forget to remove “mydomain” with your own website domain name. We took the above domain as an example for a better explanation.
The above WordPress Login URLs can only work for new installations, But what if you have installed WordPress on the Subdirectory or Subdomain of your Website?
For WordPress installed in Subdirectory, Use these WordPress Login URLs
www.mydomain.com/wordpress/login/
www.mydomain.com/wordpress/wp-login.php
If WordPress is installed in Subdomain, Use the below WordPress login URLs
subdomain.mydomain.com/login/
subdomain.mydomain.com/wp-login.php
How to Remember WordPress Login URLs to get quick access?
All of these WordPress Login URLs direct you to the Admin page, no matter which Login URL you choose. It is better you keep this Login URL bookmark on your browser or save it on your website in case you cannot remember it.
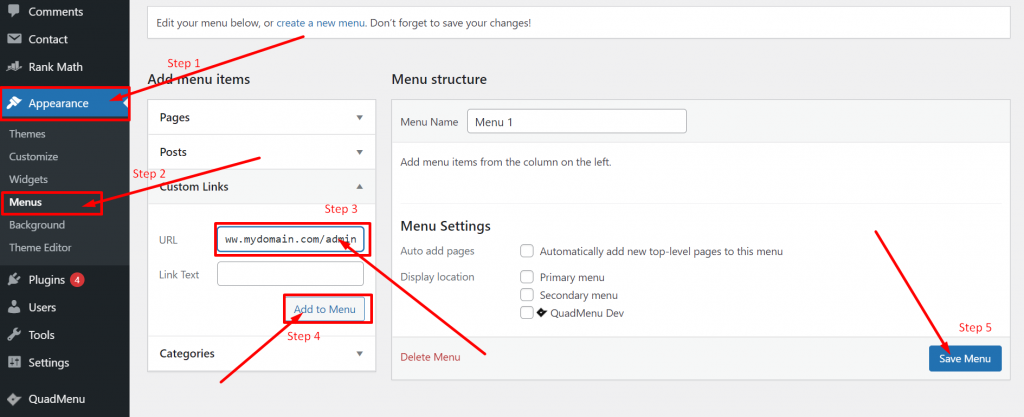
Saving Login URL on the Menu section of your Website
First of all, you need to log in to your WordPress dashboard.
- While opening the dashboard, Search for the Appearance section on the left-hand side of the Dashboard.
- Click on Appearance > Menus > Link Tab
- Add your WordPress login Url
- Click add to Menu
- And Save
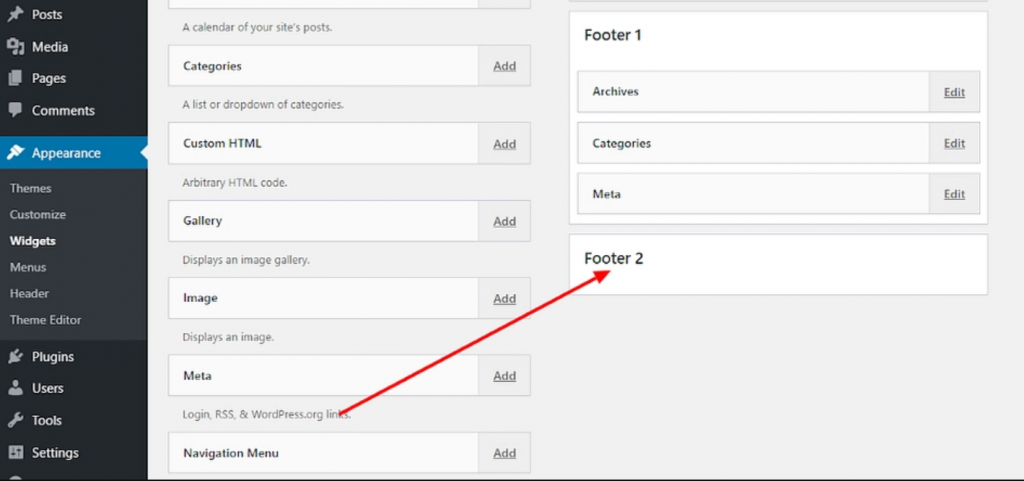
Saving the Login URL on the Footer section of your website
Go to Your WordPress Admin dashboard.
- Click on the Appearance Section on the left side of the WordPress Dashboard.
- Select Widgets
- Drag meta to the Footer and you are done
Why it is important to have a WordPress Login URL?
When a user freshly installed WordPress, he has access to the admin page, changes default settings, installs essential plugins, and adds a new theme. But to do all this stuff and customize your website without WordPress login URL is next to impossible.
This is the only link through which a user or other members can get easy access to the admin dashboard and manages it.
How to Hide or Change WordPress Login URL?
Hiding or changing your WordPress Login URL is another security measure one should always practice. However, the primary and most important security measure should be using a high-security password for accessing your WordPress URLs. Because Hackers try multiple methods such as malware attacks, hacking the website, or Bruce force attacks.
From the above three attacks, Brute Force is the most common one. Where hackers by the hit or trial method guess your website username and password multiple times. Unless or until the website got hacked. Hackers use a combination of different username and password script, that runs automatically.
Hence, You might have seen, that these platforms always asked you to put strong passwords, a minimum of 8 characters and the combination should be:
- Your name or date of birth should not be used
- Upper case
- Lower case
- Minimum1 digit
- Special characters
Enabling a double security layer on your website will become tough for hackers to get through it. Changing a WordPress Login URL not only boosts up the website security but also defines your brand. You can change WordPress Login URLs by two methods:
- By Customizing the login page
- By using WordPress Plugins (Most Preferable)
- By editing the .htaccess file
Customizing the login page is not preferable to be used. Because you do not like to mess with Website core files. Even a slight mistake would result in a catastrophe for your website. That you never might like it to happen. But still, if You want to use it, You can go to the WordPress Customizing the login page. Where a detailed method on “how to customize WordPress login page” is explained.
But if you want to choose the simple and easy path, then go for the WordPress Plugin option. Let us check out how to use it and make changes to the Login Url.
Plugin for WordPress login page
There are WordPress plugins that can help you manage your WordPress Login URL. We are sharing the best one to assist you with this.
WPS Hide Login

The most comprehensive and safest method to change the WordPress login page is using a simple and free WordPress plugin. There are a lot of plugins available that are sufficient to do the job. But the main thing is to choose the one which does not affect site performance. Hence, a light and a less complex plugin such as WPS Hide Login is highly preferable.
This plugin is built lightweight and also it does not mess with website core files. WPS Hide Login is an Open source plugin, which means it is available free to download from the WordPress directory.
Some Key features of WPS Hide Login
- Compatible with any plugins that connect the login form
- Works with multisite, with subdomains and subfolders
- Lightweight
- Absolutely Free
Pros and Cons
Pros
- Easy to download and install
- Too many no. downloads, hence you can trust upon.
- Clean and simple UI
- Compatible with most of the login form plugins
Cons
- does not work with hardcoded wp- login.php plugins
- do not guarantee free support
What do the installation and Setup Look like?
The installation of this WordPress login URL plugin is quite simple. You need to go to the ‘Plugins’ section in your admin panel. Search for the ‘WPS Hide login’ and click on the ‘Install Now’ button. This way, the plugin will be successfully installed on your WordPress; after installing, press the ‘Activate’ button beside the plugin.
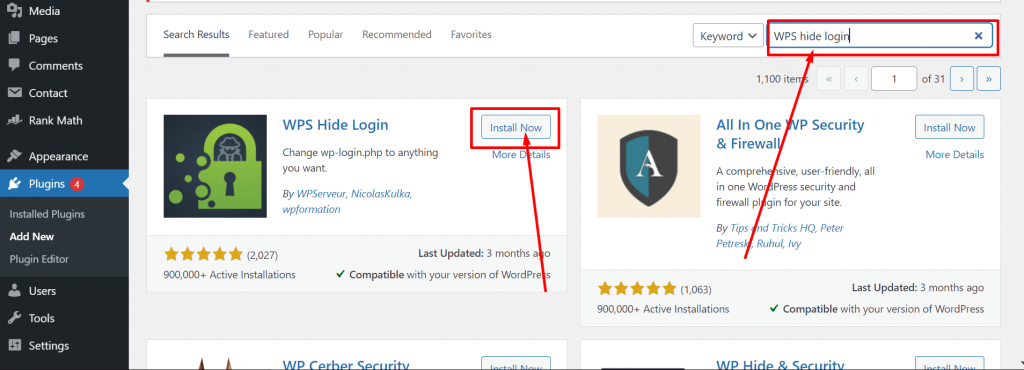
After you are done with the installation and activation part, Go to Settings > General to change the Login URL.
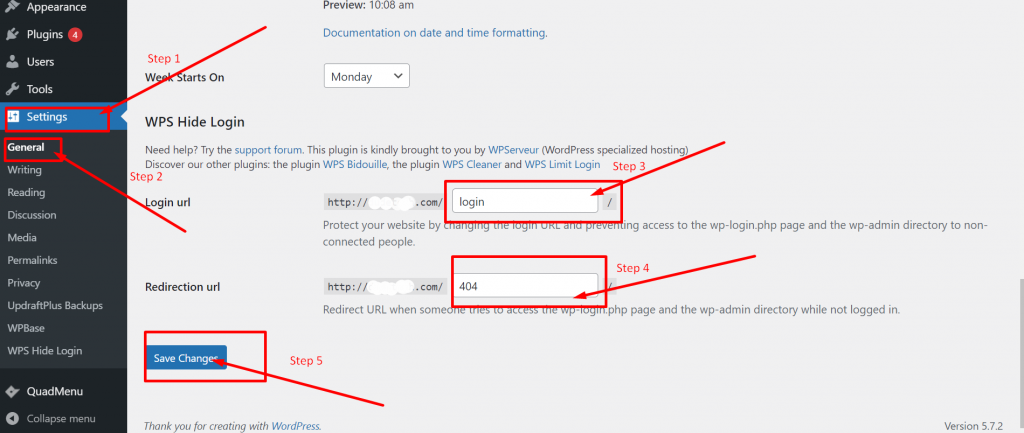
Now, when the page has opened, you can proceed to change your login URL and Redirection URL. And complete it by hitting the Save Changes button. Once you tried to log in admin page with either wp-login.php or Wp-admin. The page will redirect you to a 404 Error.
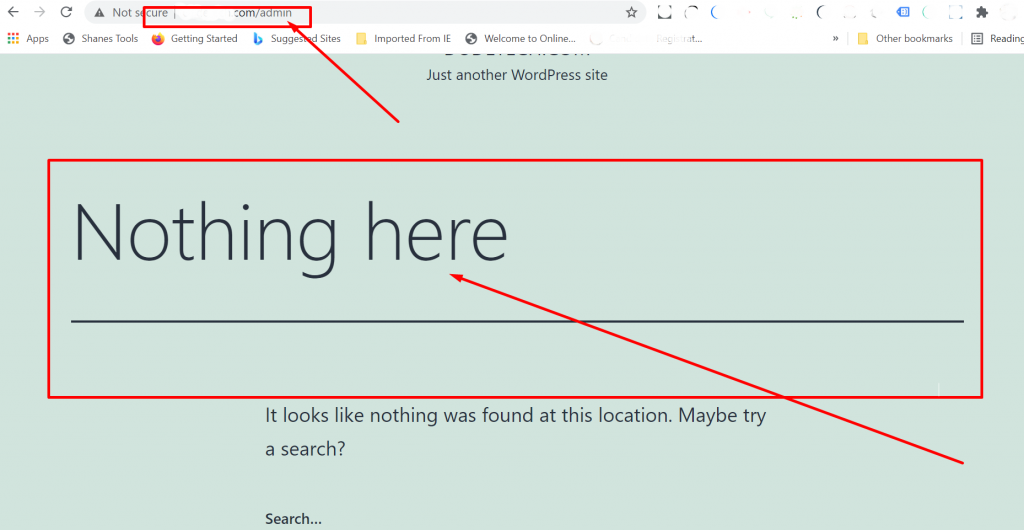
Points to Remember
- Keep in mind that, upon activation of the WPS Hide Login plugin. You will be restricted to use old login pages. It is because the plugin will redirect you to the WordPress login page with the new URL “/login” immediately. It happens so instantly that you do even not get time to customize. You must remember the new login URL, to avoid future logins.
- And the second point worth remembering is that, once you no longer use the custom login URL. You can deactivate or delete the plugin from your WordPress. The website will go back to its default Login Url “Wp-admin“.
WPS Hide login Updates and Review
We checked with WPS Hide Login plugin customer reviews in the WordPress directory and the kind of updates their developer has been pushing and found the following results for its version – 1.8.5.
- It has a whopping 900,000 + active installations right now.
- For us, it shows that it was updated last 3 months ago. [ Regularly Updated ]
- It has been currently tested up to 5.7.2.
- According to the WordPress Directory, its average rating is Average Rating 4.9/5. 1945 users out of 2047 gave it 5 stars.

Changing WordPress login URL by changing the .htaccess file
However, the WordPress plugin is quite an effective and easy method, but you can also change your WordPress login URL by changing the .htaccess file. These files contain a set of rules that need to be configured with system-wide settings. Hence, the .htaccess file can easily hide login URLs by these methods.
- By enabling .htpasswd protection, the login page will be secured by password protection. And anyone who tries to log in will need a password to get through it.
- And the other method is to give access to the login page only list of trusted IP addresses.
You can even allow certain Trusted IP addresses and limit login attempts with the help of a WordPress plugin. Without interfering with any .htaccess core file.
The Most suitable Free WordPress plugin is Limit login attempts, let’s check out more about it.
Secure your website using the Limit login attempts reloaded plugin
Limit login attempts reloaded is a simple security plugin that blocks Bruce force attacks and bans users who tried to do multiple failed login attempts. This plugin will directly ban IP addresses or usernames that try to multiple failed login attempts and surpass the specified number of login attempts. Making it tough for hackers to get through.
You must note that by default WordPress allows users for unlimited login attempts. Hence, it becomes vulnerable to being hacked by hackers who use Bruce force attacks.
Some key features of Limit Login attempts reloaded
- Limit the number of retry attempts when logging in (per each IP).
- Configurable lockout timings.
- Informs the user about the remaining retries or lockout time on the login page.
- Email notification of blocked attempts.
- Logging of blocked attempts.
- Safelist/Blocklist of IPs and Usernames (Support IP ranges) and many more.
Installation and Setup guide
Just like any WordPress Plugin, the installation of this WordPress limit login plugin is also quite simple. You need to go to the ‘Plugins’ section in your admin panel. Search for the ‘Limit login attempt’ and click on the ‘Install Now’ button. This way, the plugin will be successfully installed on your WordPress; after installing, press the ‘Activate’ button beside the plugin.
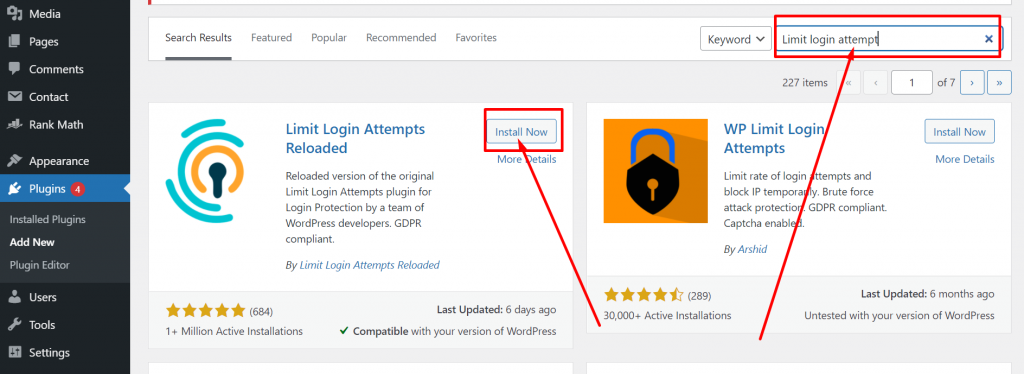
After you are done with the installation and activation part, you’ll find the plugin in the sidebar of your Dashboard.
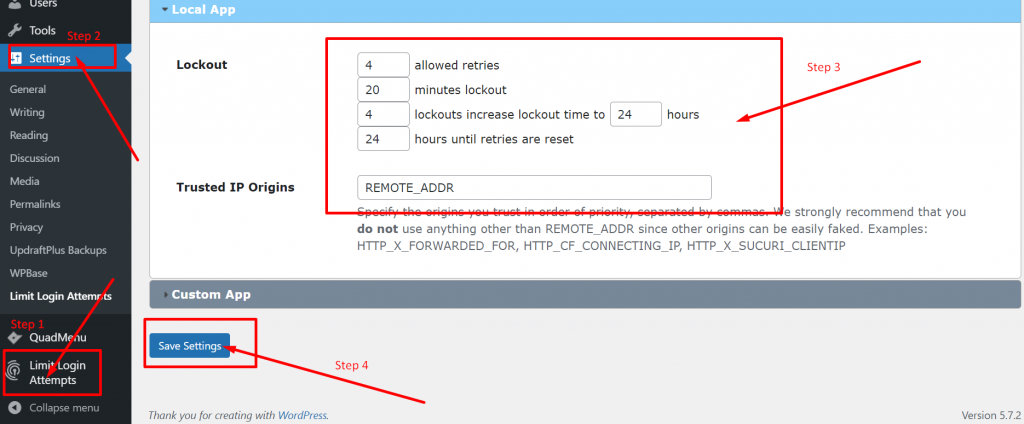
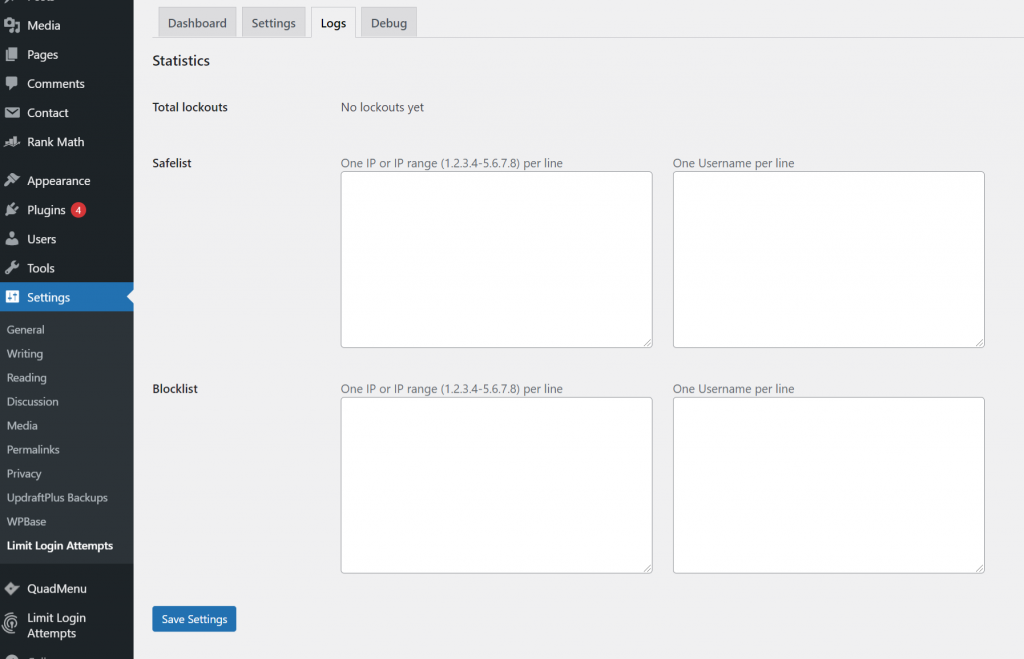
In the settings section of the plugins, you can see the options clearly mentioned.
In the lockout section:
- Allow Retries – It means the threshold number at which an IP address can attempt. After that, they will be banned or lockout completely. On average, the limitation should be around 4 to 5 attempts. Because humans have a tendency to do mistakes and often forget their passwords. The failed attempts give them some chance to remember their password and fix their mistakes.
- Minutes lockout – With this option, you can set minutes up to long an IP address will be blocked. You can also choose the “forever” option. But it is not a healthy or preferable practice. What if a genuine and authentic user gets banned forever? Hence, on average, you must provide them the time of about half an hour to remember their password and login back in with the correct credentials.
- Lockouts increase – This helps in banning hackers who are using Bruce force attacks. It uses an algorithm in which a hacker is trying multiple login attempts and get banned multiple times. The plugin will Ban it for longer hours days or even weeks. However, it is highly preferred you choose only for up to 1 day.
- Hours until retries are set – You can set the time for how long should a user have to wait until everything resets and they can try again.
In the “Logs” section just adjacent to the ” Settings” option, you will find the plugin also lets you manage safelist and blocklist options along with total lockouts.
The total lockouts let you know the total number of hackers who failed to log in.
Summary
Summarizing the above-detailed article, you have seen how changing the WordPress Login URL is crucial from a security point of view. And it is the only page through which you can get access to your WordPress dashboard. Hence, it becomes essential that you learn how to change or hide your admin login URLs from the generic public. And how you can prevent hackers to hack your website.
Whichever method you choose, For custom URLs make sure you only share the trusted users. And if possible use a WordPress plugin to avoid messing up with Core files.
If you found anything worth mentioning or if we have missed any important point to mention in this article. Please write your suggestions in the comment section below.
Some Frequently Asked Questions
How do I find my WordPress login URL?
One of the easiest and simplest ways to find out WordPress login Urls is by adding admin/login or wp-admin to the end of your website URL. i.e www.mydomain.com/admin.
What is the default WordPress login URL?
Some of the default WordPress login URLs are:
1. wp-admin.php
2. Wp-login
What is the WordPress admin URL?
By default, all the WordPress admin URLs have the same format. So, in order to open the admin page, the only thing you have to do is to add “wp-admin” at the end of your website URL i.e. https://www.mydomain.com/wp-admin, and hit enter. Once, you hit enter, you will be redirected to the admin page asking for a username and password.

Rahul Kumar is a web enthusiast, and content strategist specializing in WordPress & web hosting. With years of experience and a commitment to staying up-to-date with industry trends, he creates effective online strategies that drive traffic, boosts engagement, and increase conversions. Rahul’s attention to detail and ability to craft compelling content makes him a valuable asset to any brand looking to improve its online presence.


![How to Block IP Address in WordPress? Best Solutions [2023] Block IP Address](https://www.wpoven.com/blog/wp-content/uploads/2022/06/How-to-Block-IP-Address-in-WordPress-Best-Solutions.png)
