It is pretty irritating and frustrating for anyone to see an error message on their browser while browsing their favorite websites, especially network errors such as ‘err_network_changed,’ which are unique and occasionally appear on the Chrome browser if something goes wrong with the network connection.
It becomes even worse if you do not know what the error means and how to proceed further to fix it. But one thing to note is that this particular ‘err_network_changed’ error is not specific to the Chrome browser only. You might face similar errors on different browsers as well; the only difference is the syntax that different browsers use.
So, regardless of the variation of the error message you face on different browsers, if the root cause is the same, the troubleshooting method will be able to fix it too. Fortunately, this network error is not a big mess and can be easily fixed by some simple steps.
To make you completely aware of this unique type of error message, in this article, we will discuss its meaning, what causes it, and how you can fix it. Let us get started!
Read: 🚩 How to Fix the ERR_INTERNET_DISCONNECTED Error? (9 Methods)
How to fix the err_network_changed error?
The troubleshooting methods that we are going to cover in this particular section would also work for other network errors. However, if you encounter errors somewhat different from ‘err_network_changed,’ it is better to check your internet connection to ensure it is active.
If the internet connection is active, it means the issue can be easily fixed from your side. But in case, the internet is not active or temporarily down due to some reason, all you have to do is wait or contact your ISP to resolve this issue as soon as possible.
1. Check your Internet Connection
The first thing you should do if you see an ‘err_network_changed’ error is to check whether your internet connection is stable or not. If your internet is unstable or has temporary disruptions it can trigger err_network_changed error.
Make sure your Wi-Fi modem is plugged in and turned on. Check if the lights or indicators on the modem are showing a normal status. Usually, these lights indicate if your network is working fine.
You can also try opening the website using a different browser or on another device connected to the same Wi-Fi to see if it works.
If you think your modem is causing the problem, you can either restart it or perform a soft reset (instructions are usually in the Wi-Fi router manual) to see if it helps.
2. Restart your PC and Internet Modem
If you confirm that your internet connection is stable and working fine, it indicates that you should begin troubleshooting from your end. The most fundamental and basic yet efficient method is to restart both your PC and your internet modem, which is your router.
The method is very simple, all you need to do is unplug your router/modem and PC, wait for up to 10 seconds, and then plug them back in.
Now, after plugging them back in, wait for them to completely boot up (which might take 10-20 seconds), and check if the router’s LEDs indicate an active connection. Afterward, try accessing the website on your PC. This method usually works for various network errors. However, if it doesn’t, we have other methods you can try.
3. Reset TCP/IP settings
If restarting your Windows PC or Internet modem doesn’t fix the err_neywork_changed error the next method you can do is to reset your entire network configuration. In this particular process, all the internet settings will be reset to their defaults, including DNS, your IP address, TCP, etc.
Resetting TCP/IP settings for err_network_changed Windows 10 Fix :
Step 1: Open up the run command by clicking the Windows key and R. In modern versions, they can also be searched at the search bar present at the start menu option.
Step 2: Write cmd and press enter.
Step 3: Following the admin-based command prompt page opening up, the next step features typing ipconfig/release on the command page. This process triggers the release of the existing IP address.
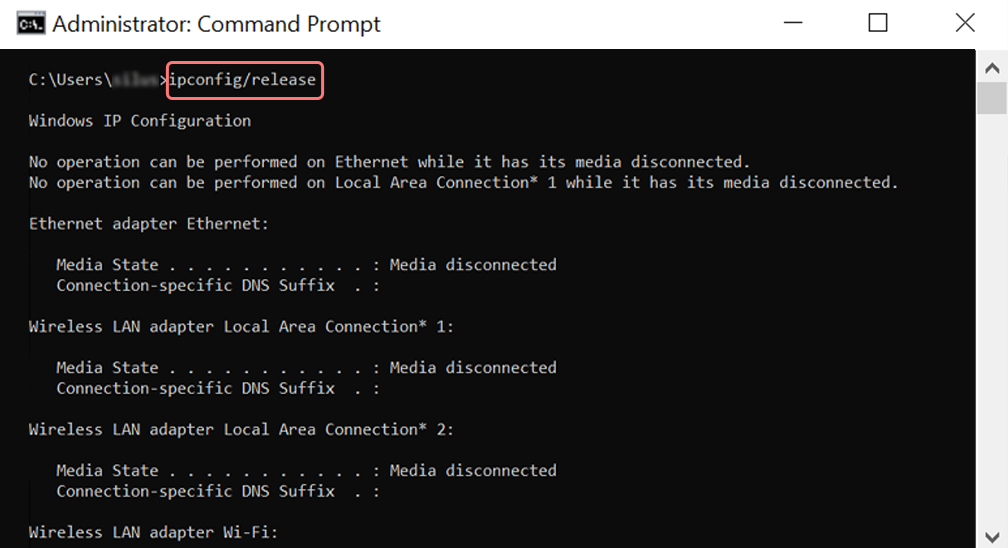
Step 4: Once the IP address is released from the system, follow the next step to release the DNS cache. Thus, type ipconfig/flushdns to release the DNS cache.
Step 5: In the next step, type ipconfig /renew, which will renew the new IP address to the system.
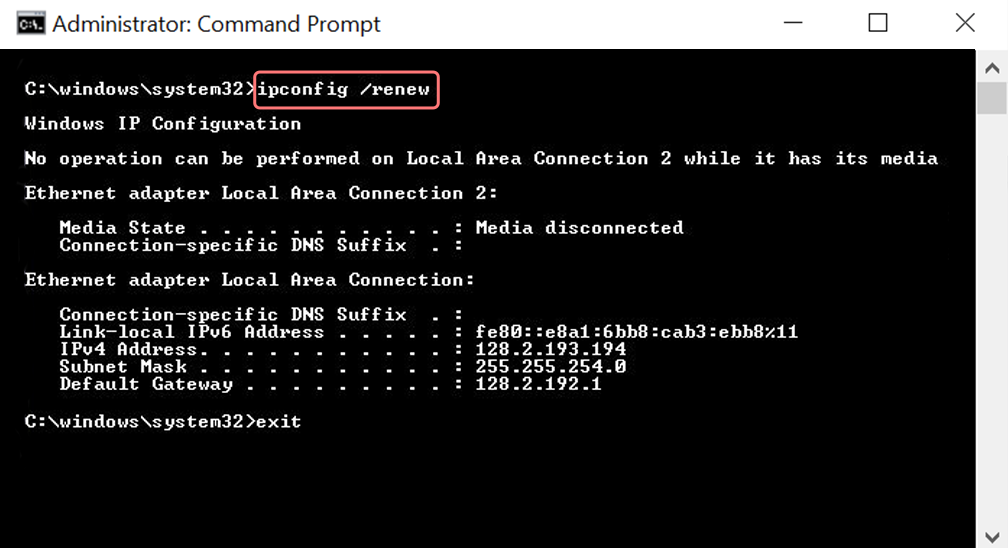
Step 6: Type netsh int ip set dns and click enter. This will reset the entire IP settings of the previous IP stored.
Step 7: Type the netsh winsock reset command. It will reinstate the Winsock Catalog.

Step 8: Finally, after the process is complete, restart the PC and check if the issue is resolved or not.
For err_network_changed MAC fix:
Step 1: As mentioned previously, using a Gas Mask is an easy way out for searching all system-related works. For the regular case users, the first step involves opening up the system preference options in the main window.
Step 2: Following this, under the Ethernet tab, click on the advanced options.
Step 3: For starters, with commands, it is required to click on the TCP/IP tab, which has the option to release a DHCP option. Thus, the process allows MAC users to clear out the local DNS.
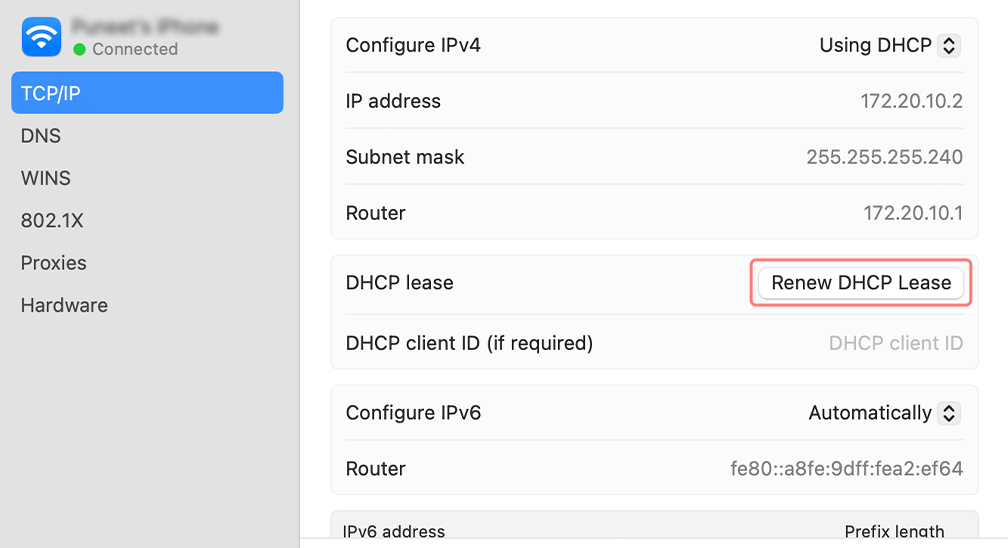
Step 4: MAC users can also clear the local DNS cache. This involves visiting the Utilities>Terminal page, where they will be required to present the command.
Step 5: The command for flushing the same is dscacheutil -flushc
4. Verify your DNS Settings
DNS or Domain Name Server settings are generally something you don’t need to configure or use custom settings for. Usually, these settings are provided by default by your ISP. However, sometimes you might encounter ‘err_network_changed’ errors, and in those cases, you need to verify your DNS settings.
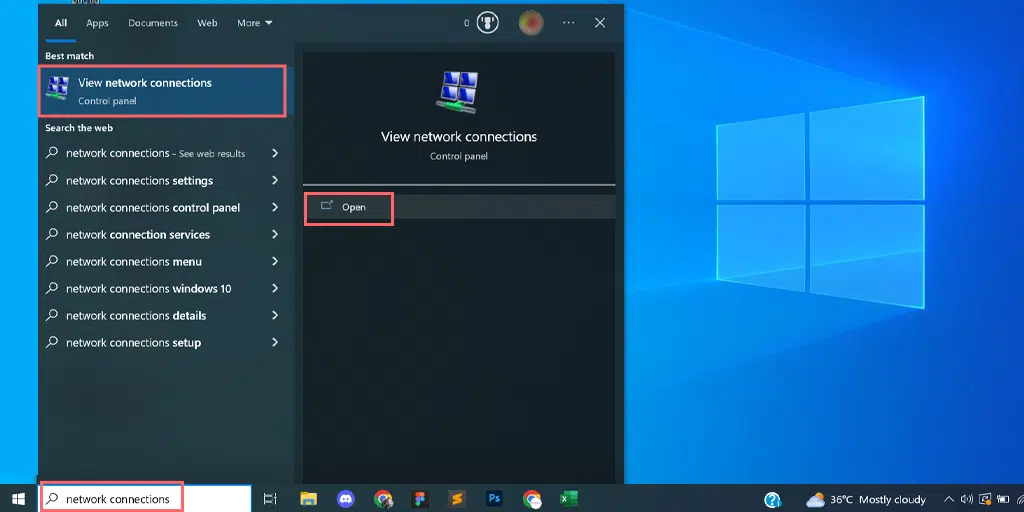
For Windows 10 or 11 users, you need to go to your Windows icon located at the bottom corner left-hand side of your screen and click on it. Type “Network connections” in the search bar as shown in the picture below and select the View network connections application as shown below:
When you click on View Network connections, you will be directed to the Network Connections page, where you can see all the available connections you have. The active/current connection that you are using will be marked as green whereas the connections that are not in use will be marked as red cross as shown in the picture below.
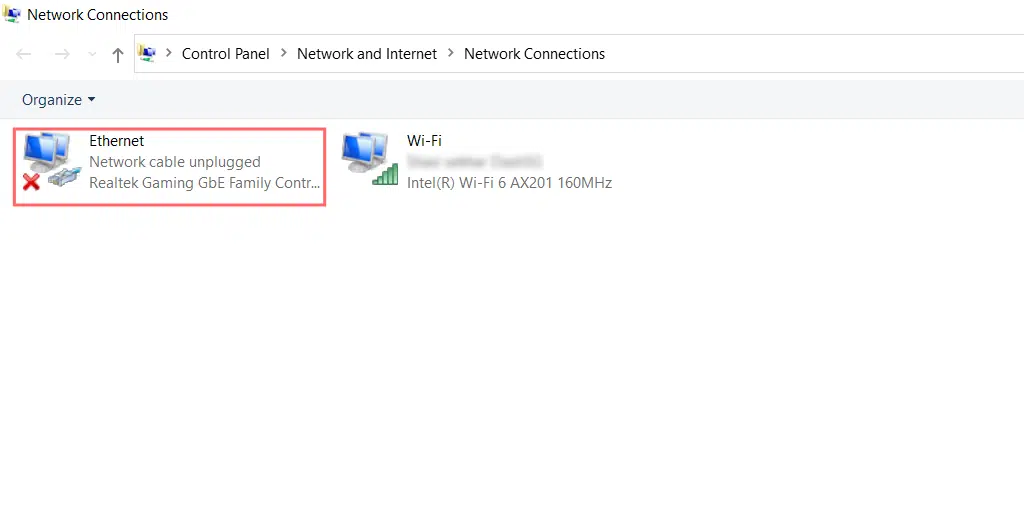
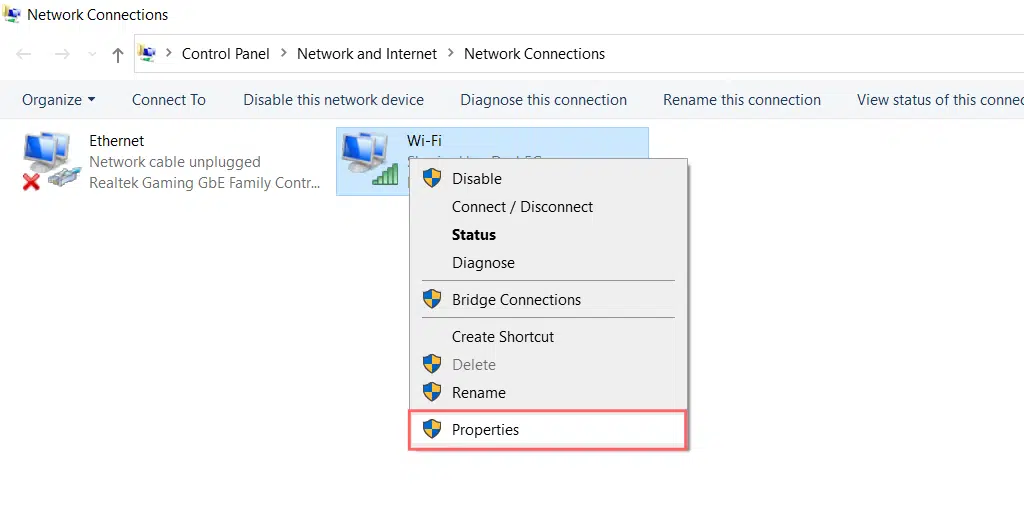
On the View Network connections page, choose the connection you are currently using or active and right-click on it to reveal options. Select properties.
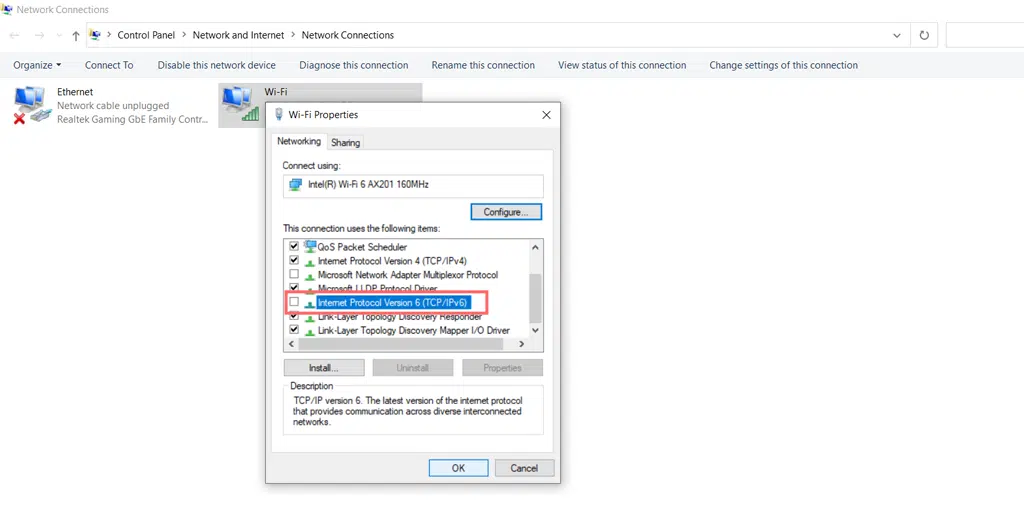
When you click on the properties, a new window will open, in which you have to select Internet Protocol Version 4 (TCP/IPv4) followed by the properties option.
In the new popup window i.e. Internet Protocol Version 4 (TCP/IPv4) Properties, if “Obtain DNS server address automatically is selected. You need to choose “Use the following DNS server addresses” and enter 8.8.8.8 and 8.8.4.4 as the servers. Click on the OK button and check.
However, if you have already specified your DNS servers, this time change the settings to automatic and click on the “OK” button >check.

Now, if the error is triggered due to your DNS issue, it should fix the error. But in case, it doesn’t help try resetting your network adaptor.
5. Disable your Network Adapter
Disabling your Network Adaptor will force Windows to reload the configuration and reset it to its default.
To disable the Microsoft Virtual Wi-Fi Miniport Adapter, the first thing you need to do is press the Windows button and R key simultaneously on your keyboard. A run pop-up window will appear.
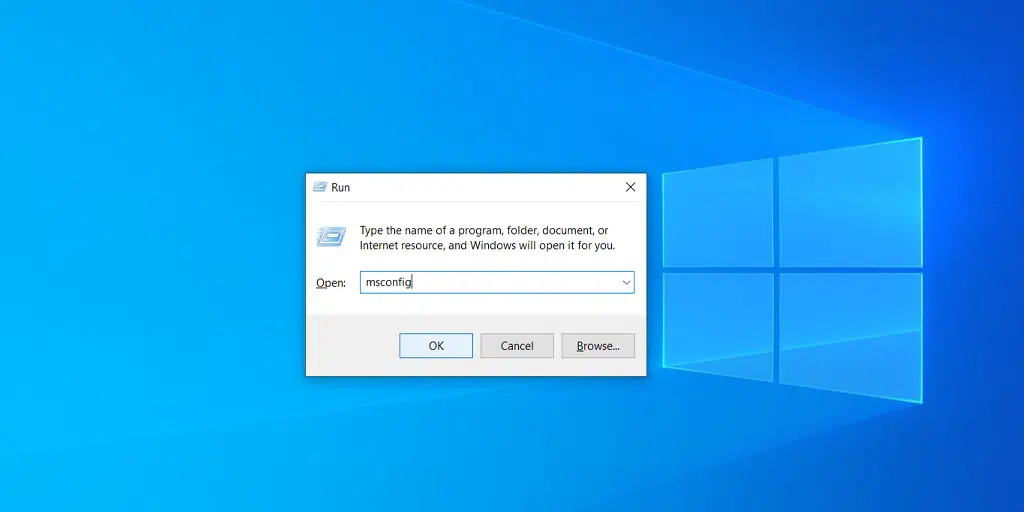
Now you need to type devmgmt.msc and hit the Enter key. This command will launch the Device Manager application on your computer screen. Now click on the View tab and select Show hidden devices to show some new devices which are hidden in the list as shown in the picture below:
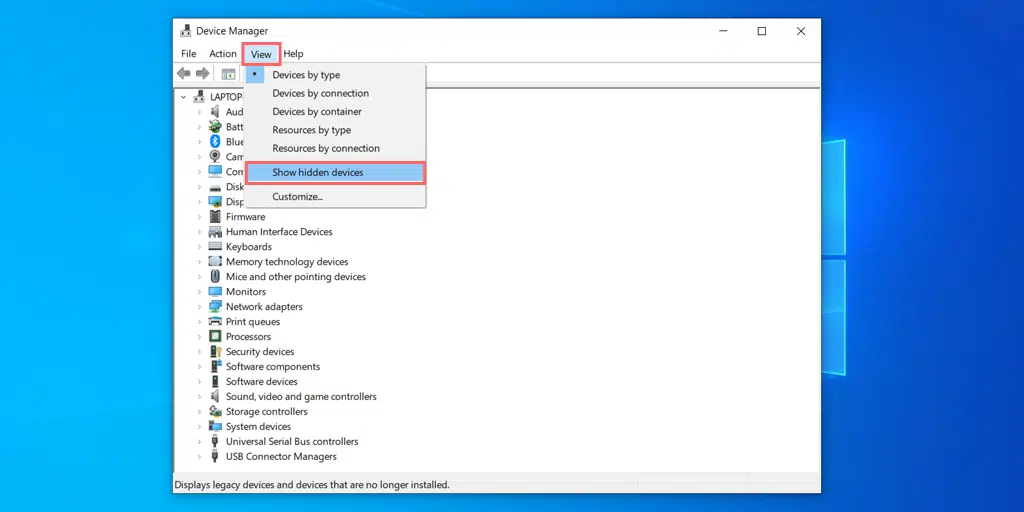
Click on the Network adapters category to expand and right-click on the Intel Virtual Wi-Fi Miniport Adapter to choose the uninstall device option.
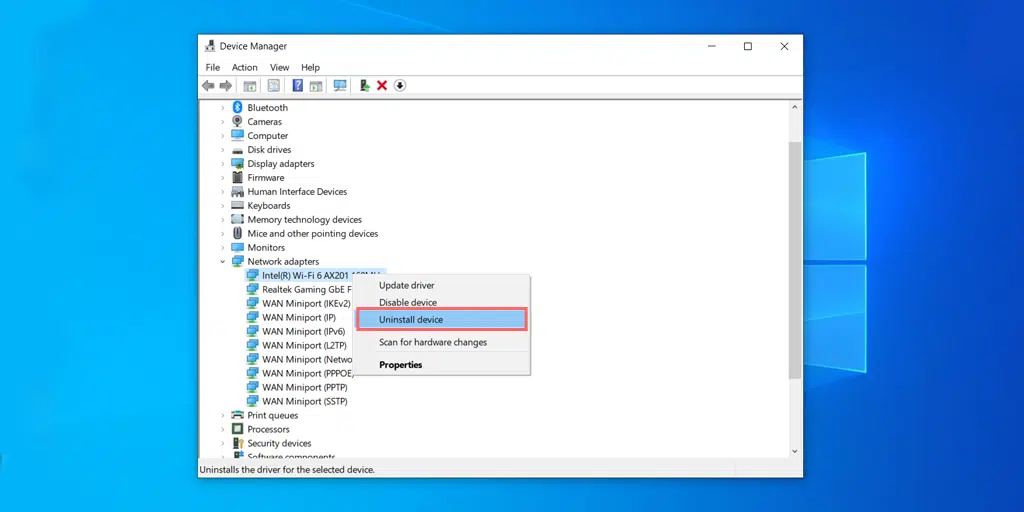
Do the same process with all the available Virtual Miniport Adapters and when done, close all the windows and restart your system.
Read: 🚩 How to Fix the ERR_EMPTY_RESPONSE Error? (7 Methods)
6. Disable your Proxy Server
A proxy server acts as an intermediary between your computer or device and the internet. It facilitates the flow of information between you and the websites you want to visit, adding a layer of separation and control.
But sometimes, it can also malfunction and not allow you to connect to the website. As a result, it triggers an ‘err_address_unreachable’ error.
Therefore, you should try turning off your proxy server to see if it’s the cause of the error.
Here’s a method to disable the Proxy Server.
- Press the Windows key + I to open the Settings window or type “settings” in the search bar as shown below:
![How to fix Error 1005 "Access Denied"? [9 Quick Methods] 3 Windows Settings](https://www.wpoven.com/blog/wp-content/uploads/2023/05/1-2.png.webp)
From the main window, select Network & Internet.
![How to fix Error 1005 "Access Denied"? [9 Quick Methods] 4 Windows Network and Internet Settings](https://www.wpoven.com/blog/wp-content/uploads/2023/05/2-1.png.webp)
Select the “Proxy” option on the Left.
![How to fix Error 1005 "Access Denied"? [9 Quick Methods] 5 Turning off Proxy Server](https://www.wpoven.com/blog/wp-content/uploads/2023/05/3-1.png.webp)
Check if the “Automatically detect settings” option is turned off under “Automatic proxy setup”.
Disable the “Use a proxy server” option in the “Manual proxy setup” section.
For Mac Users, they can do the following steps to disable proxy settings:
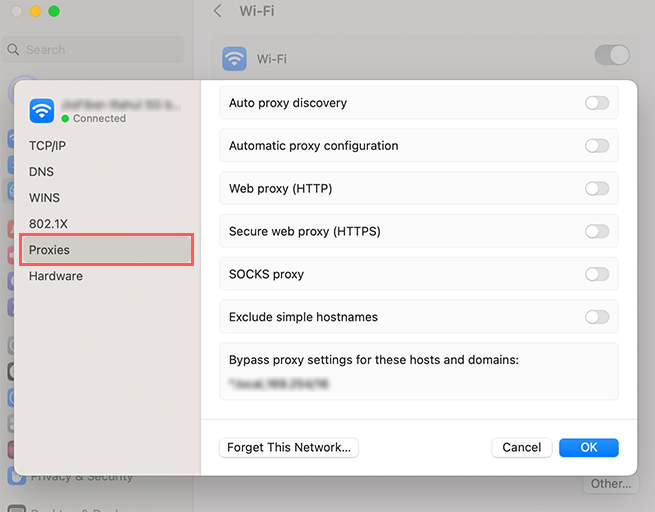
Step 1: Go to the Apple menu or click on the Apple icon located at the top left of your Mac screen.
Step 2: Click on System Settings or System Preferences, whichever is applicable.
Step 3: Now click on the “Network” in the sidebar.
Step 4: From the right pane, Select a network service > Details.
Step 5: Click on proxies and Now choose between either manual or automatic proxy configuration options, when done click on the “Ok” button and check whether the error persists.
7. Clear your Browser Cache (err_network_changed chrome fix)
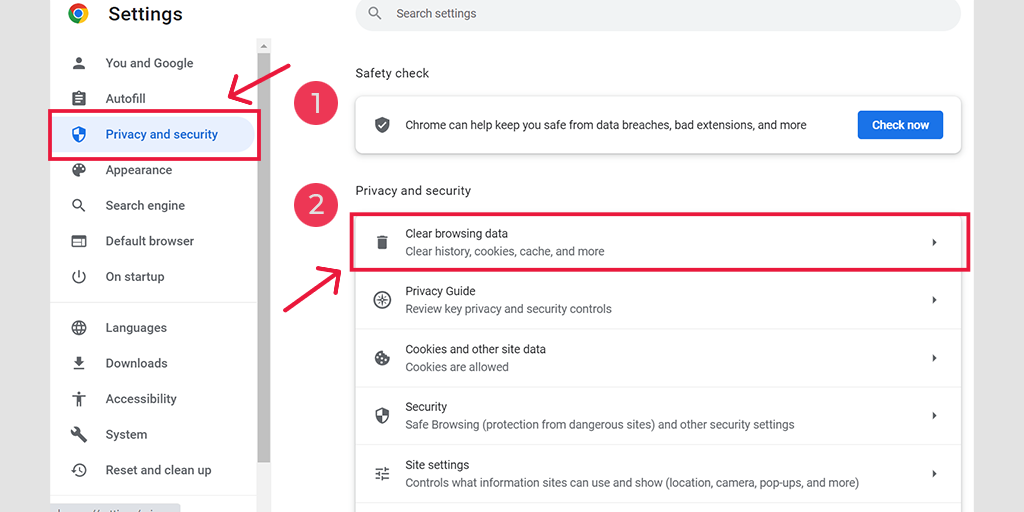
If the error persists, try clearing your Chrome browser cache. This method will clear all your browser cache and force the browser to fetch new data and it might help to fix err_network_changed error.
In Chrome browser, Go to Settings > Privacy and Security > Clear browsing data > You can uncheck the Browsing History and let cookies and other site data, as well as cache images, be checked > Clear data.
Alternatively, you can directly enter this address into your Chrome browser: chrome://settings/privacy. It will take you to the privacy settings where you can click on “Clear browsing data“.
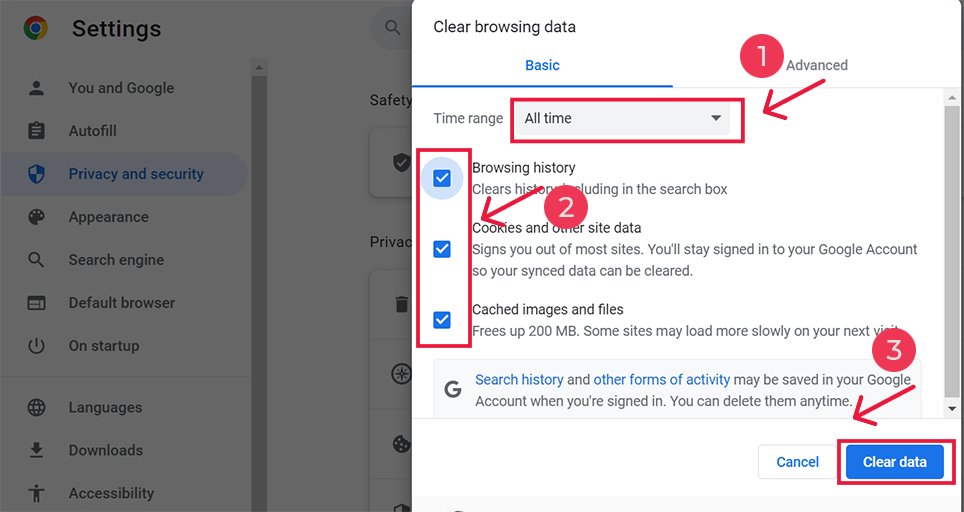
In the pop-up window, you will see plenty of other options, but you have to choose as follows:
- Select the time range as “All time”.
- Select cookies and other site data as well as Cache images (you can also select browsing history)
- Click on the Clear Data button.
For err_network_changed android fix
Launch the Chrome app on your Android mobile phone, and then to fix this error, click on More > Settings.

After that click on Privacy and Security > Clear browsing data.

At last, select Cached images and files > Clear data. However, if you still seeing this error, you need to try out our next troubleshooting method.
If the error still persists, we have plenty of other methods mentioned in our related network error blogs that work like a charm for any type of network error. Please check them out using the link provided below:
- How to Fix the ERR_INTERNET_DISCONNECTED Error? (9 Methods)
- How to Fix the ERR_EMPTY_RESPONSE Error? (7 Methods)
- How to Fix the ERR_CONNECTION_RESET Error in Chrome? (8 methods)
Read: 🚩 How to Fix the ERR_CONNECTION_RESET Error in Chrome? (8 methods)
What does err_network_changed error mean?
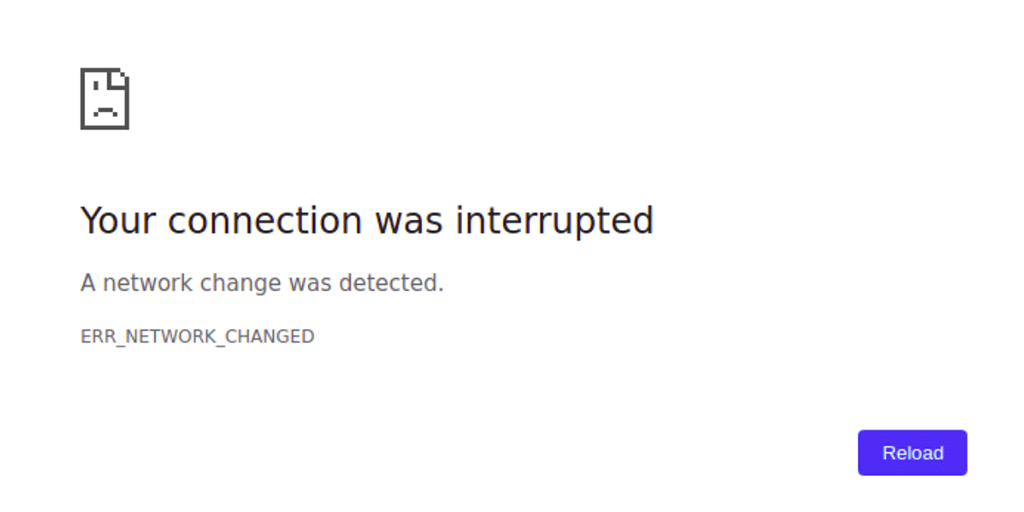
The err_network_changed means that something went wrong with your internet connection. Like any browser error, the err_network_changed error message also comes with a short description that tells little specific about its potential cause.
The error message generally states, “Your connection was interrupted” accompanied by another message ” A network was changed “.
The above error message simply conveys that although you have an active internet connection, it is not working right now. This can happen due to various reasons, with a change in IP address or a DNS issue being the main culprits.
It’s true that any sort of error can be very irritating, but the good thing is that the internet connection is active, so it can be fixed from your end.
On the other hand, if the connection is not active, there is not much you can do from your end. All you can do is wait for the connection to be restored.
What causes the err_network_changed error?
The err_network_changed error message appears on Google Chrome, and it triggers when there is an issue with your network connectivity. This can happen due to various reasons, such as,
- Network Configuration Changes: Changes in the network configuration, such as switching between different Wi-Fi networks or connecting/disconnecting from a VPN, can trigger this error.
- IP Address Changes: If your device’s IP address changes while you are browsing, it can lead to the ERR_NETWORK_CHANGED error.
- DNS Issues: Problems with the Domain Name System (DNS) can cause this error. DNS translates domain names into IP addresses, and if there’s an issue with DNS resolution, it can disrupt your connection.
- Network Connectivity Problems: Temporary disruptions or instabilities in your internet connection can trigger this error, especially if the connection is being constantly switched or interrupted.
- Network Hardware Changes: Changes in network hardware or settings on routers or modems could also lead to the ERR_NETWORK_CHANGED error.
- Browser Issues: In some cases, the error might be related to browser-specific problems or conflicts.
- Network Adapter Issues: Problems with your network adapter or its settings on your device can also cause this error.
Summary
The err_network_changed error is exclusive to Google Chrome, but it has nothing to do with your Chrome browser. It mainly triggers due to your internet connectivity issue and faulty IP address. If you are a regular internet user, there are high chance that you might face this issue someday.
Fortunately, these types of network issues can be fixed by simple troubleshooting steps such as,
1. Check your Internet Connection
2. Restart your PC and Internet Modem
3. Reset TCP/IP settings
4. Verify your DNS Settings
5. Disable your Network Adapter
6. Disable your Proxy Server
7. Clear your Browser Cache (err_network_changed chrome fix)
You can any of these methods and it will definitely resolve your err_network_changed error easily.
If you have any queries or suggestions regarding this post, please do let us know in the comment section below.
Frequently Asked Questions
How do I fix an ERR network change?
You can easily fix the Err network change error by using the following methods:
1. Check your Internet Connection
2. Restart your PC and Internet Modem
3. Reset TCP/IP settings
4. Verify your DNS Settings
5. Disable your Network Adapter
6. Disable your Proxy Server
7. Clear your Browser Cache (err_network_changed chrome fix)
Why does ERR_NETWORK_CHANGED when using a VPN?
VPNs, or virtual private networks, act as intermediaries through which internet data is passed. This is why they can also affect your overall network speed and sometimes trigger issues. VPNs generally change the IP address to protect the user’s privacy, but sometimes when the browser detects this IP address change, it can lead to the ‘err_network_changed’ error.
What does the Err_network_changed error mean?
The err_network_changed means that something went wrong with your internet connection. Like any browser error, the err_network_changed error message also comes with a short description that tells little specific about its potential cause.

Rahul Kumar is a web enthusiast, and content strategist specializing in WordPress & web hosting. With years of experience and a commitment to staying up-to-date with industry trends, he creates effective online strategies that drive traffic, boosts engagement, and increase conversions. Rahul’s attention to detail and ability to craft compelling content makes him a valuable asset to any brand looking to improve its online presence.

