WooCommerce is the most popular e-commerce engine in the world. It is used in more than a third of all online stores, and this is about a million online stores. And this is absolutely logical because WooCommerce is extremely stable, easy to configure, as well as easy to expand and improve.
Since Woocommerce is focused on the global market, it supports direct payments, payment after delivery, or through various payment systems. By default, Woocommerce supports two payment systems: PayPal and Stripe.
In this blog, we will tell you how to Install and use the Woocommerce Stripe payment gateway in step by step method and its benefits.
Read: 🚩 Stripe vs PayPal: Which Payment Gateway is Better?
What is Stripe and how does it work?
Stripe is the largest processing platform that allows individuals and companies to accept payments via the Internet and in mobile applications. The service allows you to make a payment without redirection in one click and supports Bitcoin and Apple Pay.
The company’s headquarters is located in San Francisco, USA. The founders of Stripe are brothers Patrick and John Collison.
- Work on Stripe began in early 2010 and the platform was officially launched on September 29, 2011, after beta testing.
- In March 2013, Stripe acquired the Kickoff chat and task management application, resulting in new employees joining the Stripe team.
- Stripe launched a beta program to support Alipay in June 2014, making its Woocommerce Stripe gateway processing services available to customers in China.
- In October 2014, Stripe became one of the first payment service providers to support the integration of Apple Pay in iOS applications.
- Stripe launched support for Bitcoin transactions in February 2015.
- Stripe currently operates in 26 countries, including the US, Canada, the UK, Australia, and several European countries, with plans to expand to more countries.
- The company has over 1,300 employees, 9 global offices, and millions of active Stripe users.
- Some notable companies using Woocommerce Stripe to accept payments include Xero, Rackspace, Hubspot, Twitter, Fitbit, Reddit, Kickstarter, and The Guardian, among others.
- Stripe’s investors include Sequoia Capital, General Catalyst Partners, Andreessen Horowitz, and PayPal founders Peter Thiel, Max Levchin, and Elon Musk.
- Unlike other payment services like PayPal and fully integrated e-commerce solutions such as Shopify, Stripe focuses solely on providing the technical base, fraud protection, and banking infrastructure necessary for online payment systems.

Read: 🚩WooCommerce Vs Shopify: Which is Best for Your Online Store?
WooCommerce Stripe integration
- Using the WooCommerce Stripe payment gateway, web developers can customize payment acceptance and processing on their websites without the need to register and maintain a trading account.
- Integrating WooCommerce with Stripe is easy, as Stripe’s backend API supports various programming languages such as Go, Java, Node.js, PHP, Python, and Ruby.
- Stripe allows businesses to accept payments from any country in the world, but the connected company must be located in one of the allowed countries listed on the official Stripe website.
- Payment for goods and services is made on the seller’s website, and the client does not need to leave the site to pay for the selected product through the built-in WooCommerce Stripe gateway payment form.
- Stripe supports integration with Apple Pay in iOS applications and has a beta program with Alipay, which allows customers in China to use Stripe’s payment processing services.
- Stripe charges a fee of 2.9% + 30 cents for each successful transaction for its services, and a commission of 0.5% of the amount for each successful Bitcoin transaction.
- Unlike most competitors, Stripe does not charge for connection, monthly fees, card validation procedures, or failed transactions. The system also does not set limits on the minimum amount of monthly payments.
- The system is safe for buyers, as the seller’s identity is carefully verified before integration, and payments are credited to the merchant’s bank account after each transaction. Verification is currently only available in the United States and Canada, with other countries to follow in the future.
Why using WooCommerce with Stripe is a good idea?
Stripe, an online payment gateway, provides several key benefits and is an excellent solution for your WooCommerce website. Read our complete guide on WooCommerce Payments gateway.
- On-site checkout: The biggest advantage of using Stripe is on-site checkout. On-site verification keeps your customer on your online store website, rather than sending them to another site to complete the verification and, as has been proven, results in higher conversion rates.
- Easy WooCommerce stripe integration and WordPress in general: Stripe is easy to integrate with WooCommerce with the free WooCommerce Stripe extension that allows getting started in just a few clicks.
- Simple payment structure: Stripe also has an easy-to-understand transaction fee structure: 2.9% + 30 cents for successful transactions, and no additional payments.
Read: 🚩 WooCommerce Vs Shopify: Which is Best for Your Online Store?
Some Stripe Features that integrate well with WooCommerce
Some of the key features of Stripe’s integration with WooCommerce include:
- Quick and easy setup: Stripe can be quickly and easily set up on a WooCommerce website, allowing businesses to start accepting payments right away.
- Secure payments: Stripe is a highly secure platform that provides fraud protection, SSL encryption, and other security measures to ensure that online transactions are safe and secure.
- Mobile payments: Stripe’s integration with WooCommerce enables businesses to accept payments through mobile devices, making it easy for customers to make purchases on the go.
- Subscription payments: Stripe supports subscription-based payments, making it easy for businesses to set up recurring payments and manage subscriptions.
- Customizable checkout experience: With Stripe’s integration with WooCommerce, businesses can customize their checkout experience to match their branding and provide a seamless customer experience.
- Multi-currency support: Stripe supports multiple currencies, making it easy for businesses to sell their products and services to customers in different countries.
How to install WooCommerce Stripe Payment Gateway
If you are completely unfamiliar with WooCommerce or WordPress, you must set up your own WordPress website. Select the right eCommerce hosting provider, get the domain name, and make basic configurations. In general, the process is extremely easy and will not take much.
Step 1. Install the WooCommerce plugin
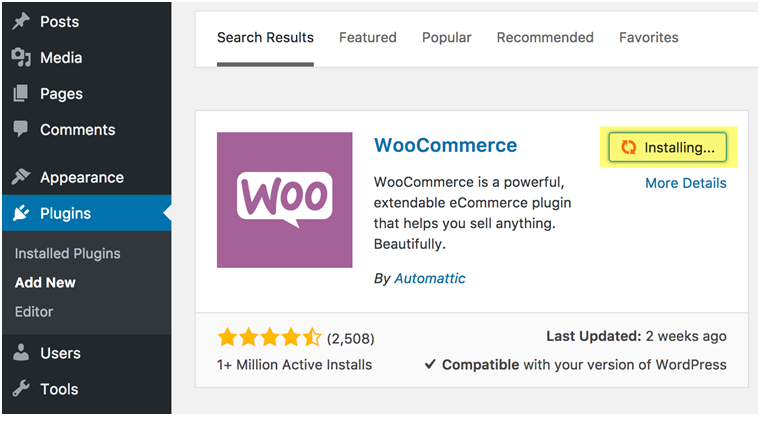
After you have your own WordPress site, you need to install the WooCommerce plugin to turn your site into a fully-featured e-commerce store on the WordPress platform.
When you first install WooCommerce, you will have the opportunity to go through the installation wizard. Any settings that you choose at this stage can be changed at any time after the completion of the installation wizard. You will see the option of choosing the Woocommerce Stripe payment gateway. However, you need to add a payment gateway plugin in any case.
Step 2. Install SSL certificate
To use Stripe, an SSL certificate is required to run on your site. It is not difficult to install the SSL certificate. If you are not sure how to do that, contact your hosting provider support.
SSL protects your site and visitor data by encrypting data transmitted over the Internet, such as submitting forms and transactions with a credit card. If you accept any payments on your website, SSL is not negotiable. In addition, the gateway plugin, which you will use automatically, implements Woocommerce Stripe payment gateway JS to tokenize payments in order to protect card data.
Step 3. Add the test products
If you are just configuring your website, the easiest way to start is to import some demo products. You can do this in the control panel of the e-commerce site in the Dashboard — WooCommerce section.
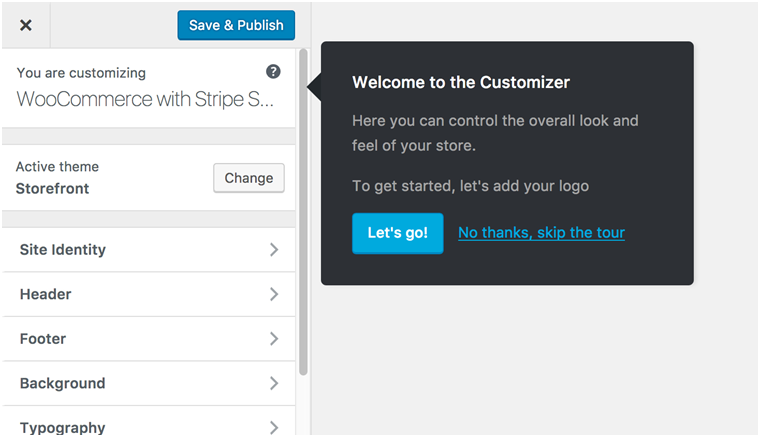
Select “Add sample products” and click “Let’s Go” and you will be redirected to the settings screen. Make any changes to the design of your online store and click “Save and Publish.”
Your product samples will be uploaded to make the testing very simple.
How to Install a Woocommerce Stripe Payment Gateway
1. Install the Stripe Payment Gateway Plugin
After you log into your WordPress as a website administrator, go to Dashboard — Plugins — Add New and find WooCommerce Stripe or WooCommerce Stripe Payment Gateway. Among other Woocommerce Stripe plugins, this is the best solution.
Click on it to install the plugin, and once more to activate it.
2. Configure Settings
Having installed the plugin, you will be taken to the Plugins page, where you should tap Settings to go to the Stripe settings screen.
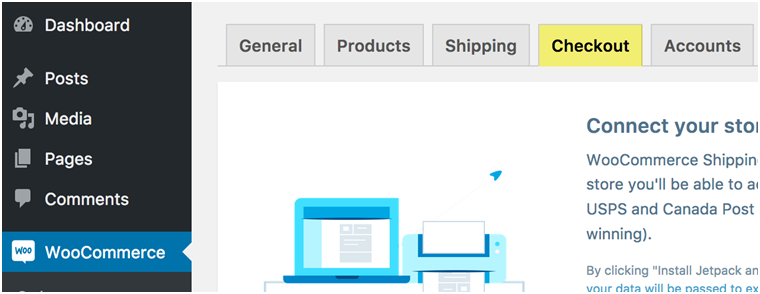
You can also access these settings in the Dashboard — WooCommerce — Checkout — Stripe section at any moment.
Common issues that may arise during installation and how to troubleshoot them
- “Installation failed” error message: If you receive an installation error message, ensure that your WordPress and WooCommerce versions are up to date. Also, check if there are any conflicts with other plugins or themes that may be causing the error. Try deactivating other plugins and switching to a default theme to troubleshoot the issue.
- “Stripe not showing up as a payment option” issue: This issue can occur if the Stripe plugin is not correctly installed or enabled. Ensure that you have downloaded the correct plugin and that it is activated. Also, check if your Stripe account is fully set up and verified.
- “Payment not processing” error message: This issue can occur if there are problems with your payment settings or customer information. Ensure that you have set up your payment behavior correctly and that customers are providing accurate information. Additionally, ensure that your Stripe account is fully functional and not experiencing any technical issues.
How to Configure Woocommerce Stripe Payment Gateway?
Here is a step-by-step guide to configuring the Stripe payment gateway parameters:
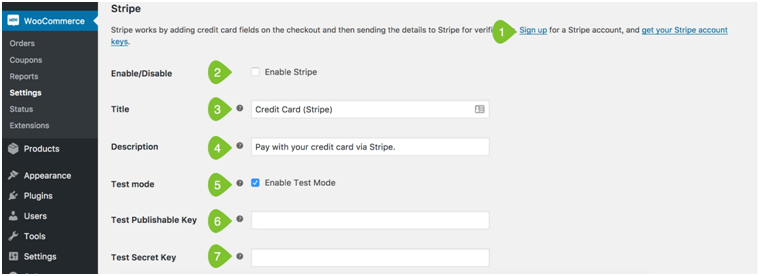
- First, add your Stripe account. For that, create a new account if you do not have it yet, or log in to the existing one. This is a quick and easy process, clearly explained by the on-screen guide.
- Turn on Stripe by ticking a box.
- Enter a title. This is a must and will be displayed to your customers. They will see this name.
- Enter a description. This is optional, and the text entered in this field will be also displayed to your customers.
- Turn on test mode. After you have completed a successful transaction in demo mode, you can return to this screen to disable the test mode and enter your Live Publishable and Secret keys.
- Enter your test publishable key.
- Enter the test secret key.

- Enter the statement descriptor — this will be displayed on your client’s credit card statement.
- In most cases, you will be able to get the payments immediately; if you do not, you will get the payments in up to 7 days.
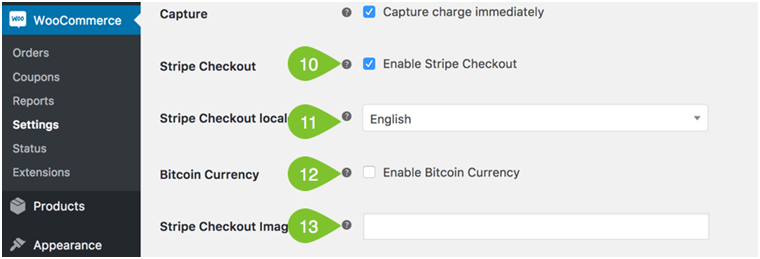
- If you turn on Stripe Checkout, your customers will be prompted to enter information about their card in the pop-up module, rather than on the screen fields.
- Select the language you want to use. The plugin supports many popular languages.
- Stripe Checkout allows you to select bitcoin currency as payment if it is required.
- You have the ability to display a custom image of 128 × 128 sizes in a checkout modal.

- If you have not enabled the Stripe Checkout feature, you are able to turn on the Payment Request API. It works with enabled browsers — for example, it offers Android Chrome users to use Chrome Pay and allows them to use their saved bank cards.

- If you want to turn on Apple Pay, check the corresponding box.
- Set the button style you would like to prefer. You can choose between black or white.
- Select the language for the Apple Pay button. Here you can find more than two-digit ISO codes.

- Activating the payment via saved cards will let your customers reuse the same bank card in your online store. Stripe servers store the bank card numbers.
- Enabling debug message logging will save messages to help troubleshoot the site. This does not need to be included if you have no problems with your e-commerce store.
- Last but not least: do not forget to save your changes!
Some Best practices for configuring the WooComemerce Stripe payment gateway
Here are some best practices for configuring the WooCommerce Stripe payment gateway:
- Keep your Stripe account updated: Make sure to keep your Stripe account updated with the latest information, including your business address, bank account information, and tax ID number.
- Enable Stripe Webhooks: Webhooks are an important part of Stripe’s functionality, allowing you to receive notifications when certain events occur, such as when a payment is made. Enabling webhooks can help you keep track of payments and quickly respond to any issues.
- Enable Strong Customer Authentication (SCA): SCA is a new regulation that requires online payments to be authenticated with at least two methods. To comply with SCA, you’ll need to enable it in your Stripe account and update your payment gateway settings in WooCommerce.
- Customize your payment form: The payment form is the first thing your customers will see when making a purchase, so it’s important to make it easy to use and visually appealing. You can customize the form in your WooCommerce settings, adding fields for additional information or removing unnecessary ones.
- Test your payment gateway: Before launching your online store, make sure to thoroughly test your payment gateway to ensure that it’s working properly. You can test the gateway using Stripe’s test mode, which allows you to simulate transactions without actually charging your customers.
- Keep an eye on fraud: Stripe has built-in fraud detection features, but it’s still important to keep an eye on your transactions to prevent fraudulent activity. You can use the Stripe Dashboard to monitor transactions and flag any suspicious activity.
By following these best practices, you can ensure that your WooCommerce Stripe payment gateway is set up for success and provides a secure and reliable payment experience for your customers.
Testing WooCommerce with Stripe
We recommend testing your Stripe Payment Gateway using all the payment methods you have included.
Visit the front page of your store and add a demo product to the cart.
Go to the cart and go on with the checkout.
You can process a test transaction using the test credentials shown on the screen.
How to Use WooCommerce Stripe Payment Gateway
After testing, go back to Dashboard — WooCommerce — Checkout — Stripe and check the box next to the Enable test Mode button.
You will need to enter your live publishable key and your secret key.
Do not forget to remove the demo products!
Once this is done, your WooCommerce site with Stripe Payment Gateway will be ready to let you sell anything without any limitations.
In this tutorial, we told you how to use the Woocommerce website with the Stripe payment system using the Stripe Payment Gateway plugin. Of course, there are some other Woocommerce Stripe plugins but we’re pretty sure this is the best one. Please let us know if you have any questions on the topic.
Best practices for using WooCommerce Stripe payment gateway
Here are some best practices for using WooCommerce Stripe payment gateway:
- Keep your Stripe account updated: Make sure that you keep your Stripe account updated with the latest information, such as your business address, email address, and phone number. This will help to ensure that your transactions are processed smoothly and without any issues.
- Test the payment gateway before going live: Before going live with your WooCommerce Stripe payment gateway, make sure to test it thoroughly. This will help you to identify and fix any issues that may arise during the transaction process.
- Enable 3D Secure authentication: 3D Secure is an extra layer of security that requires customers to enter a password or other information to verify their identity. Enabling 3D Secure authentication can help to reduce the risk of fraudulent transactions.
- Use strong passwords and two-factor authentication: To protect your Stripe account and prevent unauthorized access, use strong passwords and enable two-factor authentication. This will help to ensure that your account and your customer’s data are secure.
- Monitor your transactions regularly: Keep a close eye on your transactions and monitor them regularly. This will help you to detect any fraudulent activity and take appropriate action.
- Provide clear payment instructions: Make sure to provide clear payment instructions to your customers, including information on how to use the payment gateway, what types of payment methods are accepted, and what the process for refunds and chargebacks is.
By following these best practices, you can help to ensure that your WooCommerce Stripe payment gateway is secure, reliable, and effective in processing transactions.
Benefits of Using WooCommerce Stripe Payment Gateway
Overview of the benefits of using WooCommerce Stripe payment gateway:
- Secure payment processing: WooCommerce Stripe payment gateway provides secure and reliable payment processing with advanced fraud detection and prevention measures.
- Wide range of payment options: Customers can pay using various payment methods, including credit and debit cards, Alipay, and Bitcoin.
- Seamless integration: WooCommerce Stripe payment gateway integrates seamlessly with WooCommerce, providing a smooth checkout experience for customers.
- Easy setup: Setting up the WooCommerce Stripe payment gateway is straightforward and can be done in a few easy steps.
How WooCommerce Stripe payment gateway can improve your business:
- Increased sales: By providing a wide range of payment options and a smooth checkout experience, WooCommerce Stripe payment gateway can help increase sales and conversion rates.
- Enhanced security: With advanced fraud detection and prevention measures, the WooCommerce Stripe payment gateway provides enhanced security for both businesses and customers.
- Better customer experience: The seamless integration and easy checkout process provided by the WooCommerce Stripe payment gateway can help improve the overall customer experience.
- Increased trust: The reputation of Stripe as a reliable and secure payment processing company can help build trust with customers and improve the credibility of your business.
Comparison of WooCommerce Stripe payment gateway to other payment gateways:
- Compared to other payment gateways like PayPal, Stripe offers lower transaction fees and faster processing times.
- Stripe also offers a wider range of payment options, including support for Bitcoin and Alipay, which are not available on some other payment gateways.
- WooCommerce Stripe payment gateway also integrates seamlessly with WooCommerce, providing a better overall user experience for businesses and customers.
Conclusion
Using the WooCommerce Stripe payment gateway provides a reliable, secure, and user-friendly payment option for your customers. With its easy integration and flexibility, it can help improve your business by reducing payment errors, increasing conversions, and providing a seamless checkout experience.
If you haven’t already, we highly recommend installing and using the WooCommerce Stripe payment gateway for your WooCommerce store. The installation process is straightforward and can be done quickly.
It’s important to have a reliable payment gateway for your eCommerce business, as it not only ensures that payments are processed smoothly but also instills trust and confidence in your customers. By choosing a reputable payment gateway such as WooCommerce Stripe, you can create a positive user experience and build long-lasting customer relationships.
If you find anything missing or would like to add your thoughts to it, Please do let us know in the comment section below:
Frequently Asked Questions
How do I add a Stripe payment gateway in WooCommerce?
You can easily add a Stripe payment gateway in WooCommerce by simply installing a WordPress plugin named “WooCommerce Stripe Payment Gateway” from the WordPress directory.
Do WooCommerce payments use Stripe?
Yes, WooCommerce Payments is powered by Stripe. It’s a payment gateway that provides an easy way to accept credit and debit card payments directly on your WooCommerce store without having to set up a separate Stripe account. When you use WooCommerce Payments, you’ll be using the Stripe payment gateway to process payments, manage refunds, and access transaction data.
What is WooCommerce Stripe Gateway?
WooCommerce Stripe Gateway is a payment gateway that enables businesses to accept online payments on their WooCommerce stores. It is a plugin that integrates Stripe’s payment processing system with the WooCommerce platform, allowing customers to securely make purchases using their credit or debit cards. The plugin is designed to provide a fast and easy way to set up and manage online payments, while also providing advanced security features to protect against fraud and chargebacks.

I am a Co-Founder at WPOven INC currently living in Vancouver, Canada. My interests range from Web Development to Product development and Client projects. I am also interested in web development, WordPress, and entrepreneurship.

