If you are looking for How to create a WordPress child theme? then you are landed on the right page. When you learn the basics of WordPress, the next thing you must be looking for is how to customize a WordPress website. Hence, here comes the major role of WordPress child themes to play.
No doubt, there are also other ways through which you can customize a WordPress website, but the most fundamental method is by using a WordPress child theme. Whereas other methods have their limitations and work up to some extent. There are also some circumstances in which you have installed a theme that is not up to your mark and you need to make some tweaks to it.
What do you do, then? You will either use a plugin or look for another theme that matches your requirements. This can be a quite time-consuming process and cost you money as well. But this is not the right solution.
What if you are happy with your current theme and no plugin is available that helps you out with your customization? The only suitable and viable solution left for you is to customize your WordPress theme and make it the right fit for your website.
But it is not as easy, as it seems. To avoid any conflicts or issues you need to learn How to create a WordPress child theme first. In this post, we try to bring you detailed and comprehensive material on parent themes and child themes. How do they work? What are their major roles? and How can help your website improve its functionality?
Various Ways on how you can customize WordPress theme
Making some tweaks or customizing a theme that can match your requirements can be sometimes tricky and in the worst cases can be hazardous to your website. It is because, when you add or make some changes to a third-party theme and try to update it, your all previous changes or tweaks will get lost. And the website will look exactly like when it was newly installed. Which you won’t like to happen.
Hence, there are some ways by which you can customize or make some changes to your WordPress themes without losing anything. These methods are:
- Customizing theme using WordPress Plugins
- Making changes or Editing themes directly
- By creating a WordPress Child theme
1. Customizing theme using WordPress Plugins
Since we are familiar with the amazing flexibility and lot of customization options provided by WordPress. There is no doubt you can also customize or add some functionality to a website theme by installing some plugins. This option is quite handy and does not require a lot of effort.
It is most suitable if you are looking for customization in functions rather than designing or changing in appearance. Whatever plugin you are using, make sure it does not need to be complex or use heavy resources. If you are wondering to add some lines of code to the functions.php file of your theme, you should use a WordPress plugin to do the same.
It is because, it may look easy to add a one-line code to the function.php file, but it has nothing to do with your theme’s look or appearance. It will only change the functionality of your website. And if in the future, if you change the theme or update it, you won’t lose any functionality that you had added earlier with the help of a plugin. This is why it is better to install a plugin rather than simply adding codes.
If in any case, you aren’t able to find a plugin that can fulfill your requirements. The best thing you can do is to create a new plugin for your website.
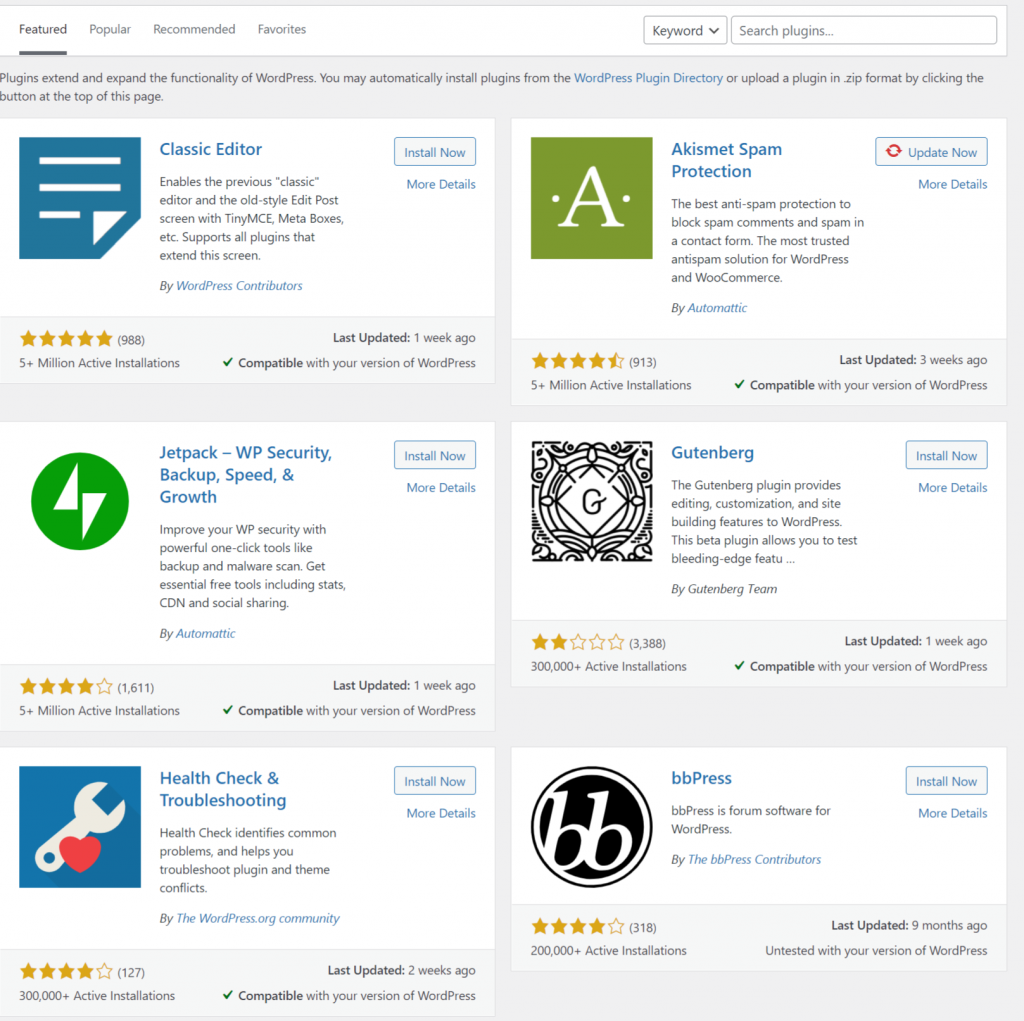
Installing a plugin to increase the functionality of a website depends on individuals and their requirements. Some users would prefer to customize the appearance or aesthetic of a website rather than functionality.
2. Direct Editing of your theme files
This method of customizing a theme file is best suitable only for websites that are running on custom WordPress themes, not from third-party or Free WordPress plugins. Custom WordPress themes are specially designed considering all the requirements and inputs given by the website admin. Hence, you have all the power to edit, remove, add features, or redesign the website completely without any risk of losing the changes that you have made in the next update.
But one thing you must be aware of is the fact that you cannot be 100% risk-free from the conflicts of Direct theme file editing. If you do not have enough knowledge about WordPress theme files and How to code them, it is still highly recommended that you create a WordPress child theme instead.
It is always better to play the safer side rather than inviting any issues. Even then, if You want to edit theme files directly, you must keep a Backup file of your Original theme as a safety measure. Always try to run a test on a staging platform before making it live.
3. By creating a WordPress Child Theme
This is the most safest and highly recommended method for anyone who is looking to customize their WordPress theme. Whether it is customizing functionality or the looks. Check out these situations in which you will be required to use a child theme:
- If your website is running on a third-party theme and it requires regular updates.
- If you do not want to make any changes in the main file that can be a risk to website damage.
- If you are looking to customize the whole aesthetic of the website rather than just functionality.
Hence, Using a WordPress Child theme can save you from any risk or damage while customizing your website. In this article, we are providing you with all the details about how you can create and implement them. Let us Get started with the basic definition of the WordPress Child theme.
What is exactly a WordPress child theme?
A WordPress Child theme is like any other theme that works sequentially with the parent theme and takes over all the information (All the theme files) from it. It is one of the best and safest practices that every developer uses to make customization or changes in a WordPress theme file and helps to retain all the changes whenever the theme gets updated.
All about WordPress Child themes and Why you need them?
The term Child theme only comes into existence when a parent theme is available. It is better understood when someone has created a WordPress child theme from it. Hence, a parent theme is just like a normal theme file that you can find in your WordPress directory. Or any theme file that you find in a WordPress directory and has all sets of files in them, then it is a Parent theme.
Now you must have been confused between the Parent theme and the WordPress Child theme. Well, there is not much of a difference when we talk about their WordPress back-end processes. All the functions would be the same as the parent theme whether the activation process or the execution.
The only difference that makes these two indifferent to one another is their dependency. A parent theme executes the whole independently, whereas a WordPress child theme’s execution is solely dependent on its parent theme. Without it, it won’t be active and working.
Hence, this is the reason why a WordPress child theme cannot run independently, rather you add customizations or copy the files from the parent theme. Inherits and works on all the basic files and features from the parent theme in addition to all the customizations or modifications you have made into it. This includes changes in website layouts, website features and functions, etc.
Some Pros and Cons of using WordPress Child theme
Pros
- You do not need to start from scratch to make customization or changes. Hence, it boosts the development time.
- Easy to update theme files without losing any customization or modifications that you have made.
- If you are not ok with your tweaks or modifications, all you need to just deactivate your WordPress child theme, and your website will be like before.
- Gives you the flexibility to customize your website without worrying about anything.
Cons
- You need to learn about the Parent theme first to create a WordPress child theme.
- There is a Learning curve, and you may take a longer time to understand all the hooks and filters of the framework first.
- It is also possible that parent theme developers may no longer provide updates and may bring certain changes to it, that may destroy your child’s theme.
- Possibility to slow down your website speed.
When you should consider having a WordPress Child theme?
So far, you might have concluded that you create a WordPress child theme, whenever you want some customizations or modifications to your website. But to your surprise, it is not that necessary.
It solely depends on how many customizations you want on your website. If it is minor tweaks such as fonts or color changes. Then, certain WordPress plugins might help you out with the same. If you are looking to change the color of your Parent theme, then the CSS plugin can help you out with it.
But, when you want to make some big changes to your website, such as layout changes in templates, or adding certain major functions and features, then you need to use a WordPress child theme.
Learn How to create a basic WordPress child theme
So far now, you have learned what is a WordPress child theme and what are its pros and cons. Now it is time to learn how can you create a simple WordPress child theme first. Just follow our comprehensive step-by-step process. For your reference, we will use Twenty-twenty One, the latest WordPress default theme.
Step 1. First, you need to create a folder in wp-content/themes
Before proceeding further, one thing you must keep in mind is that a WordPress child theme requires mainly three things, its new folder, style sheet, and a function.php file. Hence, the first step is to create a new folder in wp-content/themes.
All the themes must be located in the wp-content/theme folder and you must create a new folder with a unique name in it. For your convenience, we highly recommend you name your WordPress child theme folder name, same as the parent theme name but with adding “child”. For example, we are using Twenty Twenty-one WordPress theme, hence we will name the new folder twentytwentyone-child.
However, you are not bound to use only the name of your parent theme, You can use any name you want but it should be unique and does not include any space, or it can generate some errors.
Step 2. Create a StyleSheet (Style.css file)
Once you have created a folder, now you will be required to have a stylesheet. It mainly consists of all the codes that decide the overall design of a website. However, there are plenty of style sheets that can be available but here, we are considering only one.
To create a stylesheet you need to create a text file and name it style.css. That’s it! You are done, but to make it work, you need to write “style sheet header” just at the beginning of the file.
/* Theme Name: My Twenty Twenty One Child Theme
Theme URI: https://example.com
Description: A child theme for Twenty Twenty One.
Author: Your Name
Author URI: https://example.com/
Template: twentytwentyone
Version: 1.0
License: GNU General Public License v2 or later
License URI: https://www.gnu.org/licenses/gpl-2.0.html
Tags: light, dark, two-columns, right-sidebar, responsive-layout, accessibility-ready
Text Domain: twenty-twenty-one-child */
The above information allows WordPress to properly handle WordPress child themes and each term has its meaning mentioned below:
- Theme name. The distinctive name of the theme will show up in the WordPress back end.
- Theme URI. All the documentation and codes will be found at this location. It must be present so that the theme can be accepted into the WordPress directory.
- Description. The description of your theme helps users to understand what the theme is capable of.
- Author. In simple terms, it is your name or the user’s name who uses this particular Theme.
- Author URI. Authour’s website.
- Template. This is critical and without it, your WordPress child theme won’t work. It is the folder where your parent theme is stored. You must use the folder name rather than the theme name.
- Version. This shows the Version number of your WordPress child theme. Usually, it starts with version 1.0.
- License. Shows the License of your child’s theme and is under General Public License. The License must be the same as your Parent Theme license.
- License URI. This is the location, where your theme’s license is explained in detail with all terms and conditions.
- Tags. These Tags will help other users find your theme in the WordPress directory. Therefore, if you are using some tags, then make sure they are relevant to the theme.
- Text domain. The text domain lets themes be easily translated into different languages that can be easily understandable internationally.
But for your knowledge, the above all this information is generally not required. But the only two main information i.e. your theme name and template is only required for a WordPress child theme.
And the rest of the information is only important if you are creating a new theme and publishing it. Hence, for a WordPress child theme, all you need to provide the following information as shown below:
/*
Theme Name: My Twenty Twenty One Child Theme
description: A child theme for Twenty Twenty one
Author: Your name
Template: TwentyTwentyone
Version: 1.0.0
*/
Step 3. Create a Function.php file
The last and final step is to create a Function.php file, which we have already discussed with you before. From the name itself, you can easily understand what the Function.php file is. It allows you to modify or add new functions and features to a WordPress website. Even you can add or create your functions and add them.
In other words, a function.php file consists of all the codes that decide how a website should look and function. And Creating a function.php file is also easy just like you have created a style.css file. All you need to do is create a text file and paste the following code into it.
<?php
/* enqueue scripts and style from parent theme */
function twentytwentyone_styles() {
wp_enqueue_style( 'child-style', get_stylesheet_uri(),
array( 'twenty-twenty-one-style' ), wp_get_theme()->get('Version') );
}
add_action( 'wp_enqueue_scripts', 'twentytwentyone_styles');
Another thing you must note while creating a function.php file is that twenty twenty-one themes use get_template_directory( ) to load their stylesheet. For this, you need to enqueue the child theme’s stylesheet using the wp_enqueue_scripts action.
Upon completing all the above steps, the next thing you need to do is save your files and Activate your child theme.
Note: You are not required to create a function.php file if you do not want to use PHP to customize your theme. You can also do without it. Style sheets with other files can be sufficient for you. The only reason to mention this is to make you aware of how this important file is.
Step 4. Activating the Child Theme to make it work
Now, the Final and last step after creating a folder, style sheet, and function.php file is to activate your child theme to make it work. For this, you need to go to your WordPress Dashboard, Appearance > Theme in the WordPress back end, and look for twenty twenty-one child themes. Select the Child Theme and click on the Details option to reveal the contents of the Style sheet header.
Now, select the “Activate” button, which lets you activate the theme and your website look like something as shown in the picture below:

The above image may look like something went wrong, but it is not. The main reason why your website would appear as shown in the picture is due to the unavailability of any style files. And in the absence of style files, your website would appear only in textual format.
From this, you can understand that having a style sheet and a folder is sufficient to create a child theme. And if things are working great for you, it means you have almost successfully created it. But by adding styling you can make it a lot better.
How can you Customize/modify your WordPress child theme?
To make changes in your website’s styling or the way it looks, each WordPress theme has a style.css file in its main directory. Which is only responsible for the appearance of your website. All the CSS goes here only in the main stylesheet. But in some cases, there can be only the theme’s header information is present and these type of themes generally have their CSS files present in a different directory.
But to make customizations into these files, you must have a basic knowledge of CSS. Major Browsers like Google Chrome and Firefox have inbuilt inspect element tools that let you see the CSS and HTML of any Web page. For example, if you want to see or inspect elements for a webpage, just right-click on anywhere on the webpage and select the “inspect element” option if you are using Google Chrome.
The result will be something like as shown in the picture below:
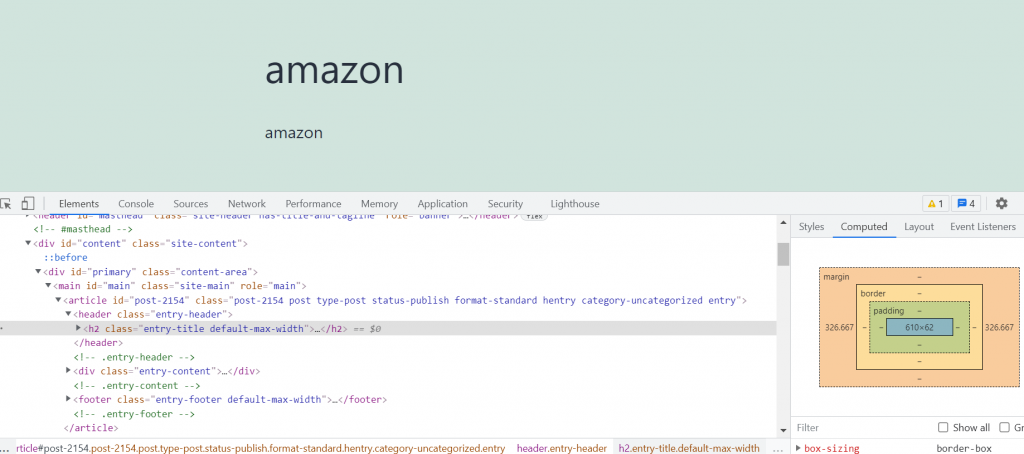
The browser of your computer will be split into two parts, at the bottom of the browser you can see the HTML and CSS of that particular website.
When you move your mouse to a different location on your website, the element gets highlighted at the bottom of the webpage.
That shows, how the CSS ruled out that particular element in the webpage. You can also make certain changes from there, we are changing the background color of the body to #d53d10.
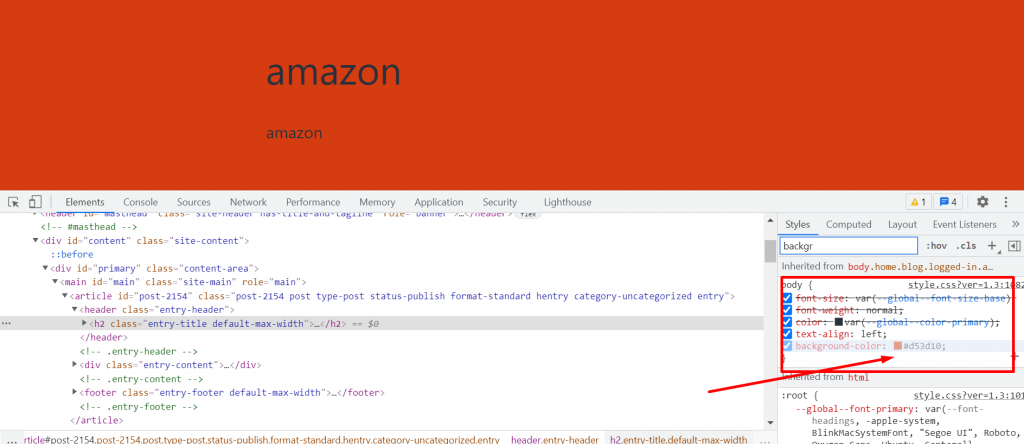
body.background-color: #d53d10;
You can easily see how the color of the background body of the website changes to Orange in color. and if you find this beautiful or want to make it permanent on your website, just copy this CSS rule and paste it into your WordPress child theme’s style.css file. Save the changes and you are done.
If you want to make other changes to the website, Repeat the above process and paste the CSS rule accordingly on your style.css file.
Customizing by editing Template files
Do you know every available WordPress theme has its different Layouts? Similarly, for our WordPress theme twenty twenty-one, we have a header, Navigation menu, Content area, Footer, widget area, and social sharing buttons.
Each WordPress theme has a different layout. Let’s look at the layout of the Twenty-Thirteen theme. You have a header, navigation menus, content loop, footer widget area, secondary widget area, and footer. Each of these sections is being managed by their respective files that are present in the Twenty Twenty-one folders which are called templates.
Generally, these template files are named according to the area that they are used for. Such as, if a template file is used for the Header section or navigational Menu, the template file will be named header.php. However, certain areas such body of the webpage where content is present can be of multiple types of content templates.
Hence, to modify a template file, the first thing you need to do is to choose the template file that you will be going to customize and copy it completely into your child’s theme.
Customizing by Adding new functions to the WordPress child theme
You may have seen many articles on the internet and on certain YouTube videos that you just copy a code from any third-party website and paste it directly to your theme’s function.php file to add some functions or features to the website.
But doing this, adding codes directly to the parent theme function files may get disappear, whenever you try to update your WordPress theme. This is the only main reason, why we highly recommend you to use a WordPress child theme and add all your customizations to it.
Hence, to avoid such mishappen, you need to create a new function.php file in your WordPress child theme’s folder and name it functons.php
How to Troubleshoot the errors if any?
If you are doing it for the first time, or just a beginner, it is highly anticipated that you may encounter some problems during creating a WordPress Child theme file. However, the most common error that you might encounter is a syntax error. It generally happens if you miss some elements in the code. Which can be easily eliminated by carefully looking out the codes.
If still, you are still facing certain issues, you can simply delete the child theme and create a new one. After all, you are not making any changes in the parent theme, and if you have made any mistake or forgot to mention anything in the Child theme you can simply delete it and start again without affecting the parent theme file.
Summary
As Far now, you have gone through almost every main point of a WordPress Child theme and learnt how can it be useful and when, why, and how you can create it. No doubt, Creating a child theme is one of the best and precautionary measures one should always follow while customizing their theme without directly adding code snippets into the parent theme.
Whether you have to change the styling, layout, or functionality of your website, simply create a Child theme first and add your modifications to it rather than to the parent file. I hope, you will follow the above valuable points about the WordPress Child theme and will implement it on your website to take advantage of it. Without losing any data or customizations you have already made in your next theme update.
If you find this post helpful to understand all concepts of the WordPress Child theme and help you out to create a child theme for your website. Or if you like to add more valuable points to it, please do let us know in the comments section below.
Frequently Asked Questions
What is a child theme for WordPress?
a WordPress Child theme is like any other theme that works sequentially with the parent theme and takes over all the information( All the theme files) from it. It is one of the best and safest practices that every developer uses to make customization or changes in a WordPress theme file and helps to retain all the changes whenever the theme gets updated.
How do I create a child theme in WordPress?
You need to follow these simple steps to create a child theme in WordPress.
step1: First you need to create a folder in wp-content/themes
step2: Create a StyleSheet (Style.css file)
step3: Enqueue the parent and child themes’ stylesheets
Step4: Create a Function.php file
Step5: Activate the Child theme
What is the difference between the child theme and the parent theme?
The main difference between the child theme and the parent theme is that without a parent theme, a child theme cannot work but without the child theme a parent theme can easily work. A child theme inherits all the features of the parent theme and works as the additional layer on top of the parent theme. IT lets developers make customizations and modifications to the website without fear of losing any customizations after updating the parent theme.

Rahul Kumar is a web enthusiast, and content strategist specializing in WordPress & web hosting. With years of experience and a commitment to staying up-to-date with industry trends, he creates effective online strategies that drive traffic, boosts engagement, and increase conversions. Rahul’s attention to detail and ability to craft compelling content makes him a valuable asset to any brand looking to improve its online presence.

![How To Update WordPress Theme Without Losing Customization [ 3 Methods ] update WordPress theme](https://www.wpoven.com/blog/wp-content/uploads/2022/05/update-WordPress-theme.png.webp)
