Are you looking for How to add Expires headers in WordPress? Then you must have run your WordPress site through a speed testing tool that suggests you add Expires headers.
This means your website struggled with poor loading time and you haven’t optimized its browser cache yet. Which has the main purpose of helping your website is to tell the visitor’s browser to store certain files on their computer and load those files whenever the visitor visits the website again, rather than downloading the same file from the server again on each visit. And helps to boost the website speed.
So, in this post, we will try to cover all the aspects of Expires headers such as What they mean and how they can boost your SEO. After that, we will explain how you can easily add them to your website in a very comprehensive manner.
But first, let us understand what Expires headers mean.
How to Add Expires Headers in WordPress?
Now let us see How can you Add Expires Headers in WordPress using these two different methods. The plugin method is quite easy and highly recommend it if you are a beginner. The manual method is recommended for those who have some technical expertise.
But if you were a WPOven client, you do not have to worry about your website loading speed and follow all these extra steps to boost website speed.
At WPOven we offer a fully managed Web hosting solution with the fastest dedicated servers that have Worldwide CDN-ready Data centers and cutting-edge security. That means we do not leave any stone unturned to bring you the Fastest and most secure experience ever.
A. Add Expires Headers in WordPress using WordPress Plugins
Although, there are plenty of WordPress plugins available through which you can easily add Expires Headers in WordPress. But we are going to pick the most suitable one which is Free and has a better user interface.
Hummingbird and WP Super Cache are some popular plugins that have a huge number of downloads in the WordPress repository.
1. Hummingbird
Humming Bird is a website speed optimizer plugin that is available free to use from the WordPress repository and provide a lot of other good caching option.
It includes some out-of-the-box features like:
- Scan your website completely and point out the errors that are responsible for slowing down website performance.
- A complete Caching solution to load pages faster without compromise, Gravatar, and browser cache tool.
- Provide Performance reports and tips to optimize your website speed.
- Boosts your website speed hence increasing your Conversion rate
- Boost SEO and Improve Rankings
- Turbo speed HTML, JavaScript, and stylesheet CSS transfer.
- Helps with optimization such as CSS, Googe Font Files, combining JavaScript, etc., and many more.
Let us see how you can optimize your website performance by adding Expires Headers in WordPress using Hummingbird Plugin.
First, you need to install the Hummingbird plugin on your website, and to do so, visit your WordPress website dashboard > Plugins > Add new.
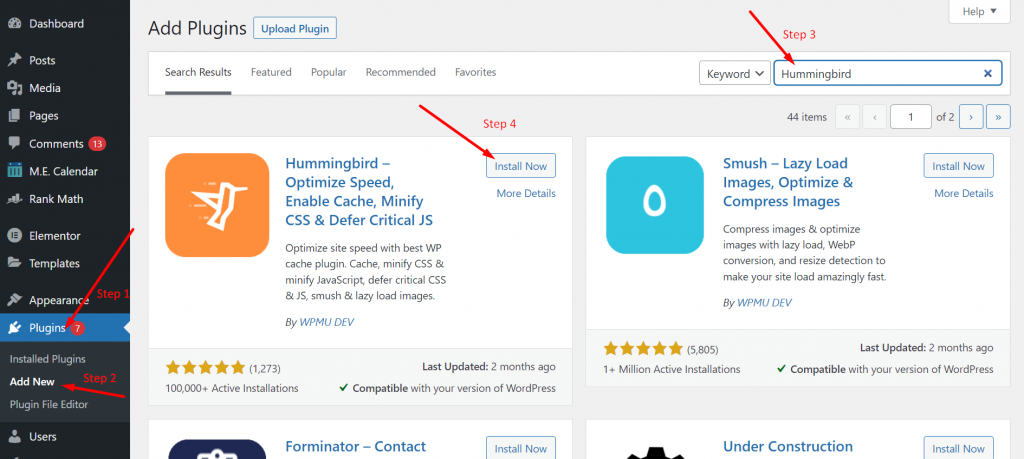
Type “Hummingbird” in the search bar. Once done, the plugin will appear as shown above. Click on the Install Now button and proceed by clicking on the Activate button. After successfully activating the plugin, you will find it listed in the WordPress dashboard menu. Click on it and select Caching as shown below:
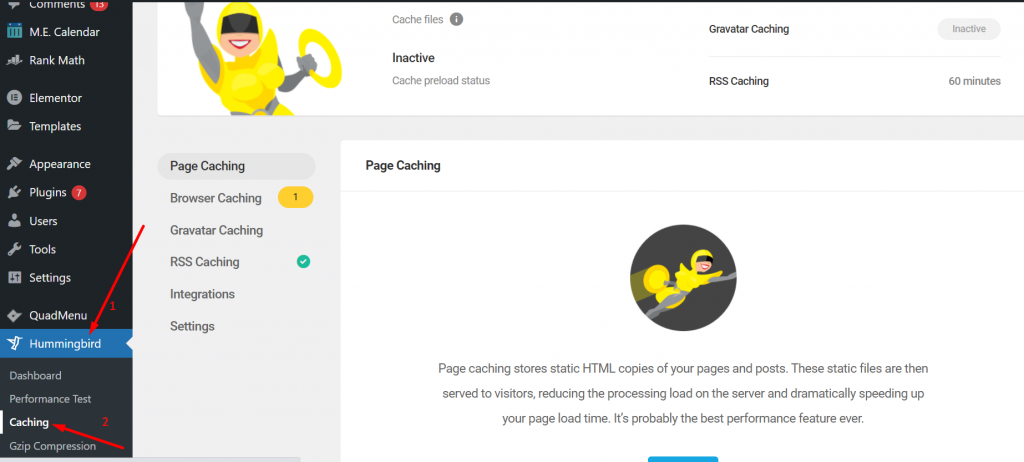
Once you reach the caching page of the plugin, you will see 6 options. You need to click on Browser Caching and proceed further.
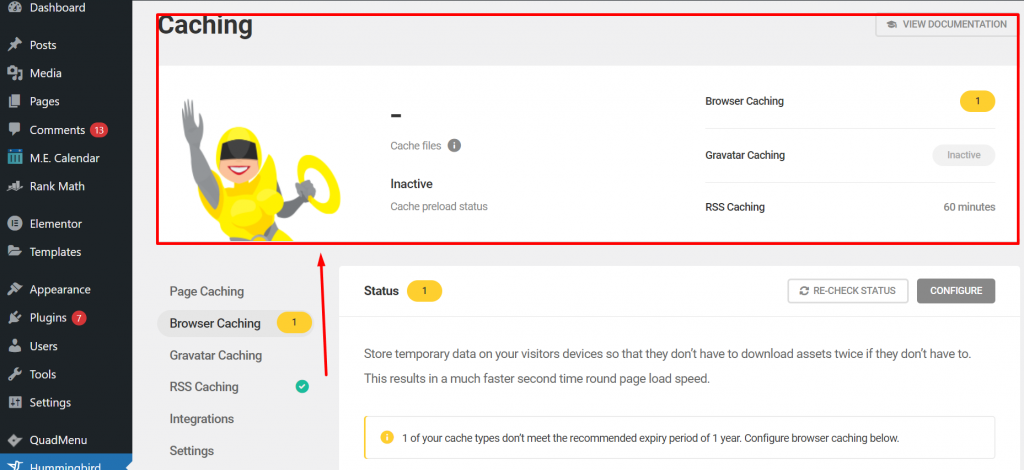
At the top of it, you can check the status. And when you scroll a little down, you will find a configure option, click on it, and start configuring your Browser caching.
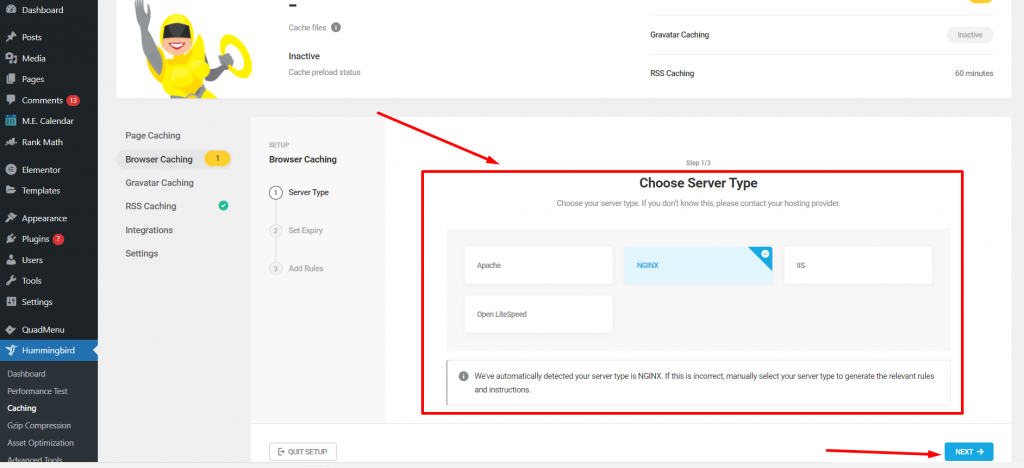
Now on the Browser Caching configuration page, you will be asked to choose Server Type. Select a Server type, Apache, NGNIX, IIS or OpenLiteSpeed proceeded by clicking on the Next button.
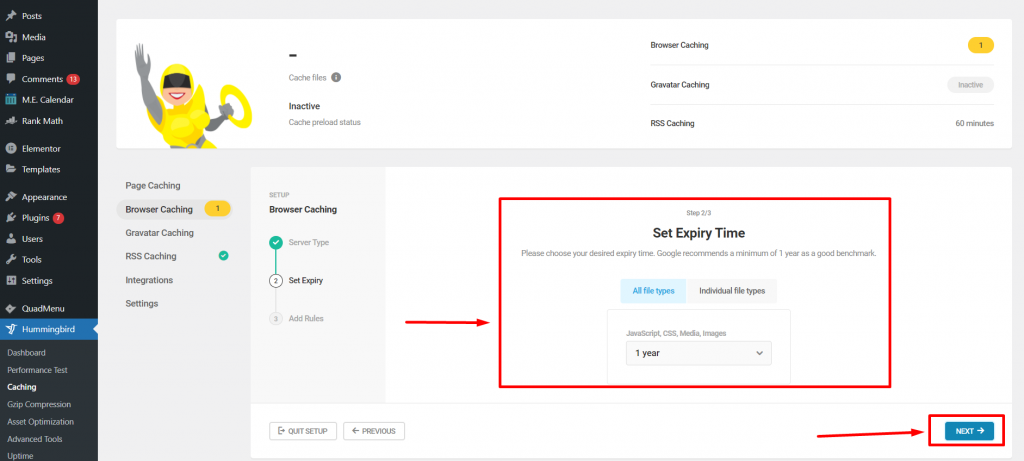
In the next step, you will be required to set an Expiry time for either All file types or Individual file types. After that click on the next button to go further to the next step. In which a generated code will display and you will be required to copy and
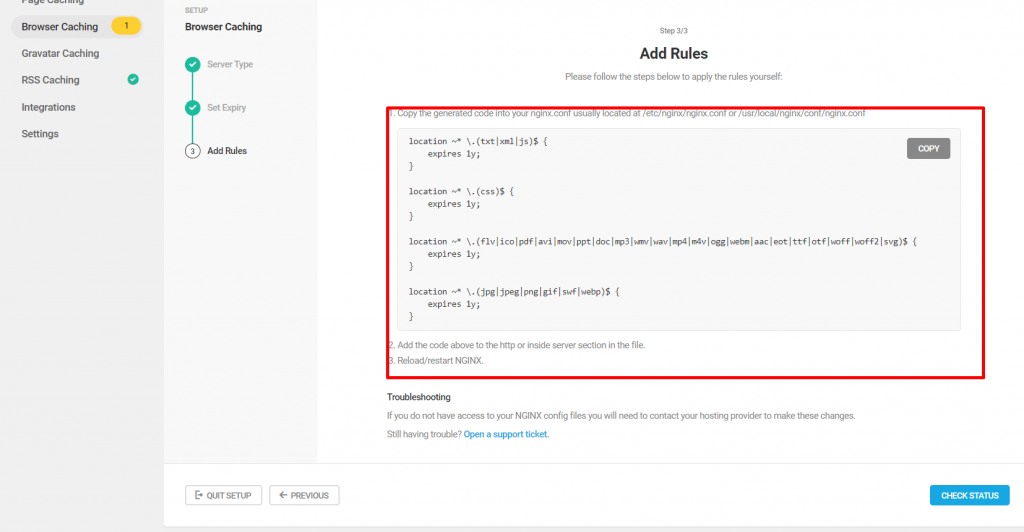
Add the code to the HTTP or inside the server section in the file. When you are done, reload and restart NGINX.
Another Plugin that you can try is WP Rocket let us check How it can help you to Add Expires Headers in WordPress.
2. WP rocket

If you won’t find Hummingbird easy, you can try another popular caching plugin WP-rocket. As soon as you install and activate this plugin, it automatically starts browser caching without following any further steps and configuring settings.
But to use this plugin, you need to buy their yearly plans starting from $49 to $249 per year. However, if your budget doesn’t allow you to use this plugin, you can always go for the alternate option (hummingbird) that we have already mentioned, and it’s Free.
B. Add Expires Headers in WordPress Manually
If you have the technical expertise and know-how to manage and handle WordPress files, you can always go for the manual method. This method to add Expires Headers in WordPress mainly involves adding certain codes to your .htaccess file.
Since we have already mentioned that this method is best suitable for only those users who have expertise in WordPress files, beginners must refrain from using this method because in case any mistake happens in codes, the whole site can get completely damaged or broken.
Hence, it is highly recommended that you make a complete WordPress backup before proceeding to further steps. You can also check out our detailed article on “How to Backup WordPress site in 5 min?” for your guidance.
But before proceeding on the main steps, the first thing you need to do is to determine your website server, whether it is Apache or NGINX.
To do so, one of the simplest and easiest methods you can try is to open your website on any browser > Right-click on the page > Select Inspect element option.
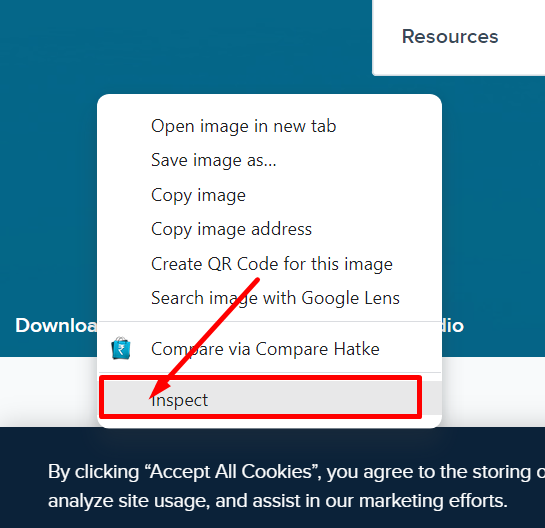
After that, you need to click on the Network Tab as shown in the picture below. In some cases, you will be required to reload the page to load the results.
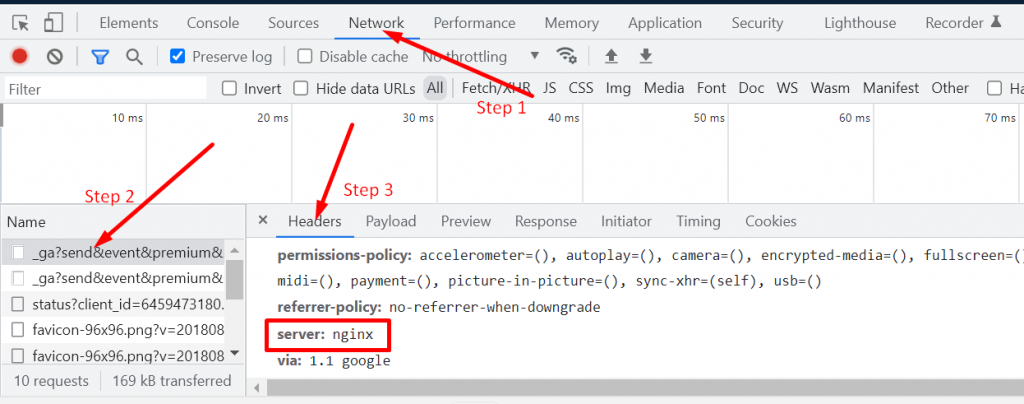
When the results get loaded, the next step you need to do is to click on your domain name or any link that is related to your domain under the name column as shown in Step 2 (See picture above). After that, you can scroll down in the Headers column as shown in Step 3, and check out your server.
However, tools like GTmetrix can also let you know what type of server your website is running on, under the Header section as shown below:
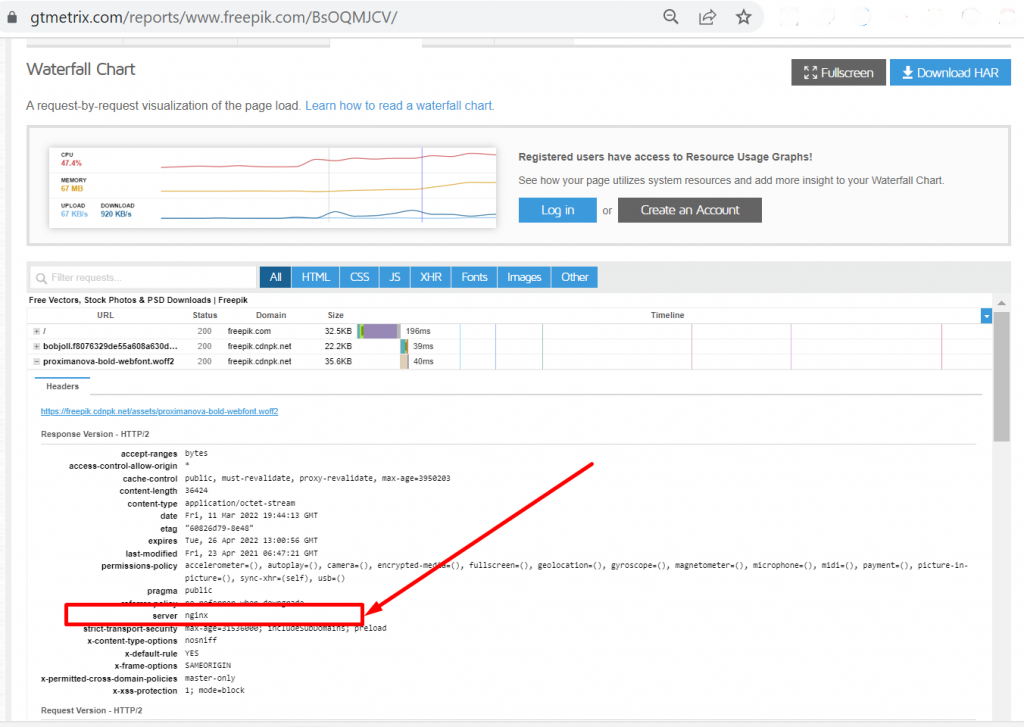
Now you have successfully been able to determine which web server your website is using. Let us see how you can add Expires headers in WordPress on both types of web servers.
1. Add Expires Headers in WordPress (Apache)
If your WordPress site is on an Apache server, then you need to add expired headers in the WordPress .htaccess file. Which you will find in the root folder of your web server. Let us check out the steps you need to follow:
Step 1: To get access and edit this file, you need to either use the cPanel provided by your web hosting provider or connect your hosting account with an FTP client (FileZilla).
Step 2: When you can access your root folder, locate the .htaccess file.
Step 3: Download a backup copy of the .htaccess file so that, if anything goes south, you can upload the backup file again and resolve the issue ASAP.
Step 4: Now, you need to add Expires Headers to your browser caching.
EXPIRES HEADER CACHING ##
<IfModule mod_expires.c>
ExpiresActive On
ExpiresByType image/jpg "access 1 year"
ExpiresByType image/jpeg "access 1 year"
ExpiresByType image/gif "access 1 year"
ExpiresByType image/png "access 1 year"
ExpiresByType image/svg "access 1 year"
ExpiresByType text/css "access 1 month"
ExpiresByType application/pdf "access 1 month"
ExpiresByType application/javascript "access 1 month"
ExpiresByType application/x-javascript "access 1 month"
ExpiresByType application/x-shockwave-flash "access 1 month"
ExpiresByType image/x-icon "access 1 year"
ExpiresDefault "access 4 days"
## EXPIRES HEADER CACHING
The values mentioned in the code snippet will work for most of the websites, but you are free to make changes or make certain adjustments in time values for different file types.
2. Add Expires Headers in WordPress (NGINX)
If your website users an NGINX server, then you need to add access to your server configuration file and add expired headers to it. However how to access and edit these files can vary from host to host, so you should contact your hosting provider for assistance.
After that, you will need to add the following Expires Headers code in your web server configuration file:
location ~* .(jpg|jpeg|gif|png|svg)$ {
expires 365d;
}
location ~* .(pdf|css|html|js|swf)$ {
expires 4d;
}
Note: You can change the expired values as per your requirement or file type. You must have noticed images has longer expiration time because they stay the same for a longer period than typical HTML, CSS, JS, and other file types.
3. Add Expires Headers in WordPress (CDN systems)
If you are using CDN systems such as Cloudflare to deliver content, then you will be required to use different expiration dates for your resources. However, the best alternative to avoid this is by unsettling your ETags from the CDN server.
To do this, you need to add the following code snippet in your .htaccess file.
#Disable ETags
<IfModule mod_headers.c>
Header unset ETag
</IfModule>
FileETag None
What are Expires headers?
Expired headers are HTTP headers whose main purpose is to tell your visitor’s website browser whether it should load resources from the browser cache or it should load new resources from the web server.
Due to this, it helps to increase your website speed by loading the elements from the local browser cache rather than downloading them from the server.
To make this happen, you need to Add Expires Headers in your WordPress site, and after that, the web browser will start browser caching for a certain period that you have already set up in Expires headers.
Let us understand it with an example, suppose you have implemented Expires headers on JPEG files for one month. This means your visitor’s browser will load the resources from already stored browser caching for one month. After the one-month duration, the visitor’s browsers will start loading newer versions of resources from the server.
Similarly, you add different expire headers for different types of files and reduce a significant amount of HTTP requests, which overall helps to ramp up your website speed.
How You can Check Expires Headers on your Website?
There are many online tools available such as through which you can check out your website performance and analyze their core web vitals. Some of the best tools to run speed tests are Website speed checker by Bitcatcha and another popular tool is GTmetrix. These tools provide you results in the form of Grades, scores, and Warnings about some issues your website might face.
Similarly, through this tool, you can also check Expires Headers on your website and if found missing, you can add them later.
To do so, first, go to the GTmetrix website, and enter your website URL as shown below:
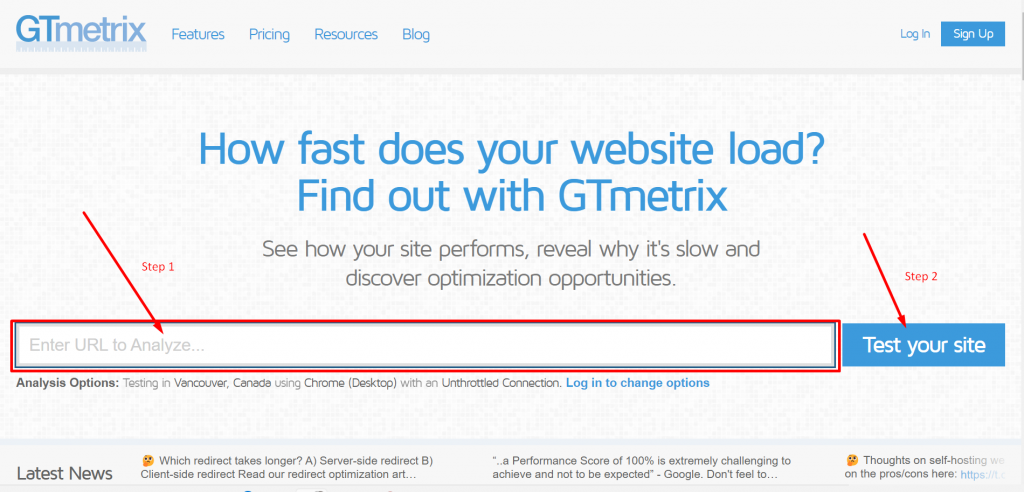
When you click on Test your site button, it will take some time to analyze your website vitals and show you a complete result as shown below:
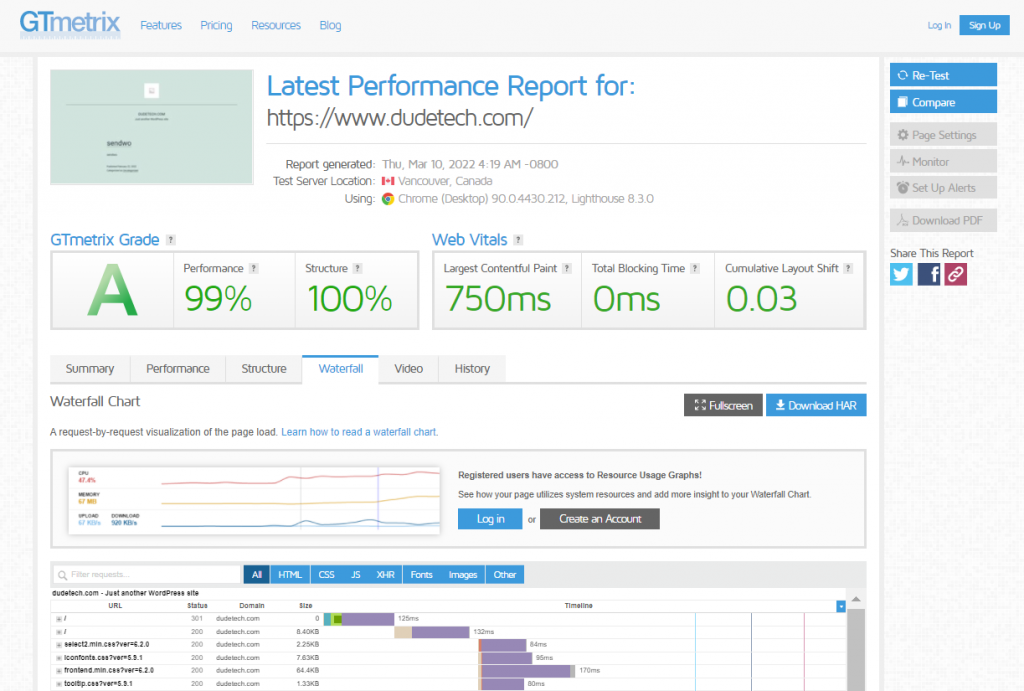
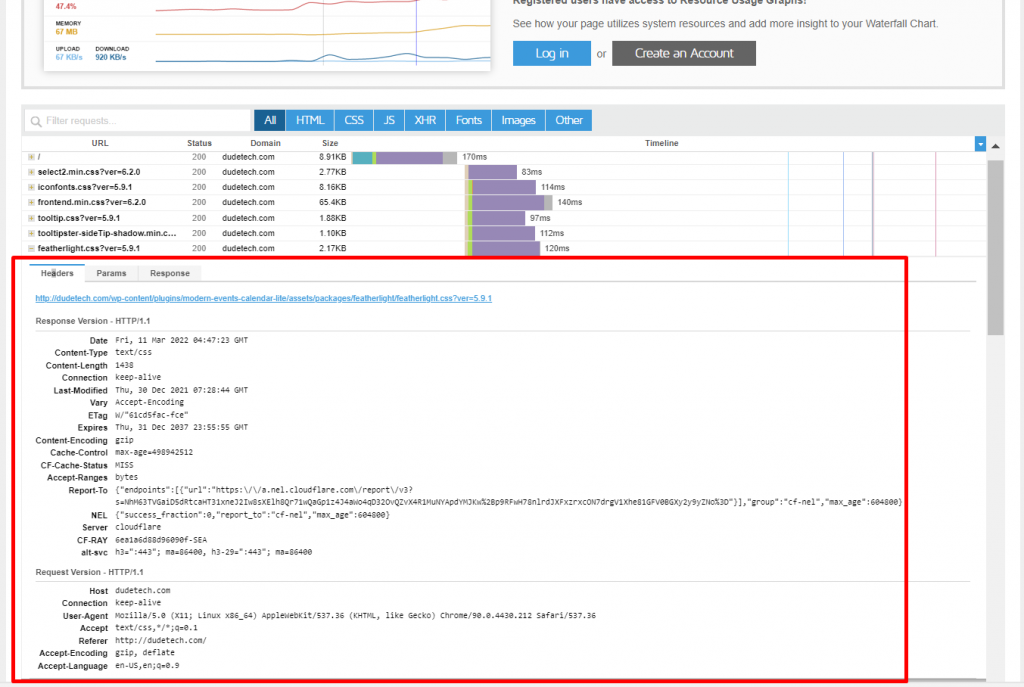
Now to check, Expires Headers on the WordPress site, click on the Waterfall tab > Headers tab and check out the results as shown below:
Summary
To Summarize the whole post, Adding Expires Headers in WordPress provides you control over Browser caching behavior to some extent. And helps to enhance overall your website loading speed. Even though this method will not make a remarkable change in your website speed, this technique has shown great improvement in user experience.
In addition to it, any user needs to know how to add Expires headers in the WordPress site correctly. Because if you do it incorrectly the consequences can be harmful to your website and instead of boosting up the speed of the website it will slow your website down.
Moreover, if you have any more suggestions or valuable points to add to this post that we have missed mention, please do let us know in the comment section below:
Frequently Asked Questions
How do you fix and add expired headers?
You can fix expired headers by using three different methods:
1. Using a Caching WordPress plugin i.e. Hummingbird or WProcket.
2. By accessing yours.Htaccess file and add the code snippet to it.
What are expired headers in WordPress?
Expired headers are HTTP headers whose main purpose is to tell your visitor’s website browser whether it should load resources from the browser cache or it should load new resources from the web server. Due to this, it helps to increase your website speed by loading the elements from the local browser cache rather than downloading them from the server.
How do I add expired headers in cPanel?
To add expired headers in cPanel follow these simple steps:
1. log in to your website’s cPanel.
2. Navigate through the File section and Select the File Manager icon.
3. Go to the public_html folder and open it.
4. Navigate through the .htaccess file and download a backup copy first.
5. Now right-click on the .htaccess file for options.
6. Click on the Edit option, add the code snippet, and save it.

Rahul Kumar is a web enthusiast, and content strategist specializing in WordPress & web hosting. With years of experience and a commitment to staying up-to-date with industry trends, he creates effective online strategies that drive traffic, boosts engagement, and increase conversions. Rahul’s attention to detail and ability to craft compelling content makes him a valuable asset to any brand looking to improve its online presence.

