Are you someone who’s interested in starting a WordPress blog, and has a question running in your mind about “How to start a WordPress blog? But I feel intimidated and unsure about it. You’re not alone! Many people face this challenge when starting.
Blogging can be more than just a fun hobby – it can also be a way to make a full-time income. However, getting started can be tough. Often, bloggers begin with lots of enthusiasm and the goal of earning money, but they end up failing because they don’t have the right knowledge or skills.
But don’t worry – the key to success is starting on the right foot with a WordPress blog. You don’t need to be an expert in technical skills or SEO to get started. With a little guidance and support, you can turn your idea for a WordPress blog into a reality.
So, if you’re keen on starting your blog but don’t know where to start, keep reading this blog. We’ll help you get started and set you on the path to becoming a successful blogger!
How to Start a WordPress Blog: What you will need?
If you are looking to start a WordPress Blogs, here is an entire step-by-step process listed below:
- First Decide on your WordPress Blog Niche
- Research and Decide Domain Name
- Select a Web Hosting Service Provider (WPOven Recommended)
- Setup Your Website On WordPress
- WordPress Installation and other settings
- Select a Theme that matches your Blog Niche
- Install Recommended Plugins
- Start Creating content and publish it
- Promote Your Blog
We are going to explain each step in detail, So, Don’t worry, we’ll break down each step in a detailed and beginner-friendly manner below, so you don’t have to stress about it.
Step1. Choose a WordPress Blog Niche
The initial and foremost step of “How to start a WordPress blog?” is to decide on your WordPress Blog Niche. You are free to choose whatever blog Niche you are interested in.
- Choose a niche that you’re genuinely interested in exploring and learning more about, rather than following the latest trends or what successful bloggers are doing.
- Your niche will determine the audience you target, so it’s important to choose one that aligns with your blog’s goals.
- For example, while bodybuilding and fitness share similar ideologies, the blog contents and themes will be different.
- However, don’t feel limited to producing content solely within your chosen niche. You’re free to explore and write about topics in other areas of interest, too. Try out different topics to find what interests you most!
- To help you get started, we’ve provided some popular blog categories, but there are many more niches to choose from, with lots of sub-niches within each category.
Some of the most popular Niche you can consider are:
- Lifestyle
- Art + DIY
- News
- Business & Finance
- Entertainment
- Food
- Tech
- Science
- Product Reviews and many more.
Read: 🚩 How To Start A Food Blog In 2023? [Complete Guide]
Step 2. Research and Decide Domain Name
Having your domain name for your WordPress blog is one of the basic and most important things for a website.
It is so important that your whole brand reputation, Web traffic, and Search result optimization (SEO) depend on it. You cannot select any random name before keyword research and analysis.
For the best domain name, you must check these qualities to get better visibility online.
- Do keyword research around the niche.
- Try to choose a name from the keyword or names around it which has high search volume and low competition.
- If keywords are unavailable, you can choose Your name and link it with your niche to make a Brand out of it. It is called Self Branding. The domain name should be your name and niche, the tone you use for writing, and the theme you choose that defines your personality.
- Always give priority to the “.com” domain.
- The name should be easy to remember and pronounce.
- Make it as short, if possible, make it to one word
The whole buying and registering of a domain name will depend on availability and the seller. But on average, it will cost you around $10- $20 per year/domain.
Step 3. Select a Web Hosting Service Provider – WPOven Makes It Easy!
- After registering your Domain name, you need to buy a Web hosting service.
- Web hosting is like the home where you host all your website contents, while the domain name is like your home address.
- Web hosting providers make your website accessible to users.
- There are many web hosting services available, so it’s important to choose the right one.
- WPOven is one of the best web hosting service providers you can trust.
- WPOven has servers and data centers with dedicated hotspots around the world to keep your blog connected to the internet all the time. Check out the Key Features given below:
Some of the key Features of WPOven are:
- Unlimited Website hosting
- Free Email
- Complete WordPress Maintenance Package
- Unlimited Migration and Staging
- You can choose a Datacenter from our 13 locations around the world
- We offer a Dedicated Cloud with More SSD Storage than any web host
- Enterprise Grade Security
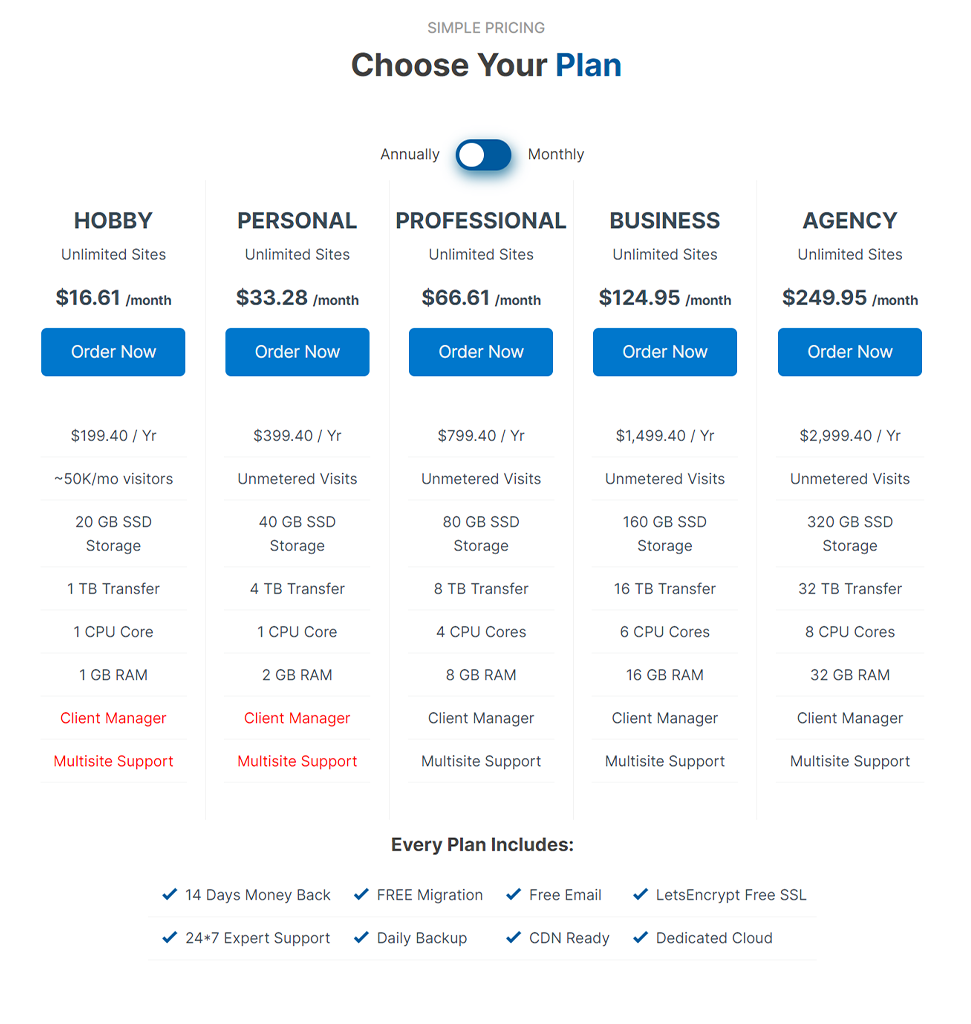
And Plans start at $16.61 per month. You pay less and get more. It is one of the lowest and best plans for anyone who would like to start a WordPress blog.
Step 4. Setup Your Website On WordPress
Done with your domain name and buying WPOven web hosting service? Now it is time to get into details on How to start a WordPress blog?
But before that, you should know how to set up WordPress on your web hosting first. Check out the step-by-step process mentioned below:
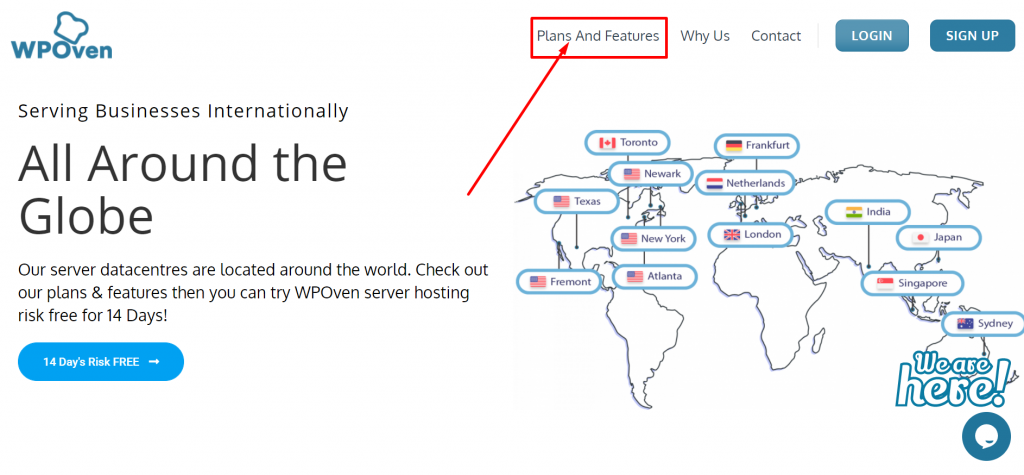
In the First step of setup, you need to go WPOven homepage.
1. Sign Up for a Free Account on WPOven.com
- In the first step of website setup, you need to visit WPOven Homepage, and click on the Sign UP button as shown in the picture below:
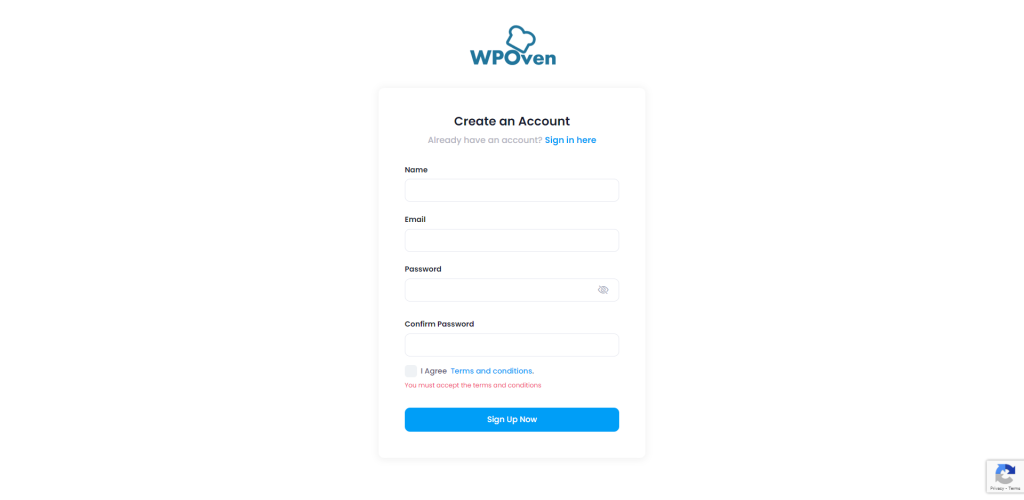
- Once, you click on the Sign-Up button a Sign-UP form appears asking for your important credentials such as:
- Your name
- Email address
- Password
- Check the terms and conditions button and hit the Sign UP Now button to complete registration. A verification email will be sent to your registered email id. You have to open your email box and click on the verification email to verify it.
2. Choose the Suitable Plan
After you are done with your verification, it is time to choose your hosting plan. Go back to the Homepage and click on the “Plans and Features” button as shown in the image.
- A page with detailed plans and Features will appear. Read thoroughly and check out the complete details that are most suitable for your requirements.
- To choose a suitable starting plan we will recommend you go for a very basic one. Once you, start growing and getting traffic, you can move on to higher plans.
- At WPOven, we take care of every user and we have plans for everyone, from users who like to have a website for their hobbies or for running an Agency.

3. Complete the Payment
The basic plan at WPOven starts at $16.61 a month, especially focusing on users who want a website as their hobby or newbies who were for How to start a WordPress blog just like you.
- To continue with the process, click on the “Order now” button and complete the payment.
4. How to add your Domain to WPOven
After you are done with buying a Web hosting service, now it is time to Set up your Domain Name on your Web hosting service. Just check out the “How to Add Your Domains to WPOven” setup tutorial. It will really help you to get through this.
Step 5. WordPress Installation and other settings
- Choose a suitable hosting plan from the options mentioned earlier. We recommend starting plans for beginners.
- If you’ve chosen WPOven as your hosting provider, you won’t need to manually install WordPress since it’s already pre-installed. However, if you’re using a different host, you’ll need to download and install WordPress manually.
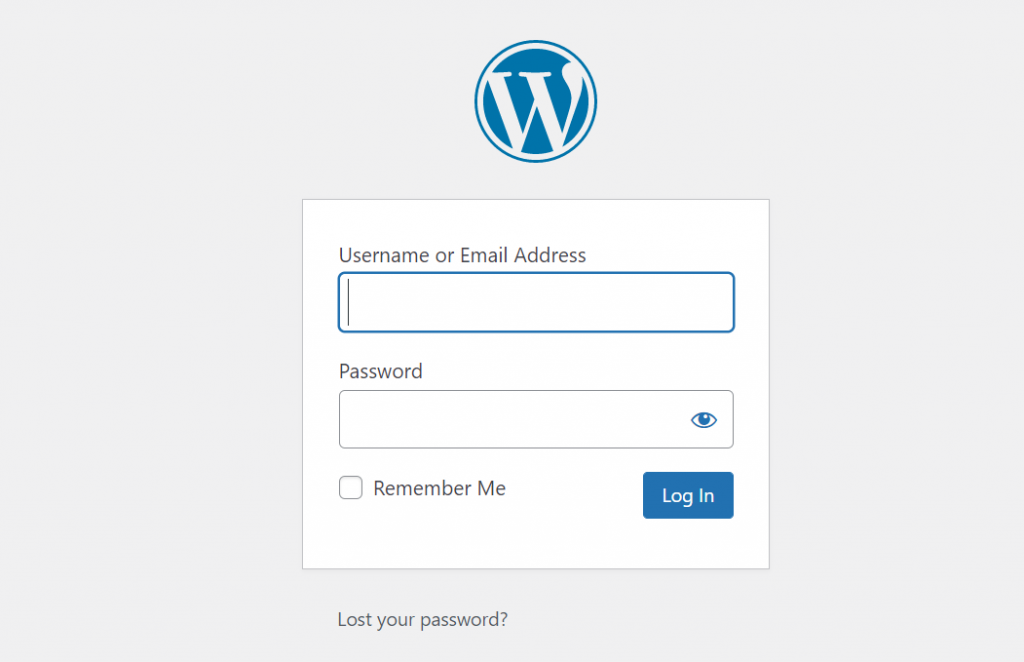
- Once WordPress is installed on your website, you can log in to your WordPress admin dashboard by visiting the link https://www.yourdomain.com/wp-login or admin. This will take you to a login page where you’ll need to enter the username/email and password that you created when setting up your hosting account.
- WordPress is highly customizable due to its open-source nature. You can even customize your admin login page. Check out our guide on “How to change your default WordPress Login Url” if you’re interested.
- After successfully logging in, the WordPress dashboard will appear, displaying all the necessary website settings and options. You can check out all the Menu buttons on the left sidebar of the WordPress Dashboard to explore your options.
You found there are too many options are there, but you need to know only some of the important settings at the initial stage. Let us figure them out.
WordPress general settings
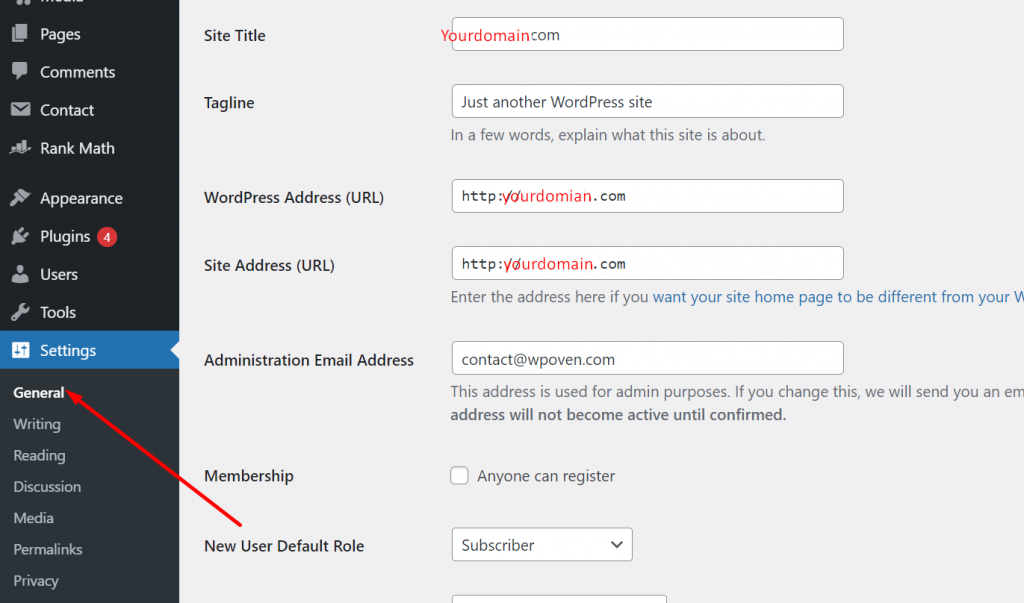
- Log in to your WordPress admin dashboard.
- On the left sidebar, hover over “Settings” and click on “General.”
- Enter your website’s title, tagline, and other required settings.
- Remember to have a tagline for your website to let visitors know your aim or motto.
- Your website’s title will help with branding.
- You can change these settings at any time if needed.
WordPress Writing Settings
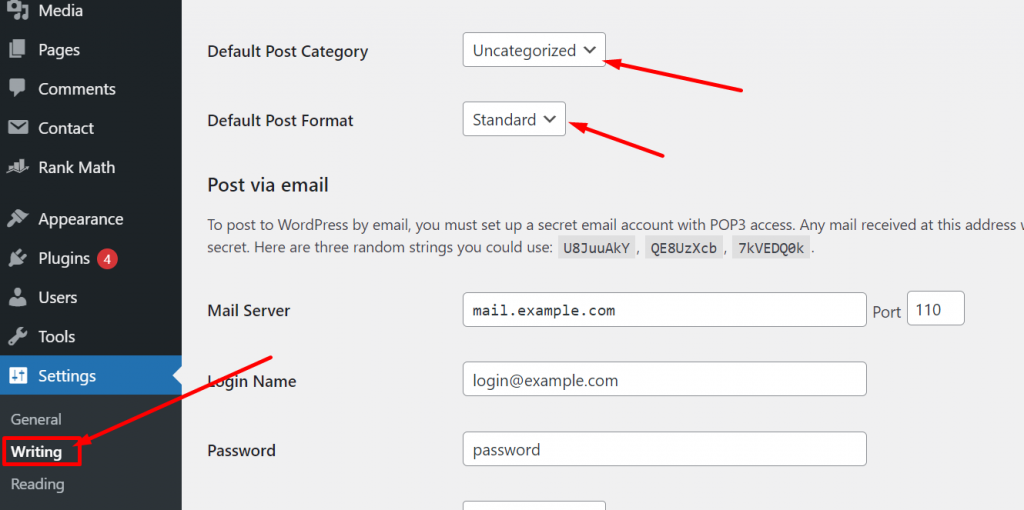
- Once you have changed the General settings of WordPress, scroll down to find the Writing Settings button.
- Click on the Writing settings button and you will see options for the default post category and post format.
- You can choose a default post category and format for your posts, but don’t worry too much about this step as you can change these settings later.
- Remember, this step is not crucial, so you can skip it for now and move on to other settings if you want.
WordPress Reading Settings
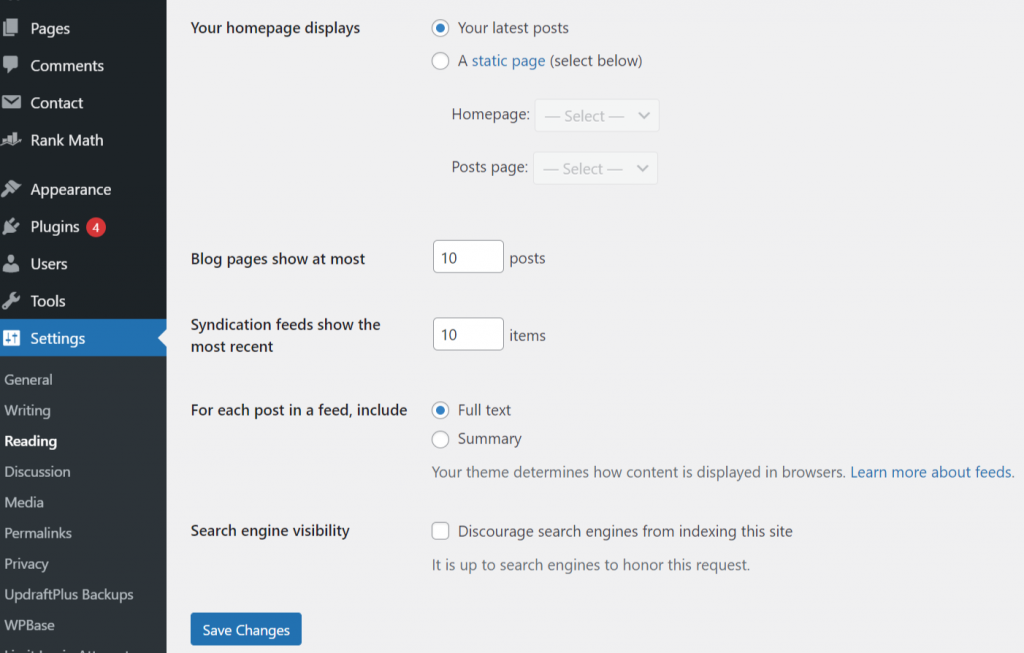
Now you are done with changing the writing settings, Now move on to changing the Reading settings. Depending on the WordPress theme you are using, the fields in the reading settings may be a little different.
But most of them will have the option to choose how your homepage display shows to your readers, Decide the number of Blog pages, Encourage or Discourage Search Engine indexing, etc.
Note: We highly recommend you discourage search engines from indexing the site, before completing the Website design and start pushing articles on the website. It is because an incomplete website with no posts will create a negative impact on search engines and it will affect SEO.
WordPress Discussion Settings
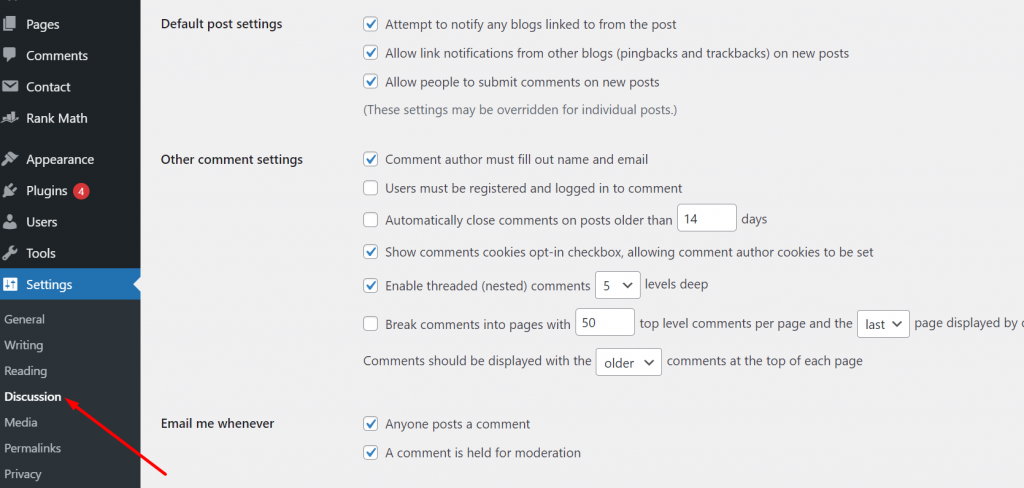
The discussion settings page contains all the settings related to the post comments and their moderation. This settings page will allow you to restrict spammers or bots that try to spam your comment section with irrelevant links or advertising.
Initially, your main consideration should be to restrict random users to comment or the comments must be approved manually.
WordPress Media Settings
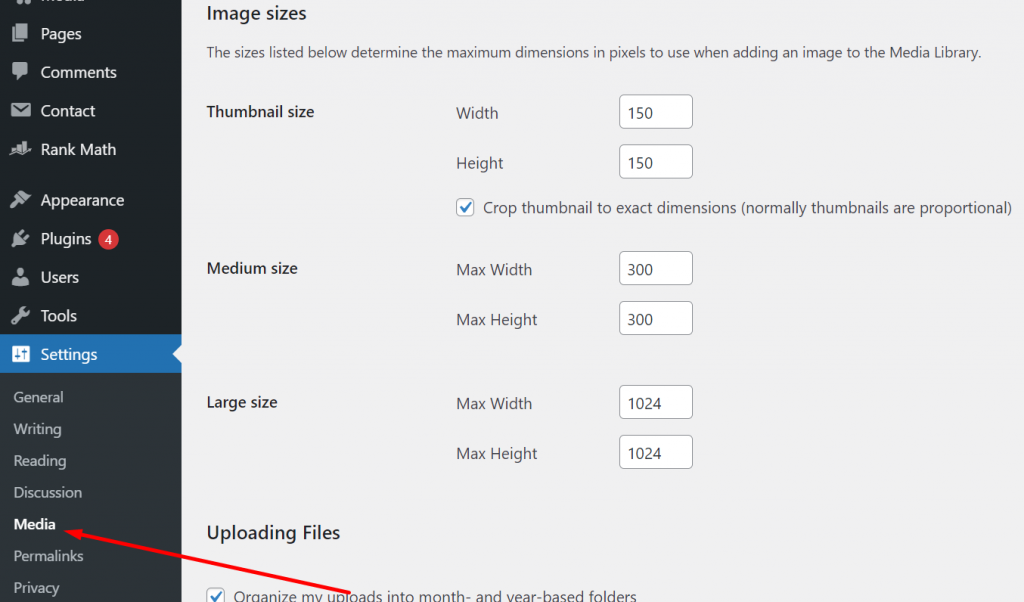
WordPress also gives users a media settings option to customize the size and width of thumbnails or images they upload. You can leave it as it is or define pre-set size media configuration for the posts.
Permalinks Settings
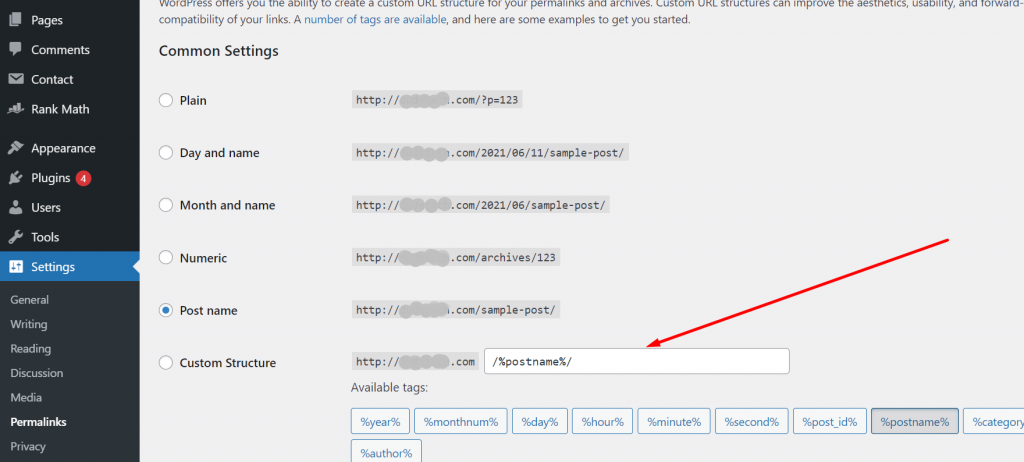
- Permalinks are permanent links that appear on the browser’s address bar when a visitor opens any page of the website.
- It is a combination of the domain name and the page name.
- For example, the permalink of a post “https://www.wpoven.com/blog/how-to-start-a-travel-blog/” consists of the domain name “WPOven” and the link “blog/how-to-start-a-travel-blog”.
- In the permalink’s settings, users can customize the permalink format by selecting Day and name, Month and name, Numeric, Post name, and Custom structure options or leaving it plain.
- WordPress uses the plain format as the default option, which is not easily readable and looks unusual.
- For better SEO, it is recommended to use the post name in the permalink format.
Note: Always try to use your Focus keyword in the slug, that will help to boost your SEO. Another point you must note is that, once you have selected your permalink format and executed it. You cannot change it afterward, if you try to do so, it is possible that the link can be broken and show a 404 error page.
Set your User Profile
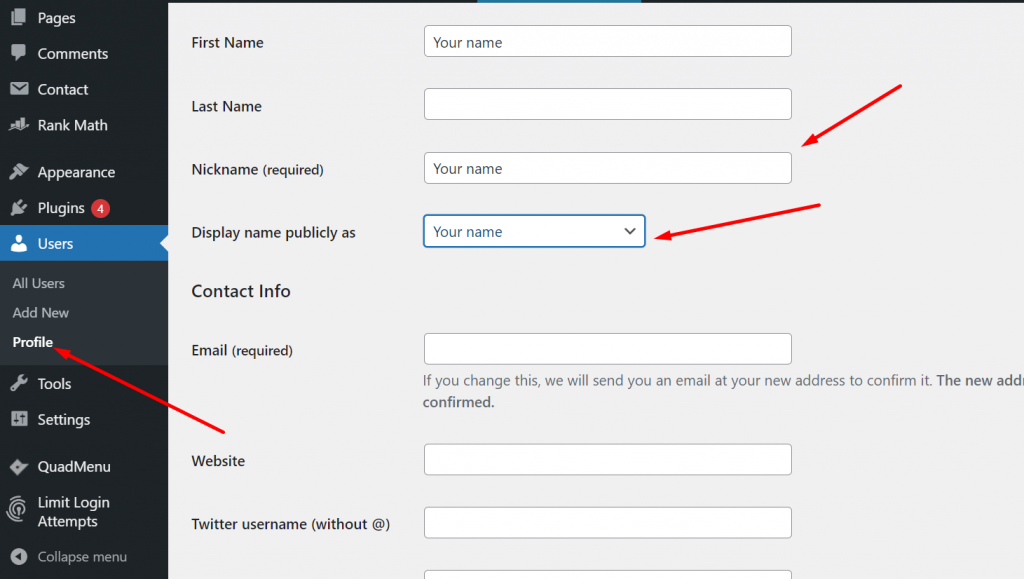
- After making changes and setting up the WordPress General Settings, users should also check their User Profile settings.
- To edit the User Profile, users can hover over the Users menu button and click on the Your Profile option.
- The user information fields may be filled by themes by default, so users should ensure that every detail in the User Profile is correct.
- Users should check the “Display name publicly as” drop-down options to ensure it is correct.
- At the bottom of the User Profile settings page, users should complete their Gravatar profile, which will make posting articles or posts on any WordPress website easier.
Step 6. Select a Theme that matches your Blog Niche
- You can begin with easy and basic default WordPress themes that have a clean design or choose a fancy theme that matches your blog niche.
- However, you should remember that choosing a theme is not more important than the quality of content you will be pushing.
- The focus should be on the quality of content rather than the theme design and looks.
- Once users attract a satisfactory audience base, they can consider the theme of their blog.
- You can select and purchase the most suitable theme for your blog niche and requirements from theme directories available on the web.
- One of the most popular theme directories you can consider is Themeforest, which offers millions of themes for all types of niches at a minimal cost.
Some Free and paid themes are available to download from the WordPress directory:
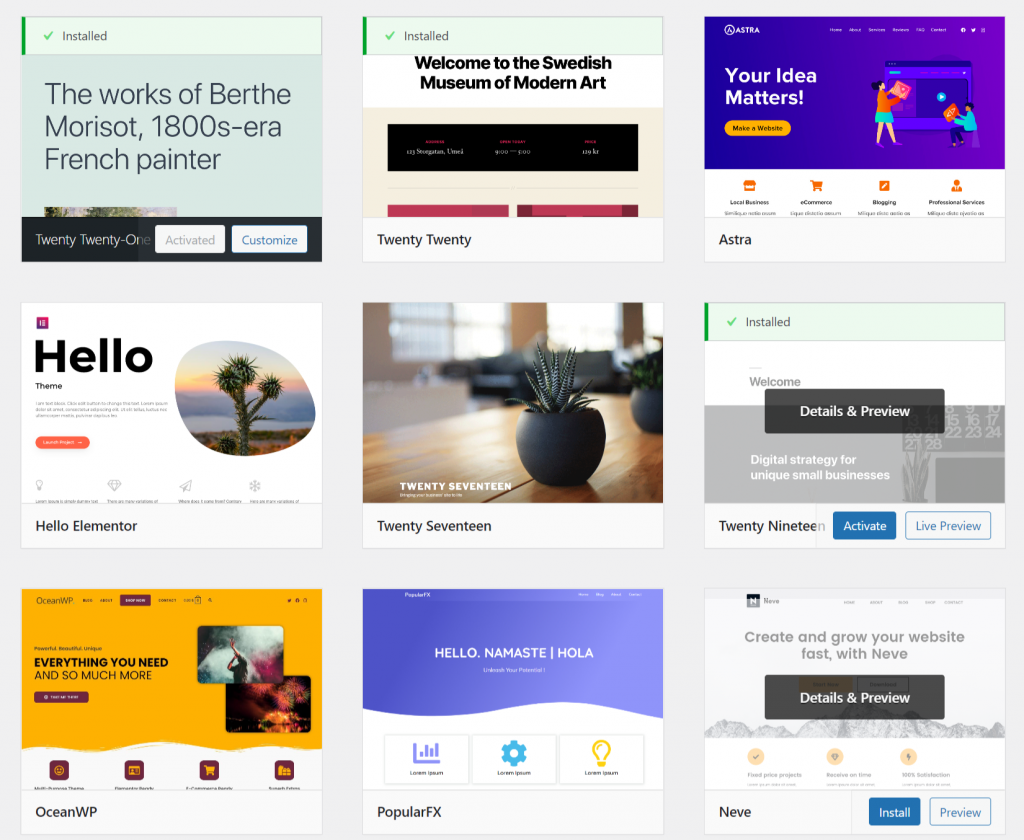
However, apart from being free and easily available on the WordPress directory, you might want to switch to a theme with a more beautiful design and features at some point in time. In that situation, to make the whole theme-switching process easy.
- Navigate to the Appearance section of the WordPress sidebar.
- Click on Themes.
- Click on the “Add New” button to upload a new theme.
- Choose a theme file from your computer and click on the “Install” button.
- Once the theme is successfully uploaded, click on the “Activate” button to activate it.
- Now, you have successfully added and activated a new theme on your WordPress website. The new theme will provide a fresh, featureful, and new look to your blog for your visitors.
Step 7. Install Recommended Plugins
After installing the theme successfully on your website, another important step is to install some plugins. However, it is not a difficult task to install multiple plugins on your website, before pushing any content. But the main problem is that:
- Installing too many plugins can slow down your website and affect user experience, so it’s important to choose wisely.
- WordPress already has built-in features that are essential for running a blog, so you don’t necessarily need to install any plugins.
- However, installing plugins can enhance your blog’s performance and overall experience.
- Choose the most essential plugins for your blog, such as those for SEO, security, contact forms, and social media sharing.
- Only install plugins from trusted sources, such as the WordPress plugin directory or reputable third-party developers.
- Regularly update your plugins to ensure they are functioning properly and to address any security vulnerabilities.
To make an easy process for you, we have provided some of the best and most essential plugins for the blog to start with:
These essential plugins are free to install and use, and can be easily downloaded from the WordPress directory.
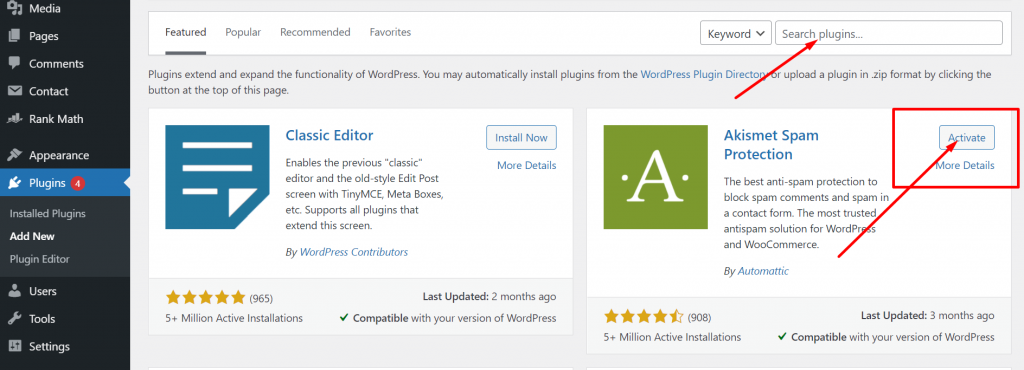
- Log in to your WordPress admin panel.
- Navigate to the ‘Plugins’ section in the sidebar menu.
- Search for the desired plugin by typing its name in the search bar.
- Click on the ‘Install Now’ button beside the plugin.
- Wait for the plugin to download and install.
- Once the installation is complete, click on the ‘Activate’ button beside the plugin.
- The plugin is now installed and activated on your blog, and ready to use.
RankMath (SEO plugin)

To make things easy and fast, Rank Math SEO is one of the best choices for SEO for your website. Its excellent feature provides you with top-notch SEO capabilities that were not easy to do previously. Its Automation features have the potential to do the task of the entire SEO team in just a few steps.
- To gain consistent organic traffic on search engines, several SEO parameters must be fulfilled.
- SEO is a common source of traffic for many websites.
- SEM can help achieve top ranks on SERPs by bidding for a better position.
- SEO traffic is based on optimization and content quality, unlike SEM.
- The better the content optimization and content, the higher the chances of ranking on top.
- However, optimizing for search engines can be more tedious than writing content, therefore here these SEO Plugins can help you out.
Read: 🚩 Rank Math Vs Yoast SEO: Which is the Best WordPress SEO Plugin?
Askimet – Protect from spam

Spammers or Spam comments can be a potential threat to your blog and can hack your website. Hence you need to take necessary measures to restrict their passage to your blog. There are many WordPress plugins available in the market, but with a high number of installations and positive responses, we think Askimet Spam Protection is the number one choice.
All you need is to install it, activate and choose the level of protection, and you are ready to go. Once you are done with all the settings, the Askimet Spam protection will continuously keep on scanning all the comments and if anything is suspicious, automatically will move them to the spam folder.
Add social sharing buttons

As a WordPress blogger, you would like your content to be shared widely. And this can only be possible when you install social share buttons on your blog. These social share buttons can be fixed either on the left side of the blog or the bottom of the content.
This plugin will let you add social media share icons for RSS, Email, Facebook, Twitter, LinkedIn, Pinterest, Instagram, YouTube, and ‘Share’ (covering 200+ other social media platforms) and upload custom share icons of your choice.
Readers can easily share their content with their friends on various social media platforms with a single click. All, you need to do is download the “Social media share button” from the WordPress directory, install it, and activate it.
Install Google Analytics Plugin

To monitor your website’s performance, see its stats, and generate reports, Google Analytics is the best tool available right now. Once, you have created a google analytics account and linked your website to it. You can easily track and monitor all your website vitals daily.
But to make this feature a lot easier and take it to another level for getting better experience and performance. Some WordPress Plugins let to directly integrate your Google Analytics with your WordPress dashboard.
Hence, Monster Insights is one of them, that easily integrates with any SEO plugin and helps you to monitor the website vitals on the same dashboard.
Always ensure the backup of your Blog

While running a blog, it is always highly recommended to be cautious about any mistakes with your blog. To reduce the risks, you must take daily backups of your blog to avoid any data loss in case of a site crash or hack. Vault press is an amazing Free backup WordPress plugin from Jetpack, that makes this whole process a lot more easier and automatic.
Completely owned by jetpack, you do not need to pay a premium for creating and maintaining complete website backup. All the features come with jetpack premium packages. However, if you do not want to use any WordPress plugin, you can also use other alternative solutions such as backing up your website via your Hosting service provider or doing it manually.
Step 8. You are Ready to Start Blogging
Now at this stage, your website is almost ready to push content and start bogging. But before that, there are some essential points that you must consider. Like deleting all the irrelevant, sample pages or posts from the Dashboard that WordPress has by default after installation.
Compose your first content
To add a new post or compose, you need to navigate through your Posts menu, and click on the “Add New” option, the page will load a new page showing similar to the picture below:
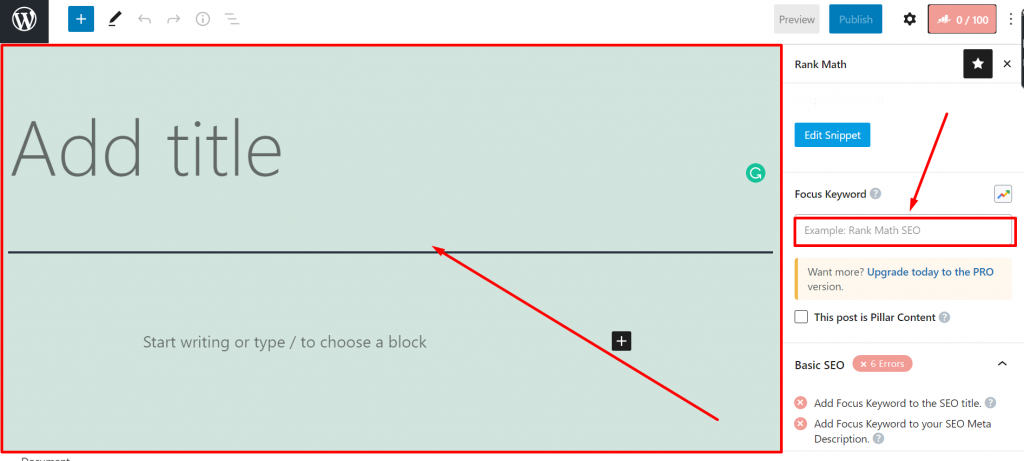
First, you need to consider the main three points as mentioned below:
- Add a title to the post: This field is most important for your blog. As it determines what your content is all about and it has a major weight from SEO’s point of view. It should be interesting, SEO friendly, Eye-Catchy, and Relevant to content.
- Body of the Content: After the title of the content, the next thing is to write. This section holds the majority of your screen. With different options to edit, such as multiple writing styles, pictures, videos, Gifs, and many other options, you can use your creativity to bring out more attractive content for your readers. Even the engines favor only rich content which has high audience retention. The more you write, the better the visibility will be.
- Optimizing your content: Only writing long paragraphed content is not enough for getting better organic traffic and rankings. For better results, you need to deliver relevant content, should be helping the users, and optimize as per the search engine standards. To make things easy use the Rank math SEO plugin, and complete its parameters while writing content.
- Add rich media and tags: When you upload any rich media such as videos or pictures. Do not forget to add tags to them. This will help to easily search content based on tags on your blog.
If all the above main four points are considered, it is now time to hit the publish button to push your content to the readers. However, there are a lot more things you need to consider, but initially, these four points are the pillar ones.
Step 9. Promote Your Blog
Creating your blog and writing content is just the beginning – it’s time to start promoting it!
- Building brand awareness is a crucial part of marketing, and promoting your blog is an effective way to achieve it.
- To let visitors know about your blog, you need to promote it on multiple platforms. The more places you promote it, the more likely you are to reach a wider audience.
- There are many ways to promote your blog, including social media, email newsletters, and guest blogging. Experiment with different methods and find what works best for your blog.
- Utilizing search engine optimization (SEO) strategies can also help increase your visibility and make it easier for people to find your blog through search engines.
- By promoting your blog and increasing your visibility, you’ll be able to connect with more readers and create a thriving community around your content.
So, don’t hesitate to promote your blog and share your content with the world. With consistent effort and creativity, your blog can reach its full potential and achieve the success it deserves!
Use Of Social Media Platforms (Social Media Marketing)
- Social media platforms are a fantastic and widely accepted way to promote your blog.
- With a large user base on these platforms, you have a better chance of getting noticed and increasing awareness of your blog.
- Creating an account or blog page on social media and sharing links to your latest blog posts is a great way to reach a wider audience.
- To engage your audience, try fun activities like polls, Q&A sessions, and online quizzes. Also, be sure to respond promptly to their comments.
- Consistency is key when it comes to being active on social media. The more active you are, the more likely you are to gain followers and increase your blog’s visibility.
- Consider using visual-oriented social media platforms like Pinterest, Instagram, Twitter, and Facebook to showcase your content and attract more viewers. With eye-catching visuals, you can draw in more readers and grow your blog.
Influencer Marketing and Collaborations
This is quite trending marketing nowadays. You can reach social media influencers who have a good fan base and have the same niche. Or you can ask other bloggers of the same niche to collaborate with you. Or if you couldn’t find an influencer of the same niche, you can go for similar ones.
For example, if your niche is “Smartphones”, you can contact a blogger whose niche is reviewing smartphones.
Adding up more features
Being WordPress is an open-source platform, there is no limitation to its flexibility. Similarly, to increase the features and functionality of any website, there are tons of WordPress plugins available.
You can add multiple pages, themes, and plugins, customize them and even you can turn your blog into a full online store. There are a lot of other things you can do with it.
Summary
With help of the above easy steps, one can easily start their own blog. Indeed, it is easy to start a blog only if you start it with the basic settings rather than hopping directly into the deep of it.
At first, it seems a little difficult, but slowly and steadily, making some changes and learning from it, can lead you to become a Pro.
No doubt, at first you may face some issues with the theme that you have used and the plugins you have installed, but the only thing that matters a lot is the content you produce.
And you should note that no matter how your website looks or the features you have, if the readers like your content, you will definitely be successful.
If you found anything that we have missed mentioning or you would like to add your own points to it. Please write your valuable suggestions in the comment section below. We would love to hear from you.
Frequently Asked Questions
Is WordPress blog free?
WordPress is an open-source platform, indeed it is free with some add-ons. But still, you need to pay for your domain and hosting to start a blog. Luckily, the entry-level plans are quite affordable. On average the monthly plan starts at $5 per month.
How do I start a blog and make money on WordPress?
To make money out of WordPress blog:
1. Use affiliate links
2. Sell digital products on your blog.
3. Google Adsense.
4. Create Email leads
5. Accept Guest posts
How do I create a free WordPress blog?
1. Visit WordPress.com
2. Create a WordPress account by providing the required information
3. Enter your blog information
4. Select an address for your blog
5. Now you are done and ready to go.

Rahul Kumar is a web enthusiast, and content strategist specializing in WordPress & web hosting. With years of experience and a commitment to staying up-to-date with industry trends, he creates effective online strategies that drive traffic, boosts engagement, and increase conversions. Rahul’s attention to detail and ability to craft compelling content makes him a valuable asset to any brand looking to improve its online presence.


![How to Start a Fashion Blog In 2022 [Guided Steps] how to start a fashion blog](https://www.wpoven.com/blog/wp-content/uploads/2021/06/How_to_Start_a_Fashion_Blog.png)
