Browsing the web is not always a smooth sail. Innumerable errors can pop up and disrupt the entire experience. The few informed ones easily scoot past such trivial blunders. A panic-stricken situation arises in the absence of troubleshooting options.
It is with the knowledge of a few simple steps that this unfortunate little hindrance can be dealt with. In an entire pool of distinct errors, we learn how to tackle HTTP error 503 through this article.
An attempt has been made to present a clear understanding of this error. Additionally, the article below equips you with practical and effective ways to fix the HTTP error 503.
We will cover the following topics in this article
How to Fix Error 503?
There is not much that can be done to resolve this error from the user (client) side. It is only the safe refresh and restart option that a user can proceed with. However, the website administrators need to carefully analyze the 503 error glitch that is causing it to crop up. Correct diagnosis of the error is essential to apply accurate troubleshooting measures.
Let’s discuss what to do in the 503 Opps movement!
Many times, the actual cause is not that severe. Take your time to figure out the root cause. There are a couple of troubleshooting measures that can be taken to get ahead of the 503 services temporarily unavailable error.
Mostly this particular error can be well handled from the server side. But there are a few steps that a user can make use of. Therefore, the common fixes given below are divided into two parts; the users and the developers.
Troubleshooting for 503 error (Users) :
1. Refresh
A common yet potent way to address a 503 service unavailable is to refresh or reboot. Sometimes a temporary problem like such can be resolved in seconds by refreshing the page. On the client or user end, you can hit the F5, Ctrl+R, or the refresh button on the address bar. This may solve the issue. But more than often the 503 error can only be dealt with from the administrator end. Therefore it is futile to check if the website is specifically down on your end. Dedicated tools that give such information will only show that a 503 error is a server problem and not a user-related one.
2. Restart the Device
Another troubleshooting option for users is to restart their devices if they encounter an HTTP 503. Users can resort to this if they suspect an incorrect DNS configuration to be the cause. Error arising due to a DNS fault is mostly conveyed through a message like ‘Service Unavailable – DNS Failure’.
Simply restart the computer or router. Otherwise, an alternate public DNS server can be chosen and changed for both the computer and router.
If the error still shows despite using the above two troubleshooting measures, users can contact the website and ask for help. All legit websites supply their contact information with email addresses or contact numbers.
3. Close other multiple active Tabs
Sometimes, the ‘Error 503’ can also be triggered due to having multiple active tabs open, which can overwhelm the caching server. Therefore, to alleviate the strain on the caching server, it is advisable to close any other active tabs when encountering such error messages on your current tab.
4. Check if there is too much packet loss
As we have already mentioned earlier heavy packet loss can also be one of the reasons that trigger the ‘Error 503’ error. To check this, you need to run a ping test, Here is how you can do it.
A ping is a tool used to measure the time it takes for data to travel from your computer to another computer (host) and receive a response (ACK handshake). To make sure the test is accurate, it’s a good idea to use a larger packet of data (10000 bytes) than the default size. Here’s how you can do it:
For Windows users:
- Press the Windows key + R to open the Run dialog box.
- Type “cmd” and press Enter to open the Command Prompt.
- Type “ipconfig” and press Enter to display information about your network adapter.
- Make a note of the “Default Gateway” value. You’ll need this for the next step.
- Type “ping Default Gateway -t -l 10000” and press Enter.
- After about 15 pings, press Control + C to stop the ping test.
For Mac users:
- Open the Terminal.
- Type “ipconfig” and press Enter to display information about your network adapter.
- Make a note of the “Default Gateway” value. You’ll need this for the next step.
- Type “ping Default Gateway -s 10000” and press Enter.
- After about 15 pings, press Control + C to stop the ping test.
If you find that there is heavy packet loss, you can
5. Reset your Current Browser to default settings or alternately use a different browser
Sometimes, if your web browser isn’t set up properly, you might see these errors. The easiest way to fix this is to reset your browser back to its default settings.
To reset Chrome settings to their default and see if it resolves the issue.
5.1. Open the Chrome browser.
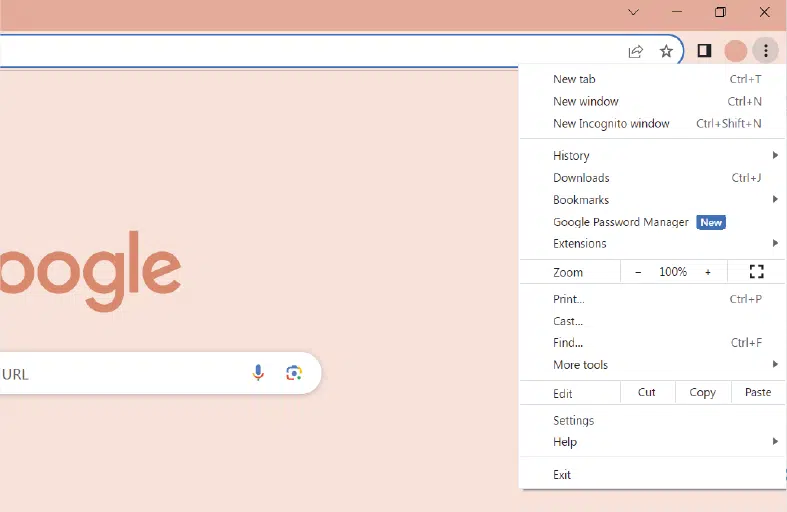
5.2. Click on the three-dot menu button at the top-right corner.
5.3. From the menu, select “Settings.”
5.4. On the left side of the page, find and click on “Reset and clean up.”
5.5. Now, on the right side of the page, click on “Restore settings to their original defaults.”
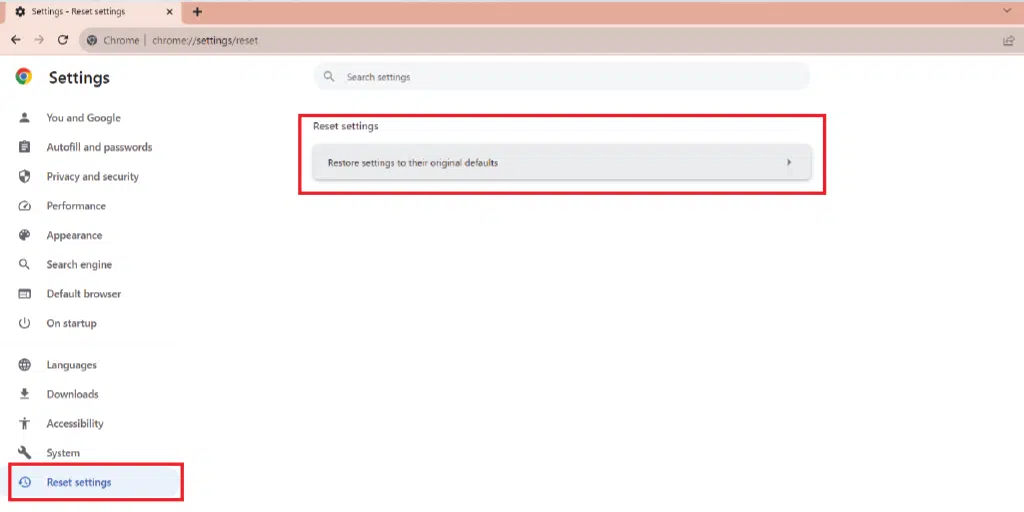
A confirmation pop-up will appear. Click on “Reset settings” to continue.
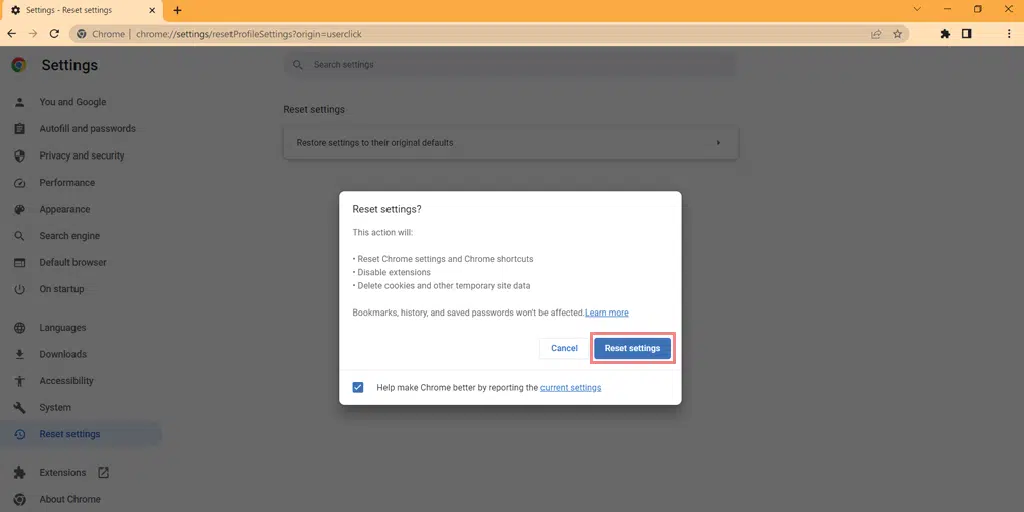
Follow any further instructions that come up to finish the process.
Once everything is done, restart Chrome.
OR
you can try a different browser such as Mozilla Firefox or Edge alternatively.
Troubleshooting for 503 error (Developers) :
Developers and administrators can oversee and remove this server-sided error more efficiently than any user could. The following solutions can be made use of :
6. Reboot the Server
Despite going into very specific troubleshooting options, website administrators can safely select the alternative of a server reboot. A server reboot quickly restarts the webserver. This process eliminates any congestion in the server chain. A simple server reboot can provide smooth server hosting and remove the 503 error in seconds. Besides a website/application spanning over multiple servers calls for a systematic and planned reboot.
7. Examine Firewall Configuration
A firewall’s job is to sort the incoming traffic into potentially harmful and safe. It is an essentially significant security tool for website safety. However, specific circumstances like a faulty configuration can cause a firewall to malfunction. In the case of a flawed configuration, some vital traffic may be barred from accessing the website. Content delivery network (CDN) based applications undergo this firewall problem frequently.
Automatic firewall resources allow the CDNs to function as responsible third-party platforms to hold the ‘heavy’ content so as to maintain the application speed and smoothness. But many times this firewall prevents even secure data from passing through. This could lead to a 503 error. Inspect the firewall or temporarily disable the CDN as one of the troubleshooting options.
8. Faulty Server Connection
503 service unavailable errors can crop up due to a server connectivity issue. In the entire chain of servers, there might be one that won’t be responding due to ongoing maintenance or connection breakdown. This is specifically true for all applications and websites using more than one server. In such a case all an administrator can do is detect the fault in the server connection or look out for the server in maintenance.
9. Detect Maintenance
As discussed in the main causes of HTTP error 503 errors, server maintenance is a common occurrence. In planned maintenance, the administrator is well aware and can select a specific time as well. But there are instances when an application goes for automatic maintenance. This holds true for WordPress. Most automatic maintenance is uninformed resulting in a 503 error. It is advised to all web administrators to look for any kind of maintenance before panicking at the sight of such an error.
10. Look into Web Server Resource
If administrators find out the increase in traffic on the website is causing an HTTP error 503 error, it is high time to optimize web server resources. Most of the time it is the usage of cheap hosting that causes this error. The growing popularity of a website/app is directly proportional to a spike in traffic. In such cases, inadequate web resources hamper the server’s capacity to accept access requests. Use of a CDN, better website host, limited plugins, reducing JavaScript and CSS files, and adoption of Gzip compression among others are ways to increase web resources.
It is wise to contact the web hosting support and discuss the recurring 503 error and then go for upgrading the hosting plan if needed.
11. Inspect Server Logs
One can swiftly head to logs anytime in case of troubleshooting. They provide valuable information regarding server, website errors, and application functioning. The server log conveys valuable information regarding the server used for running the website or the application. These logs can be further inspected to detect the status of the various other connected services. A closer look into these logs can help sort the HTTP error 503 services unavailable error problem once the root cause comes to the surface. A website also displays error logs that can provide a good lead, to begin with.
12. Deactivate or Limit Themes or Plugins
A 503 service unavailable error can sometimes be caused due to excessive stuffing of plugins or employment of unsupported themes. This is common for a WordPress-hosted site in most cases.
It is also possible that a plugin might be incompatible with the website. Disable the plugins via an FTP client and dive into the WordPress root folder. Here in the wp-content, the plugin folder exists. Rename the folder so the plugins remain unrecognized by WordPress. Check to see if the 503 error is removed. If the error is gone, it was the plugins causing unnecessary trouble.
Otherwise, there is also the theme setup that could have caused the error. In the WordPress database, change the website theme to a default one. If it is the website theme causing the error this little step can remove the HTTP error 503 services unavailable error.
Both the users and administrators can make use of any of the troubleshooting options mentioned above to do away with the HTTP error 503.
However, if the HTTP error 503 displays on your browser as ” Error 503 backend fetch failed “. In this particular message, it gives you more insight into where the issue might lie—specifically in the backend fetching process.
So for this follow the given below, methods.
How to Fix Error 503 Backend Fetch Failed?
13. Examine Varnish Plugin
If your website is using a Varnish Cache, the first thing you need to do is to find out whether the error occurred due to the Varnish plugin or the Web server.
To figure it out, the best thing you can do is to disable the Varnish and try to fetch without it. After that, see if the “Error 503 backend fetch failed” still exists. If no then, your Varnish Plugin is the main culprit.
To do so,
1. Open your cPAnel and login it with your credentials.
2. Go to the Web Accelerator section > Choose to Manage Varnish > Click on”Disable Varnish” as shown below.

3. Now click on “Confirm Action” to Disable it.
You’ve successfully managed to turn off or disable Varnish for your website. Now, try loading your website to see if the error is fixed. If it is, that suggests something might have gone wrong with your Varnish plugin.
You can turn it back on to see if restarting the Varnish plugin resolves the issue or not.
If the error still doesn’t go away, you’ll need to conduct a more thorough investigation by reviewing the error logs, which will help you to determine a clear picture.
To generate a log file follow the steps given below:
Follow these commands to log entries where the varnish response or backend response status is 503.
$ varnishlog -q 'RespStatus == 503' -g request
To log all entries >=500, use the following command,
varnishlog -a -w /var/log/varnish/varnish50x.log -q “RespStatus >= 500 or BerespStatus >= 500”
14. Increase the cache Tag Length
By default, Varnish has a cache tag length of 8192 bytes. If this length exceeds due to some reason, the Error 503 backend fetch failed will occur.
To resolve this, you can increase the value of your Varnish cache tags. To do this, simply raise the value of the parameter “http_resp_hdr_len” in your Varnish configuration file.
DAEMON_OPTS is used by the init script.
DAEMON_OPTS="-a ${VARNISH_LISTEN_ADDRESS}:${VARNISH_LISTEN_PORT} \
-f ${VARNISH_VCL_CONF} \
-T
 ${VARNISH_ADMIN_LISTEN_ADDRESS}:${VARNISH_ADMIN_LISTEN_PORT} \
-p thread_pool_min=${VARNISH_MIN_THREADS} \
-p thread_pool_max=${VARNISH_MAX_THREADS} \
-p http_resp_hdr_len=70000 \
-p http_resp_size=100000 \
-p workspace_backend=98304 \
-S ${VARNISH_SECRET_FILE} \
-s ${VARNISH_STORAGE}"
15. Try making changes to Varnish and NGINX config files
The steps provided are applicable to both Varnish and NGINX. Here’s how you can adjust the configuration:
For Varnish:
Locate and open the file located at /etc/varnish/default.vcl .
Look for the line that reads .url = “/pub/health_check.php”; and modify it by removing /pub,
like this:
Original: .url = “/pub/health_check.php”;
Modified: .url = “/health_check.php”;

Alternatively, if there’s no /pub, consider adding it if needed.
The next thing you need to do is to, Go to the Magento 2 main folder and open the file named nginx.conf.sample.
Find this line: location ~ (index|get|static|report|404|503).php$ {
Edit the line by adding “health_check” to it, like so:
Original: location ~ (index|get|static|report|404|503).php$ {
Modified: location ~ (index|get|static|report|404|503|health_check).php$ {
After making these changes, save the file and restart Varnish.
15. Contact Your Web host or Website admin
If none of the above-mentioned troubleshooting methods work to fix the ” HTTP Error 503 Service not available” error. The last option is to contact your web hosting provider and ask them for support. OR you can contact the website admin and inform them about the issue.
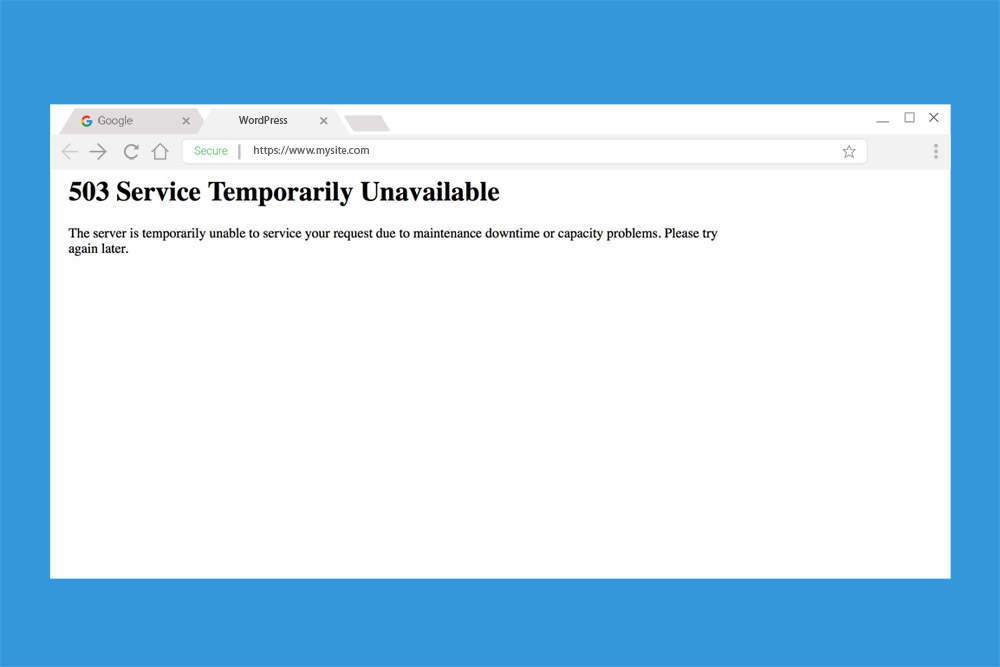
In technical language, HTTP response status codes are used for communication from server to client. These codes point out whether or not an HTTP request was able to be fulfilled. Among the five types of HyperText Transfer Protocol (HTTP) responses, server errors (500- 599) sum up the fifth category.
In order to deal with the HTTP error 503, it is important to understand its significance. HTTP error 503 the service is unavailable meaning is an HTTP status code that stipulates that a web server is unavailable to process the request.
The server can be the one that is being directly accessed or which the web browser is attempting to gain access to. Other times, a 503 error also indicates an internet or network inadequacy.
However, it is crucial to note that the 503 error code is a temporary error, pointing out that a server is temporarily unavailable. It is not necessarily that a server might have crashed or shut down. Anybody trying to gain access to a website, application, or browser through any operating system can come across this error.
In layman’s language, an HTTP error 503 arises due to a problem on the server end or due to a fault in the internet connection. Only with a fully functional server can this error be resolved. A server-sided error like it is different from client-sided errors like 400-Bad request, 403-Forbidden, 404-Not Found, 408-Request Time Out, etc.
The common occurrence of HTTP error 503 falls in this family of classifications. In other related articles the 504 Gateway Timeout Error, Error 502, and 500 internal server error have been discussed. You can also learn more about common errors (Error 403, Error 404, dns_probe_finished_nxdomain error)
What is Server Sided Error?
An HTTP error indicates a disruption in a seamless user experience. All those response status codes that initiate with the numeric “5” communicate the instances where the server has met with an error. There are 11 such server-sided errors. It is a common mistake to confuse the 5xx errors with one another.
Mostly because all of them represent a server error response. However, these responses individually stand for distinct kinds of server errors. Besides this, there are separate ways to solve them because each server-sided error is different.
All such server-side errors can be exclusively resolved by the webmaster or app builders. Due to limited server access, a user can only tackle things on his end.
Tip: If your website experiences too many and frequent server issues, it is time to migrate to a better and more reliable best-dedicated hosting for wordpress.
What are the Causes of Error 503?
To deal with HTTP error 503, it is essential to get to the root of the problem; to recognize its causes.
As understood above, an HTTP error 503 status code was conjured up due to server problems. The importance of a web page or website to access any service can be due to :
- Unstable or poor Internet Connection
- The server is “down” for Maintenance
- Technical Difficulties
- Server Inadequacy
- DDoS Attack
- Inaccurate DNS Configuration
1. Unstable or Poor internet connection
You might encounter the ‘Error 503 Service not available’ if your internet connection is unstable or slow. When you attempt to visit a website and it takes a longer time to load because of a sluggish connection, requests start piling up.
Consequently, the website’s data is collected in a storage space called a cache. However, when this storage becomes too full, it leads to an issue and displays the ‘Backend Fetch Failed’ error.
2. Issue with Plugins or Website
If the website you are visiting is hosted on a shared server, and any of the plugins or websites hosted on that same server are faulty, it can also cause this error for other sites hosted on the same server.
3. The server is “down” for Maintenance
Ongoing server maintenance for example during a plugin, theme, or software update can possibly cause this HTTP error 503. In this case, the website goes into ‘maintenance mode’ and will display a message as such, “Briefly unavailable for scheduled maintenance. Check back in a minute.” You can also check if your site is down for others too

On the same page, the HTTP header communicates the time or date after which the server would be able to accept and process requests.
The maintenance mode only restricts the audience’s access until maintenance is fully completed and alongside gives the administrators full autonomy. The users will be able to gain access after retrying in a short while. It can also be because your WordPress site is in maintenance mode.
You can also check out our dedicated post on WordPress Maintenance mode and learn How you can easily put your website in maintenance mode.
4. Heavy Packet loss
Heavy packet loss is when data traveling across a network, like the Internet, is experiencing significant disruption or loss. When you send information online, it’s split into small units called “packets.” These packets move from one place to another to create websites, videos, messages, and more.
When there’s heavy packet loss, some of these packets don’t reach their destination. This can cause problems in things like video calls or slow down website loading. It usually happens when the network is crowded, unstable, or facing technical issues.
5. Website blocked
When you try to open a website that has a bunch of ads, and you’re using a tool such as Adblocker, this tool stops the ads from showing up.
Because of this, the website’s content doesn’t load properly. This can make a bunch of requests pile up, leading to the error we’re talking about. Also, your browser has other safety things that can stop shady websites from loading, and that’s another reason you’re seeing this error right now.
6. Technical Difficulties
Technical trouble encountered by the host company can also cause the HTTP error 503. This results in a communication blockade between a server and the website. Therefore any responsible administrator would always opt for a reliable hosting service.
7. Server Inadequacy
The incapacity of the server to support an overwhelming number of users due to an abrupt increase in traffic can also cause this HTTP error 503. The sudden rise in traffic takes the server off-guard and throws it offline.
In this scenario, an effective configuration of the website/application can aid in processing requests. Other times, the service providers opt for bandwidth throttling to lower website congestion or to promote their other unlimited bandwidth services. Throttling sometimes is purely a planned move by ISPs.
8. DDoS Attack
A distributed denial of service (DDoS) attack crams a website with innumerable access requests and causes it to malfunction. As a result, it affects its functioning. Moreover, the website or its server falls off the wagon and goes offline. Notorious attackers gain access to plenty of unprotected IoT devices for this purpose. To avoid such a DDoS attack website administrators must invest in a good and dependable hosting service provider. Besides, an increased amount of security can prove beneficial.
9. Inaccurate DNS Configuration
A consistent HTTP error 503 can show on account of a faulty Domain Name System (DNS) configuration. It is the DNS that converts a web address to its corresponding IP address. This allows websites to adopt easily understandable domain names instead of numbers. It is the DNS servers that establish a connection between the domain name and IP address. A fault in the DNS configuration of the computer or router can redirect you to an entirely different page and can display an error 503 service unavailable.
The key to solving an HTTP error 503 is to figure out its cause and adopt troubleshooting measures accordingly.
It is only with systematic supervision that such errors can be avoided. Our superbly well-managed WordPress Hosting – WPOven helps you ace your WordPress management and supervision skills. At remarkable prices, beginning at just $16.61 get your hands on free SSL, huge SSD storage, dedicated RAM and cloud, regular malware detection and cleaning, facilities for business emails, WP development, and Server Support among others. Our elaborate plans offer a whole lot of possibilities.
Identifying the 503 Error
How an error is projected on individual websites is totally at the mercy of web designers. Most bigger brands have these web pages quite creatively built. A tweaked web page adds a touch of personality. With not only one dedicated form the HTTP error 503 can also crop up in many configurations and names. But there will always be the presence of a ‘503’ code.
The vexing HTTP error 503 can present itself in the following ways:
- HTTP 503
- HTTP Error 503
- 503 Service Unavailable
- Error 503 Backend fetch failed
- HTTP Server Error 503
- 503 Service Temporarily Unavailable
- 503 Error
- HTTP/1.1 Service Unavailable
- Error 503 Service Unavailable
- Service Unavailable – DNS Failure
If any of the above HTTP error 503 codes pop up, the website administrators or app builders need to figure out its cause and act quickly. A persisting HTTP 503 can hamper the website/application’s popularity. Additionally, it is necessary to fathom that a 503 error code depicts a server problem. It is not a fault with your computer system and nothing extraordinary can be done on the user’s end to fix it.
Conclusion
The occurrence of any HTTP status code indicates a disturbance in the smooth functioning of a website or an application. The HTTP error 503 code, however, signifies server incompetence. But despite that, there are troubleshooting options both for the client and server end as mentioned above. All it requires is a careful diagnosis of the actual reason for the error to remove it.
In the future, this peculiar server-side problem can be totally avoided by website administrators through the usage of potent management tools like WPOven. Trustworthy hosting like it takes care of any such erroneous behavior on a website.
General FAQ
What is error 503?
Among the five HTTP error codes, 503 falls in the fifth category. It is basically due to the unavailability of your server at the moment. You should choose your hosting server very diligently to avoid this issue. WPOven provides you best servers, support, and dedicated server plans starting at just $16.61. Free daily malware scanning and cleanup, offsite backups with every plan.
What does 503 Service unavailable mean?
Error 503 is an HTTP error, it belongs to the 5th category. It means that the server is not available at the time when the web browser is trying to connect to it. A good and secure hosting that provides you amazing support like WPOven can help you resolve it in the blink of an eye.
What can cause a 503 error?
Some of the cases of 503 error are –
1. Server “down” for Maintenance
2. Technical Difficulties
3. Server Inadequacy
4. DDoS Attack
5. Inaccurate DNS Configuration
How to fix error 503?
HTTP Error 503 can easily be fixed in the following way –
1. Restart the Device
2. Reboot the Server
3. Examine Firewall Configuration
4. Faulty Server Connection
5. Detect Maintenance
6. Look into Web Server Resource
7. Inspect Server Logs
8. Deactivate or Limit Themes or Plugins

Snehil Prakash is a WordPress enthusiast and web development expert who previously served as the Marketing Manager at WPOven. He believes that business owners should spend their time investing in their core business missions, not setting up and maintaining a WordPress site.
Snehil has been instrumental in providing all-inclusive managed WordPress solutions to businesses of all sizes, ensuring that they have the resources they need for a robust online presence.



Hi I upload images to Pinterest and after having no issues up to 3 days ago after 5 months without issue suddenly my images will not load and they freeze and hang or receive a 503 error code.
Despite extensive messages to the site they have not resolved my issue they said it was my browser no it has worked faultlessly for 5 month 2222 images uploaded without a glitch everything on the site works as it should except for being able to load my images I have tried all I can rebooting clearing caches enabling and disabling extensions refreshing whilst on the site yet 3 days in not a single image has saved to my Pinterest boards
I feel their server is at fault but they have done nothing How can I resolve this 503 is clearly a server error of the website and I am not a website Any help would be apreciated
Kind regards Chris Charles
Hi chris,
error 503 is purely a server error and only the website owner is responsible to resolve such an issue with their hosting company. Pinterest is a global business and we believe its server is powerful to handle all such requests without 503 errors. You must contact pinterest support for better insights about this problem.