Beginners who have recently started to learn to build WordPress sites often do not know How to edit footers in WordPress. They do not even know how to use the footer space efficiently to make an impactful WordPress site.
There are various different ways through which beginners or web admins can efficiently use the footer space. Such as you can add links to your privacy policy page, terms, and conditions, add social media links or icons, an About page link, and many more.
Or you may like to remove the WordPress brand line “Proudly Powered by WordPress“. Whatever the reason, in this article, we will let you know How to edit the footer in WordPress using step by step method.
But before we directly started the steps, first let us clear some basic points on WordPress footers.
A WordPress footer is a bottom area or space after the main website body content. It is not much different from the header; you will find a footer on every page of your website.
Since it is at the bottom of your page, many beginners generally ignore this particular area, but there are many different ways you can make use of it to help your visitors as well as enhance your website’s SEO.
See, this is what our Footer looks like and how it helps thousands of our visitors.
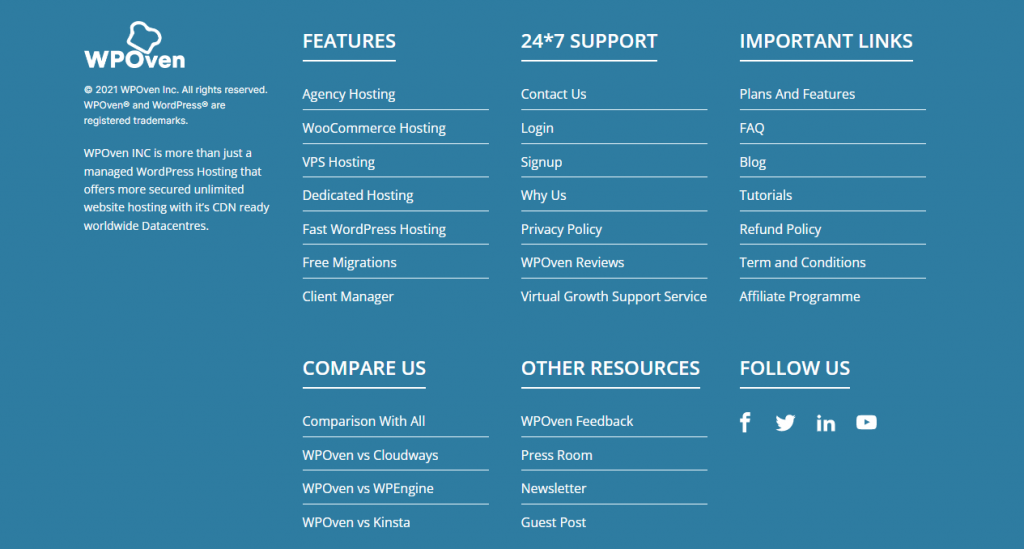
Most websites use the footer area to display some important links to the Privacy policy and links to the important pages of the website.
Most WordPress themes come with a customizable Footer widget area, in which you can easily add different widgets, add/remove links, add code snippets and you can even design a fully custom footer for each page of the website.
In WordPress, you will even find the footer has a separate file named footer.php available which will load with every page of your website. This means that whatever changes or customization you will make to the footer, will reflect on all the pages of your website.
Since the footer section will appear on every page of your website, you cannot simply ignore this area or waste it by putting irrelevant links as well as default texts from your installed theme. Therefore, check out the main reasons why you should consider editing the footer in WordPress:
- You can take advantage of the footer section of your website to put the most important links that you were unable to put in the header.
- The footer section helps to boost your brand power and provides a good impression of your website in the long run.
- Rather than putting useless or irrelevant links or just leaving your Footer completely blank, you can add the logo of your website along with a short introduction of your business/brand or tagline, so that your visitors get used to it and will easily recognize it whenever possible.
- While considering from an SEO perspective, editing your website footer is also very important. Since the footer section will appear on each page of your website, whatever links you will be going to put in the footer section will be treated as site-wide links. Therefore, you must try to put quality links that are relevant to your website, avoid internal linking as well as choose anchor text that shows the brand, and also avoid keyword stuffing.
So, you must edit your footer section after installing a WordPress theme. Fortunately, many of the WordPress themes have now come with an edit option, through which users can easily customize the footer section without adding code snippets in the footer.php file manually.
As we all know, making changes to the footer.php file is risky and if anything went wrong while adding code to it, it can completely damage your website.
No matter, whether you are using a free theme or a premium one, editing the footer in WordPress doesn’t require any paid plugin or some special skills. If you have just basic knowledge of coding, you can easily edit the footer.php from the WordPress dashboard itself. But as we have already mentioned in the above section, it can be highly risky, hence we highly do not recommend you to try this method.
However, there are other methods available through which you can easily edit the WordPress footer and are risk-free too. So, in this post, we will let you know How to edit the footer in WordPress using the following methods:
- Using the Default Editing tool of WordPress
- Using a WordPress plugin to edit the footer.
- Using WordPress Widgets.
As we have already said at the beginning of this section, you are not required to have WordPress paid plugins to edit the footer, Hence, we will use the free plugins that will do the job exactly the same. However, if money is not your main concern and you can invest in premium footer editing plugins, you can use that too.
Now, let us some of the methods with the help of which you can edit the footer in WordPress:
1. How to Edit Footer in WordPress using WordPress Customizer?
As we have already mentioned in the previous section, most of the themes now provide an editing option with the help of which users can easily edit the footer section of their website. Similarly, WordPress itself has a default theme customizer option that you will find in the WordPress dashboard.
With the help of this theme customizer option in WordPress, you will not only edit the footer section but, you can also customize the overall appearance of your website, its header section, change the title, add the website logo, etc.
It is treated as one of the most user-friendly and risk-free methods through which you can edit your website.
So, let us see how you can edit the footer using the WordPress theme customizer.
But before we proceed directly to the steps, we are taking the most popular free theme “Astra” as an example. You will also find an extra option for customization in this particular Free WordPress theme.
Step 1: First login to your WordPress dashboard.
Step2: On the left side of your WordPress dashboard, lookout for Appearance > Customize, as shown in the picture below:

After that, a website customization page will load in which you can see various options are available as shown in the picture below:

Step3: Now you can start editing Footer by clicking on the ” Footer Builder “, where you will find blocks in which you have to click on the “+” sign and you will see various options as shown below:
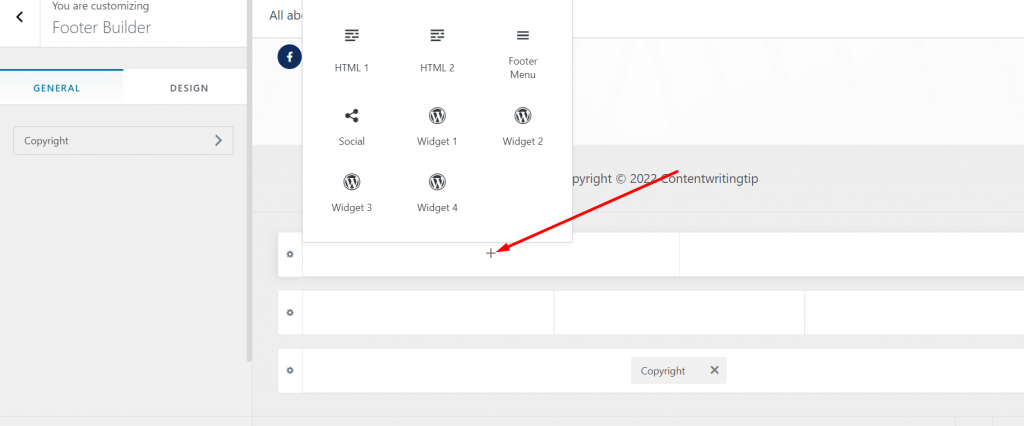
Select whichever option you like such as Widgets, social, footer many, or Html to embed on that particular block.

Once you are done editing the widget area, click on the publish button to reflect changes in the live website
2. How to Edit Footer in WordPress Using Plugins?
Sometimes to get desired results in the footer area of a WordPress site, you need to add some lines of code. This usually helps to connect with third-party applications or plugins.
Let us suppose, you have to integrate Google Analytics with your WordPress site, and for that, you have to add code snippets either in the header or footer area to track your website. So, the easiest method to do is to use a WordPress plugin named “Insert Headers and Footers“.
All you need to do is Go to your WordPress dashboard > Plugin > Add new > search ” Insert Headers and Footers” > Install > Activate.
After successfully, activating the plugin, go to WordPress admin panel > settings > Insert Headers and Footers and now you can add codes in the “Scripts in Footer” section as shown in the picture below:
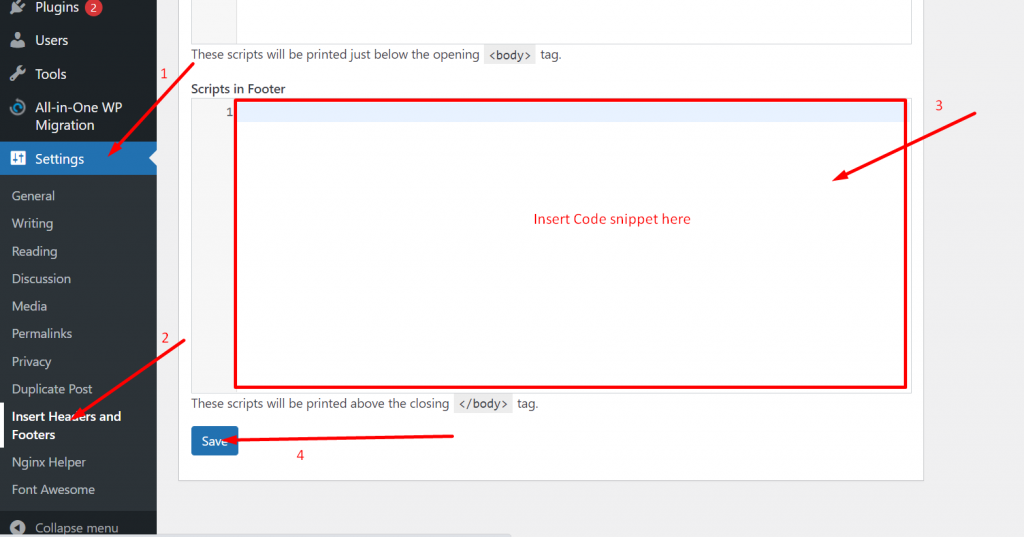
Now after adding the code, click on the Save button and you are done.
Similarly, there are also other various WordPress plugins such as SeedProd, with the help of which you can create custom Footers for different WordPress pages. But do remember to avail of these features you need to buy a premium subscription to the SeedProd plugin.
3. How to Edit the Footer in WordPress using a Widget?
Widgets are considered one of the coolest features of WordPress. These are basically small blocks with the help of which you can easily insert any type of content i.e. images, videos, HTML codes, text, etc., and can easily drag and drop any section of your website.
Due to its vast popularity and user-friendliness, this feature is supported by a majority of WordPress themes and hence they allow you to edit or customize the footer section of the website.
This is how you can do it,
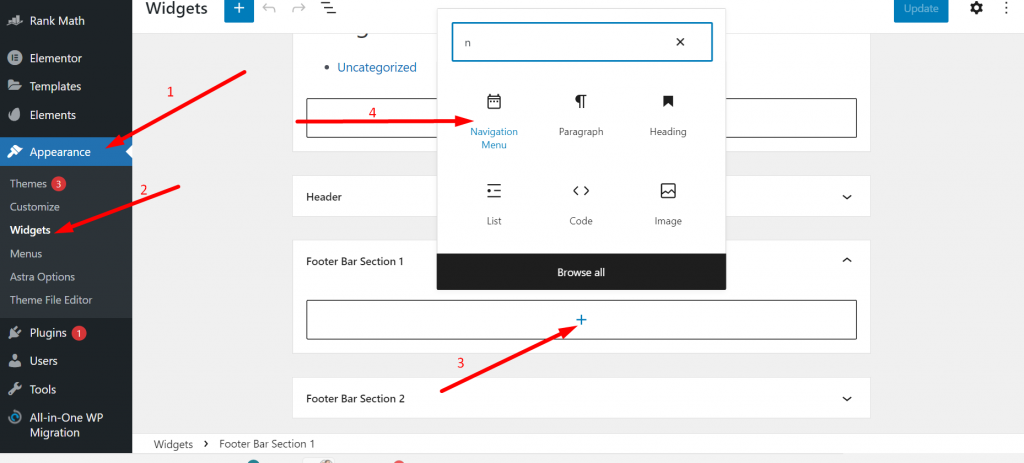
Go to your WordPress dashboard > Appearance > Widgets> Footer bar section 1 and click on the “+” sign to choose the widgets you like to use.
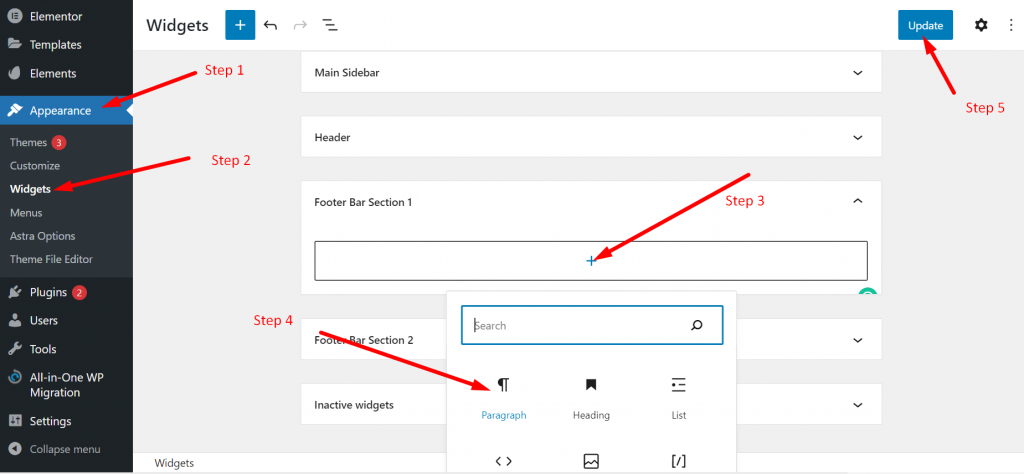
You can choose any of the widgets available and when done editing click on the update button to save the changes.
You must have noticed after installing the WordPress theme on your site, a default copyright text appears in the Footer section. Which spoils the authenticity of your website. However, you can easily edit or remove that text with the help of the method given below:
1. How to Remove “Proudly Powered by WordPress” in the Footer?
Although, there are various ways through which you can easily remove or edit the default WordPress Footer text. But in this blog, we will show you the easiest, most convenient, and risk-free way.
The first thing you need to do is to go to WordPress dashboard > Appearance and click on Customize. Which we have shown in the earlier section of this post. However, in case your theme does not allow you to edit or customize the footer section, you can remove or edit it by editing your footer.php file, which we will show you later.
In this example, we are using the Astra WordPress theme and when you click on Customize button the page will look like this.
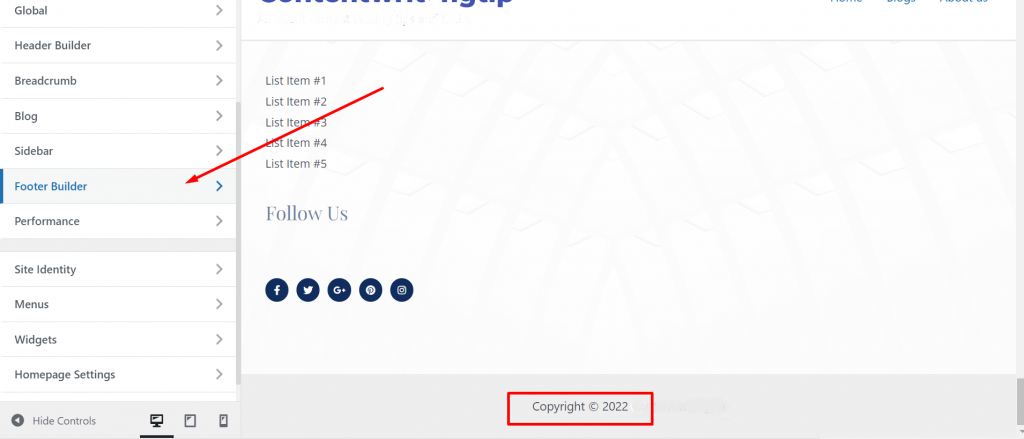
After that click on Footer Builder as shown above and you will have all the Footer editing options shown on your screen.
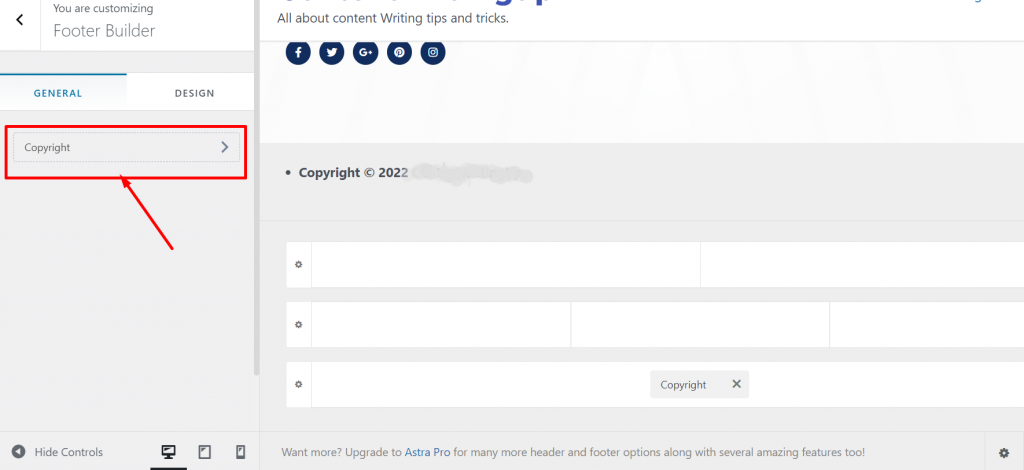
Now if you like to make changes to the Copyright default text you can change it through the visual editor as shown below, or if you like to completely remove the copy right click on the cross mark as shown:
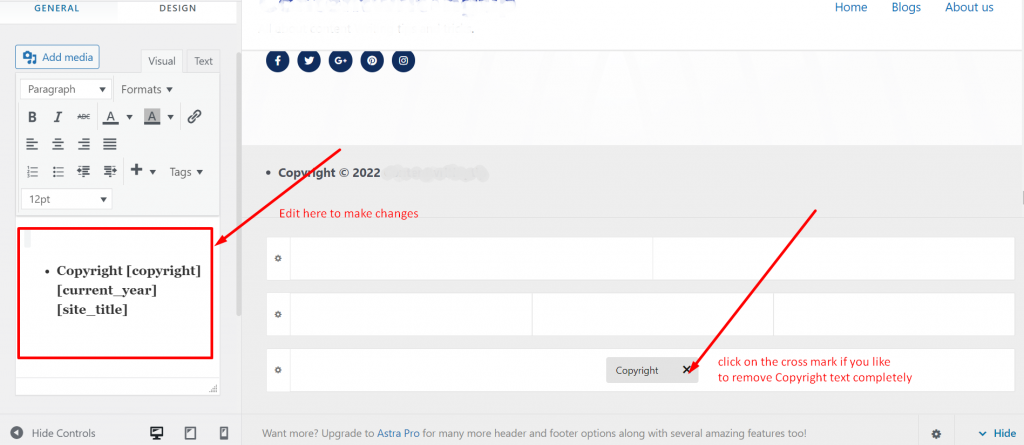
Once done editing click on the Publish button and you are done.
2. Editing Footer in WordPress by Customizing the Footer.php File
You can edit the Footer section of WordPress by another method, but this method requires editing your footer.php file which can be risky, so do not recommend you to go for it. But if you have no option left, you can also try this method.
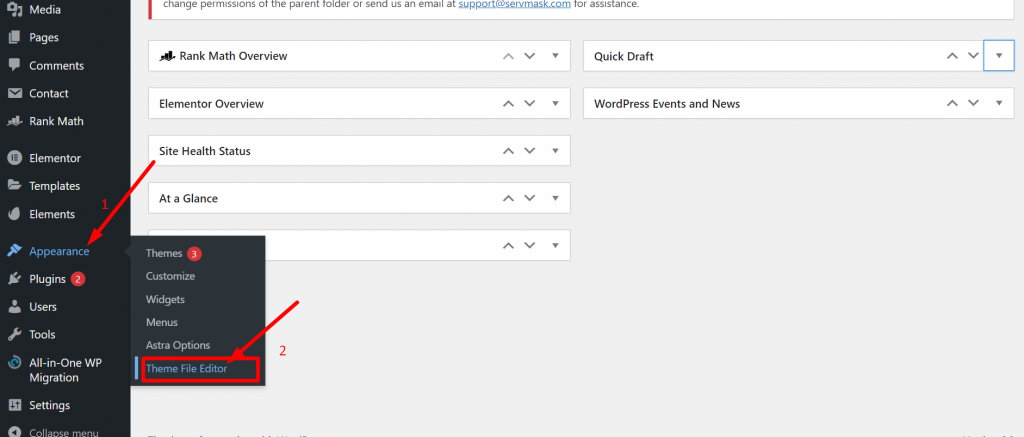
For this method, we are using WordPress theme twentytwentyone, and the first step is, to go to your WordPress dashboard > Appearance > Theme Editor as shown below.
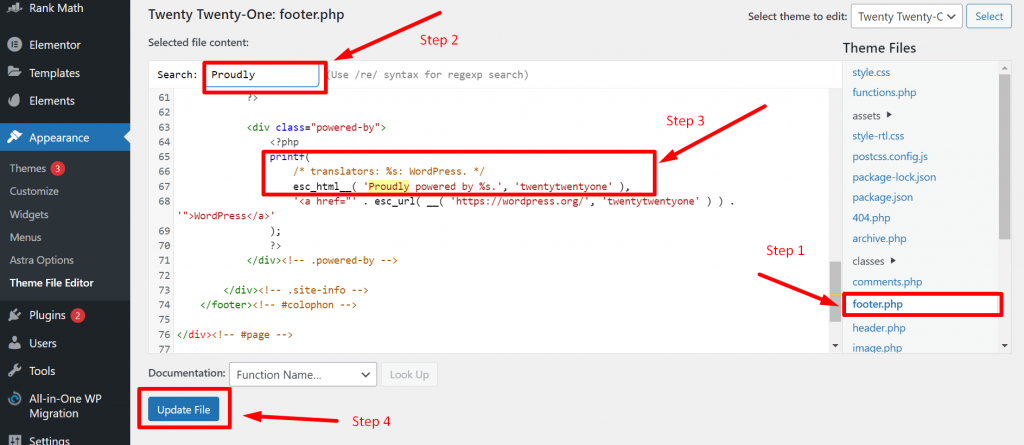
Now from the theme files list, click on the Footer.php as shown in the picture below:
But before proceeding further, you must make a backup of the file so that you revert the changes if anything goes wrong.
To do so, copy all the content of the footer.php file > paste it into your Notepad and save it to a separate folder.
Go back to your footer.php window, press the Ctrl+F keys, and type “Proudly” into the search box.
Now remove the code snippet as highlighted in the picture above with step 3 from your footer.php codes and click on the Update file button.
You have now successfully able to remove the “Proudly powered by WordPress” text from your website footer.
You must have noticed that in many of the website’s footer sections, they have provided extra navigational links to their footer section. These extra navigational links are usually referred to as the secondary menu of a website.
These links are often not considered as important as the Header menus but these links can be beneficial to the users. Let us see how you can create Footer menus in the easiest way.
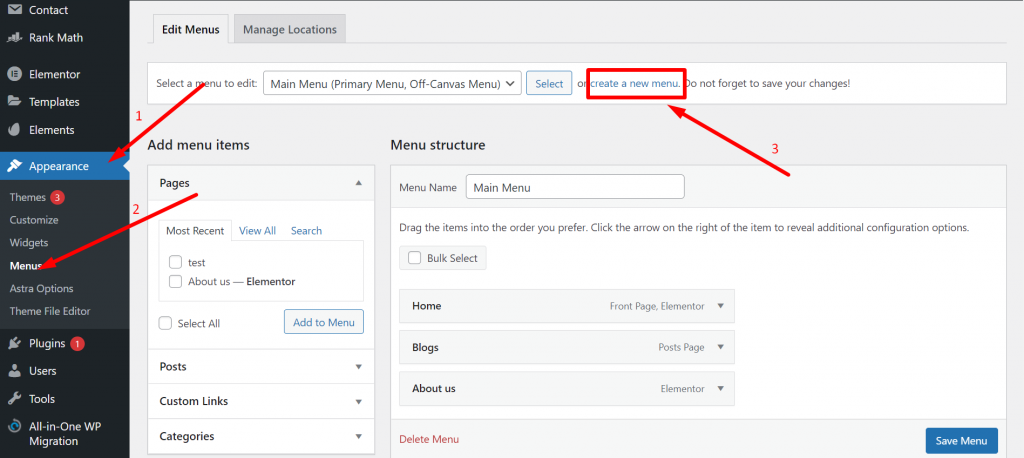
First, you have to go to your WordPress dashboard > Appearance > Menus and click on the “create a new menu” link as shown below:
Now give your new Menu name so that it can be easy to identify.
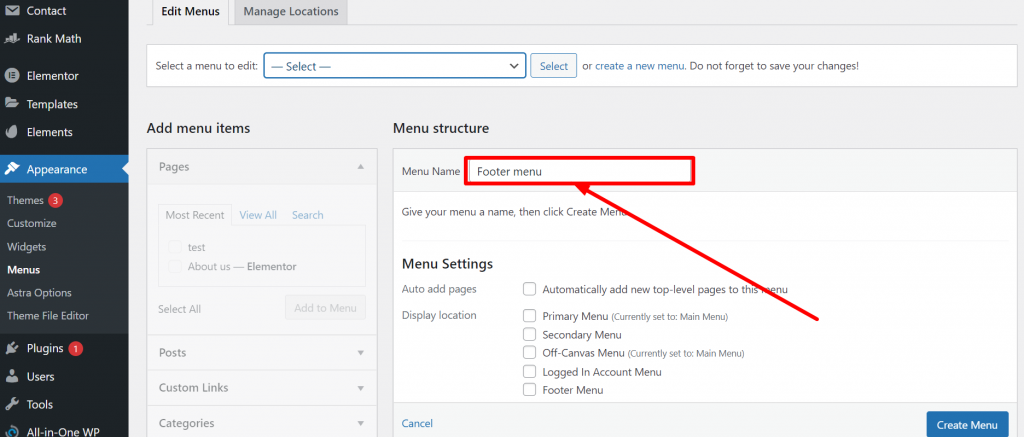
Now, let us see How to edit the Footer menu in WordPress? Under Menu settings go to Display Location, check the Footer Menu box, and click on the Create Menu button.
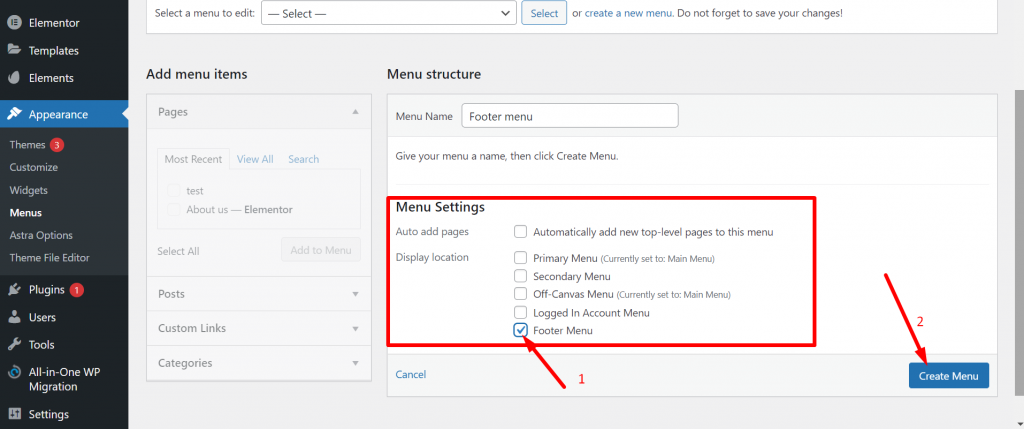
Now you have successfully been able to create Footer Menu, but you are not done yet. You have to choose the relevant links to appear in your Footer Menu. Go to the Add menu section and select all the relevant pages you like to add to the footer menu and click on the “Add to menu” button.
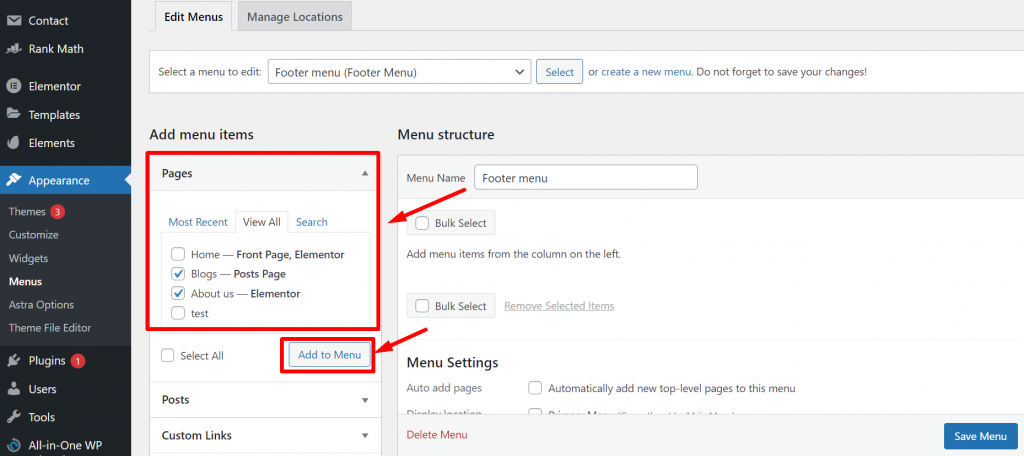
However, you can also add Posts or Custom links to the Footer menu section. When you are done adding links to the Footer menu, drag and adjust their position as per your wish. When everything is done, finally click on the Save Menu button to publish it on your live website.
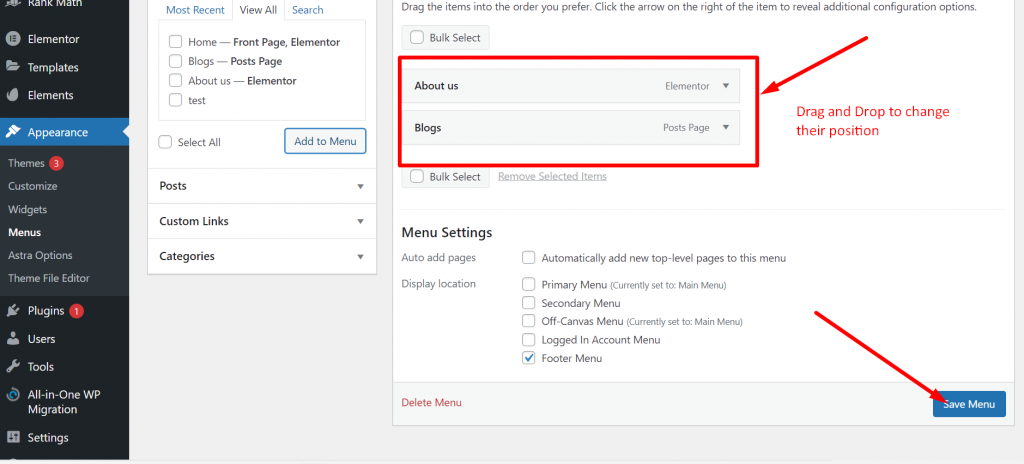
Now, what if you want to add an existing menu to the Footer section? To do this, follow the simple steps given below:
On the same Menu page, click on the Manage Locations option and click on the Dropdown link provided beside the Footer Menu as shown below:
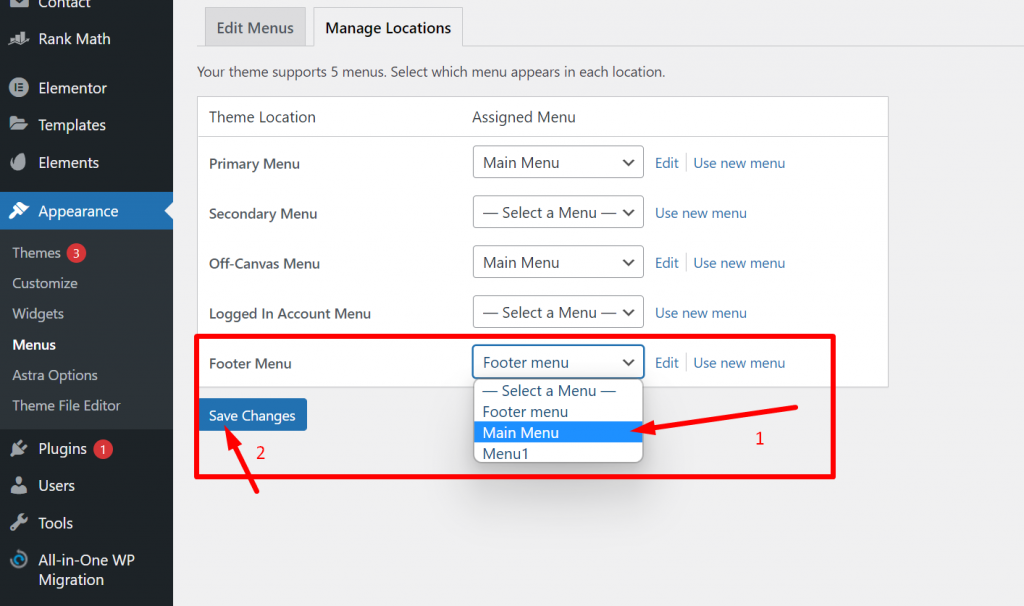
Select the existing menu you would like to appear in the Footer section when done click on the Save changes button and you are done.
Now, if you want to place it on the Footer section, Go to Appearance > widgets > Footer Widget 1 and click on the “+” sign to select the Navigational menu widget.
Select the menu option you want to show on the footer area from the drop-down option.
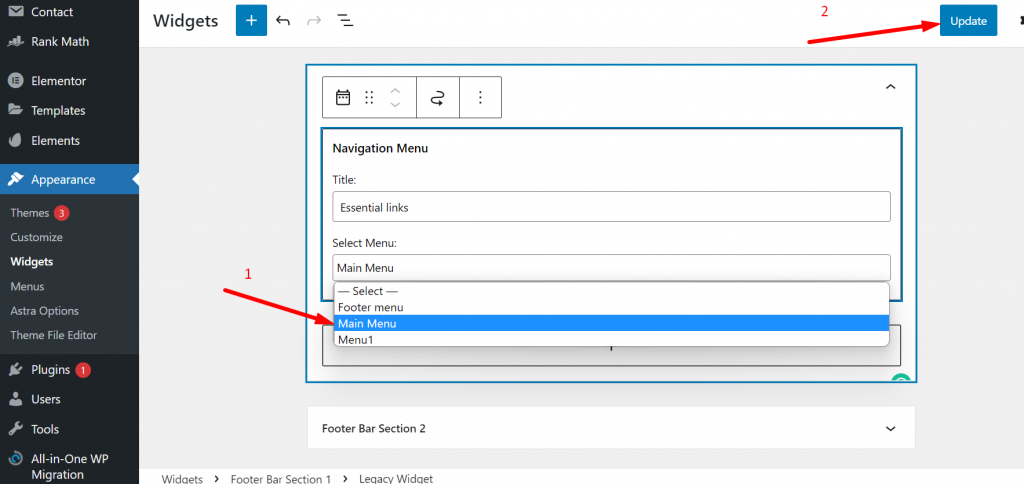
Once done, click on the update button and you are done. Now your existing menu will start appearing on the Footer area of your WordPress site.
We all know how a slight mistake can potentially harm your website’s reputation as well as its performance. On which no one would like to compromise. Therefore, here are mentioning two most common mistakes you must avoid while editing Footer in WordPress.
1. Using Unnecessary Links or Keyword Stuffing in the Footer Section
In earlier times, when search engine was evolving, people used to put irrelevant links in the footer section of their website in order to boost their SEO and create n number of backlinks. Even, some users use to hide the links using CSS, which now Google has considered these activities as a violation of their Search engine Guidelines. And for that, they have started to penalize the websites, so it is highly recommended to avoid these practices and focus only on White hat SEO.
2. Not giving importance to the Theme’s License documentation
It is now common for users not to give much importance to the theme’s license documentation, and due to this, sometimes they have to face some serious legal charges against them. Especially, third-party themes, which have mentioned in their license documentation that they do not allow removing copyright notices. In that case, you must contact the theme author and try to negotiate with them.
Summary
As you have seen in the above post, editing the footer in WordPress is not that difficult and complicated. There are various methods available through which you can edit your footer and the best part was none of the methods was lengthy and hardly took a few minutes to do.
Through these methods, you will be easily able to customize your footer section of the website and add maps, social media icons, and other various widgets. Even, if your current theme doesn’t provide you with many options to customize the footer section you can still use third-party editing tools such as Elementor.
Similarly, if you know any other best tool, plugin, or method to edit the footer in WordPress, do let us know in the comment section below.
Frequently Asked Questions
How do I edit headers and footers in WordPress?
Although there are various methods available through which you can easily edit headers and footers in WordPress, the easiest and simplest method is, Go to your WordPress dashboard > Appearance > Customize. If you are looking forward to adding code in the footer section, you can use the headers and footer plugin or you can directly add the code in the footer.php file (not recommended).
How do I edit the copyright footer in any WordPress theme?
The first step is to Go to Your WordPress Dashboard > Appearance > Customize. Now a customized page will appear, in which you have to click on Footer or Footer Builder, where you will be able to edit the copyright text easily.
What is a footer in WordPress?
A WordPress footer is a bottom area or space after the main website body content. It is not much different from the header; you will find a footer on every page of your website.

Rahul Kumar is a web enthusiast, and content strategist specializing in WordPress & web hosting. With years of experience and a commitment to staying up-to-date with industry trends, he creates effective online strategies that drive traffic, boosts engagement, and increase conversions. Rahul’s attention to detail and ability to craft compelling content makes him a valuable asset to any brand looking to improve its online presence.

