WordPress Push Notifications have been remarkable tactics that show some tremendous results in increasing web traffic and have gained huge popularity among online businesses and marketers. WordPress Push Notifications, not just help you to increase your website traffic, but it helps you to capture more audiences, bring your visitors back to your website, higher Click through Ratio (CTR), and have better signup results.
WordPress Push Notifications, let you send messages and notifies your users about your latest updates and post on your website and remind your users if they are not regularly visiting. This way, it can bring back your users again and again on your website and maintain healthy traffic that generates more revenue.
So, in this article we let you know What are WordPress Push Notifications? more the advantages of WordPress Push Notifications, and How you can implement them on your WordPress Website.
What are WordPress Push Notifications?
Since I have already mentioned a little about What WordPress push Notifications are? and you might have a clue, But let me elaborate in detail. WordPress Push Notifications let users send messages or notify them, whenever a new post or content is published on the WordPress website. Even you have the option to send pre-defined custom messages at any time, no matter whatever the users are using the device to browse, either it is a mobile phone or a web browser.
Since its initial release in 2009, WordPress Push Notifications has gained a tremendous response, and the majority of the internet users are implementing this feature on their website.
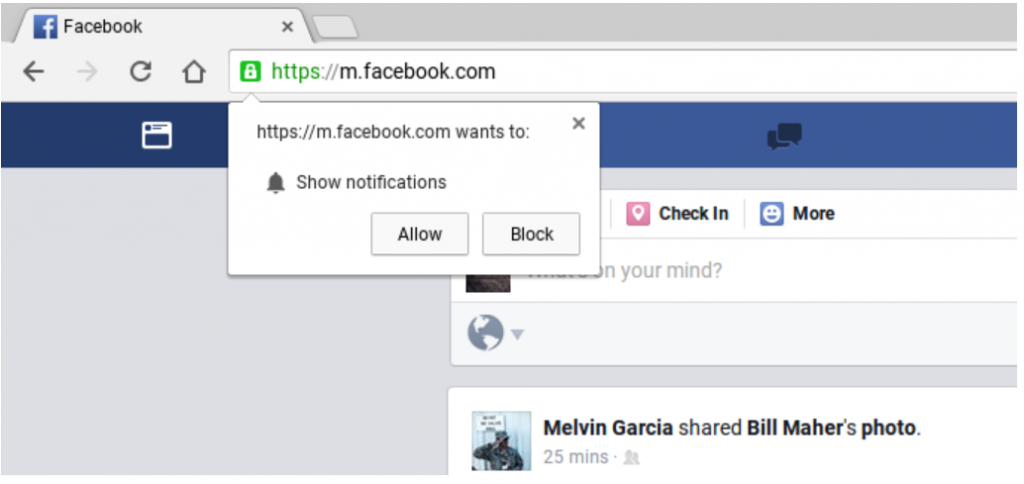
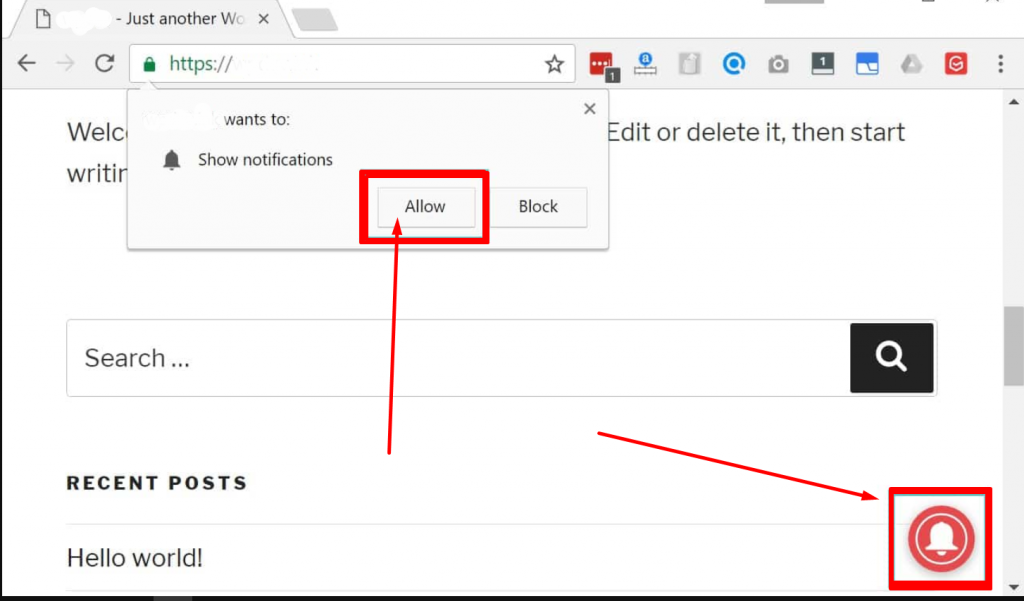
An example of WordPress Push Notification on chrome by Facebook is shown in the above picture, which you may have seen on many occasions too. You can enable push notifications from Facebook just by clicking on Allow button, and the website will start sending you notifications through your web browser.
The best thing about website admins is that the users or visitors do not have to visit your website for any notifications. Whenever you open the browser, the notifications will start rushing out automatically.
The first-ever browser that started to roll out this feature was Safari, when things are getting heated up, then Google Chrome and Firefox have also introduced this feature in 2016. And for now, this function has become a basic feature for most of the web browsers are existed now
According to Statista, Google chrome currently holds around 68.76% of the browser market share. It means, enabling WordPress Push Notifications in Chrome can alone help you to reach a large audience and hence, increase your web traffic. It is not just limited to web browsers, but for now, it has been also available on your android devices as well but not for its users.
What are the advantages to have WordPress Push Notifications?
You must be surprised to know that more than 70% of the visitors who left your website, will never visit your website again and you won’t like it to happen with your website. Hence, to attain and track the visitors on your website and compel them to subscribe or make conversions, there are various other methods you can implement such as email marketing, paid marketing, and social media marketing along with allowing WordPress Push notifications on your website.
No doubt, email marketing is one of the most effective marketing methods that has the potential to cover a large audience and help in conversion, but email marketing in addition to WordPress Push Notifications can be cherry on the top.
Here, there are some of the major advantages of implementing WordPress Push Notifications on your website:
- It asks users their consent, whether they would like to get notified or updates form the website in near future or not. It means if a user is interested in your website, he/she will definately come again and again on your website.
- WordPress Push Notifications are way smaller and shorter than your typical email marketing updates.
- There is no limitations of your reach as compared to social media campaigns. All the messages or notifications will reach with cent percent assurity.
- Users have the option to customize their device on how to display WordPress push notificaitons.
- It is still not implemented by majority of the companies, hence competition is low.
Even some of the most popular and high authoritative websites like Facebook, Linkedin, etc. know the importance of WordPress Push notifications, hence they have already implemented them.
How do you set up WordPress Push Notifications?
Since WordPress is one of the most flexible and easy-to-use CMS, It has a wide range of plugins that helps you to increase the functionality of your website. Similarly, when you are looking to implement WordPress push notifications, there is a variety of premium and free WordPress push notifications plugins available.
In this article, we bring you two widely used and completely Free plugins, with the help of them you can easily enable WordPress push notifications on your WordPress Website.
OneSignal

As per the data and information mentioned on their official website, Onesignal has been trusted by more than 1300000 leading businesses, Zynga, Softonic, and Eat Street are some of the famous businesses are one of them.
Sounds trustworthy, isn’t it? Well, one thing to keep in mind. Everything they provide features are mentioned on their official website. And from their free version, they only make money by collecting the data from the users to improve web and mobile experiences.
So, if you have any concerns about your data usage, you also have an option to upgrade to their premium plans in which your data will not be accessed.
One of the major advantages of using Onesignal is, it lets users set up on as many WordPress websites as they want. It means you can manage multiple different WordPress websites from a single One Signal Dashboard and be able to control or regulate each one of them. Hence, it becomes so handy and efficient to use, if you want to manage multiple websites on a single dashboard. In addition to that, all these features are Free and easy.
Some Important Features:
- Open source and absolutely free to use
- free plan allows targeting up to 10,000 subscribers
- Supports Majority of the Web browsers (Google Chrome, Safari, firefox, Microsoft and Opera)
- Automatic Notifications
- Targeting segments
- Customization Options
- Real time Analytics
- A/B testing
- Schedule your Notifications
Pricing
Although this WordPress Push Notifications plugin is available free to install and use from the WordPress directory. But as already mentioned above, if you have any privacy issues and do not want your data to be accessed, you can switch to their premium plans starting at $9-$99 per month.
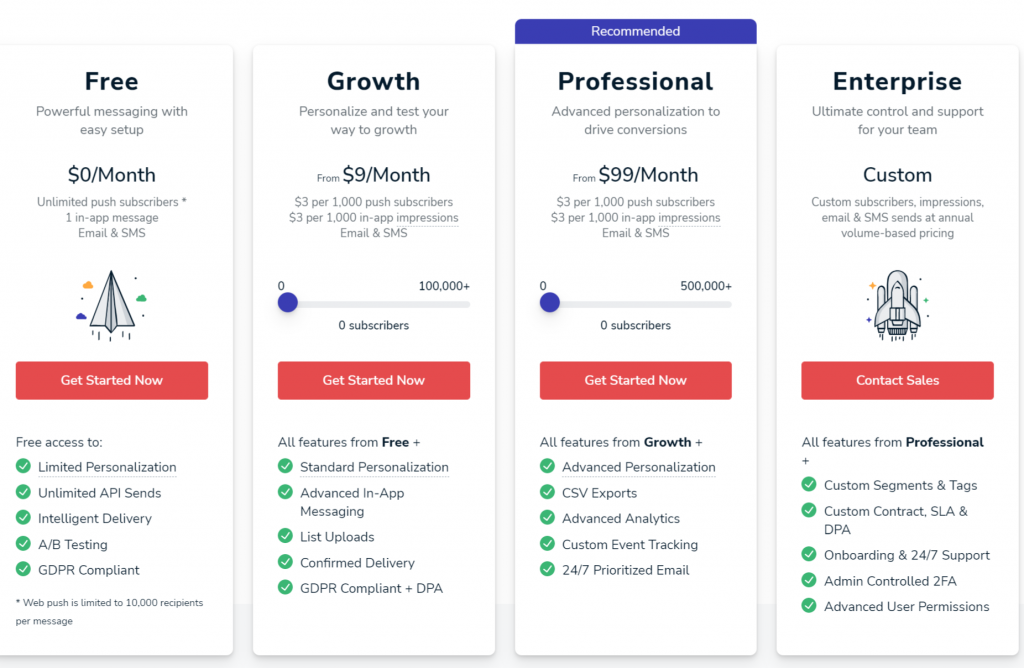
OneSignal Complete Installation Guide
Given, below is a step-by-step process, that will guide you through the complete installation and setup process. But before that one thing, you must keep in mind that, while setting up the Onesignal plugin, it is highly recommended that you must always choose HTTPS on your domain rather than HTTP. It is because the WordPress Push notifications and permissions are distinguished by domain.
Now let us begin!
Step 1
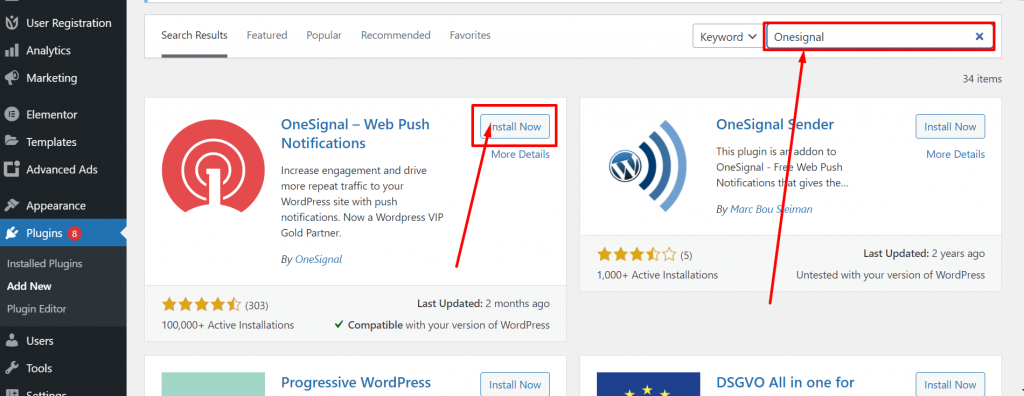
The first and foremost step is to log in to your WordPress Dashboard > Go to plugins >Add new > Search Onesignal > Install > Activate.
Step 2
After Successful installation and activation of the plugin. Go to Onesignal and sign up to create a free account.
Step 3
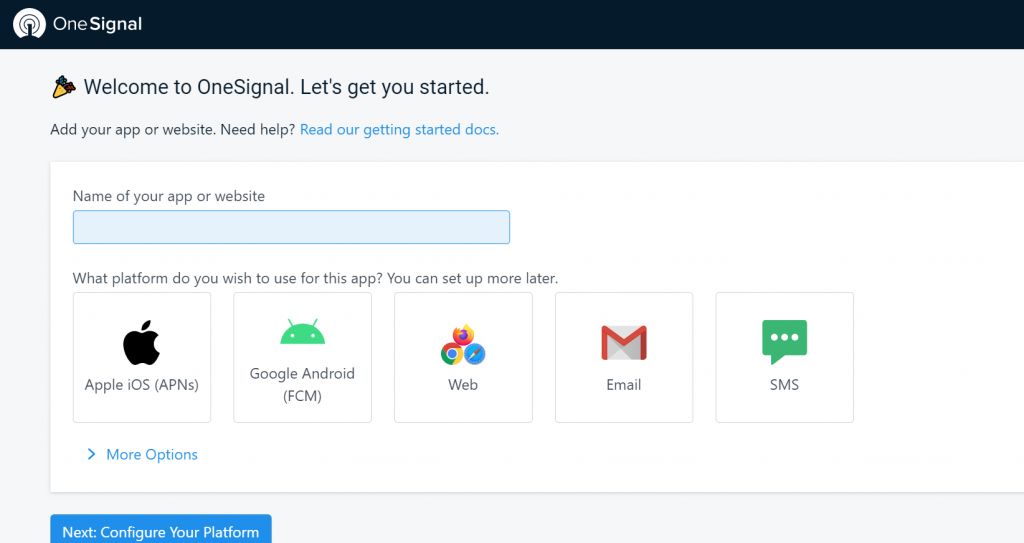
Now give the Name of your App and select which platform you wish to use for this app(Apple iOS, Google android, Web, Email, SMS). Once done click on the Next Button to Configure the Platform.
Step 4
Now the page will reload to the Configuration page asking you to choose Integration. If you are a WordPress user you select the WordPress plugin or website builder. After that choose your Website Builder, in my case, I choose WordPress.
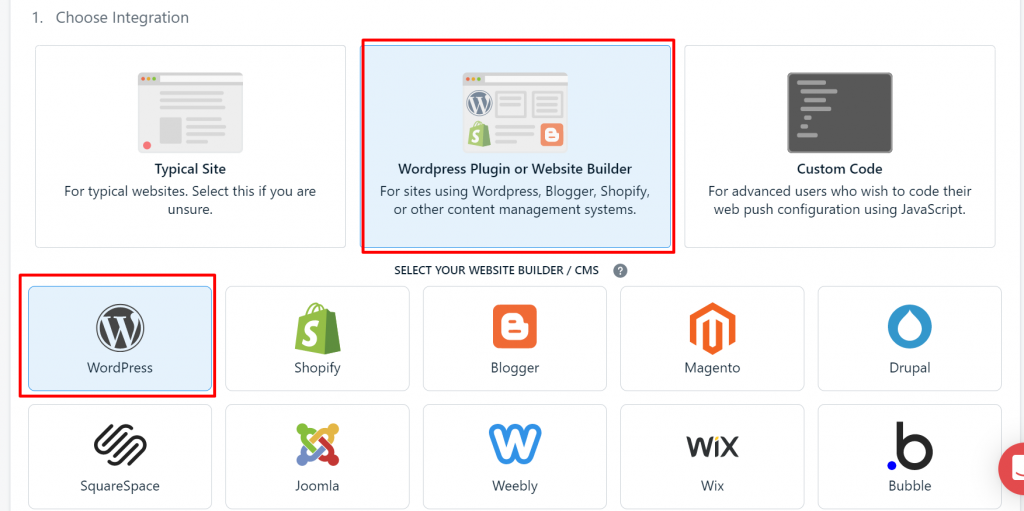
Step 5
On the same page, fill up the second section and provide necessary information about the website in the field given.
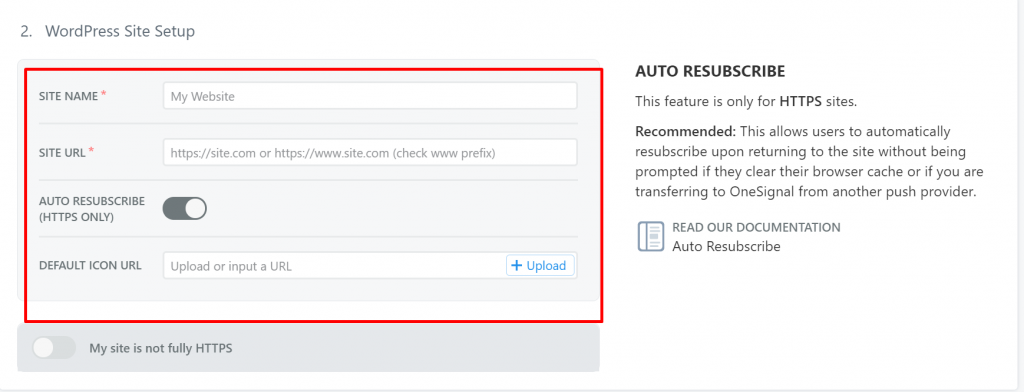
Step 6
After providing essential information about your website, click on the save button and a new Web configuration page will appear. The next thing is to install the Onesignal WordPress plugin on your WordPress website and Once installed, copy both these keys into Configuration > Account Settings.
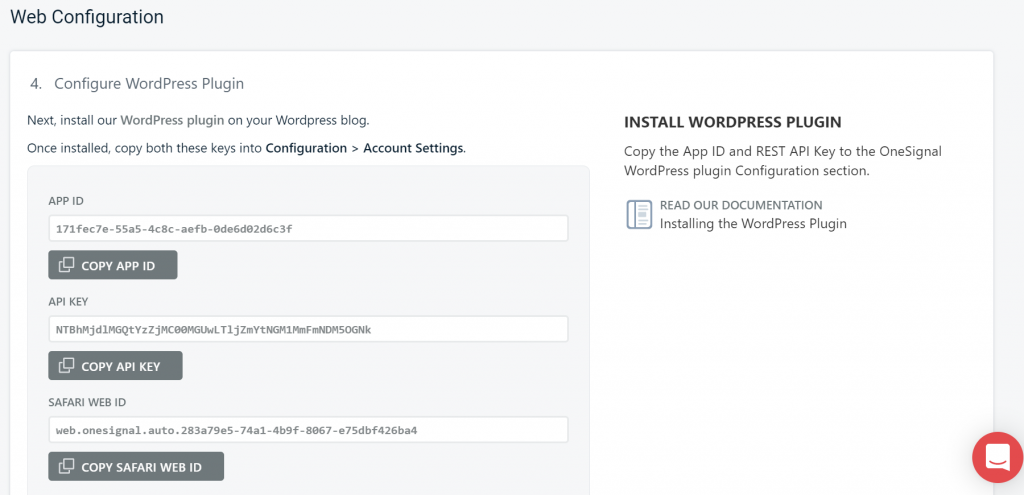
After copying all the keys and paste into the plugin Account settings, click on the Finish button to complete the setup.
Step 7
After copying all the keys, Go back to your WordPress Dashboard, Click on the Onesignal app to open. Click on the Configuration tab and past all the keys in the required fields. You can leave other fields as it is (default) and scroll down to the bottom to save the settings.
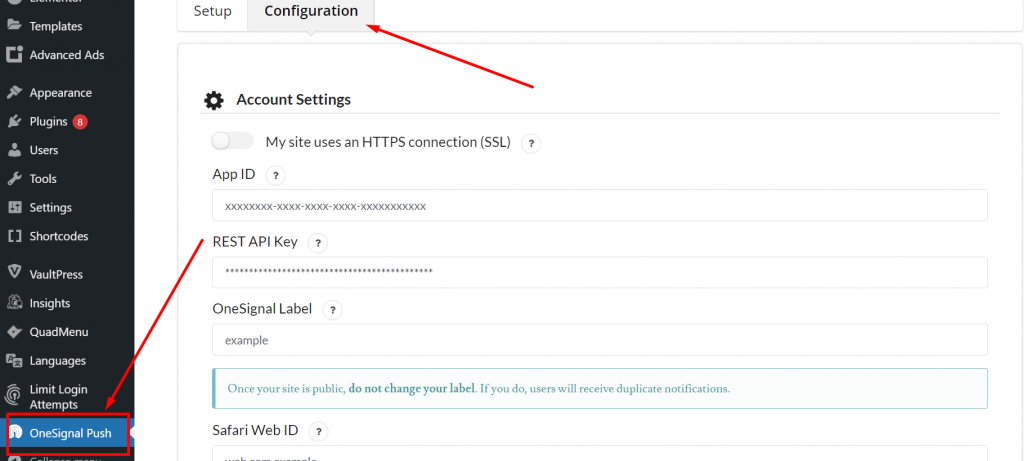
Step 8
Now after completing the above steps, it is time to test and check if it is working or not. Click on the bell icon as showing in the picture and click on “Allow”.
Step 9
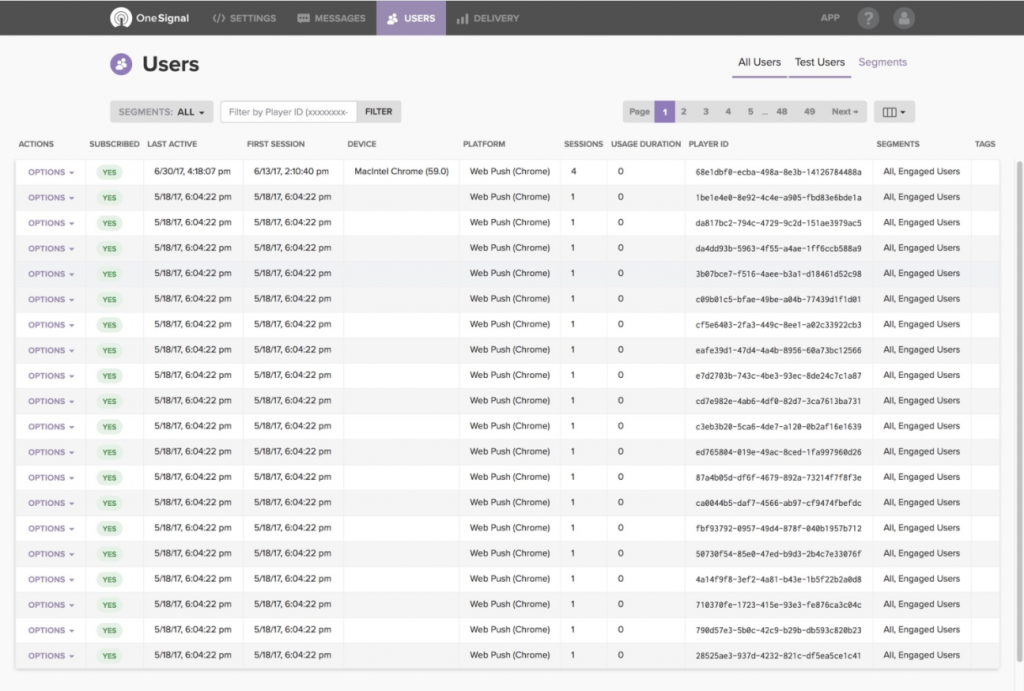
Now you can check and monitor your website subscribers and their activity from the Onesignal dashboard from logging on to their official website.
Step 10
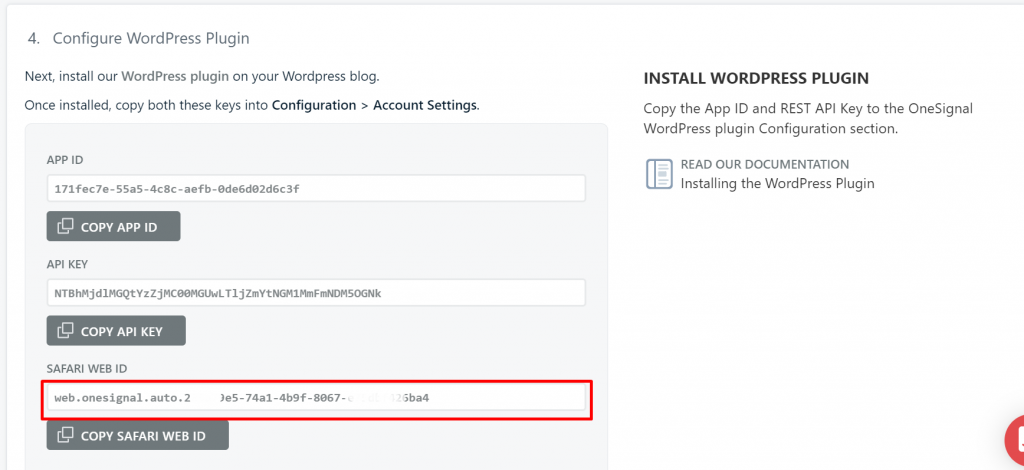
Now if you like to enable this feature for safari users, you need to go to your Onesignal account settings, click on Platforms > Web push Platforms and click on it, the page will redirect to the Web configuration page, left it as it is, click on save button to proceed the next page.
On the next page, all the keys will be shown, copy the Safari Web ID on the clipboard.
Step 11
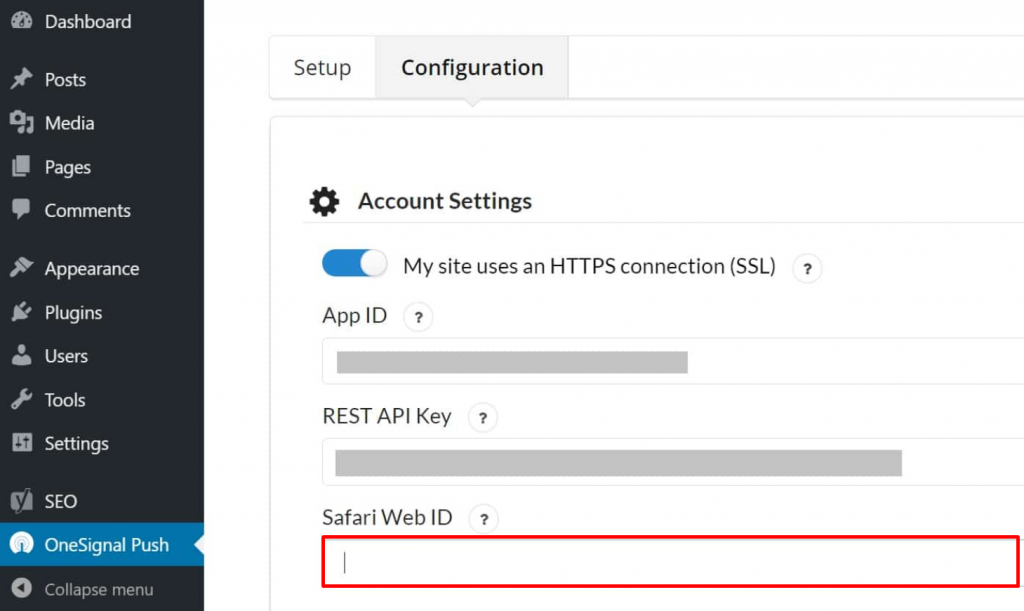
After copying the safari Web ID, Go to your WordPress dashboard, open the Onesignal Settings page, click on the Configuration tab and paste the key into the Safari Web ID field. Scroll down and click on the Save button.
And you are done, your push notifications will show up on Chrome as well as Safari too.
Onesignal Extra setting configurations
With Onesignal there are different extra configuration settings are available, but I will cover some of the important ones down below.
If you are concern about the efficiency and performance of the OneSignal, the plugin is not heavy and doesn’t affect your website. It is so lightweight that uses only a single script of about 100KB. It is all due to their Cloudflare which is their CDN partner that maintains the Website speed.
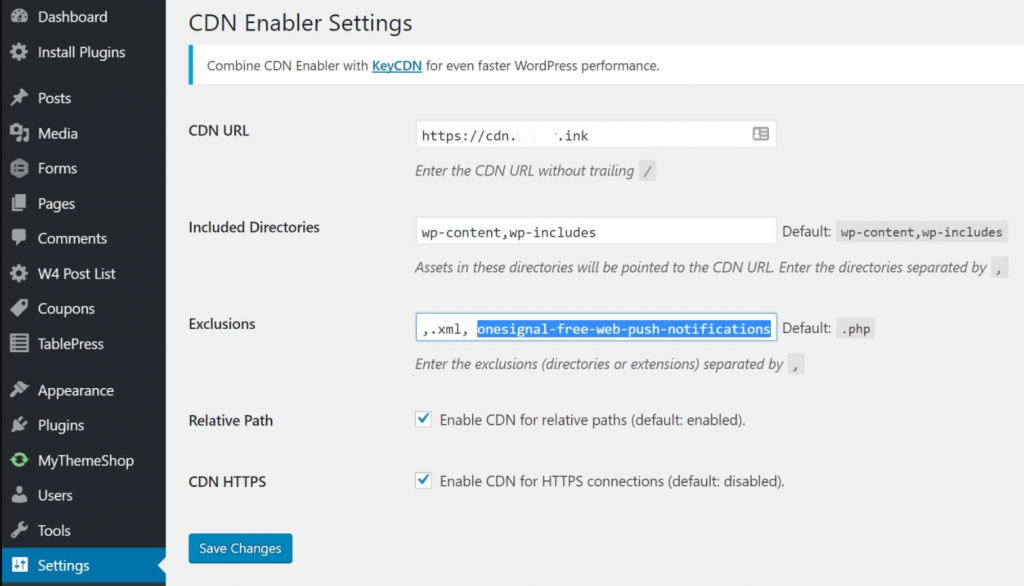
But one thing you must note down is that Onesignal does not work well with third-party CDN providers. But with the help of some CDN plugins, such as CDN enablers, making changes into its settings, it can work correctly with Onesignal.
Enable/Disable Automatic Push Notifications
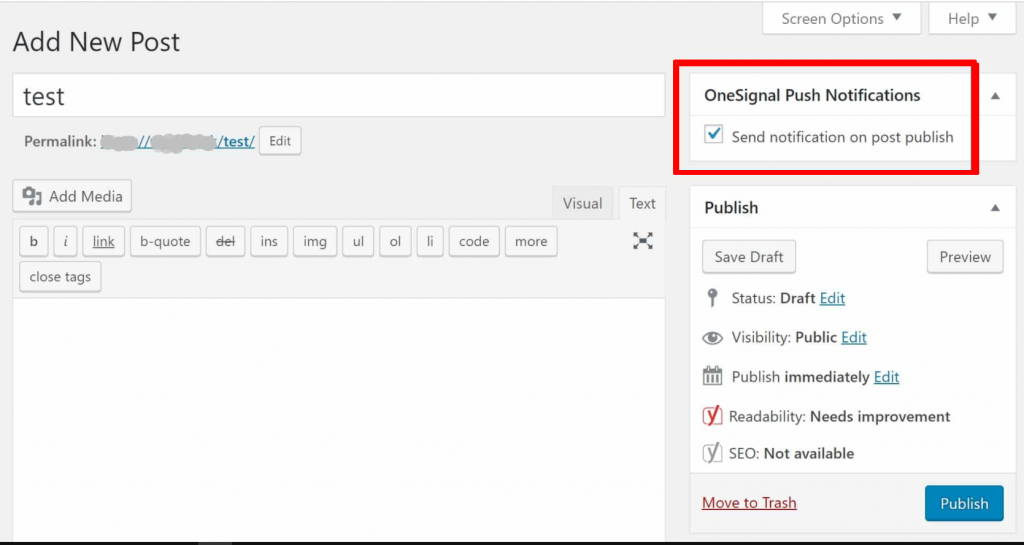
Upon installing and activating the Onesignal WordPress plugin, by default, it enables automatic push notifications, whenever you post or publish content. However, you can disable or enable this whenever you are looking to publish content but do not want to push notifications by simply uncheck the box as shown in the picture below:
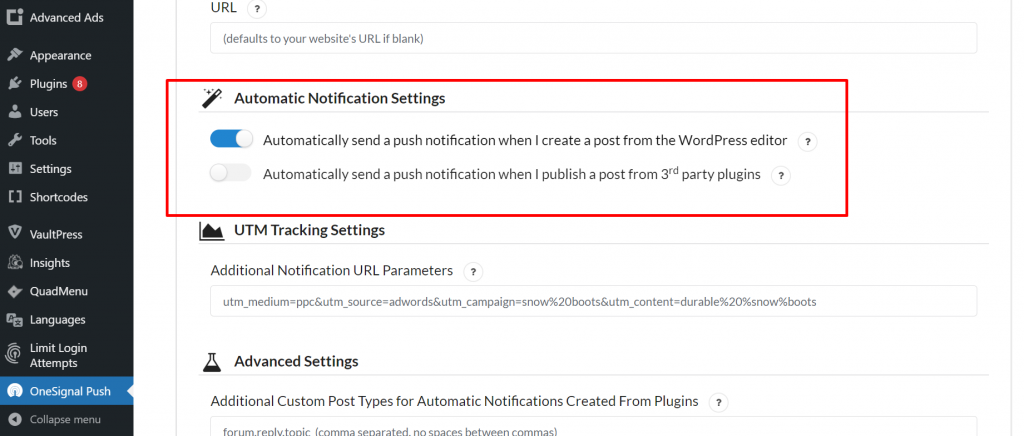
Alternatively, you can also disable and enable the automatic push notifications by accessing to Onesignal settings page. Click on the Configuration tab and scroll down to look for the Automatic Notifications Settings option. After that, you can uncheck the Send notification on post publish from WordPress editor. This is the best procedure to ensure everything is done right.
Promt user Settings
Another extra setting on Onesignal you can configure is Automatic Prompt user settings. If you want new visitors on your website to be automatically subscribed for WordPress push notifications, you have the option to enable that feature in the plugin settings.
Even you can enable or disable the red floating notification bell icon, that your visitors may find irritating on your website.
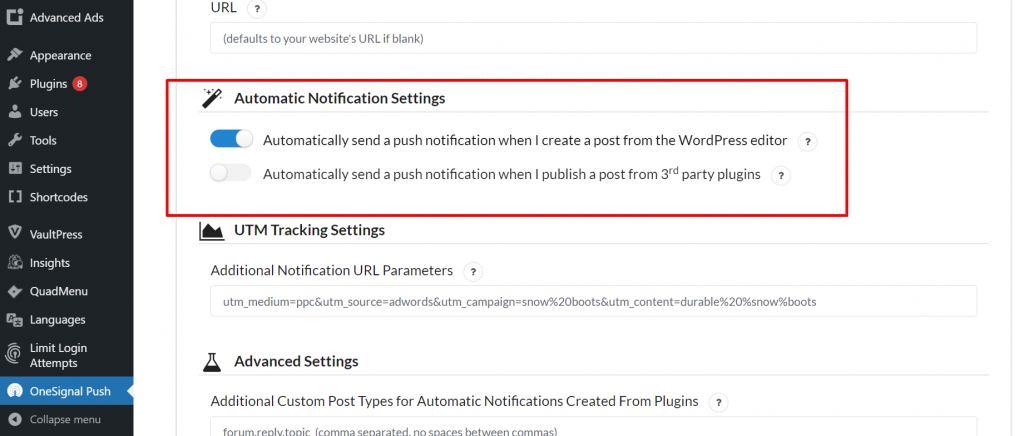
In addition to it, there are other multiple settings that you can configure such as:
- Subscription bell Text Customization
- Welcome Notifications settings
- Automatic Notifications Settings
- UTM tracking settings
- Advanced Settings
And you have control over your Onesignal settings from its Dashboard.
How to Unsubscribe from WordPress Push Notifications?
Sometimes, a user might accidentally hit on subscribe button and don’t want to receive WordPress push notifications of your website, or a user might no longer be interested in receiving a push notification. There is a good gesture to provide an option or link somewhere on your website, to unsubscribe from WordPress push notifications.
However, implementing unsubscribe button may vary from browser to browser, so, it is better for you should refer to Onesignal’s official documentation about the same in detail.
PushEngage

Along with the Onesignal WordPress push notifications plugin, PushEngage is one of the best plugins available in the market right now. Its easy and simple configuration settings let you easily add push notifications to your WordPress website.
Some Important Features
- Supports multiple Browser on both mobile devices as well as desktop web browsers
- Supports both HTTPS and HTTP websites
- Lot of Customization Options
- Segmentation
- Drip push Notification
- AB testing
- Auto Push
- Triggered Campaign
- Schedule your Notifications
- Analytics
Pricing
Although PushEngage has also a Free version that is available to download and install but with certain limitations. However, If you are running a business website or want to explore all its feature without any restrictions or limitations, you can also move on to their paid plans starting at $9 per month to $29 per month.
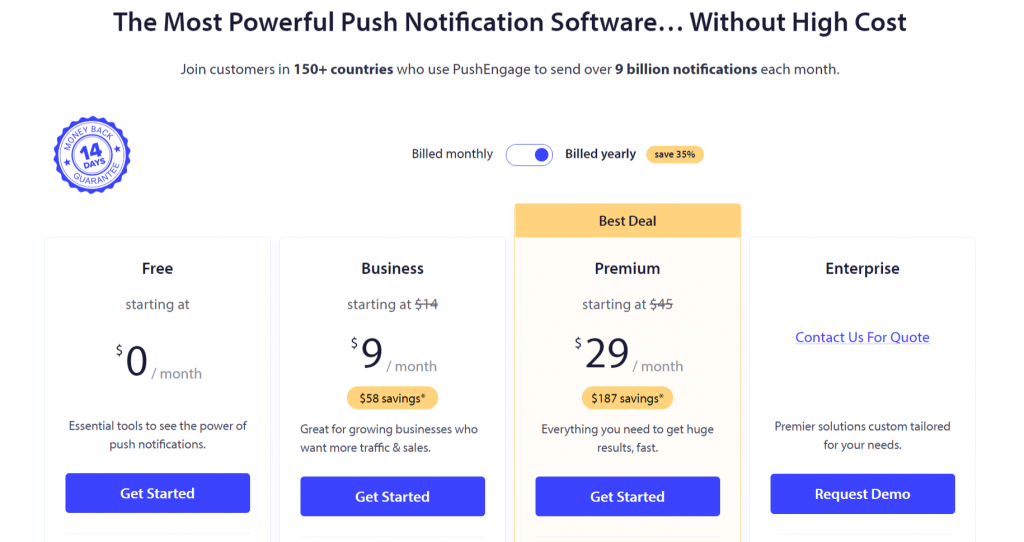
PushEngage Complete Installation and Setup Guide
Here, is a full installation and setup guide for PushEngage Plugin. The first and foremost step is to create a PushEngage Account just we were doing in the previous Onesignal WordPress Push Notifications plugin.
Step 1: Creating Your PushEngage Account
Go to the PushEngage official website, i.e www.PushEngage.com, and click on the Get Started button located at the top right side of the navigation menus.
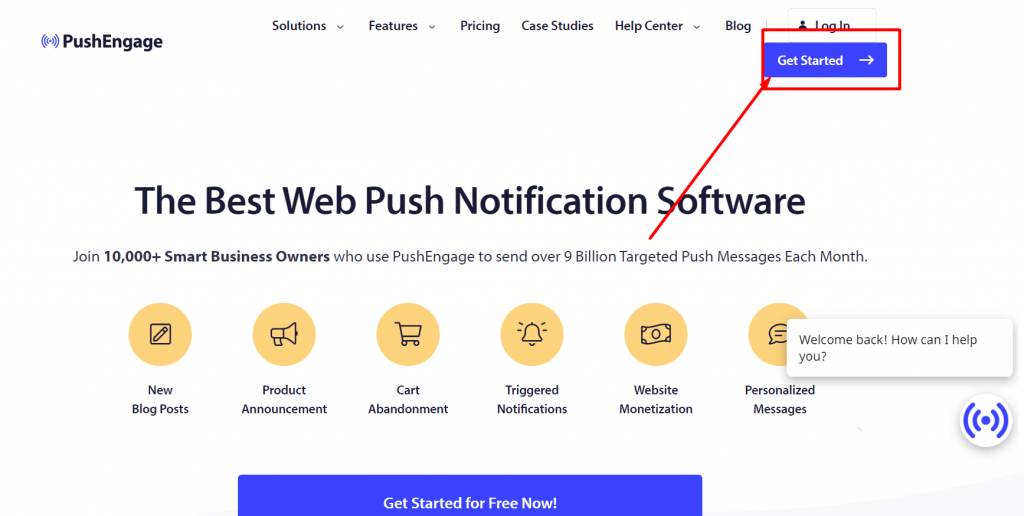
When you click on Get started button, the page will redirect to their pricing page, where you can see Free to Business plans is listed. If you do not want to spend a single penny, you can go for their Free plan which will offer you up to 500 subscribers and up to 30 notification campaigns per month. When your website traffic rises up, you can upgrade to its business plans which will help you to acquire more subscribers and eventually need to send more WordPress push notifications.
After finalizing the plan you chose for your website, you will be required to create a PushEngage account by either choosing your Gmail account or create a new one.
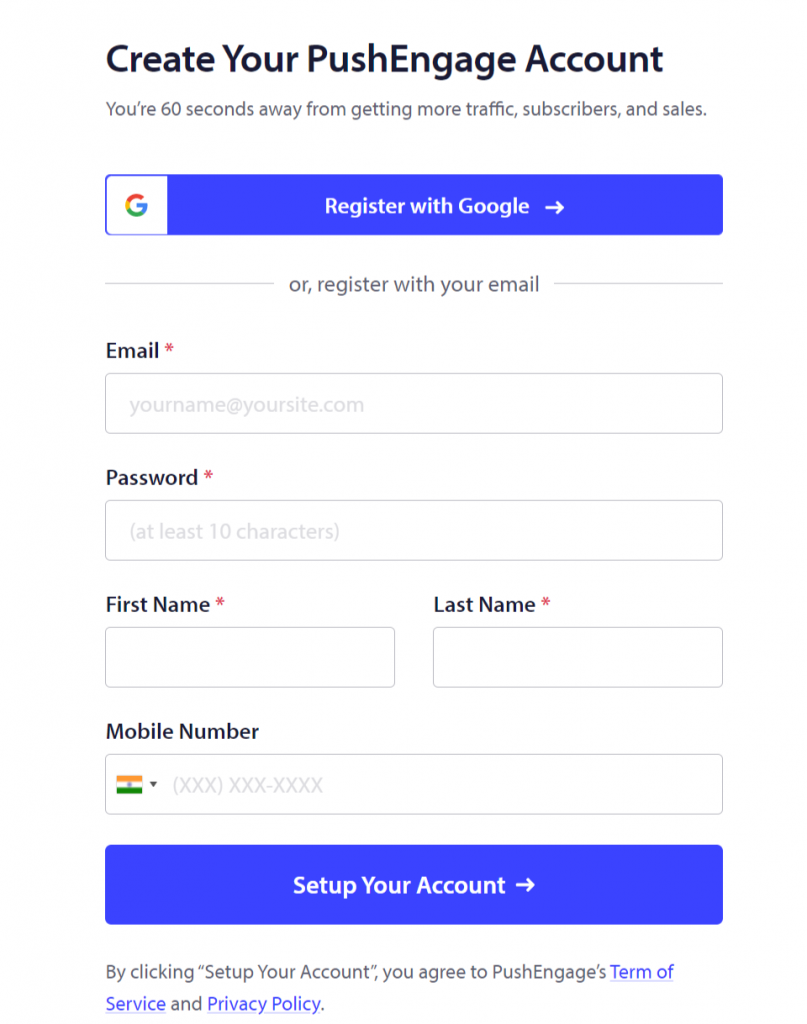
After successfully creating an account on PushEngage, the page will load directly to PushEngage Dashboard. And if you have signed up using your Google account, the PushEngage will ask you to enter your website details:
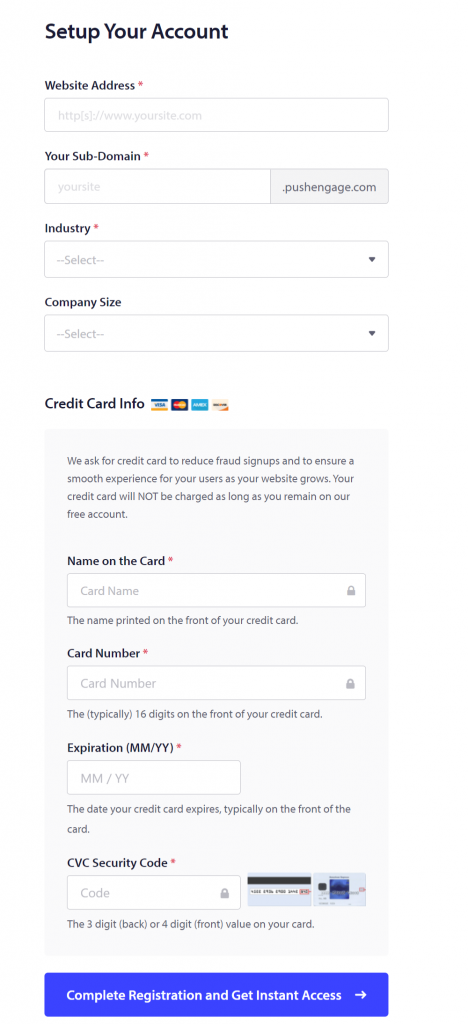
Once Completing the Registration and Get Instant Access, the page will load to the PushEngage Dashboard page. Where you should go to the Settings > Site Settings > Installation Settings and Click on the Change link to Upload an image of the site which will be shown in the push notifications.

You must also keep in mind that, the image should be in either JPG or PNG format and size should be of 256X256 Pixels. This image will be showed up in your WordPress push notifications.
Now you have successfully completed all the key information for the website now it is time to connect your wordpress website with PushEngage.
Step 2: Integrating your WordPress site with PushEngage.
Now in our second step, it is time to integrate or connect your Website to Pushengage. And to start this, the first thing you need to do is to Install and activate Pushengage WordPresss push notifications plugin, by going to your wordpress site Dashboard > Plugins > Add new Plugin > Search” PushEngage” > Install > Activate.
After successfully installing and activating Pushengage plugin, Go to Pushengage from your WordPress admin panel. Click on Setup tab and enter Your API key.

To find where you API key is? Go to your Pushengage Account Settigs > Site Settings and there you will find API keys link. Open that link and click on “Generate a NEw API key , button.

When you Click on Generate a New API key button, a new API key will generated and you will be successfully able to see it.

After successfully generating an API key in the PushEngage plugin, you need to copy it and paste it down at the Pushengage Setup Page, which was required earlier and click on Submit button to complete the process.
Step 3: Configuring WordPress Push Notification settings in Pushengage
Now, you will be able to see all PushEngage Settings. Click on General Settings Tab to ensure every detail that you have provided are correct or not. And if you want to make certain changes to it, you can do here or on the pushengage dashboard.

Next Tab is Subscription Dialogbox through which you can set up the message that you would like people to read when they visit your website. Just click on the Subscription Dialogbox and make suitable changes accordingly.

With the image you have already provided to show in your WordPress push notifications, plus the default text along with it. However, you can also change it to and write whatever you like to. After making these small changes, do not forget to click on the “Update Optin Settings” button to save the changes you have make.

Note: One thing you must Keep Note that you cannot change whatever is shown in the browser’s own pop up dialog box. IT will show you the default “Show notification” text.
Now in Intermediate Page Settings, you have the option to edit or write whatever Page Heading and Tag Line you want to appear on WordPress push notifications. and after making changes do not forget to click on Update page settings button to save the changes you have made.

Even, you have the option to create a welcome notification for thanking your visitors for subscribing your website. If you want to make changes or don’t like the default welcome message, all you need to do is to click on “Welcome Notificaton Settings” tab and type the title that you would like to add and the message for the welcome notification.
You also can choose your homepage address as the URL or you can also send your visitors to some other address as well. But one thing you must keep in mind that, you must check the ” Send Welcome Notifications to Subscribers” box to save the settings and make welcome notifications effective.

Step 4: It is time for testing WordPress Push notifications on your website
After completing all the installation and setup part of WordPress Push notifications on your website using Pushengage plugin. It is now time to check if it is working as per your expectations or not.
To begin the testing, you need to open your website either on your desktop browser or on the smartphone. If you able to see an subscription dialog box immediately that you have already set up. Just like the image shown below:

It means it is is working successfully.
No next thing you need to do is to click on the “Allow Button” and you will see an popul window will appear. Now you have successfully subscribed to WordPress push notifications from your website. You will also receive a welcome notification on your web browser after successfully subscription.
It is also possible that, if a user does not want to enable notifications at first, But at some point of time want to subscribe, it can be automatically enabled with PushEngage. A red bell widget floating on the wepage of your site.

The users will easily find this bell icon floating on the webpage and can easily subscribe if they want.
Step 5: WordPress Push Notificatitons will be sent to your subscribers
After complete setup and installation of PushEngage, by default the plugin will send notification to users on each new post. The Notification will appear including the post you have earlier set and a small size of featured image. And When the subscriber click on the notification box, they will be redirected to the original page immediately.
However if you do not want or wish to send notifications whenever you post something new, you can also disable this by visiting your WordPress Dashboard > PushEngage > General Settings> WordPress Post Settings.
Scroll down to lookout for the Auto Push Option and uncheck the box to disbale auto send WordPress push notifications. Followed by clicking on “Save wordpress settings” button to make the changes effective.

In addition to it, another feature of PushEngage is, you also have the option to customize notifications in the plugin. All you need to do is just go to PushEngage official website and login to open the Dashboard > Go to Notifications > Create > New Notification.
On this page, you will have all the options to customize notifications such as, title of the notification, text or message, image, address, etc. You also have the feature to schedule notifications and implement them target audiences to increase the web traffic.
Some other PushEnage Features you must look upon
Like OneSignal, PushEngage also offers a wide range of features even in their Free version, For example: You can enable an overlay feature on the top of your website and guide users on how to subscribe your website and where to click for allowing notificaitons.

Just go to your PushEngage Account settings > Subscription Settings > Opt in Management, and look out for the Susbscription Overlay option on the same page.
Click on the check box to enable Subscription overlay, however you can also edit or change overlay Label if you want and click on the preview button to see how it will look. If you find everything okay hit on the update button to make changes effective.

But in Safari you are required to move further more steps to enable this overlay function, so that safari users can also able to subscribe to your WordPress push Notificatiions. In safari, you will be required to have an Apple Developer account that will cost you around $99 per year.
After that you will be able to create an unique Push Notification ID for your wordpress website. When you have your Push ID as well as certificate, Go to your PushEngage Settings page > Subsctiption Settings > Safari Web Push as shown in the picture below:

After that hit the Update to make changes effective and now you will be able to see overlay notification on your safari browser as well.
Summary
And if you like to explore more WordPress push notification plugins, there are plenty of options are available, and it is also essential to choose the right WordPress push notification service from the very beginning. It is also observed that there are also some plugins available that will not let you change your notification service provider in between. The only option left for a user will be to start from the scratch.
Hence, For your convenience we have provided you the two most powerful contenders in the market that will make things easy and more trustworthy for you. If your budget is limited or you are just a beginner and want to learn things without spending a lot of money. These two WordPress push notifications plugin are capable of delivering enough features and functionality even in their free version, that will be sufficient to do your work easily.
We hope this detailed article on Ultimate guide on WordPress push notifications will really help you learn how ot add wordpress push notifications to your website. No matter whether it is for chrome browser of safari, we tried to cover almost everything tha majority of the users are working on.
At last if you find anything missing, or like to add something more that we missed ot mention in this article, please do let us know in the comment section below. We love to hear from you.
Frequently Aksed Questions
How do I add push notifications to my WordPress site?
There are multiple WordPress Push notification plugins are available in the WordPress directory. Either free or paid, these plugins will easily let you setup full functional Push notifications on your website. Some of the popular plugins you can refer to Pushengage and Onesignal.
How do I set up push notifications?
To enable/set up push notifications
1. Click on the bell icon floating at the bottom of the web page or click on more option on bottom navigation bar to select settings.
2. Click on turn on notifications
3. Click on Allow button
4. And you are done
How do I set up OneSignal push notifications?
Onesignal is one of the best WordPress push notifications plugin and to set up this on your website:
1. Install and activate the Onesignal plugin on your website from WordPress directory.
2. Create an Onesignal account on its official webiste by providing essential informations.
3. Name your app and select platform (Apple ios, Google android,Web, email, SMS)
4. Choose integration
5. WordPress site Setup
6. Copy App ID, API key, Safari WEB ID
7. Paste the copied IDs in the Onesignal plugin settings.
8. Click on save button and you are get to go.

Rahul Kumar is a web enthusiast, and content strategist specializing in WordPress & web hosting. With years of experience and a commitment to staying up-to-date with industry trends, he creates effective online strategies that drive traffic, boosts engagement, and increase conversions. Rahul’s attention to detail and ability to craft compelling content makes him a valuable asset to any brand looking to improve its online presence.

![How To Update WordPress Theme Without Losing Customization [ 3 Methods ] update WordPress theme](https://www.wpoven.com/blog/wp-content/uploads/2022/05/update-WordPress-theme.png.webp)
