Managing a single wordpress website is tough, but managing multiple WordPress sites can be more challenging and chaotic. It can become even worse if you are not able to find the right tools to manage some essential functions for multiple wordpress sites such as taking regular backups and updates.
Hence, to overcome this problem luckily there are various Management tools are available on the online market, that help you out to Manage Multiple WordPress sites from a single dashboard. These tools will help you to save your precious time and reduce efforts to keep updating plugins or software on multiple sites.
In this post, we will mention some very useful Management tools in detail, with the help of which you can be easily able to manage multiple WordPress sites like a pro. In addition to it, we will also help you out to decide which will be best suitable for you and fulfill your needs.
Let us get started!!
Why do you need tools to Manage Multiple WordPress sites?
Although managing and handling a single WordPress site is a little difficult as well as a time-consuming process. It becomes more difficult when you have to manage multiple WordPress sites at once. Hence to reduce your efforts and time, there are some tools are available, with the help of which you can easily make things better. Let us see why you need tools to manage Multiple WordPress sites:
- Can automatically and quickly update softwares on all the websites simultaneously.
- Can update and monitor plugins and themes on all the websites simultaneously.
- Take regular backup of your WordPress websites and store them at offsite location.
- Managing Tools help you to manage different users, comments and other features of WordPress on different websites at the same time.
Although even wordPress has provided you a feature to create a multisite network. But it has its limitations, where with the help of tools you will have a lot of added features without any limitation and flexibility.
What parameters you should look into tools that manage multiple WordPress Sites?
Now you have already known, how much a tool can be beneficial to manage WordPress sites. Now it is time for you to know what parameters you must look into multi-site management tools to pick the right and best tools. Let us see.
1. Single dashboard to manage Multiple WordPress sites
Whether you are running an agency or working as a freelancer, working and managing multiple sites at once can be challenging. It is also important for you to deliver the project on time without disappointing your clients. Hence, to make things easier and systematic, it is why a single dashboard is essential to manage multiple wordpress sites in one place.
So, while choosing the best tool to manage multiple wordpress sites, the first thing you must look into is a tool that whether it is providing you with a dashboard that can collect information from all the websites on a single dashboard. Through this, you will be able to monitor, update plugins or software and make other general setting changes in just a few clicks.
Another most important thing you must consider is that the dashboard must have other useful management tools such as security and SEO plugins so that it helps to make management even easier. This way it will be easy for you to optimize your website from a single dashboard and even monitor security scans of all the websites.
2. Security
If you are running a website, you must have to know how much it is important to update plugins and themes to ensure the security of your website. But there are also a lot of other things that you are required to do to ensure the security of your website. But things become more complex and hard if you have to ensure the security of multiple sites at once. Hence, the multisite management tool must be able to handle and manage the security of all the websites without leaking any vital information, or else your website will be a huge risk.
The tool must let you scan and monitor your website activities and check any threats. Also generates a comprehensive report about all the website activities and vulnerabilities of your websites. Also, check if they are capable of carrying out regular security scans and their fixes or not.
One thing you must keep in mind is that this should not be a one-time process but scanning and monitoring your website is a continuous process that helps to reduce all possible security threats. So, your Management tool must be able to check all possible security threats and provide a high level of security to your websites.
3. Must be able to manage Multiple WordPress sites
The tool must be able to handle multiple websites or support Multisite functionality. You must be familiar with the term multisite if you are managing a network of websites on your WordPress with a single Dashboard.
If you are using multisite installation on your wordpress, it means you are going to manage more than one website either for your clients or if you are running an agency. This multisite feature is usually very useful in running an agency where you can manage and handle multiple accounts of your clients from a single dashboard.
From there you will be able to easily monitor, update, fix, and do a lot of other website configurations on all the websites simultaneously.
4. Must provide automatic migration functionlity for multiple websites
Now even though we talk so much about gathering all of your websites in one place, it’s easier said than done. Sometimes you already have WordPress websites but in different hosting and migrating them to one place requires a lot of work.
Unless, of course, if you have an automatic migration available which helps you move your old websites to the new place with just a few clicks. No coding required, no effort wasted. If you’re going to choose a hosting platform that makes management of multiple websites easy, also make sure that it guarantees a smooth and fluid migration service, so you don’t waste time.
5. Must be able to manages all the plugins
You must have to know how many plugins can be significant for a website. But you cannot also deny the fact that they can be a real threat too if you are unable to regularly update them. It is so important because ignored or plugins on old versions can have loopholes in them through which hackers can easily get access through your website.
So, it becomes an essential task for anyone to constantly update their plugins or themes with the latest version available. It is a very easy process especially when you are dealing with a single website. But things will become difficult when you have to manage multiple WordPress sites at once. Every time you need to log in to one website and update plugins and log out. Again repeat the same process with another website, which can be a time-consuming process.
So, to manage multiple wordpress sites, You must make sure that tools also must be able to manage multiple plugins quickly and from the same dashboard. The management tool must set all your website’s plugins and themes on automatic updates. In addition, the Management tool should also let you install and activate plugins for multiple websites from the same dashboard in just a few clicks.
6. Must provide a Staging platform for multiple websites
Generally, staging platforms are very helpful for developers or agencies who need to make some changes and tweaks on websites to show their clients. Although it is not helping you manage multiple wordpress sites.
Running an agency or Freelancing, you need to handle multiple projects at the same time, and to satisfy your customer needs, you constantly make tweaks and do a lot of experiments with multiple pages at the same time. So, if your Management tool is unable to provide you with a starting platform, you will be required to preview all the changes whether it is minor or major to your clients.
So, if you are running an agency or a freelancer who works on multiple projects, you must make sure that whatever management tool you choose, it must offer you a staging platform. Although, there are some web hosting companies such WPOVen, that provide a staging platform in their plans too.
7. Must have Automation, bulk and schedule action functionality
To manage multiple wordpress sites manually can be a very daunting task even with using a normal management tool with manual functionality. However, things can be a lot easier when automation, bulk, and schedule actions are included in the management tools. These features make things a lot easier and better while handling bulk tasks, scheduling them, and binging all these under automation.
No manual work of choosing a particular website and assigning or managing tasks one by one. You can select all the websites at once and schedule their updates, automate plugin installations, etc. This will help to reduce efforts, save time, and increase work efficiency.
That being said, now let us hop into some of the best tools that possess the qualities we have mentioned above and also help you out to manage multiple wordpress sites easily. Let us check out.
Tools to manage Multiple WordPress sites:
There are various online tools or even some web hosting service providers are available that can help you to manage multiple WordPress sites , let us see what are they:
1. WPOven
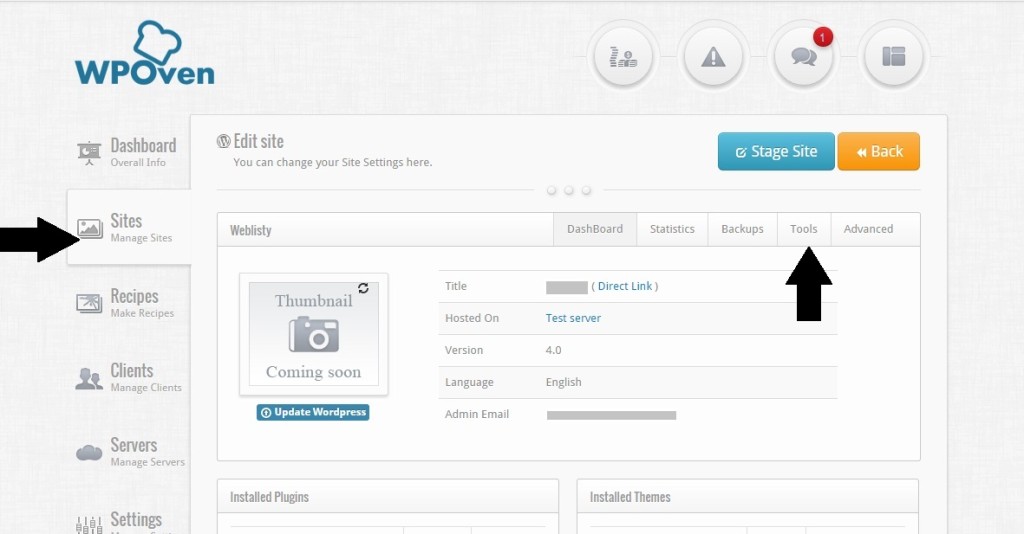
Unlike other Web hosting service providers, WPOven better knows all the pain points of the users and provides a smooth and seamless solution whenever possible. If you are looking to manage multiple WordPress sites, WPOven is the right Managed Web hosting provider for you. Not just it is a Managed WordPress web hosting service provider but also, you can add unlimited wordpress sites and manage them right from the single dashboard.
Multisite features you will get with WPOven:
- Dedicated VPS Hosting For Unlimited Sites
- Unlimited sites support
- More sites you’ll add the more value you will get
- 24/7 dedicated expert support for all your websites
- Free SSL for all sites
- Free migration of all sites to your server
How to setup a WordPress Multisite network?
If you are not using a fresh WordPress install for this, then firstly you would have to deactivate all your plugins.
Step 1 Open the wp-config.php file and add the following line to activate the MultiSite Network option.
|
1 |
define('WP_ALLOW_MULTISITE', true); |
Before the next step, we need to know the difference between a Sub-domain Multisite and a sub-directory Multisite.
Sub-domain multisite: Example: http://subsite.example.com/
Sub-directory multisite: Example: http://example.com/site
Step 2 Now login to your WordPress admin area and navigate to
|
1 |
'Tools' -> 'Network Setup' |
and fill in the form. After filling the form you will be directed to a page that asks you to update your ‘wp-config.php’ file with the settings provided there and also shows the Apache Settings to be updated.
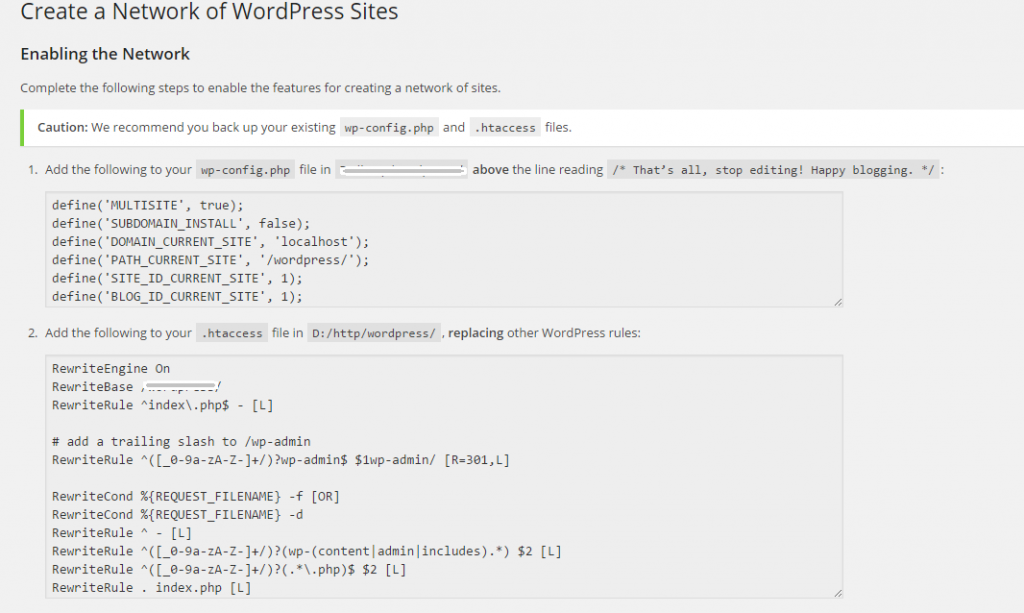
Now paste the codes provided for the wp-config.php file just above the line
|
1 |
"/* That's all, stop editing! Happy blogging. */" |
Here is a sample code for Sub-directory Multisite for a domain with name example.com
|
1 2 3 4 5 6 7 |
define('MULTISITE', true); define('SUBDOMAIN_INSTALL', false); $base = '/'; define('DOMAIN_CURRENT_SITE', 'example.com'); define('PATH_CURRENT_SITE', '/'); define('SITE_ID_CURRENT_SITE', 1); define('BLOG_ID_CURRENT_SITE', 1); |
Here is a sample code for Sub-domain Multisite for a domain with the name example.com
|
1 2 3 4 5 6 7 |
define('MULTISITE', true); define('SUBDOMAIN_INSTALL', true); $base = '/'; define('DOMAIN_CURRENT_SITE', 'mu.rtcamp.net'); define('PATH_CURRENT_SITE', '/'); define('SITE_ID_CURRENT_SITE', 1); define('BLOG_ID_CURRENT_SITE', 1); |
Now add the code provided for the .htaccess file.
If you are using Nginx instead of Apache, you can check this tutorial: HERE

You can either do the complete multisite set up by your own or if you are not comfortable in accessing core files, you can ask the WPOven Support team to do it for you.
2. Manage WP

When looking for Management plugins, ManageWP turned out to be one of the oldest and most popular ones in the market available now. This Free tool lets you manage multiple wordpress sites from a single dashboard which is hosted on Manage WP’s website.
Some key Features of Manage WP
- Easy and quick updates to your wordpress sites, themes and plugins in a single click.
- Automatic backups and storing at offsite location
- Multisite staging environment and migration facility
- Uptime Monitoring
- Client report generation
- Premium addons increases functionality such as SEO ranking, White label and link monitor
- Easy to collaboration without revealing your password and many more.
Some Pros and Cons of Using ManageWP
Pros
- Generate Reports automatically
- Notifies you on Downtime
- Alerts you on security risks
- Available free to use with affordable addons
Cons
- Need accuracy in Downtime reports
- Need to have detailed report on security risks
- Need alerts and notifications in details
- Limited to Customized reports
Pricing
Although you can easily use Manage WP Free for more features you need to buy their premium add-ons.
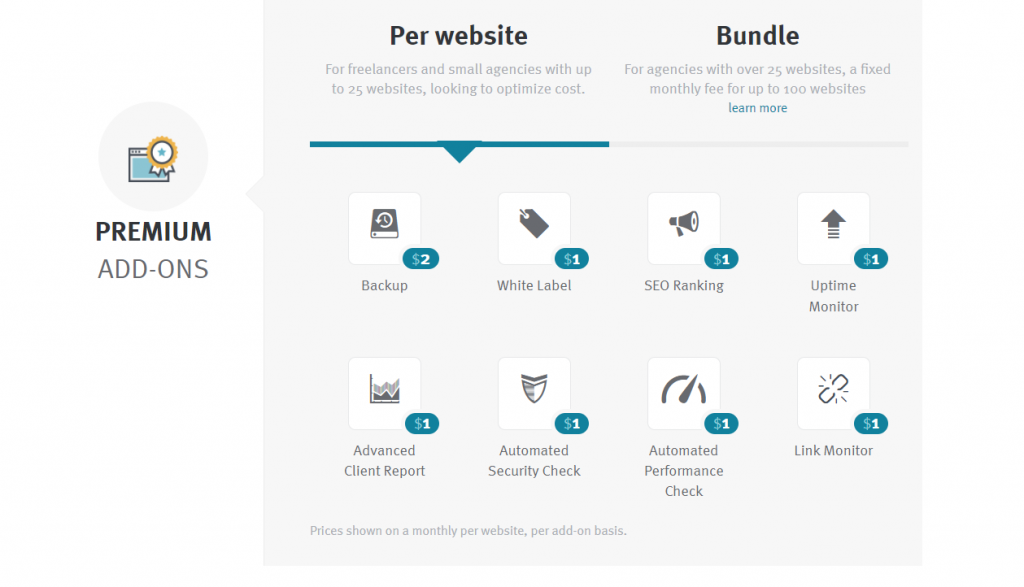
How does the ManageWP setup look like?
When you have decided to go with the ManageWP tool to Manage Multiple WordPress Sites, the first thing you need to do is to sign up on their home page as shown in the picture below:
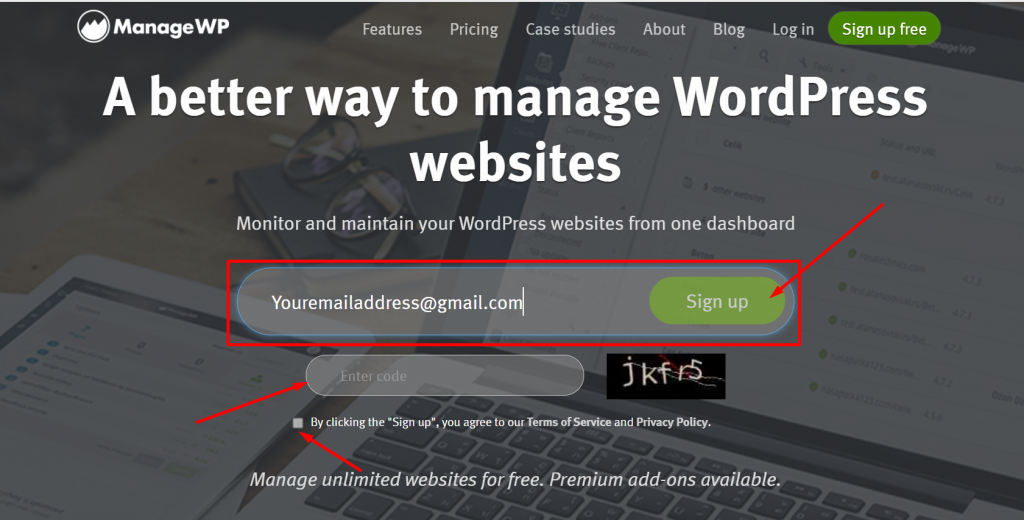
Provide your email address, captcha and click on the terms and conditions box hit on the Signup button. As soon as you hit on the sign-up button, you will be asked to put your name on the introduction page.
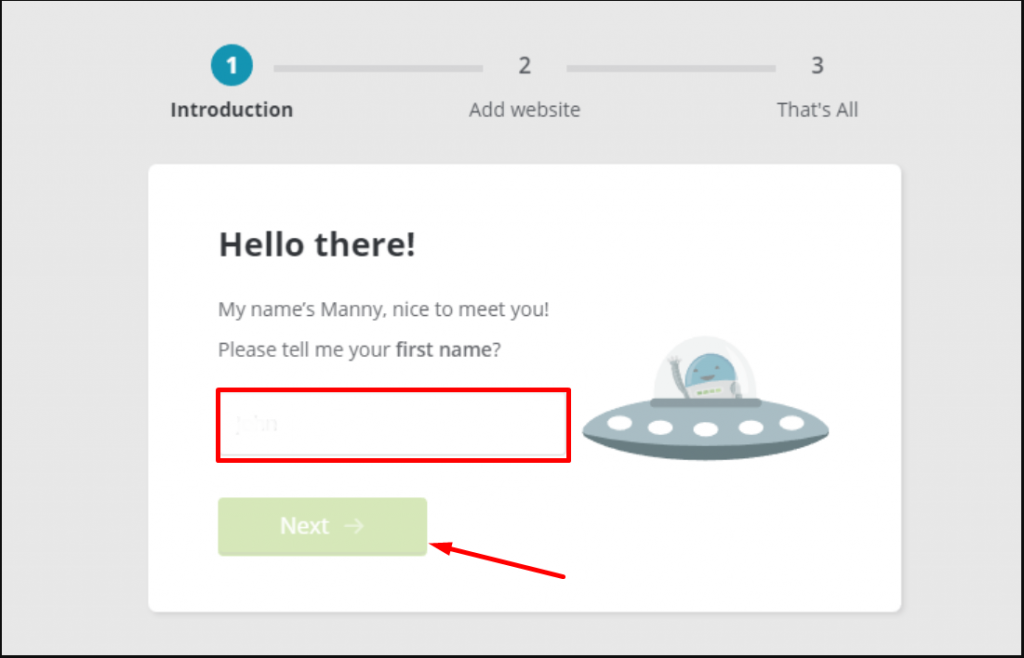
Now after adding your name, the next step is to add your website, but for this, you need to do verify website ownership.
To verify website ownership, you have two options to do it, either choose wordpress admin credentials or use the connection key that you will find on your website’s plugin.
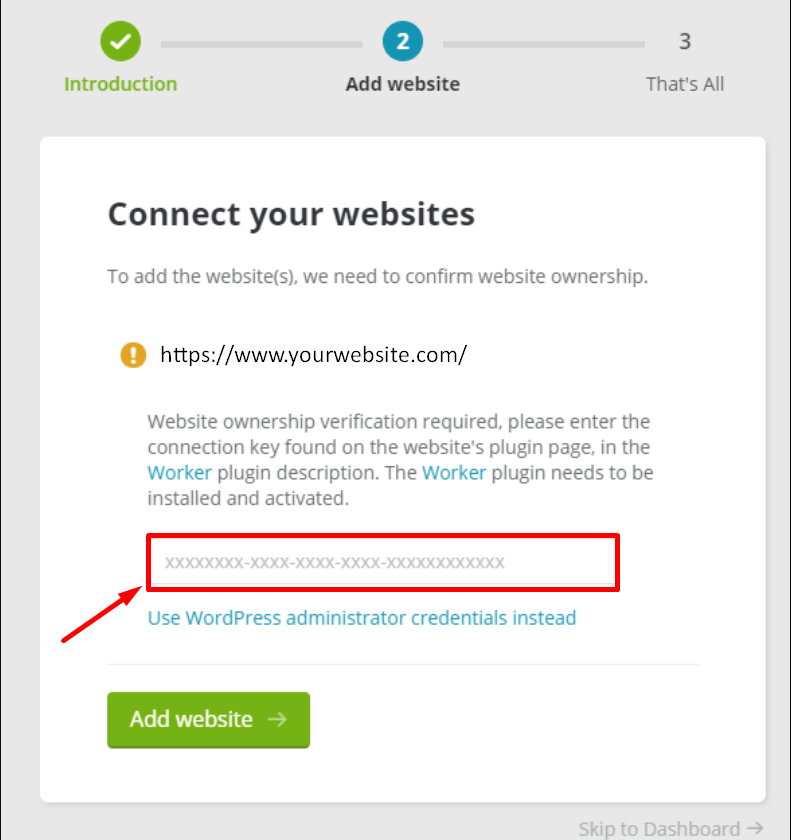
Now for the connection key, you are required to install the Worker plugin on your WordPress site.
Go to your WordPress dashboard > Plugins > Add new > Worker plugin > Install > Activate.

After successfully activating the WPworker plugin, you need to click on the connection management link given below the plugin description.

After clicking on the connection management link a pop-up page will appear showing your connection key.
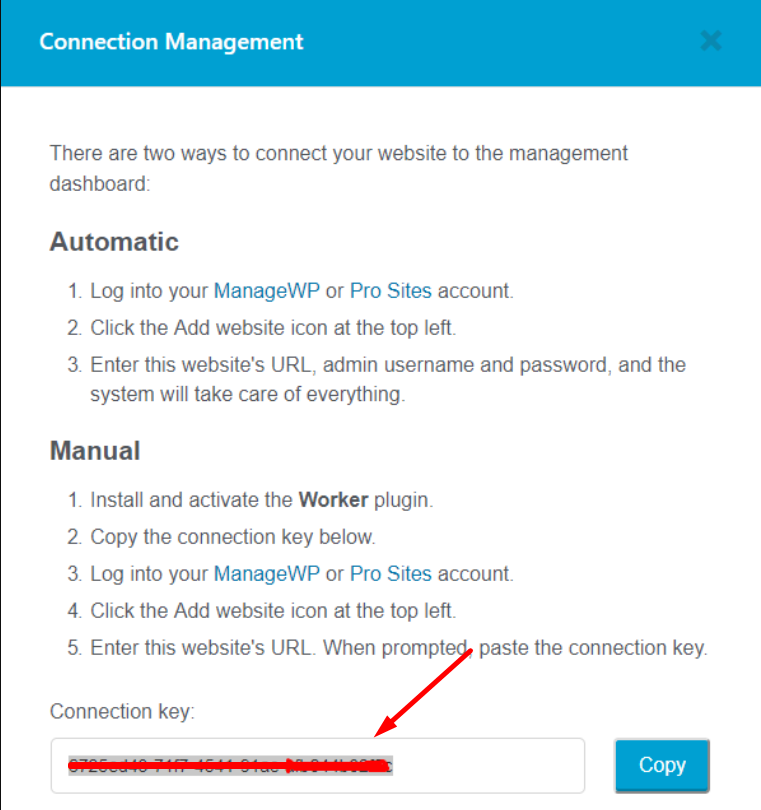
Copy the connection key and paste it to the connection page that required this key to verify. click on add your website and you are done.
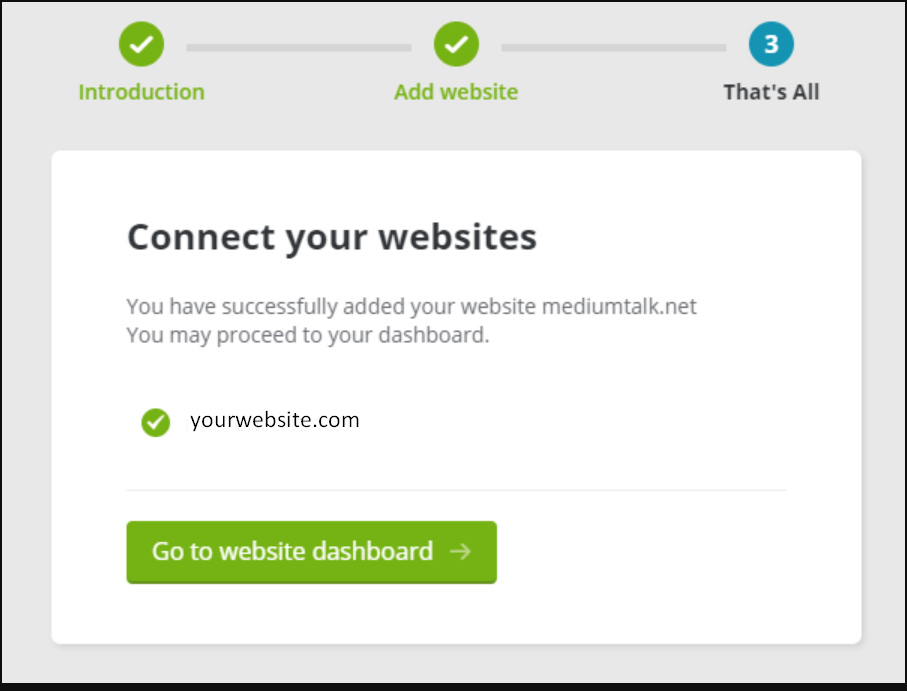
After successfully verifying and connecting your website with the ManageWP tool, you need to follow the same above steps to add multiple websites to manage through the ManageWP dashboard.
To add a new website, you need to click on the plus icon as shown in the picture below of the dashboard.
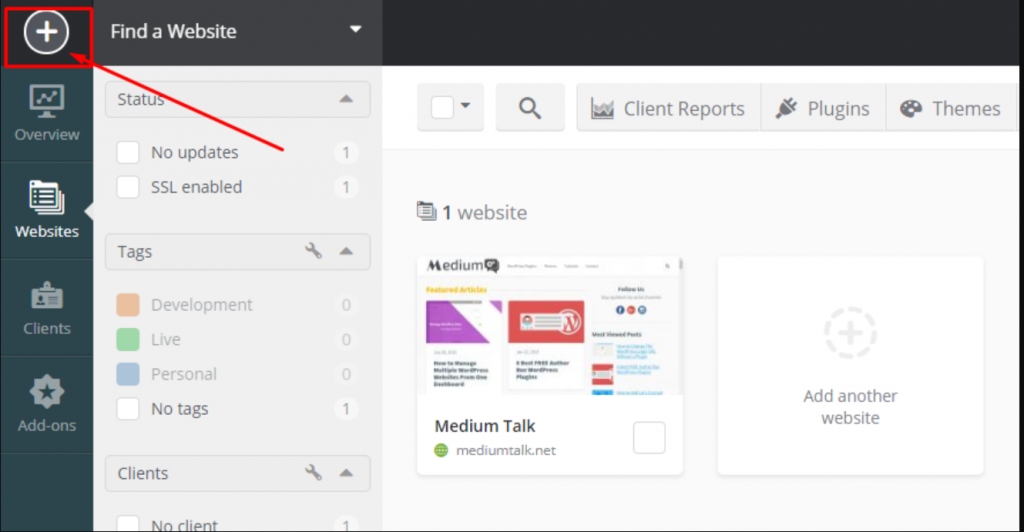
If you do not wish to use the Worker plugin installed on your website, you have an alternate solution to use your WordPress credentials to add a website on the ManageWP dashboard.
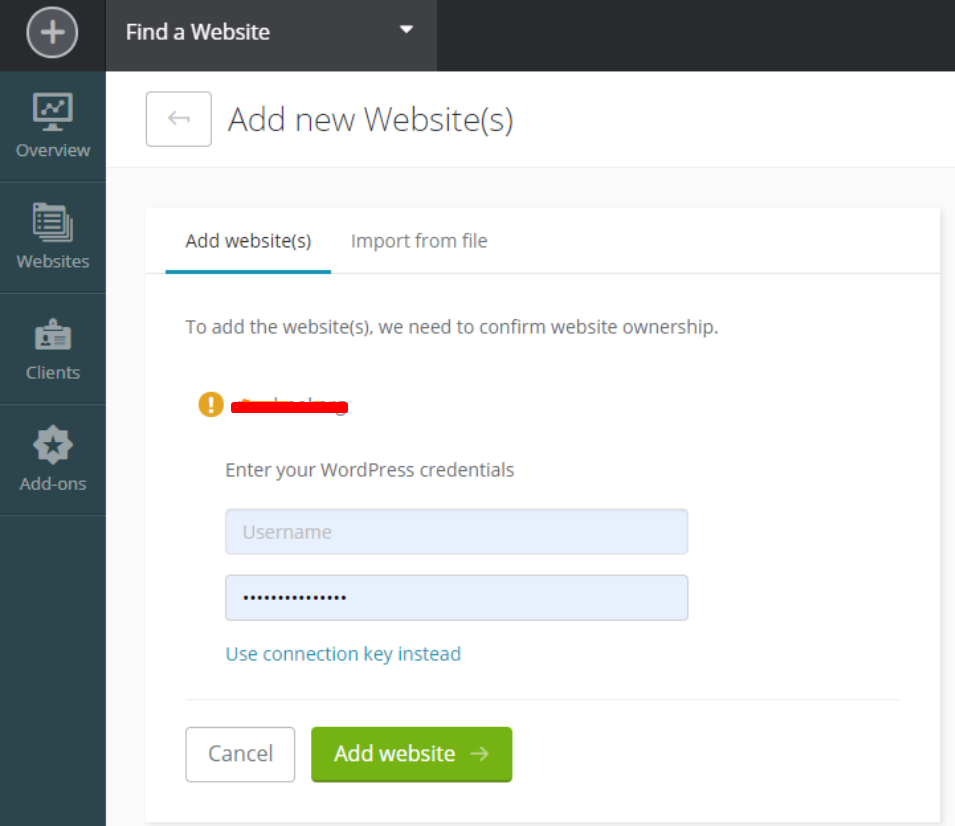
ManageWP- WPOven Review
ManageWP Review
Summary
We must say, this is one of the best Management plugins we have ever used. It has been easy to manage multiple websites from a single dashboard whether to manage updates, performance, ensuring security, taking regular backups, or maintenance. The tool can manage multiple websites flawlessly without any glitch.
The only area which I found that can be improved is sometimes you may find complications while connecting your website to ManageWP without the help of their Worker Plugin. But overall we didn’t find any serious flaw in this tool. Amazingly, you are getting so much just free.
3. WPremote
Another Free tool to Manage Multiple WordPress sites available on the internet is WPremote. It is a simple yet powerful tool that lets you run multiple websites or blogs from a single dashboard. With this tool, you will be able to update most of the wordpress core software, plugins, and themes in a single click on multiple sites. In addition, this tool gives you the power to manage all your team members as well as users directly from the dashboard. Although this tool has sufficient features in their free version if you like to add more features you can go for their premium plans.
Some key features of WPremote
- Full visibility on your client websites from the single dashboard
- Single click to update all plugins, themes or softwares of the website.
- Regular monitor
- Scan for malwares or threats
- Up to date regular backups
- One click staging
- Systematic automated reports generation
- Visual regression tests
Some pros and cons of Wpremote
Pros
- Simple and easy to use
- Support unlimited Websites
- Covers maximum features in their Free plan
- Best for simple websites
- Great support
Cons
- A limited selection of tools in the Free version
- Shows update notification for both parent as well as a child theme
WPremote Pricing
Although WPremote is a Free tool but with limited features. If you like to use their complete features, you need to upgrade to their premium plans available for every agency big or small. The minimum plan starts at $13 per month and goes up to $699 per month.
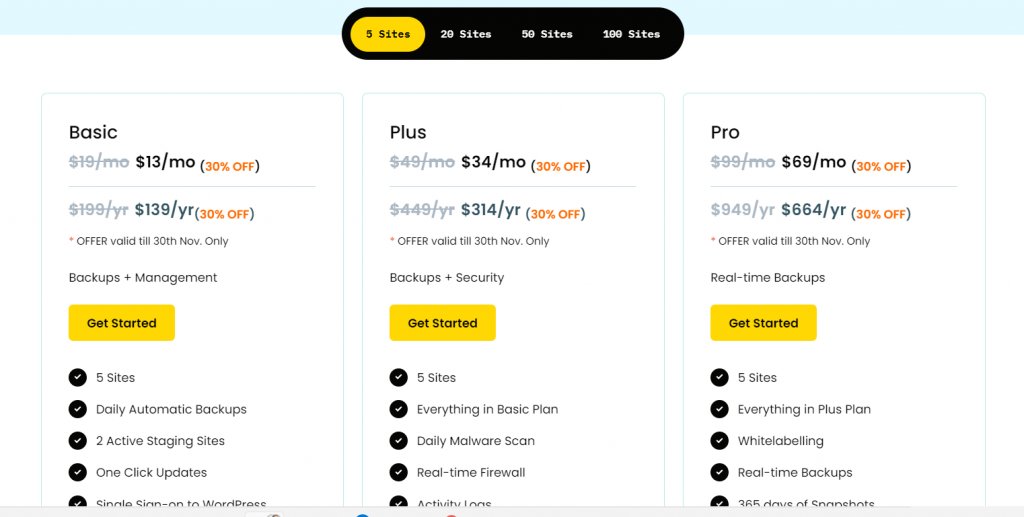
How do the WP remote setup look like?
The first thing you need to do is to sign up and create an account on wpremote.com. After creating an account successfully, WP remote dashboard will be displayed as shown in the picture below:
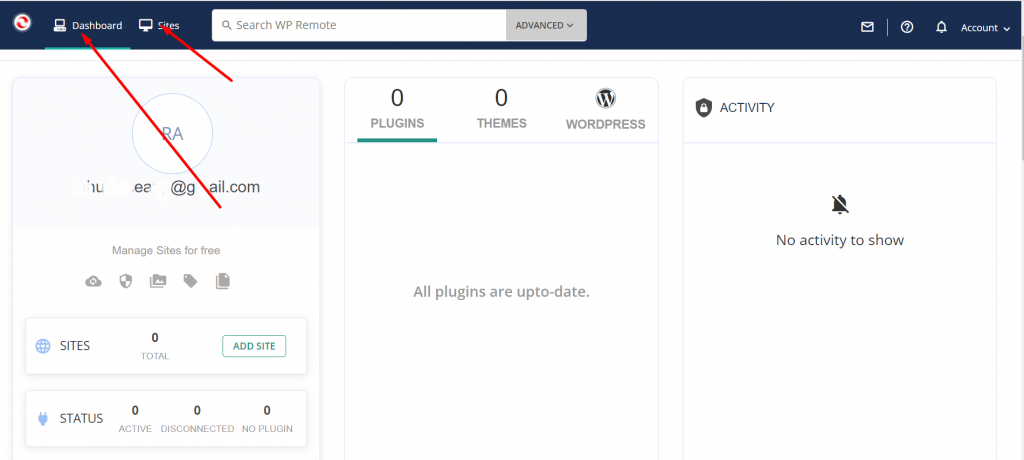
Now to add a website, click on the “Sites” link located at the left top corner of the dashboard. After clicking on the site’s link, an “Add website link” will appear and ask you to provide your website URL.
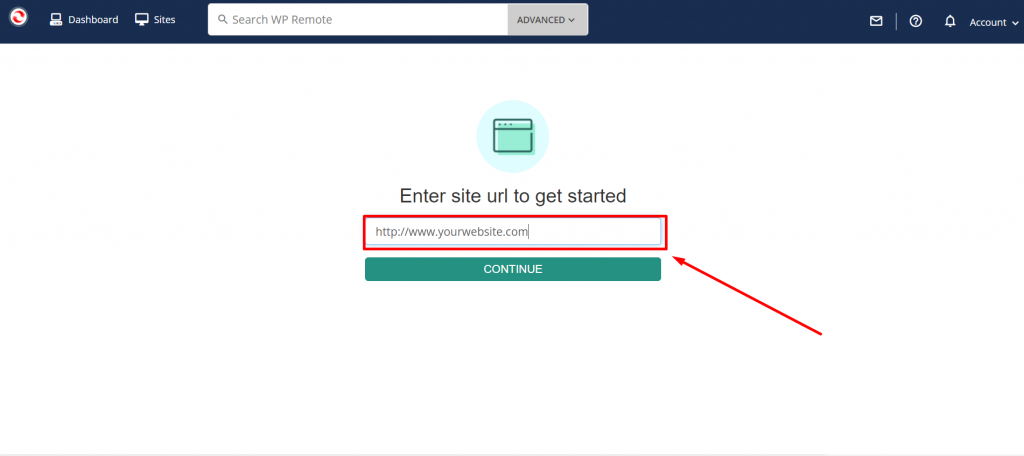
When you click on the continue button, you will be asked to verify your website either by using any of the following methods:
- Install WP remote automatically using your WP login details.
- Download WP remote to install it manually via WP admin panel.
- Via test Plugin
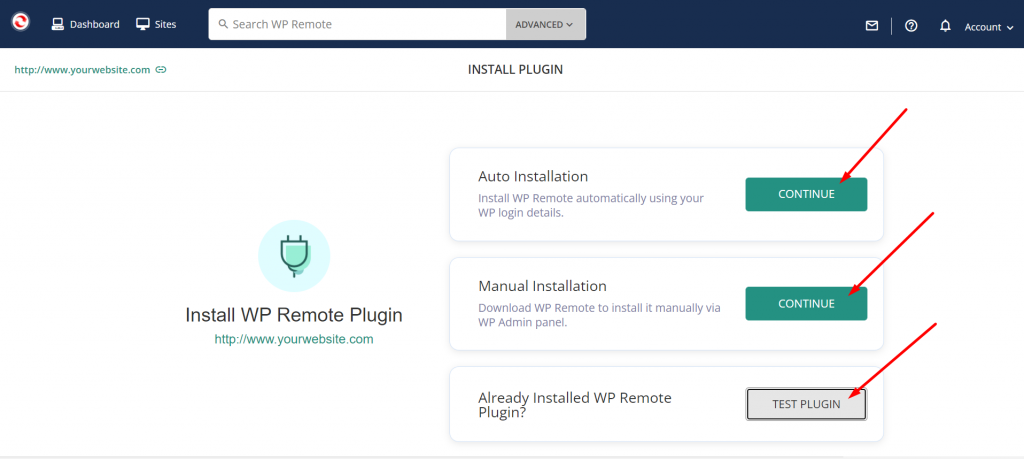
You choose any of the three methods to connect your website and after successfully adding the website, return to the WP Remote dashboard and similarly add multiple sites if you want.
WPremote WordPress review and ratings
We checked WP remote customer reviews on WordPress Directory and have been pushing and found the following results for its latest version, 4.64.
- It has 20,000 + active installations right now.
- For us, it shows that it was updated 4 months ago. [ regularly updating ]
- It has been currently tested up to WordPress 5.8.2.
- According to the WordPress Directory, its average rating is 4.3/5. 35 users out of 44 gave it 5 stars.

WP remote – WPOven Review
WP remote Review
Summary
We have rated WP remote 4.4 stars out of 5, for its simplicity, clean, and easy to use interface. The amazing thing we found about this plugin is, it gives you features that are free even other tools would charge you for that. We found this tool would be best for normal bloggers who like to manage multiple websites without any restriction and without paying any fees. But if you like to experience the whole features you need to pay for the premium which is I found quite pricy.
Collecting all the points, we highly recommend this tool to those who have a tight budget and want to manage multiple websites, without any restrictions.
4. Infinite WP
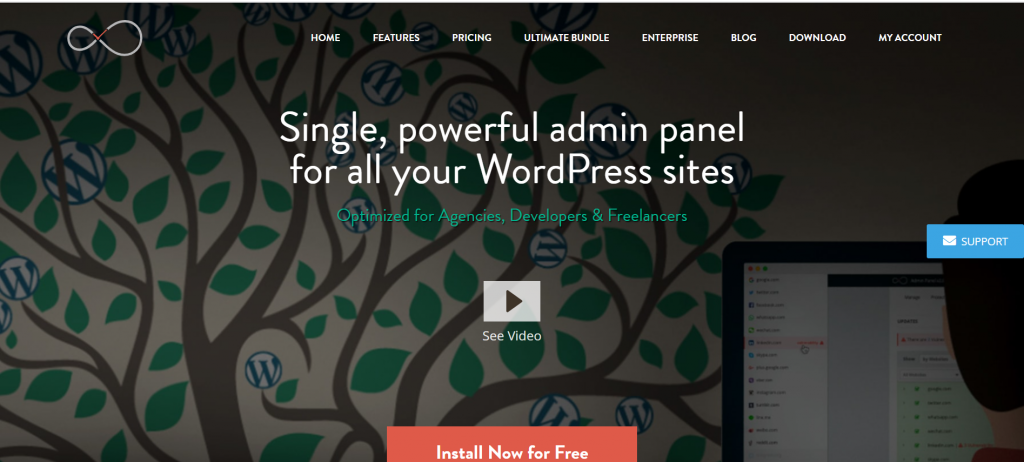
InfiniteWP is one of the most powerful and featureful WordPress management tools specially developed for Agencies, freelancers, and developers. They have both free as well as premium versions available to cover the majority of the users and provide all the basic features in their free plans but restricted to managing core updates, plugins,s and theme updates.
However, the real power and feature you can only experience when you upgrade to their premium plans, where some amazing and powerful features will be unlocked such as offsite migration, staging environment, uptime monitoring, monitoring and malware scan, 2-factor authentication, and many more.
Some key features fo Infinite WP
- Single click admin access
- Single click software, plugin and theme updates
- Easy Backup all websites in a single click
- Installation, migration and Staging of WordPress
- Protect your website from threats and malware by regular scanning
- Uptime Monitoring
- Comprehensive Client reporting and many more.
Some Pros and cons of Infinite WP
Pros
- Core features are Free
- No problem while updating
- Option to Backup files
- Can easily manage all wordpress websites from a single dashboard
Cons
- Expensive premium add-ons
- History of security issues
Infinite WP pricing
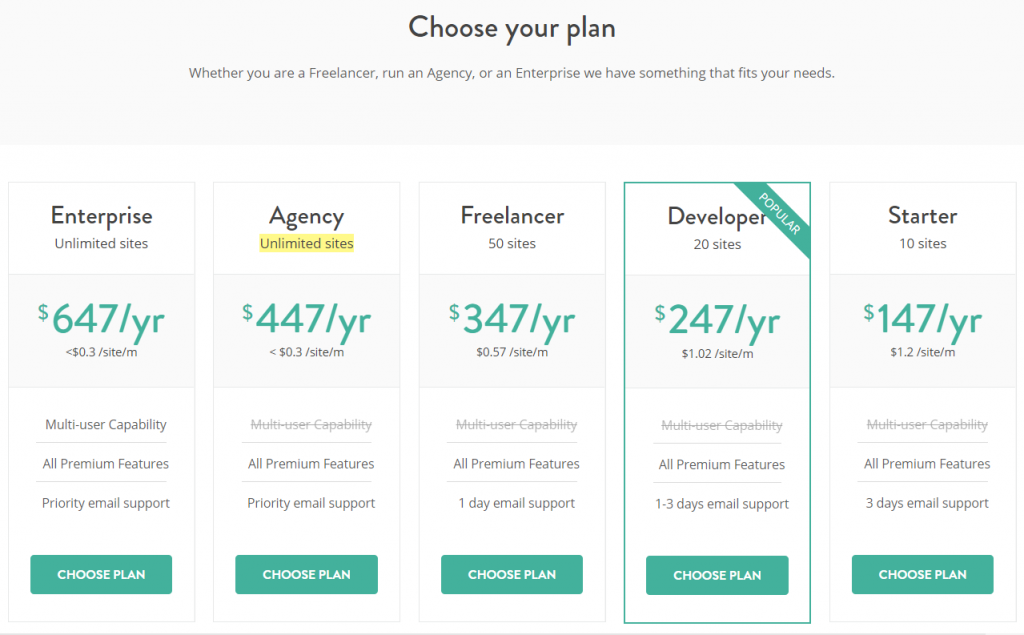
Like the above two tools, infinite WP has also a Free version available with basic core features. But to use its complete power, you need to upgrade to their premium plans starting at $147 per year to $647 per year.
How do the Infinite WP setup look like?
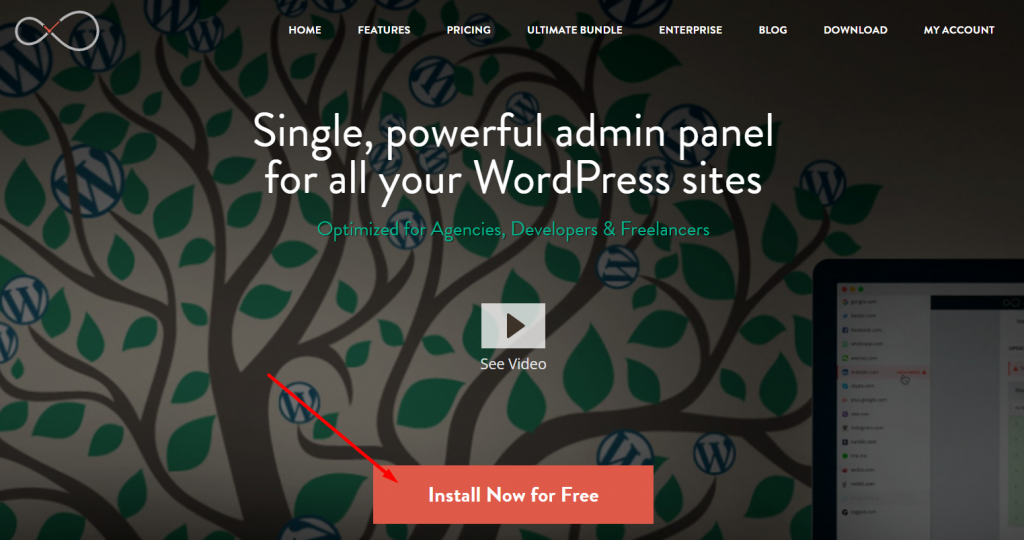
The installation and step-up of Infinite WP is easy but has more steps than any other WordPress management tool. The first thing you need to do is to go to the Infinite WP website, and click on the “Install now for Free button”.
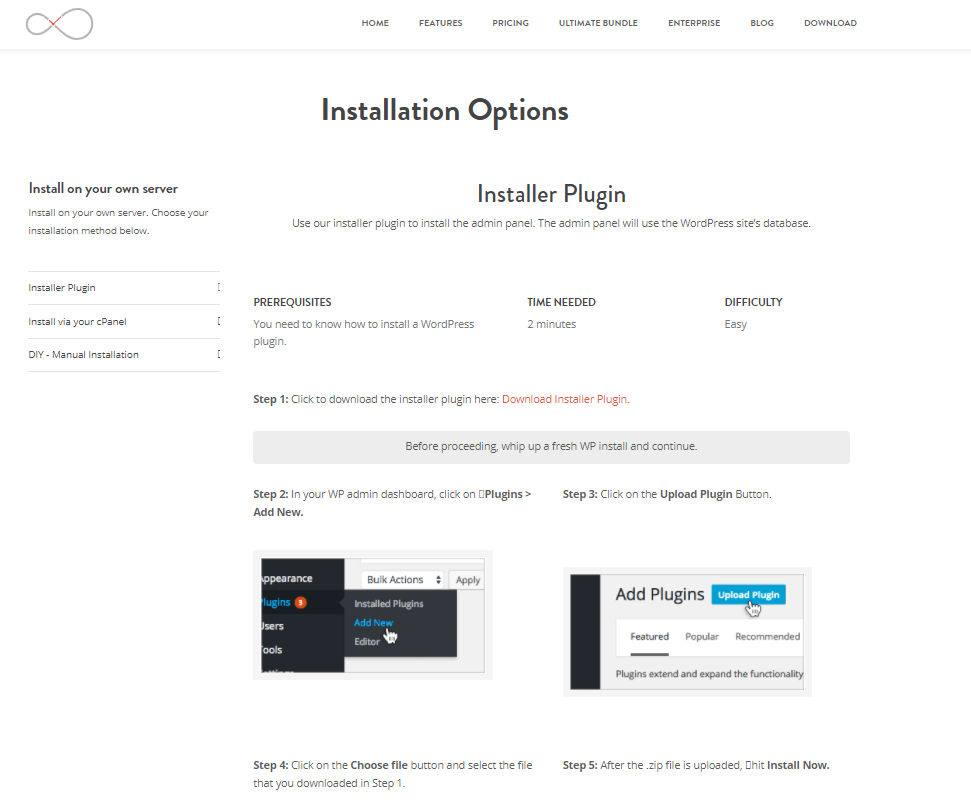
The page will be redirected to the setup page where you will be guided, how to download and upload the Infinite WP plugin on your WordPress website.
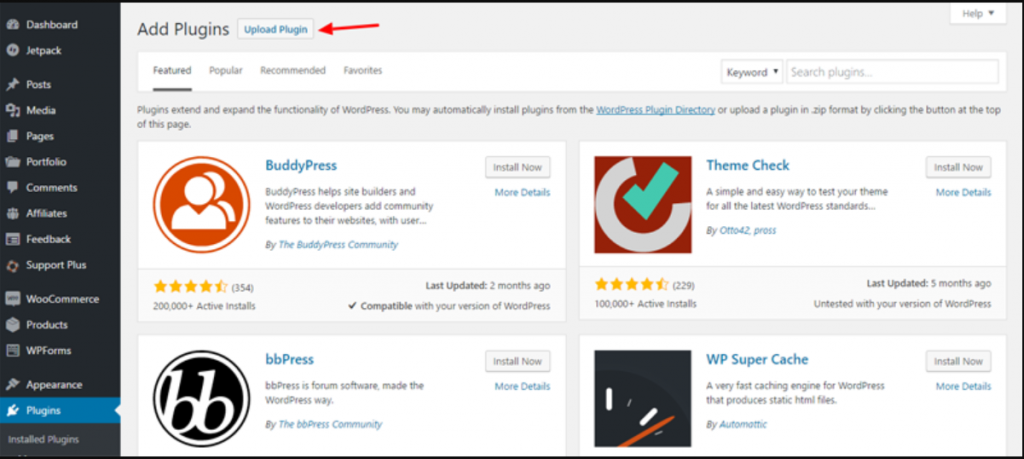
After downloading the plugin, if you are first time uploading and installing a plugin, you need to first login to your WordPress admin dashboard > Plugins > Add new > Upload Plugin.
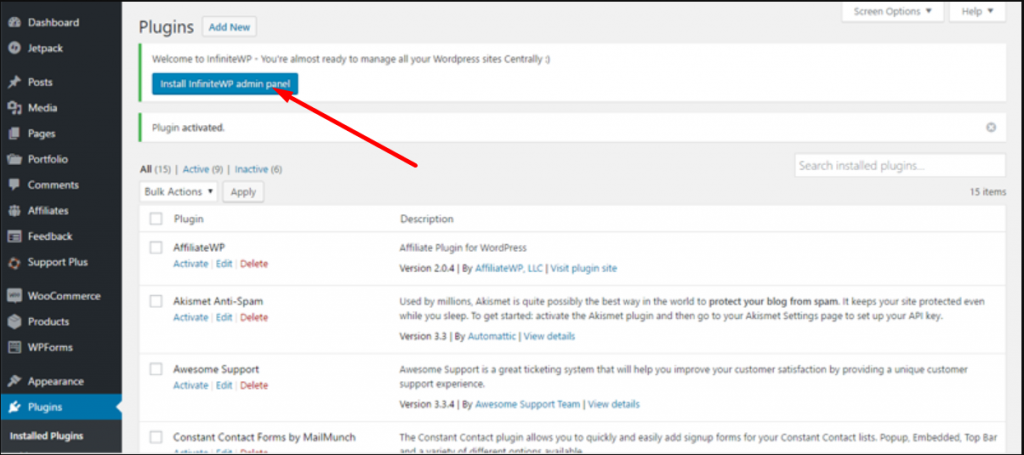
After uploading, installing, and activating the plugin, you will find a button to install the InfiniteWP admin panel as shown in the picture below:
Now the next step is to select a folder in which you are going to install the infiniteWP admin panel. But one thing you must keep in mind while selecting a folder, the folder should be new or if you use an existing one the contents present in it will be overwritten. For your safety, it is better to choose the default IWP folder and proceed to the “Download & Install” button. However, you can also click on the check box to delete the plugin after installing the Admin Panel.

Now after installing the IWP admin panel, the next steps are simple
- Accept the license agreement
- Confirm Database Details
- Create login credentials
and you are done.
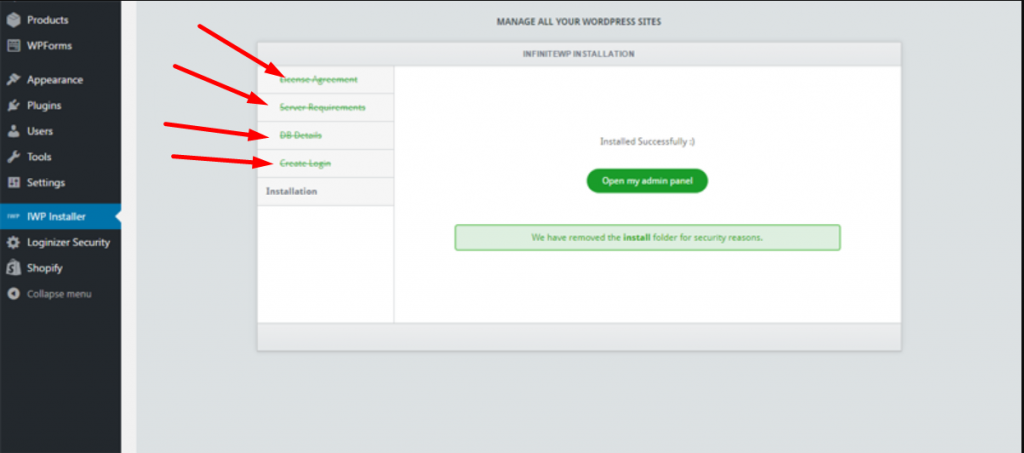
Now click on the ” Open my admin panel” shown with the green button and login with your credentials that you have newly created and you are ready to go.
Infinite WP- WPOven Opinion
Infinite WP Review
Summary
No doubt InfiniteWP is so much powerful tool to manage multiple WordPress sites. Saved our time and a lot of effort than ever and easy to manage all the websites from the tip of our fingers on the single dashboard. Overall the plugin is amazing and highly recommended for professionals and users who can pay the premium.
The only downside I found about this tool is their expensive pricing, they need to work on it and lower their plans so that majority of people can be able to use this powerful tool.
5. MainWP
MainWP is another free tool available on the internet that is popular to manage multiple wordpress sites. Unlike others, this management tool lets you manage websites with the help of an admin plugin that needs to be installed on a separate WordPress site.
It is bundled with features like regular monitoring, update management, security by Sucuri, and many more. It comes with support from some popular WordPress plugins that increase its functionality. The unique feature of this tool is that it lets you configure and tweak in a .htaccess file, error logs, and a lot of other features.
Some key Features of Main WP
- Single click access to all websites
- Regular scanning and monitoring
- Plugin and Theme management
- All plugin, software or theme update in bulk
- Complete Content management
- Complete Users management in bulk and many more.
Pros and cons of Main WP
Pros
- Provide a complete package of features
- Free with lifetime access
- Open source and can be customized
- White Labeling
Cons
- Excruciating setup and configuring extensions
- Does not support Shared hosting
- load on Server
Main WP pricing
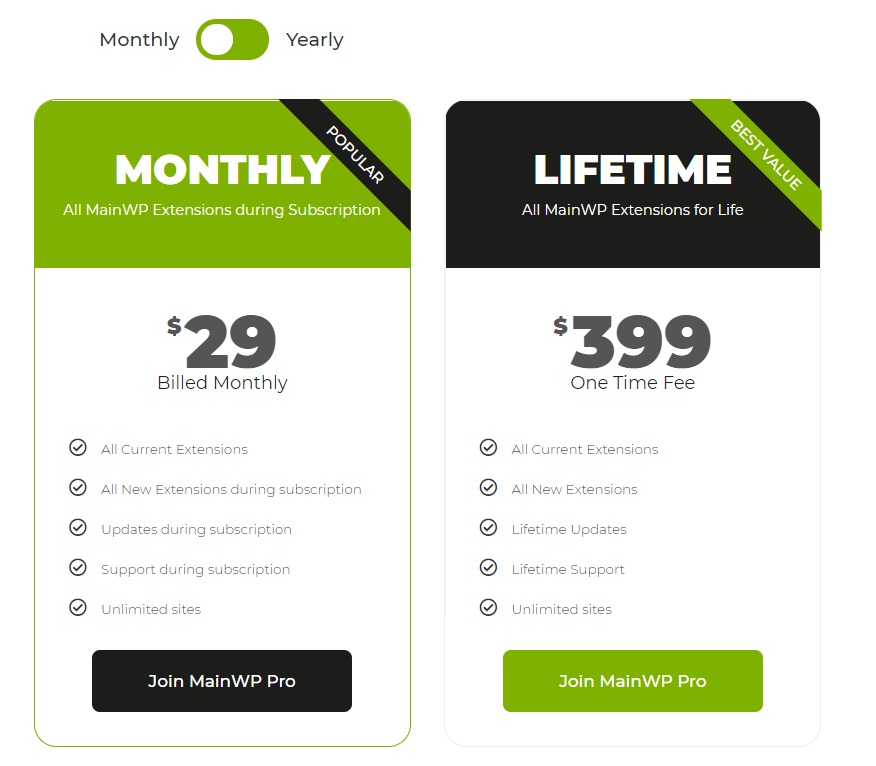
MainWP is an open-source tool hence, its core software is free. But to enjoy their more features you need to pay for their premium add-ons and a pro version is also available whose pricing starts at $29 per month as well as a one-time payment of $399.
How do the Main WP installation and setup look like?
To start the installation and setup process first you need to understand some basic things about this MainWP tool.
The MainWP has two types of plugins
- MainWP Dashboard: Need to bed installed on the main website from where you would like to control all the other connected wordpress sites.
- MainWP Child: Need to be installed on other website other than control room website to make the connection to each other
Before hopping into the setup process, one thing you must make sure that you must install the MainWP dashboard plugin only on the WordPress website which is not used for any other purpose. would suggest installing it on a WordPress website, which you will not use for any other purpose, and keep it alone.
Now the first thing you need to do, log in to your WordPress admin dashboard > plugins > Add New > “MainWP Dashboard” > install > Activate. After successfully activating the plugin, you need to start configuring the plugin to start the setup process.
The configuration page of the plugin is shown below:
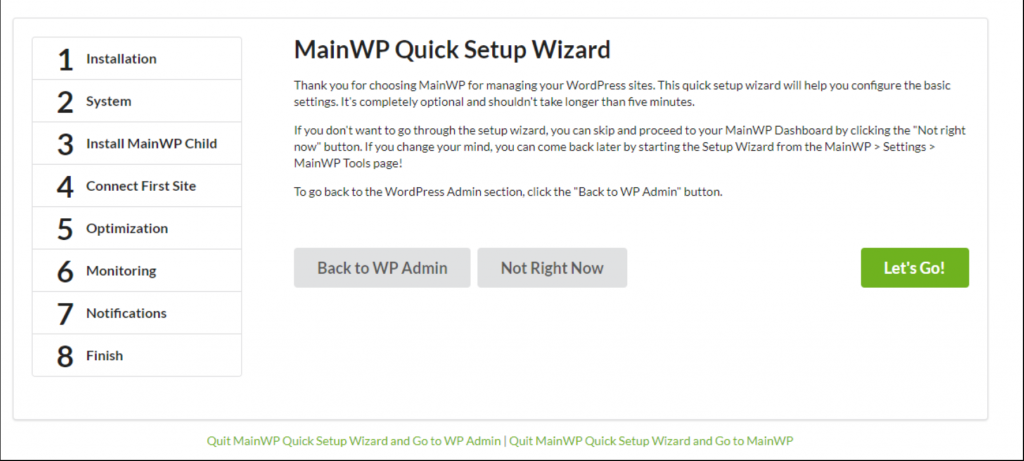
Click on the “Let’s Go!” button to begin the process.
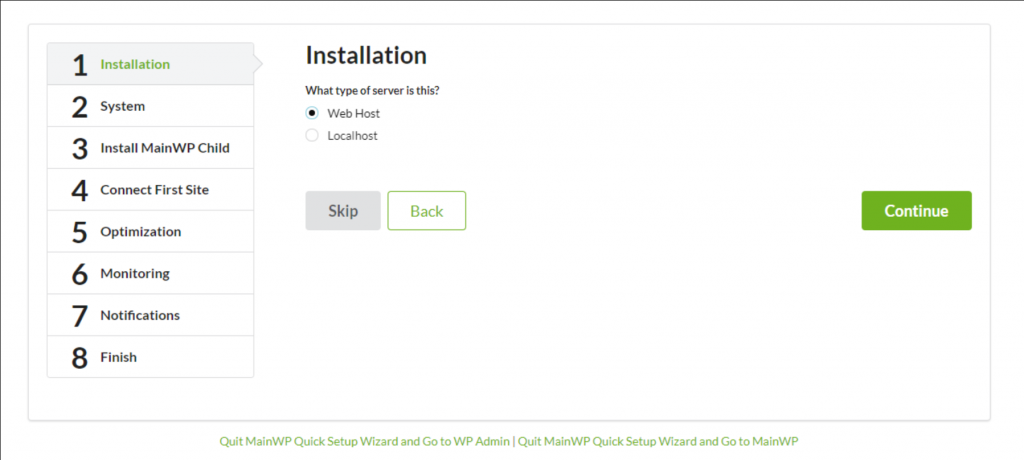
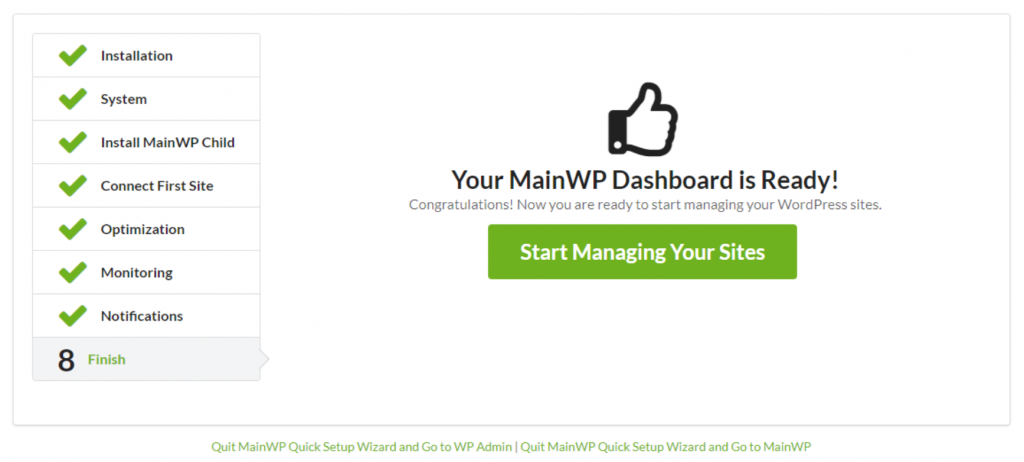
The first step is Installation, and in this step, you need to choose Web Host if your website is hosted on a Cloud Webhosting provider (WPOven).
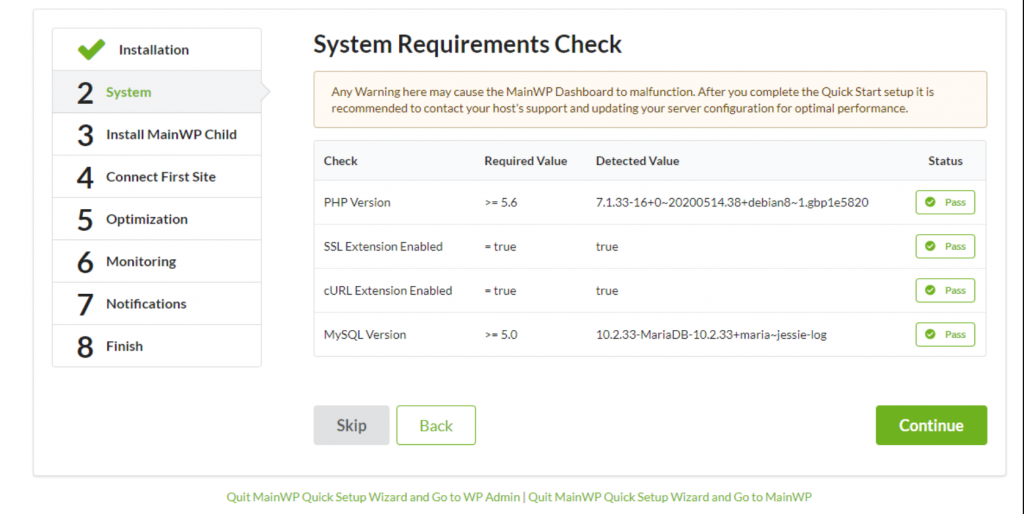
The second step is System, the plugin performs a system checkup to detect if the criteria required by MainWP Dashboard are fulfilled by the web hosting provider or not. If everything works correctly it will look like the picture given below.
The third step is to Install MainWP child, as we have mentioned earlier that, you need to install this plugin to a wordpress site which has to be connected with the control room/MainWP dashboard.
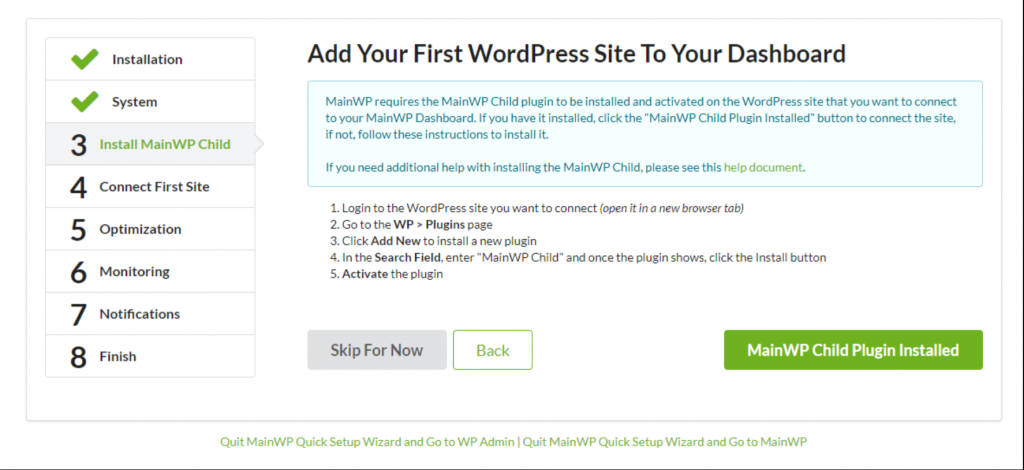
Now, you need to log into your other websites to which you would like to connect and install the MainWP child plugin.
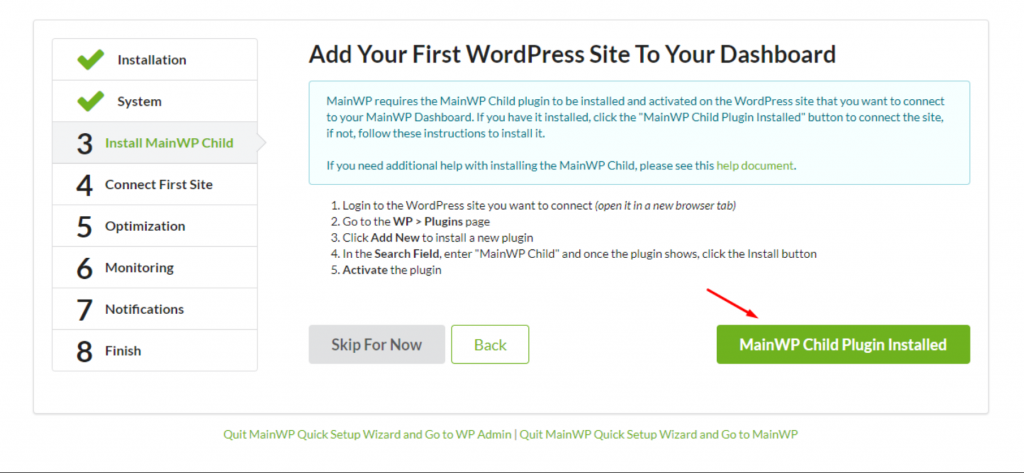
Then go back to your control room website and click on the MainWP child plugin Installed button as shown below:
The next step is to Connect your first child site with the main WP Dashboard. You need to provide the required details such as the URL of the site which you want to connect, the Admin username of that particular website, etc.
Now, it’s time to connect my Website 2 with this MainWP Dashboard. Enter the required details and click Connect Site.
If the required details are correct, you will get a success message like below.
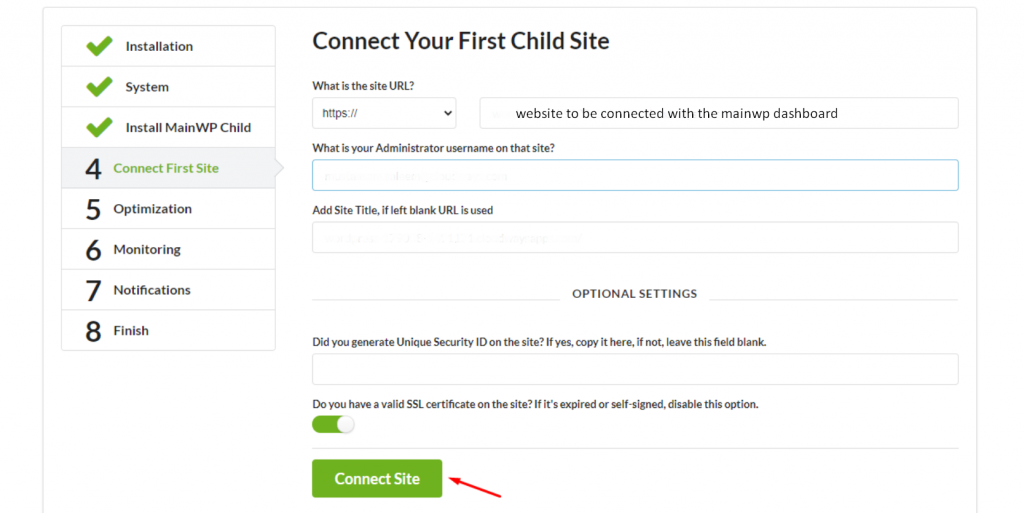
Now click on the Connect site button to connect the website, if everything goes well a message will appear showing a successful message.
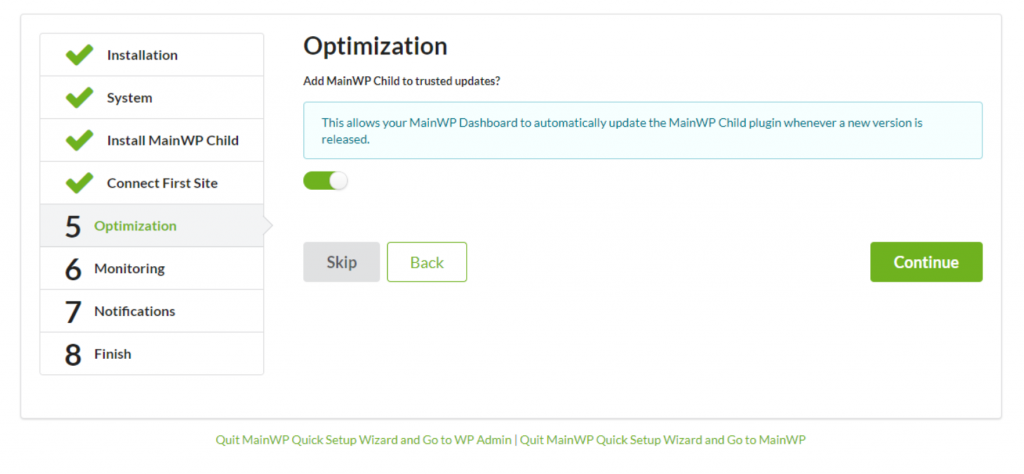
Next is Optimization, In this step, you need to allow your MainWP dashboard to automatically update the MainWP child plugin whenever a new version is released. Enable this option and click on the continue button to proceed.
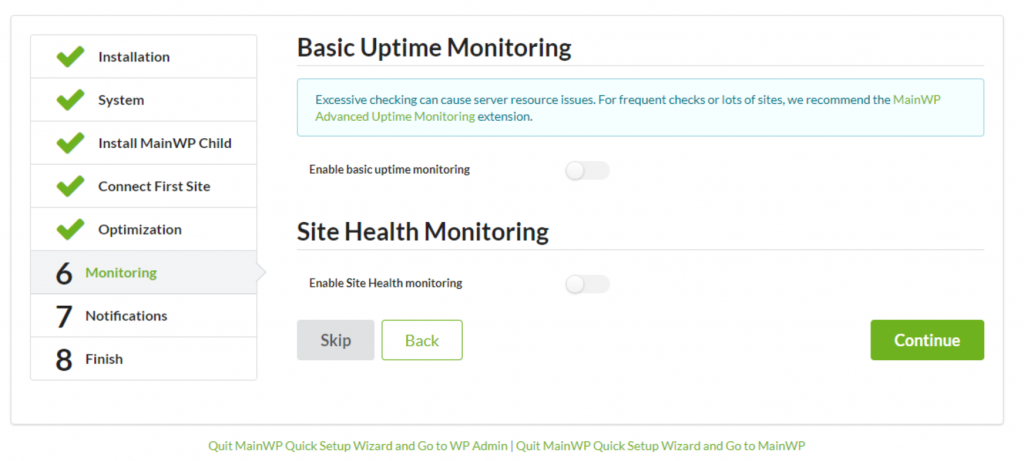
6th step is Monitoring, with MainWP you can either enable or disable it for uptime monitoring and your website health check.
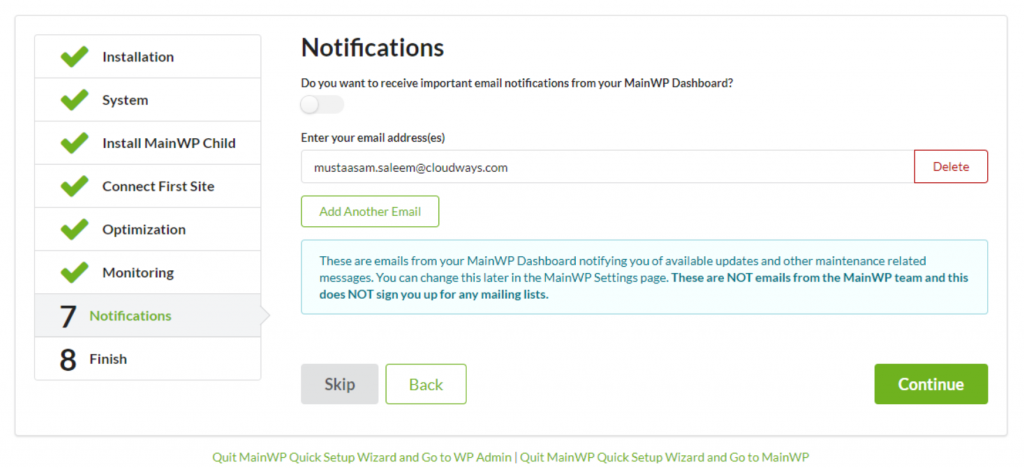
7th is Notifications, The MainWP tools keep checking up all the available updates or all the website-related messages and collect email addresses to notify the user.
Now the final and last step is “Finish“. Now you are done with all the previous settings and configurations for the MainWP dashboard. It is time to click on the “Start Managing your sites” button to end the installation and begin managing websites.
MainWP- Wpoven Opinion
MainWP review
Summary
We give MainWP an overall rating of 4. Though, the plugin is incredibly amazing, with most of the features are available in the free core software. The only downside we found that its long setup and installation process. This is their only drawback which can be excruciating for any beginner.
Whereas other areas, such as support, pricing, and ease of use are excellent. We didn’t find any issue with those areas. We can recommend this tool only if you have patience enough to complete the setup process, but once you are done it becomes worthy enough.
6. ithemes Sync
iThemes Sync is another Management tool that possesses powerful features to manage multiple WordPress Sites. This tool is also available Free like other tools that we have already mentioned in this blog, but its free version is limited to only 10 sites. Although the free plan provides some of the basic features such as managing wordpress updates right from the single dashboard. However, you also have the option to upload or install themes and plugins to the websites. But its powerful features only get unlocked when you choose their premium plans, that include, uptime monitoring, user management, security, Integration with google search console, and many more.
Some key features of ithemes Sync
- Install Themes or plugins in bulk
- Maintenance reports
- Usermanagemet
- Two Factor authentication
- Uptime monitoring
- Complete WordPress updates management
- Premium plugins integration
Some Pros and Cons of iThemes Sync
Pros
- Install or upload plugins and themes in bulk
- Dashboard for clients
- A comprehensive set of features
- Free as well as the premium version available
Cons
- Sometimes need to edit the .htaccess file
- Interaction issues with certain web hosting providers
- Can potentially break your website, since it is a security tool.
iThemes Sync plans and pricing
iThemes sync comes with both free as well as premium versions. You can easily download and install the free version directly from the WordPress directory. For the premium version, you need to buy their plan starting from $6.99 per month and going up to $69.99 per month.

How do the iTheme security installation and setup look like?
To begin the iTheme security installation process, the first thing you need to do is to create an account and choose whichever plan suits you. After that, you will be able to Download the iThemes sync plugin from the website and upload it on your wordpress website.
To upload the downloaded plugin, Go to your WordPress Dashboard> Plugins > add new > Upload > Install > activate.
After successfully activating the plugin, the first thing you need to enable the iThemes licensing for which you have already bought. Go to the ithemes settings > iThemes Licensing followed by proving the website address that you like to add and manage on your iThemes account.

Following by providing your iThemes username and password, will help you to receive updates from the tool iThemes sync automatically.

After that, you need to go again IThemes sync settings page and provide your iThemes Username and password.

After providing username and password, click on the “Sync” button and your WordPress site will be connected to iThemes Sync successfully.
You will be acknowledged by a message stating ” Woohoo! Your Site has been synced”.
You’ll see a ‘Go Manage Your Synced Sites’ button that will take you to the iThemes website where you can manage this site.
You will need to repeat the same process on all WordPress sites that you want to manage from one dashboard.
You can sign in to your iThemes account to see all the sites you have added by clicking on the Sync option and managing them from right there.
iThemes Sync – WPOven Opinion
iThemes Sync Review
Summary
Like other management tools, ithemes are also able to deliver almost all the features does a user may be required to manage multiple WordPress sites. And for beginners, it provides some of the basic features in their free version. Overall the plugin was working great during our test and didn’t find any major issues that become a major concern.
There are some areas where we think that it can be improved such as its setup process and customer support.
These are the top 5 management tools we found the best suitable management tools on the internet that you must try and manage your multiple wordpress sites. However, the option is limitless on the market, and to run tests and cover each of the management tools on the internet would be not possible. Hence, we handpicked some of the best available tools in the market that has been used by the majority of the users, and they have also gotten satisfactory results.
Summary
To manage multiple WordPress Sites is no longer a hectic task especially for WordPress sites. There are multiple tools are available on the internet that helps you out to overcome this situation and make your work easy. But the only concern is which management tool you must choose, that fits your budget as well as fulfill your requirements.
From the above top 5 plugins which one you should pick? For your convenience, we provide you with pickup points that decide which one is the right tool for you.
- ManageWP- Best for Agencies who like to handle multiple projects for multiple clients.
- WPremote– Available completely free, best suitable for beginners who dont like to spend money at the beginning.
- infinite WP- Flexible, full of features and easy to use. Best suitable for freelancers, developers and agencies.
- Main WP- Best suitablt for developers and freelancers
- iThemes Sync- Best suitable for basic website management.
We hope, this post regarding Management tools that help you to Manage Multiple WordPress sites, help you out to narrow down your search for the best management tools around the internet. If you find anything missing that is worth to mention or you would like to share your experience with a particular management tool, please do let us know in the comment section below. We love to hear from you guys!
Frequently Asked Questions
How do I manage multiple WordPress sites?
There are thousands of management tools are available on the internet with the help of which you can easily manage multiple WordPress sites from a single dashboard:
1. ManageWP
2. WPremote
3. Infinite WP
4. Main WP
5. iThemes Sync
Can you have multiple sites on WordPress?
In short yes, you can have multiple sites on WordPress. This can be possible due to WordPress’s built in feature called WordPress multisite, through which you will be able to run multiple sites on a single WordPress Dashboard.
Can I add another site to my WordPress account?
Yes you can easily add more than one WordPress site to your WordPress account. Doing this, you will be able to manage multiple websites through single login credentials. And you can easily switch to another account with a single click provided you with an option of Switch site just located under My sites section.

Rahul Kumar is a web enthusiast, and content strategist specializing in WordPress & web hosting. With years of experience and a commitment to staying up-to-date with industry trends, he creates effective online strategies that drive traffic, boosts engagement, and increase conversions. Rahul’s attention to detail and ability to craft compelling content makes him a valuable asset to any brand looking to improve its online presence.

