What is the “ERR_CONNECTION_TIMED_OUT” Error?
The “ERR_CONNECTION_TIMED_OUT” means there is something wrong with your network connection or the browser could not establish a connection with the desired website.
This error typically indicates underlying issues that prevent the browser from reaching the server hosting the website. However, this is not always the case. The ERR_CONNECTION_TIMED_OUT error can be triggered by a variety of other reasons as well, which we will discuss in later sections of this blog.
According to WordPress’s official documentation, the ERR_CONNECTION_TIMED_OUT error can occur due to server overload. This means that if you overload your server with too many requests or if the server is trying to handle more than its capacity, the error can be triggered. This is particularly common in shared hosting environments where resources are limited and shared among multiple users.
Another scenario where the error can occur is when the server takes too long to respond, exceeding a specific time limit (e.g., 30 seconds). In such cases, the browser terminates the connection, resulting in the ERR_CONNECTION_TIMED_OUT error.
It is worth mentioning that this error can appear in different variations depending on the web browser, web server, and operating system being used. However, regardless of the variation, the underlying meaning remains the same. For instance, you may encounter variations like Err_connection_closed or Err_connection_refused errors. Fortunately, both of these errors can be resolved using the same troubleshooting methods.
How to fix err_connection_timed_out Error?
Now, let’s explore some troubleshooting methods to resolve the “ERR_CONNECTION_TIMED_OUT” error. However, before we dive into the solutions, it’s important to acknowledge the frustration and confusion that can arise when encountering this error.
Typically, these types of errors originate from the client side, which may include network issues, firewall restrictions, or problems with the browser. However, it’s also worth considering that the error can be triggered due to server-related issues.
Let’s begin by examining the troubleshooting steps for resolving the error from the client side.
- Check Your Network connection
- Temporarily disable your Firewall and Antivirus installation
- Clear your Browser Data
- Change DNS Settings
- Flush and Renew DNS
- Check Proxy Settings
- Change DNS servers
- Inspect the hosts file
- Increase the memory limit
- Check out the maximum Execution time
- Temporarily Disable your Plugins
Read: 🚩 How to Fix HTTP 504 Gateway Timeout Error?
1. Check Your Network connection
When you encounter the “ERR_CONNECTION_TIMED_OUT” error message on your screen, the first and most crucial step is to check if your internet connection is functioning properly. This error typically appears when there are sudden drops in internet connectivity or if the connection is unstable, resulting in the error being displayed in your Chrome browser.
There can be various reasons behind a sudden drop in internet connection, such as a cable being unplugged, loose connection ports, a faulty router, or weak signal strength.
To troubleshoot this issue, start by trying to access the internet using an alternate device like your smartphone, desktop, or laptop to see if you can establish a connection. If you are still unable to access the internet, check if your router is working correctly and verify the power supply and configuration settings. Additionally, ensure that your internet cable is intact and the connection ports are secure.
2. Temporarily disable your Firewall and Antivirus installation
Another common reason for encountering the “ERR_CONNECTION_TIMED_OUT” error is when your antivirus software or firewall settings are too aggressive.
To safeguard your system from malware and cyber-attacks, your firewall might be blocking the website you are trying to access, resulting in the error message appearing on your Chrome browser.
To identify the underlying cause, you can temporarily disable your antivirus software or firewall for a short period and observe if the problem is resolved. If disabling them resolves the issue, you may need to reset your computer’s firewall settings or consider using an alternative antivirus program.
Now, let’s take a look at how you can temporarily disable the firewall on both Windows and macOS operating systems, allowing you to troubleshoot and potentially resolve the “ERR_CONNECTION_TIMED_OUT” error.
For Windows Computers
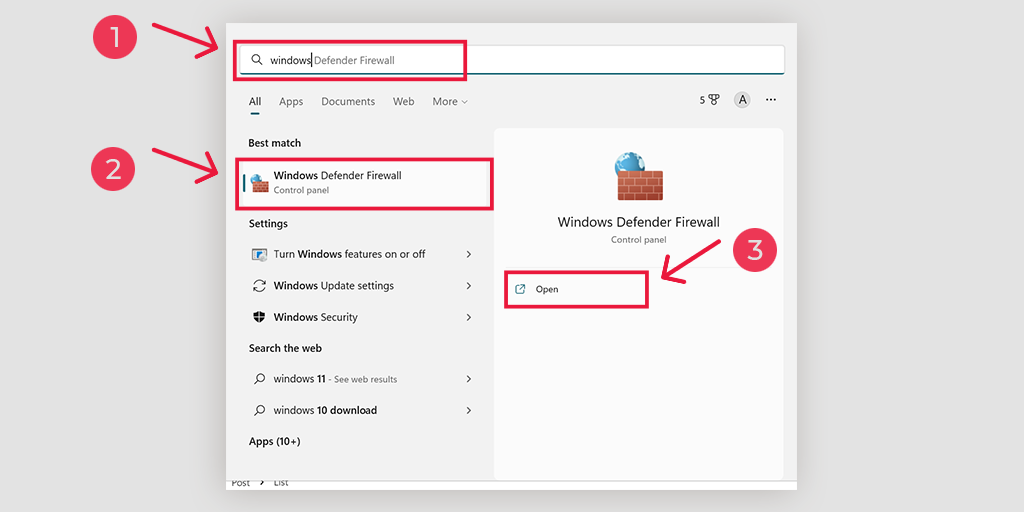
Go to Windows and the start button located at the extreme left-bottom corner of your screen, and type “Windows Defender Firewall” to search.
Now, click on the Windows Defender Firewall as shown in the picture, and a Windows Defender Firewall window will pop up, where you can find different options.
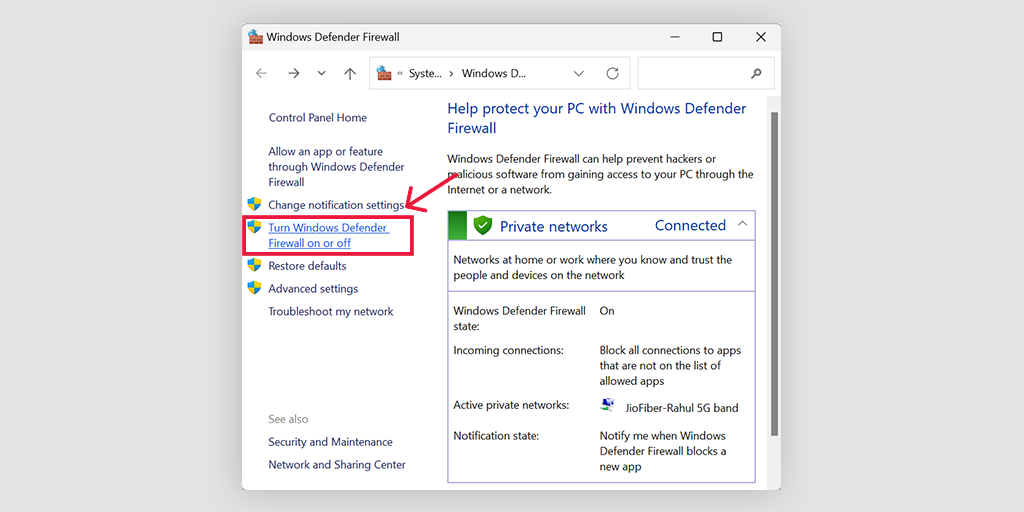
Select “Turn Windows Defender Firewall on or off“.
For macOS
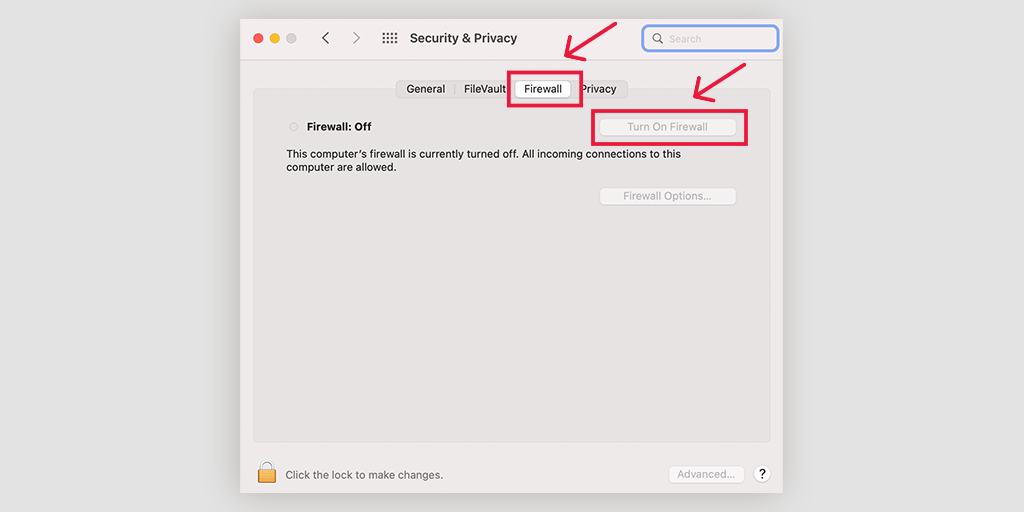
In macOS devices, you need to Open the Security and Privacy section in your system preference settings.
3. Clear your Browser Data
To make your browsing experience faster and smoother, your Chrome browser saves some website files as cache memory. But if something goes wrong and this cache memory gets corrupted, it can cause errors like “ERR_CONNECTION_TIMED_OUT” in WordPress.
Go to your Chrome Browser > Settings > Privacy and Security > Clear browsing data > You can uncheck the Browsing History and let cookies and other site data, as well as cache images, be checked > Clear data.
Alternatively, you can directly enter this address into your Chrome browser: chrome://settings/privacy. It will take you to the privacy settings where you can click on “Clear browsing data”.
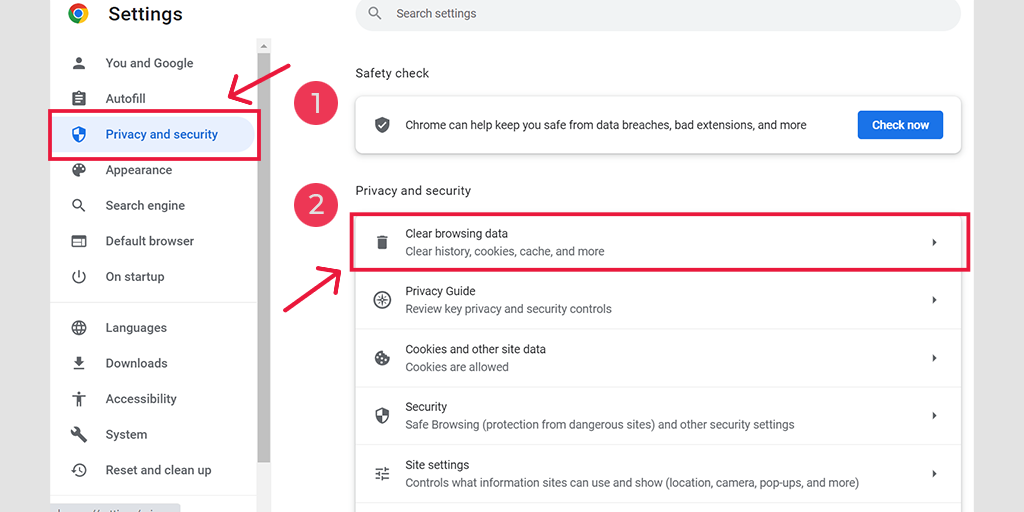
In the pop-up window, you will see plenty of other options, but you have to choose as follows:
- Select the time range as “All time”.
- Select cookies and other site data as well as Cache images (you can also select browsing history)
- Click on the Clear Data button.
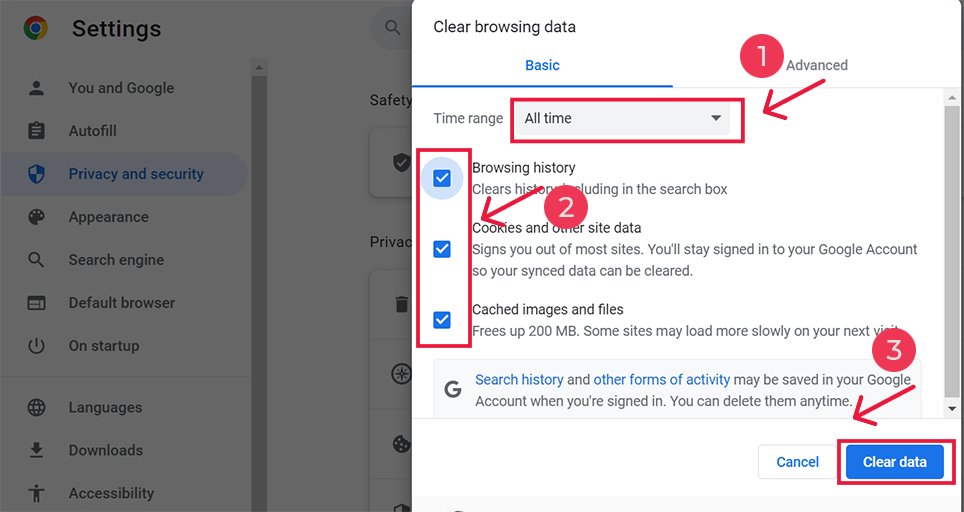
By following these steps, you can clear the cache memory and fix issues like “ERR_CONNECTION_CLOSED” in WordPress. Remember to clear your browsing history from time to time to keep your browsing experience smooth.
4. Change DNS Settings
When you encounter the “err_connection_closed” issue, it might be worth considering changing your DNS (Domain Name System) server temporarily. Typically, your ISP (Internet Service Provider) provides the DNS server addresses, but you can switch to other options during troubleshooting. Two popular and reliable public DNS domains are Google’s Public DNS and Cloudflare.
Using these free DNS servers can often help resolve the “err_connection_closed” problem. Switching to Google or Cloudflare servers has proven effective for many users. To make this change, follow the steps below based on your operating system (O/S):
For Err_Connection_Timed_out Windows 10 and 11 fix
Opening Up the Control Panel, by typing the same in the run command box
Clicking on the Network and Internet option will open up loads of other options.
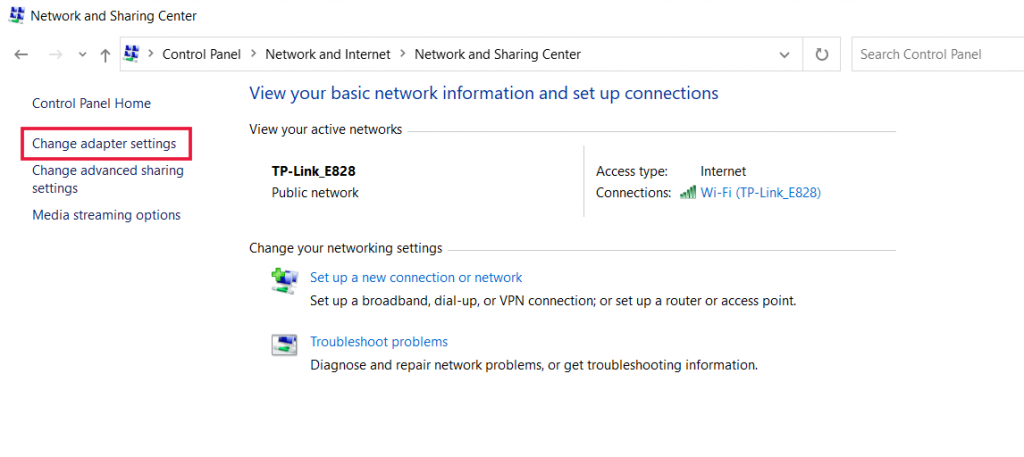
Next, click on the “Change Adapter Settings” option, this will show the current network connections.
Following the process, click on the properties option, under the Local Area Connection options, which comes for wired connections. For a wireless connection, click on the Wireless Network Connection options.
The next option involves displaying the IP version box. On clicking the same, a box will open to change the preferred DNS server and alternate DNS servers as well. For users with IPv4, the Google DNS is 8.8.8.8 and 8.8.4.4 respectively.
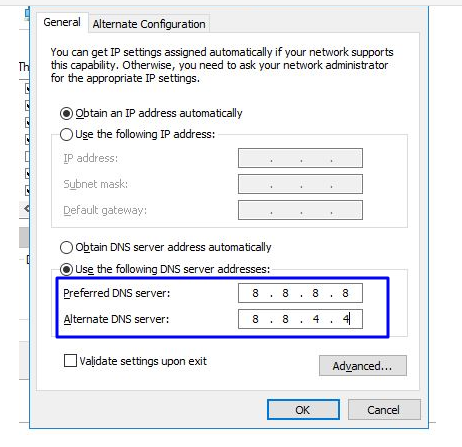
In the end, restart the browser to see the change.
For MAC Users
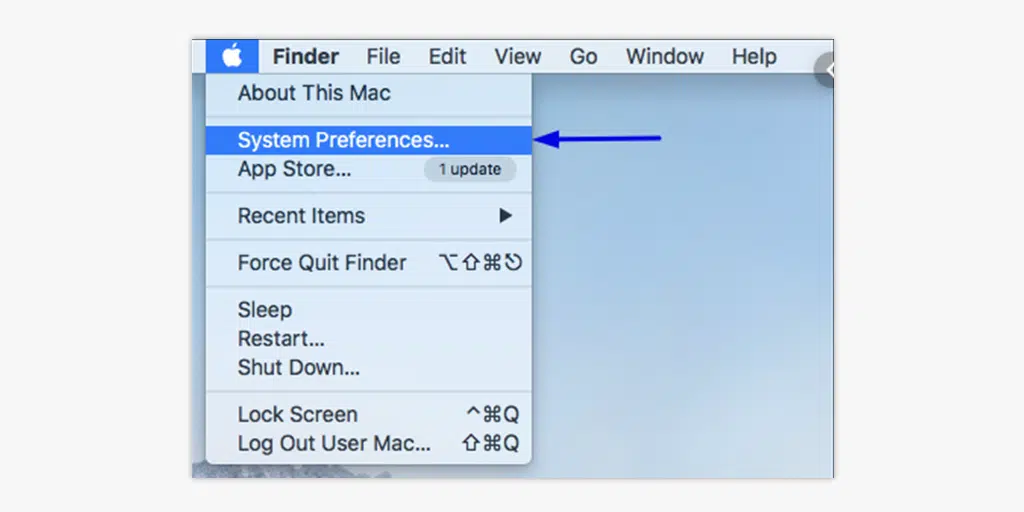
Step 1: Open the System Preference bar, situated on the top left of the screen.
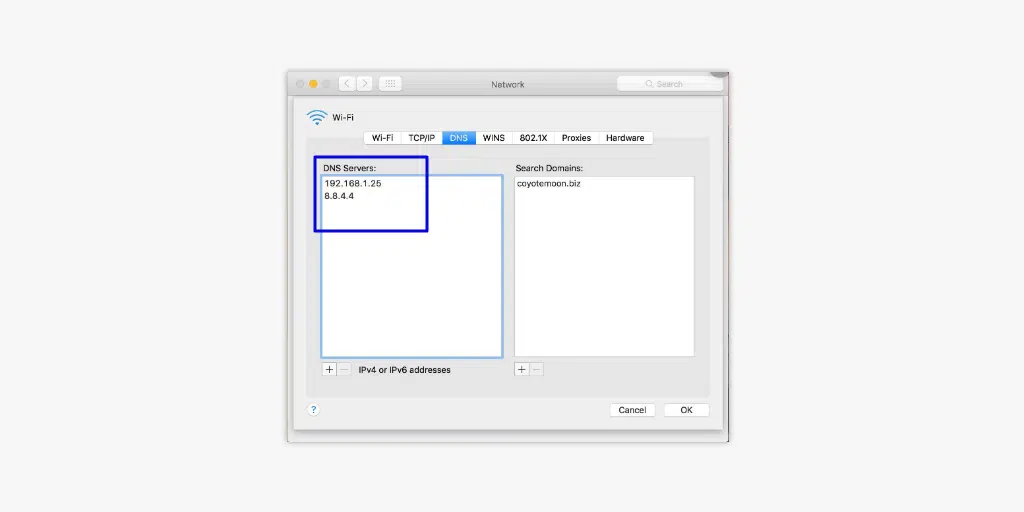
Step 2: In the following step, click on the advanced options to open up the page containing DNS server addresses
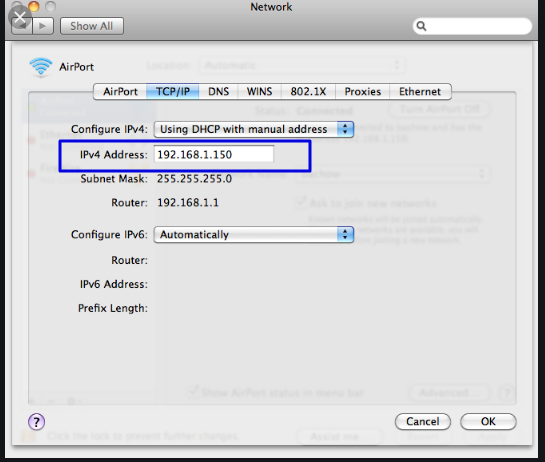
Step 3: In the final step, adding the IPv4 DNS address from Cloudflare, 1.1.1.1, and 1.0.0.1 will complete the setup.
5. Flush and Renew DNS
An outdated DNS cache can sometimes lead to network issues, such as the “ERR_CONNECTION_TIMED_OUT” error. To fix this problem, you can flush your DNS to reset it and get everything back to normal.
For Windows 10 and Windows 11 users:
Step 1: Open the Run command by pressing the Windows key and R. Alternatively, you can search for it in the Start menu.
Step 2: Type “cmd” and hit Enter to open the Command Prompt.
![How to fix the DNS_PROBE_STARTED Error? [8 Ways] 13 Opening Command Prompt in Windows](https://www.wpoven.com/blog/wp-content/uploads/2023/03/6.png)
Step 3: Once the Command Prompt window is open, type “ipconfig/release” to release your current IP address.
![How to fix the DNS_PROBE_STARTED Error? [8 Ways] 14 Using Ipconfig command on CMD](https://www.wpoven.com/blog/wp-content/uploads/2023/02/ipconfig-release.png)
Step 4: Next, type “ipconfig/flushdns” to release the DNS cache.
Step 5: Type “ipconfig /renew” to obtain a new IP address.
![How to fix the DNS_PROBE_STARTED Error? [8 Ways] 15 ipconfig renew](https://www.wpoven.com/blog/wp-content/uploads/2023/02/ipconfig-renew.png)
Step 6: Type “netsh int ip set dns” and hit Enter to reset your IP settings.
Step 7: Finally, type “netsh winsock reset” to restore the Winsock Catalog.
![How to fix the DNS_PROBE_STARTED Error? [8 Ways] 16 netsh winsock reset](https://www.wpoven.com/blog/wp-content/uploads/2023/02/netsh-winsock-reset.png)
Step 8: After completing these steps, restart your computer to ensure the changes take effect.
Read: 🚩 What is a DNS? and How it Works?
6. Check Proxy Settings
If you are using a proxy server or VPN, it’s important to know that if they are not set up correctly, they can sometimes cause the “ERR_CONNECTION_TIMED_OUT” error. Proxy servers and VPNs are used to stay anonymous while browsing the internet, but they can also complicate things and lead to this error.
To troubleshoot, try disabling the proxy server or VPN temporarily and see if the error goes away in your Chrome browser. If everything works fine without them, then you know that they were causing the issue.
If you are using VPN software, you can disable it by changing its settings. If you have a Chrome extension for a proxy server, simply go to Chrome > Settings > Extensions and disable it there.
By following these steps, you can find out if the misconfigured proxy server or VPN was the reason behind the “ERR_CONNECTION_TIMED_OUT” error and take the necessary actions to fix it.
Remember to enable these tools properly once the error is resolved to maintain privacy and security.
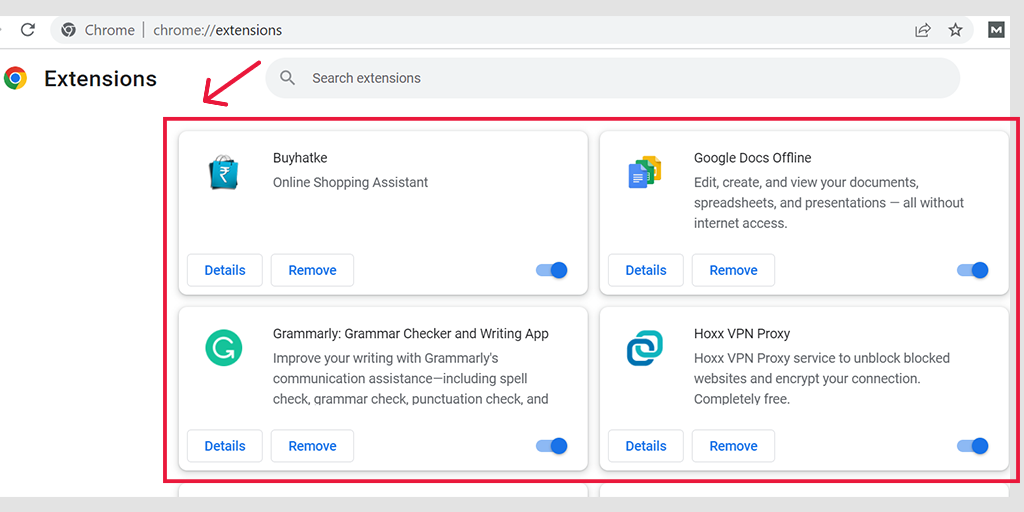
Deactivate the Proxy Server in Windows
To deactivate or disable any proxy server in Windows, you have to follow the steps given below:
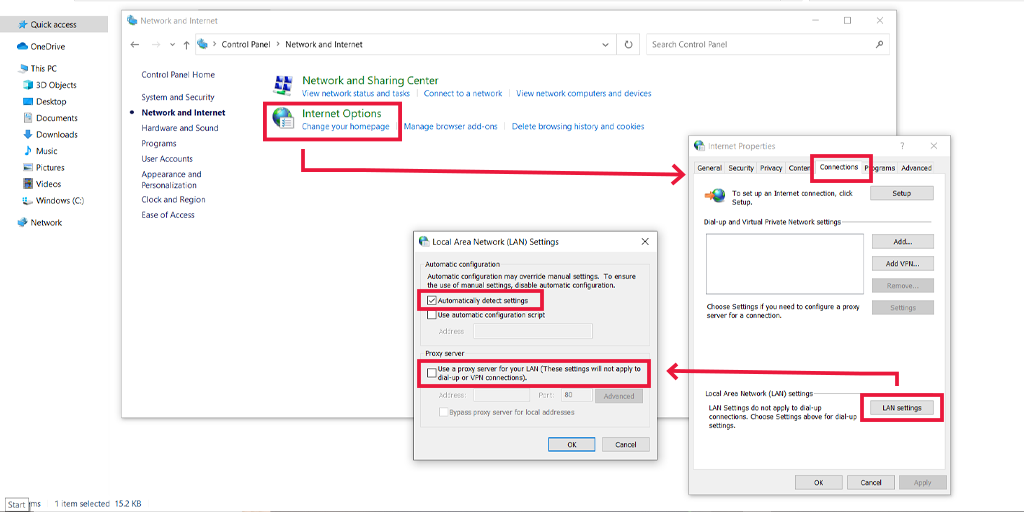
- Go to your Windows control panel and search “Internet options“.
- Click on the “Internet options” and a pop-up window will appear with all the Internet properties.
- Now click on the connections tab > LAN settings
- Uncheck the “Automatically detect Settings” and mark the box ” Use a proxy server for your LAN“.
Deactivate the Proxy Server in macOS
For Mac users, their complete documentation is provided by Apple on their support page, to change Proxy Settings. You can check out that dedicated Apple support page here.
7. Change DNS servers
For Windows 10 and Windows 11 users:
Step 1: If you are a Windows 10 or 11 User, you have to open the control panel by simply typing “Control Panel” in the search bar.
Step 2: In the Control Panel select Network & Internet > Network and Sharing Center.
Step 3: From the menu on the left, select Change adapter settings.
Step 4: Right-click on your network and select Properties.
Step 5: In the window that opens, click on Internet Protocol Version 4 (TCP/IPv4) from the list, then select Properties again.

Step 6: Click on Use the following DNS server addresses.
Step 7: Enter “8.8.8.8” for the Preferred DNS server and “8.8.4.4” for the Alternate DNS server.

Step 8: Click on the OK button to save your changes.
Step 9: Close all the windows and try re-accessing the website to see if the error is still present.
If the problem persists, you may need to try other solutions. However, changing your DNS address can often resolve internet connection issues.
For macOS users:
Step 1: First, navigate to the System Preferences on your Mac. You can find this by clicking on the Apple icon in the top-left corner of your screen, then selecting “System Preferences“.
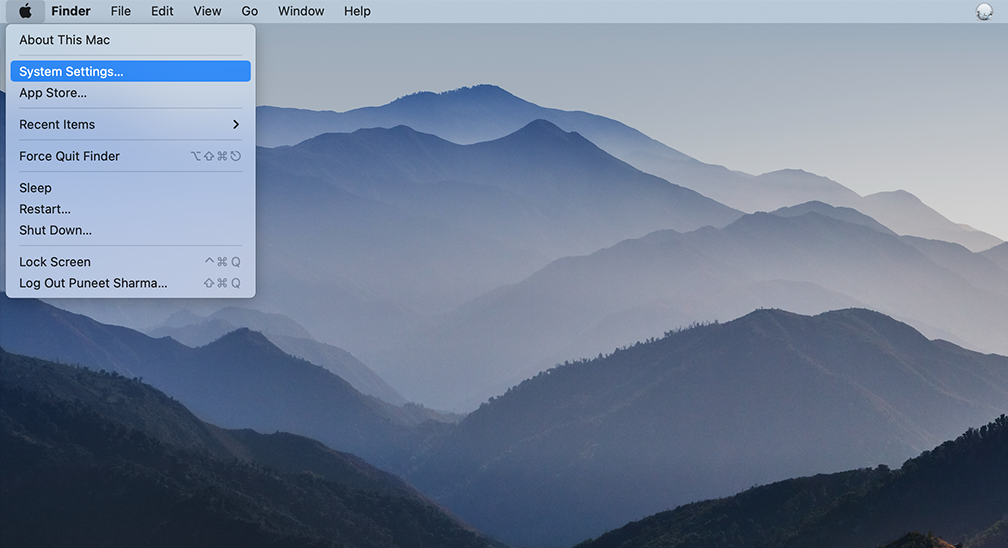
Step 2: Once you’re in System Preferences, locate the “Network” icon and click on it. From there, select the network connection that you want to modify (e.g., Wi-Fi or Ethernet).
Step 3: In the Network settings, you should see a button labeled “Advanced“. Click on that, and then navigate to the “DNS” tab.
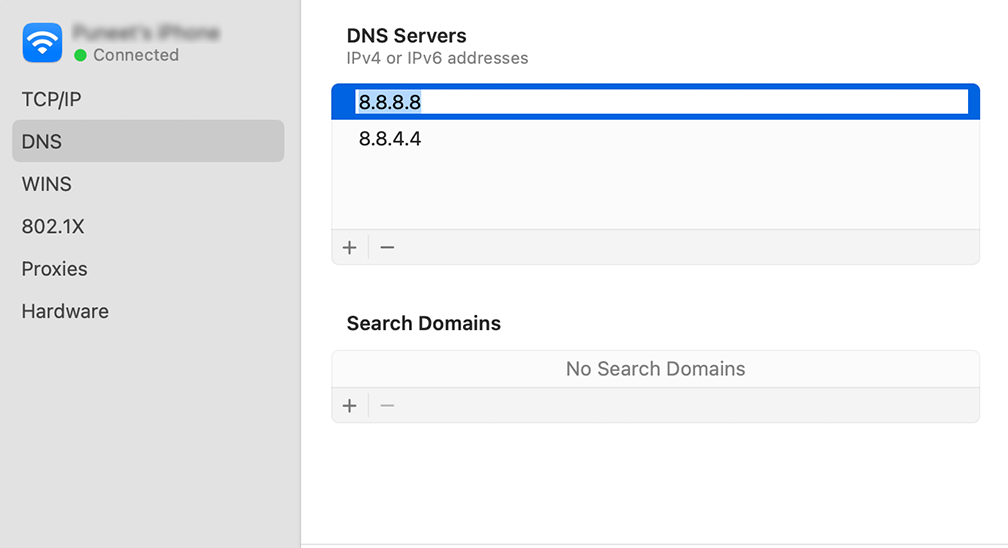
Step 4: Here’s where you’ll add the DNS server addresses. Click on the “+” button at the bottom-left of the DNS settings window, and then type in the IPv4 address for Cloudflare’s DNS servers: 1.1.1.1. Press enter, then repeat the process to add another address: 1.0.0.1.
Step 5: Finally, click “OK” to save the changes you’ve made. You should now be all set with your new DNS settings!
8. Inspect the host file
The host file on your Windows PC is responsible for mapping connections between IP addresses and their respective domain names. It functions in the following way: when you attempt to visit a website in your browser, the computer checks the host file to determine which IP address corresponds to the correct domain name.
However, there are instances where the host file may mistakenly block an IP address or a domain name, resulting in an ‘Err_connection_timed_out’ error. Therefore, it is important to examine the host file and verify whether it has inadvertently blacklisted the URL you were attempting to visit.
For Windows users
The host file generally requires administrative access, so you need to run a text editor or Notepad as an administrator. To do this, simply search for ‘notepad’ in the search bar, right-click on it, and select ‘Run as administrator.’
However, you can open the hosts file in any text editor. In this case, we will be using Windows Notepad.
Now, in Notepad, navigate to ‘File’ > ‘Open’ in the top-left menu. Insert the path
![How to Fix the ERR_CONNECTION_TIMED_OUT Error? [11 Ways] 3 Opening Notepad on Windows](https://www.wpoven.com/blog/wp-content/uploads/2023/06/1-1.png)
‘C:\Windows\System32\drivers\etc’ into the filename bar and select the host file.
![How to Fix the ERR_CONNECTION_TIMED_OUT Error? [11 Ways] 4 Accessing hosts file in Windows](https://www.wpoven.com/blog/wp-content/uploads/2023/06/2.png)
The host file will display a list of all blocked websites just below the last line that starts with the ‘#‘ sign.
![How to Fix the ERR_CONNECTION_TIMED_OUT Error? [11 Ways] 5 Windows hosts file](https://www.wpoven.com/blog/wp-content/uploads/2023/06/3-1.png)
Delete the blocked entries and save the file to apply the changes.
For macOS users
If you are a macOS user, open the Terminal enter the following command, and hit enter.
sudo nano /private/etc/hosts
![How to Fix the ERR_CONNECTION_TIMED_OUT Error? [11 Ways] 6 Accessing hosts file in macOS](https://www.wpoven.com/blog/wp-content/uploads/2023/06/4.png)
Now, delete the websites that have been shown below the last line that is started with the “::1” sign.
9. Increase the memory limit
At times, a PHP script may require more memory than it has been allocated, causing the site to take longer than usual to respond to the server.
To increase the PHP memory limit, you can add the following line of code to your wp-config.php file, just above the inclusion of wp-settings.php. However, it is important to ensure that the specified amount remains within the maximum memory limit provided by your web hosting provider.
define( 'WP_MEMORY_LIMIT', '256M' );
If you are unaware of your web hosting’s maximum memory allotment, you can either contact their support directly or consult their documentation.
For those using the Apache web server, you can add the following line of code to the .htaccess file, placing it at the bottom:
php_value memory_limit 256M"
10. Check out the maximum Execution time
Maximum Execution Time refers to the maximum amount of time a PHP script is allowed to run on a website before it is terminated by the server.
However, if the script takes more time to run than the allowed period, the communication between the server and the browser will be terminated and trigger an Err_connection_timed_out error.
But the best part is, that you can increase the maximum execution time
- Access the Files of your website via an FTP client such as FileZilla or through cPanel.
- In the File Manager, locate and click on the “public_html” directory. Look for the .htaccess file within this directory.
- Double-click on the .htaccess file to open it in the built-in text editor. You may need to confirm or choose a text editor if prompted.
- Place the following code snippet before the “End WordPress” line in the .htaccess file:
php_value max_execution_time 120
![How to Fix the ERR_CONNECTION_TIMED_OUT Error? [11 Ways] 7 Increasing maximum execution time in .htaccess file](https://www.wpoven.com/blog/wp-content/uploads/2023/06/htaccess.png)
- Save the changes: After inserting the code, click on the “Save & Close” button to save the modifications made to the .htaccess file.
- Check if the error is resolved: Open your website in a web browser and observe if the error related to the execution time limit has been resolved. The modified timeout value should take effect, allowing the script to run for a longer duration.
Read: 🚩 WordPress .htaccess File: How to Create And Edit it?
11. Temporarily Disable your Plugins
If you suspect that WordPress plugins are causing problems due to an unreliable source or exceeding your website’s capacity, it’s important to troubleshoot them. Disable all the plugins on your WordPress website.
To disable the plugins, you’ll need to access your website’s files using an FTP client like FileZilla, especially if you’re experiencing the ERR_CONNECTION_TIMED_OUT error and cannot access the WordPress admin panel.
1. Connect to your website using FileZilla or a similar FTP client.
2. Once connected, navigate to the wp-content directory in the Remote site section.
3. Within the wp-content directory, locate the plugins folder.
![How to Fix the ERR_CONNECTION_TIMED_OUT Error? [11 Ways] 8 Locating the Plugin folder in Wp-content directory](https://www.wpoven.com/blog/wp-content/uploads/2023/06/plugins.png)
4. Right-click on the plugins folder and choose the option to rename it. Change the name to something like “plugins_dead-deactivated”. This step prevents WordPress from recognizing the plugins folder and loading any plugins.
![How to Fix the ERR_CONNECTION_TIMED_OUT Error? [11 Ways] 9 Disabling WordPress plugins via the WP-content directory](https://www.wpoven.com/blog/wp-content/uploads/2023/06/plugin_dead-deactivated.png)
5. Now try accessing the WordPress admin panel. If you can successfully access it, it indicates that one of the plugins was causing the issue.
6. To identify the problematic plugin, return to the FTP client and rename the plugin’s folder back to its original name.
7. Open the plugin’s directory and rename one of the plugin folders inside, such as “plugin_dead”. This step deactivates that specific plugin.
8. Attempt to access the WordPress admin panel again. If it opens without any errors, you have identified the plugin causing the problem.
9. If the error message persists, restore the folder’s original name and repeat the renaming process with another plugin folder.
10. Keep renaming and testing individual plugin folders until you find the one that is causing the issue.
How ERR_CONNECTION_TIMED_OUT error appear on Different browsers?
Here are some of the variations of the “ERR_CONNECTION_TIMED_OUT” error that might appear on different browsers:
ERR_CONNECTION_TIMED_OUT error appears on Chrome Browser
![How to Fix the ERR_CONNECTION_TIMED_OUT Error? [11 Ways] 10 RR_CONNECTION_TIMED_OUT error appears on Chrome Browser](https://www.wpoven.com/blog/wp-content/uploads/2023/06/ERR_CONNECTION_TIMED_OUT-Google-Chrome.png)
ERR_CONNECTION_TIMED_OUT error appears on Safari
![How to Fix the ERR_CONNECTION_TIMED_OUT Error? [11 Ways] 11 Err_connection_timedout error appears on Safari](https://www.wpoven.com/blog/wp-content/uploads/2023/06/ERR_CONNECTION_TIMED_OUT-Safari.png)
What are the causes of the “err_connection_timed_out” error?
There can be Several factors that can trigger the “ERR_CONNECTION_TIMED_OUT” error. Let’s explore some of the common causes:
- Network connectivity problems: A weak or unstable internet connection, network congestion, or a faulty router can lead to this error.
- Server-related issues: The website’s server may be experiencing downtime or have misconfigured settings, preventing the browser from establishing a connection.
- Firewall or antivirus software: Sometimes, overly strict firewall or antivirus settings can block the connection, resulting in the “ERR_CONNECTION_TIMED_OUT” error.
- DNS settings or cache issues: Incorrect DNS settings or a corrupted DNS cache can prevent the browser from resolving the website’s IP address, leading to the error.
- Browser-related problems: Outdated browsers or conflicting browser extensions can interfere with the connection process and trigger the error.
Conclusion
The “ERR_CONNECTION_TIMED_OUT” error can be frustrating, but by understanding its causes and following the troubleshooting steps outlined above, you can resolve the issue and regain access to the websites you need.
Remember, the “ERR_CONNECTION_TIMED_OUT” error can happen due to different reasons. It could be a problem with your own network connection or with the server hosting your WordPress site. If you have any other tips or suggestions to fix this error, please share them in the comments below.
Frequently Asked Questions
How to fix the Err_connection_timed_out error step by step?
You can fix the Err_connection_timed_out error by following these steps:
1. Check Your Network connection
2. Temporarily disable your Firewall and Antivirus installation.
3. Clear your Browser Data
4. Change DNS Settings
5. Flush and Renew DNS
6. Check Proxy Settings
7. Change DNS servers
8. Inspect the hosts file
9. Increase the memory limit
10. check out the maximum Execution time
11. Temporarily Disable your Plugins
What is Err_connection_timed_out error in Chrome?
The “ERR_CONNECTION_TIMED_OUT” meaning is there is something went wrong with your network connection or the browser could not establish a connection with the desired website.
This error typically indicates underlying issues that prevent the browser from reaching the server hosting the website. However, this is not always the case. The ERR_CONNECTION_TIMED_OUT error can be triggered by a variety of other reasons as well, which we will discuss in later sections of this blog.
What causes a timeout error?
The reasons that cause timeout error are:
1. Network connectivity problems
2. Server-related issues
3. Firewall or antivirus software
4. DNS settings or cache issues
5. Browser-related problems
![How to Fix the ERR_CONNECTION_TIMED_OUT Error? [11 Ways] 12 Rahul](https://www.wpoven.com/blog/wp-content/uploads/2024/04/Screenshot-2024-03-07-at-9.27.44%E2%80%AFAM.png)
Rahul Kumar is a web enthusiast, and content strategist specializing in WordPress & web hosting. With years of experience and a commitment to staying up-to-date with industry trends, he creates effective online strategies that drive traffic, boosts engagement, and increase conversions. Rahul’s attention to detail and ability to craft compelling content makes him a valuable asset to any brand looking to improve its online presence.

![How to Fix the ERR_CONNECTION_TIMED_OUT Error? [11 Ways] 1 ERR_CONNECTION_TIMED_OUT](https://www.wpoven.com/blog/wp-content/uploads/2023/06/ERR_CONNECTION_TIMED_OUT.png)
![How to Fix the HTTP NGINX 499 Error? [6 Best Methods] How to Fix Http 499 Error](https://www.wpoven.com/blog/wp-content/uploads/2023/03/HTTP-499-Error.png)
